SpringSecurity系列之SpringBoot+CAS單點登錄
1.準備工作
準備工作主要做兩件事。
1.1 服務記錄
某一個 Client 需要接入 CAS Server 進行驗證,則該 Client 必須提前在 CAS Server 上配置其信息。
這個信息既可以動態添加,也可以通過 JSON 來配置,后面松哥會教搭建如何動態添加,這里方便起見,我們還是通過 JSON 來進行配置。
具體配置方式如下,在 CAS Server 中創建如下目錄:
- src/main/resources/services
在該目錄下創建一個名為 client1-99.json 的文件,client1 表示要接入的 client 的名字,99 表示要接入的 client 的 id,json 文件內容如下(這個配置可以參考官方給出的模版:overlays/org.apereo.cas.cas-server-webapp-tomcat-5.3.14/WEB-INF/classes/services/Apereo-10000002.json):
- {
- "@class": "org.apereo.cas.services.RegexRegisteredService",
- "serviceId": "^(https|http)://.*",
- "name": "client1",
- "id": 99,
- "description": "應用1 的定義信息",
- "evaluationOrder": 1
- }
這段 JSON 配置含義如下:
- @calss 指定注冊服務類,這個是固定的org.apereo.cas.services.RegexRegisteredService。
- serviceId 則通過正則表達式用來匹配具體的請求。
- name 是接入的 client 的名稱。
- id 是接入的 client 的 id。
- description 是接入的 client 的描述信息。
- evaluationOrder 則指定了執行的優先級。
接下來再在 src/main/resources/application.properties 文件中配置剛剛 json 的信息,如下:
- cas.serviceRegistry.json.location=classpath:/services
- cas.serviceRegistry.initFromJson=true
這里有兩行配置:
- 指定配置 JSON 文件的位置。
- 開啟 JSON 識別。
OK,配置完成后,重啟 CAS Server。
CAS Server 啟動成功后,我們在控制臺看到如下日志,表示 JSON 配置已經加載成功了:

1.2 JDK 證書
第二個要提前準備的東西就是 JDK 證書。
在實際開發中,這一步可以忽略,但是因為我們現在用的自己生成的 SSL 證書,所以我們要將自己生成的證書導入到 JDK 中,否則在使用 Spring Security 接入 CAS 單點登錄時,會拋出如下錯誤:
將 SSL 證書導入 JDK 中的命令其實也很簡單,兩個步驟,第一個導出 .cer 文件,第二步,導入 JDK,命令如下:
- keytool -export -trustcacerts -alias casserver -file ./cas.cer -keystore ./keystore
- sudo keytool -import -trustcacerts -alias casserver -file ./cas.cer -keystore /Library/Java/JavaVirtualMachines/jdk-10.0.2.jdk/Contents/Home/lib/security/cacerts
注意,在執行 export 導出命令時,需要輸入密鑰口令,這個口令就是自己一開始創建 SSL 證書時設置的。在執行 import 導入命令時,也需要輸入口令,這個口令是 changeit,注意,不是自己一開始設置的。
密鑰庫的位置在 JDK 目錄下的 /lib/security/cacerts,小伙伴們根據自己實際情況來修改(在 JDK9 之前,位置在 jre/lib/security/cacerts)。
我們在本地測試一定要導入證書到 JDK 證書庫中,否則后面的測試會出現上圖中的錯誤,證書導入 JDK 證書庫之后,要確保之后的開發中,使用的是本地的 JDK。
注意,JDK 證書導入之后,CASServer 需要重啟一下。
1.3 修改 hosts
另外,我們還需要修改電腦 hosts 文件,因為前面關于 CAS Server,關于 SSL 證書的配置都涉及到域名,所以后面的訪問我們將通過域名的形式訪問,hosts 文件中添加如下兩條記錄:

第一個是 CAS Server 的請求域名,第二個是 CAS Client 的請求域名。
2.開發 Client
在使用 Spring Security 開發 CAS Client 之前,有一個基本問題需要先和小伙伴們捋清楚:用戶登錄是在 CAS Server 上登錄,所以 Spring Security 中雖然依舊存在用戶的概念,但是對于用戶的處理邏輯會和前面的有所不同。
好了,接下來我們來看下具體步驟。
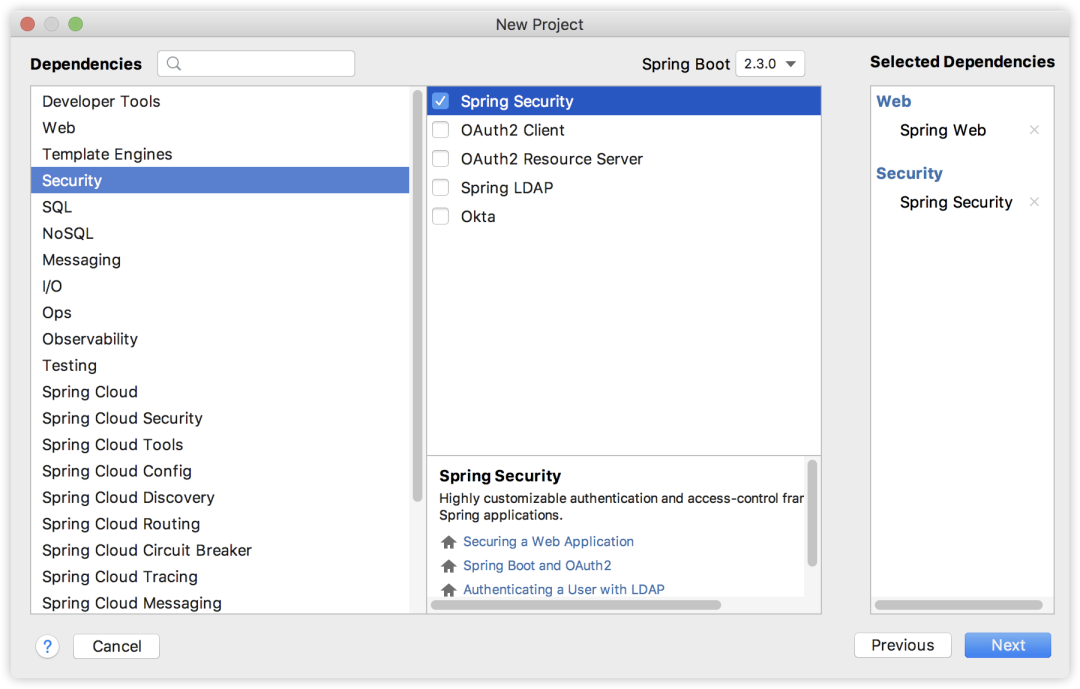
首先我們來創建一個普通的 Spring Boot 項目,加入 Web 依賴 和 Spring Security 依賴,如下:
項目創建成功后,我們再來手動加入 cas 依賴:
- <dependency>
- <groupId>org.springframework.security</groupId>
- <artifactId>spring-security-cas</artifactId>
- </dependency>
接下來,在 application.properties 中配置 CAS Server 和 CAS Client 的請求地址信息:
- cas.server.prefix=https://cas.javaboy.org:8443/cas
- cas.server.login=${cas.server.prefix}/login
- cas.server.logout=${cas.server.prefix}/logout
- cas.client.prefix=http://client1.cas.javaboy.org:8080
- cas.client.login=${cas.client.prefix}/login/cas
- cas.client.logoutRelative=/logout/cas
- cas.client.logout=${cas.client.prefix}${cas.client.logoutRelative}
這些配置都是自定義配置,所以配置的 key 可以自己隨意定義。至于配置的含義都好理解,分別配置了 CAS Server 和 CAS Client 的登錄和注銷地址。
配置好之后,我們需要將這些配置注入到實體類中使用,這里就用到了類型安全的屬性綁定。
這里我創建兩個類分別用來接收 CAS Server 和 CAS Client 的配置文件:
- @ConfigurationProperties(prefix = "cas.server")
- public class CASServerProperties {
- private String prefix;
- private String login;
- private String logout;
- //省略 getter/setter
- }
- @ConfigurationProperties(prefix = "cas.client")
- public class CASClientProperties {
- private String prefix;
- private String login;
- private String logoutRelative;
- private String logout;
- //省略 getter/setter
- }
另外記得在啟動類上面添加 @ConfigurationPropertiesScan 注解來掃描這兩個配置類:
- @SpringBootApplication
- @ConfigurationPropertiesScan
- public class Client1Application {
- public static void main(String[] args) {
- SpringApplication.run(Client1Application.class, args);
- }
- }
這里配置完成后,我們一會將在配置文件中來使用。
接下來創建 CAS 的配置文件,略長:
- @Configuration
- public class CasSecurityConfig {
- @Autowired
- CASClientProperties casClientProperties;
- @Autowired
- CASServerProperties casServerProperties;
- @Autowired
- UserDetailsService userDetailService;
- @Bean
- ServiceProperties serviceProperties() {
- ServiceProperties serviceProperties = new ServiceProperties();
- serviceProperties.setService(casClientProperties.getLogin());
- return serviceProperties;
- }
- @Bean
- @Primary
- AuthenticationEntryPoint authenticationEntryPoint() {
- CasAuthenticationEntryPoint entryPoint = new CasAuthenticationEntryPoint();
- entryPoint.setLoginUrl(casServerProperties.getLogin());
- entryPoint.setServiceProperties(serviceProperties());
- return entryPoint;
- }
- @Bean
- TicketValidator ticketValidator() {
- return new Cas20ProxyTicketValidator(casServerProperties.getPrefix());
- }
- @Bean
- CasAuthenticationProvider casAuthenticationProvider() {
- CasAuthenticationProvider provider = new CasAuthenticationProvider();
- provider.setServiceProperties(serviceProperties());
- provider.setTicketValidator(ticketValidator());
- provider.setUserDetailsService(userDetailService);
- provider.setKey("javaboy");
- return provider;
- }
- @Bean
- CasAuthenticationFilter casAuthenticationFilter(AuthenticationProvider authenticationProvider) {
- CasAuthenticationFilter filter = new CasAuthenticationFilter();
- filter.setServiceProperties(serviceProperties());
- filter.setAuthenticationManager(new ProviderManager(authenticationProvider));
- return filter;
- }
- @Bean
- SingleSignOutFilter singleSignOutFilter() {
- SingleSignOutFilter sign = new SingleSignOutFilter();
- sign.setIgnoreInitConfiguration(true);
- return sign;
- }
- @Bean
- LogoutFilter logoutFilter() {
- LogoutFilter filter = new LogoutFilter(casServerProperties.getLogout(), new SecurityContextLogoutHandler());
- filter.setFilterProcessesUrl(casClientProperties.getLogoutRelative());
- return filter;
- }
- }
這個配置文件略長,但是并不難,我來和大家挨個解釋:
- 首先一進來注入三個對象,這三個中,有兩個是我們前面寫的配置類的實例,另外一個則是 UserDetailsService,關于 UserDetailsService,我想我也不必多做解釋,大家參考本系列前面的文章就知道 UserDetailsService 的作用,一會我會給出 UserDetailsService 的實現。
- 接下來配置 ServiceProperties,ServiceProperties 中主要配置一下 Client 的登錄地址即可,這個地址就是在 CAS Server 上登錄成功后,重定向的地址。
- CasAuthenticationEntryPoint 則是 CAS 驗證的入口,這里首先設置 CAS Server 的登錄地址,同時將前面的 ServiceProperties 設置進去,這樣當它登錄成功后,就知道往哪里跳轉了。
- TicketValidator 這是配置 ticket 校驗地址,CAS Client 拿到 ticket 要去 CAS Server 上校驗,默認校驗地址是:https://cas.javaboy.org:8443/cas/proxyValidate?ticket=xxx
- CasAuthenticationProvider 主要用來處理 CAS 驗證邏輯,關于 AuthenticationProvider 松哥在前面的文章中和大家分享過(SpringSecurity 自定義認證邏輯的兩種方式(高級玩法)),當時就說,想要自定義認證邏輯,如短信登錄等,都可以通過擴展 AuthenticationProvider 來實現,這里的 CAS 登錄當然也不例外,這里雖然設置了一個 userDetailService,但是目的不是為了從數據庫中查詢數據做校驗,因為登錄是在 CAS Server 中進行的,這個的作用,我在后面會做介紹。
- CasAuthenticationFilter 則是 CAS 認證的過濾器,過濾器將請求攔截下來之后,交由 CasAuthenticationProvider 來做具體處理。
- SingleSignOutFilter 表示接受 CAS Server 發出的注銷請求,所有的注銷請求都將從 CAS Client 轉發到 CAS Server,CAS Server 處理完后,會通知所有的 CAS Client 注銷登錄。
- LogoutFilter 則是配置將注銷請求轉發到 CAS Server。
接下來我再來給大家看下我定義的 UserDetailsService:
- @Component
- @Primary
- public class UserDetailsServiceImpl implements UserDetailsService{
- @Override
- public UserDetails loadUserByUsername(String s) throws UsernameNotFoundException {
- return new User(s, "123", true, true, true, true,
- AuthorityUtils.createAuthorityList("ROLE_user"));
- }
- }
既然是單點登錄,也就是用戶是在 CAS Server 上登錄的,這里的 UserDetailsService 意義在哪里呢?
用戶雖然在 CAS Server 上登錄,但是,登錄成功之后,CAS Client 還是要獲取用戶的基本信息、角色等,以便做進一步的權限控制,所以,這里的 loadUserByUsername 方法中的參數,實際上就是你從 CAS Server 上登錄成功后獲取到的用戶名,拿著這個用戶名,去數據庫中查詢用戶的相關信心并返回,方便 CAS Client 在后續的鑒權中做進一步的使用,這里我為了方便,就沒有去數據庫中查詢了,而是直接創建了一個 User 對象返回。
接下來,我們再來看看 Spring Security 的配置:
- @Configuration
- public class SecurityConfig extends WebSecurityConfigurerAdapter {
- @Autowired
- AuthenticationEntryPoint authenticationEntryPoint;
- @Autowired
- AuthenticationProvider authenticationProvider;
- @Autowired
- SingleSignOutFilter singleSignOutFilter;
- @Autowired
- LogoutFilter logoutFilter;
- @Autowired
- CasAuthenticationFilter casAuthenticationFilter;
- @Override
- protected void configure(AuthenticationManagerBuilder auth) throws Exception {
- auth.authenticationProvider(authenticationProvider);
- }
- @Override
- protected void configure(HttpSecurity http) throws Exception {
- http.authorizeRequests().antMatchers("/user/**")
- .hasRole("user")
- .antMatchers("/login/cas").permitAll()
- .anyRequest().authenticated()
- .and()
- .exceptionHandling()
- .authenticationEntryPoint(authenticationEntryPoint)
- .and()
- .addFilter(casAuthenticationFilter)
- .addFilterBefore(singleSignOutFilter, CasAuthenticationFilter.class)
- .addFilterBefore(logoutFilter, LogoutFilter.class);
- }
- }
這里的配置就簡單很多了:
- 首先配置 authenticationProvider,這個 authenticationProvider 實際上就是一開始配置的 CasAuthenticationProvider。
- 接下來配置 /user/** 格式的路徑需要有 user 角色才能訪問,登錄路徑 /login/cas 可以直接訪問,剩余接口都是登錄成功之后才能訪問。
- 最后把 authenticationEntryPoint 配置進來,再把自定義的過濾器加進來,這些都比較容易我就不多說了。
最后,再提供兩個測試接口:
- @RestController
- public class HelloController {
- @GetMapping("/hello")
- public String hello() {
- return "hello";
- }
- @GetMapping("/user/hello")
- public String user() {
- return "user";
- }
- }
OK ,如此之后,我們的 CAS Client 現在就開發完成了,接下來啟動 CAS Client,啟動成功后,瀏覽器輸入 http://client1.cas.javaboy.org:8080/user/hello 訪問 hello 接口,此時會自動跳轉到 CAS Server 上登錄,登錄成功之后,經過兩個重定向,會重新回到 hello 接口。
3.小結
OK,這就是松哥和大家介紹的 Spring Security + CAS 單點登錄,當然,這個案例中還有很多需要完善的地方,松哥會在后面的文章中繼續和大家分享完善的方案。
好了 ,本文就說到這里,本文相關案例我已經上傳到 GitHub ,大家可以自行下載:https://github.com/lenve/spring-security-samples
本文轉載自微信公眾號「江南一點雨」,可以通過以下二維碼關注。轉載本文請聯系江南一點雨公眾號。