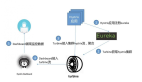
微服務架構下的熔斷框架:Hystrix-Go
本文轉載自微信公眾號「Golang夢工廠」,作者AsongGo 。轉載本文請聯系Golang夢工廠公眾號。
背景
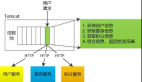
伴隨著微服務架構被宣傳得如火如茶,一些概念也被推到了我們的面前。一提到微服務,就離不開這幾個字:高內聚低耦合;微服務的架構設計最終目的也就是實現這幾個字。在微服務架構中,微服務就是完成一個單一的業務功能,每個微服務可以獨立演進,一個應用可能會有多個微服務組成,微服務之間的數據交可以通過遠程調用來完成,這樣在一個微服務架構下就會形成這樣的依賴關系:
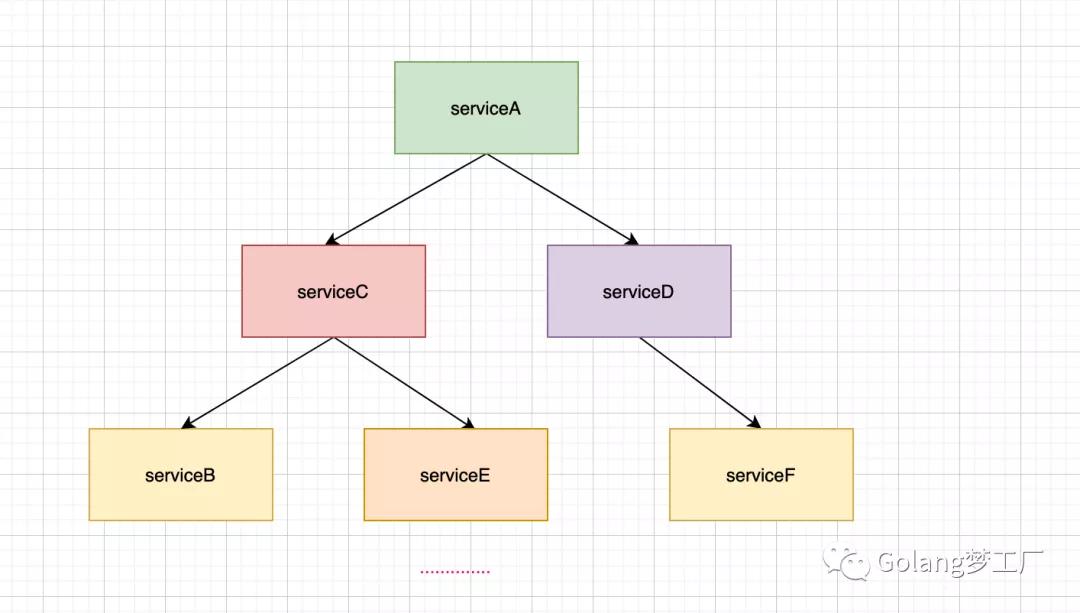
微服務A調用微服務C、D,微服務B又依賴微服務B、E,微服務D依賴于服務F,這只是一個簡單的小例子,實際業務中服務之間的依賴關系比這還復雜,這樣在調用鏈路上如果某個微服務的調用響應時間過長或者不可用,那么對上游服務(按調用關系命名)的調用就會占用越來越多的系統資源,進而引起系統崩潰,這就是微服務的雪蹦效應。
為了解決微服務的雪蹦效應,提出來使用熔斷機制為微服務鏈路提供保護機制。熔斷機制大家應該都不陌生,電路的中保險絲就是一種熔斷機制,在微服務中的熔斷機制是什么樣的呢?
當鏈路中的某個微服務不可用或者響應的時間太長時,會進行服務的降級,進而熔斷該節點微服務的調用,快速返回錯誤的響應信息,當檢測到該節點微服務調用響應正常后,恢復調用鏈路。
本文我們就介紹一個開源熔斷框架:hystrix-go。
熔斷框架(hystrix-go)
Hystrix是一個延遲和容錯庫,旨在隔離對遠程系統、服務和第三方服務的訪問點,停止級聯故障并在故障不可避免的復雜分布式系統中實現彈性。hystrix-go 旨在允許 Go 程序員輕松構建具有與基于 Java 的 Hystrix 庫類似的執行語義的應用程序。所以本文就從使用開始到源碼分析一下hystrix-go。
快速安裝
- go get -u github.com/afex/hystrix-go/hystrix
快速使用
hystrix-go真的是開箱即用,使用還是比較簡單的,主要分為兩個步驟:
- 配置熔斷規則,否則將使用默認配置。可以調用的方法
- func Configure(cmds map[string]CommandConfig)
- func ConfigureCommand(name string, config CommandConfig)
Configure方法內部也是調用的ConfigureCommand方法,就是傳參數不一樣,根據自己的代碼風格選擇。
- 定義依賴于外部系統的應用程序邏輯 - runFunc 和服務中斷期間執行的邏輯代碼 - fallbackFunc,可以調用的方法:
- func Go(name string, run runFunc, fallback fallbackFunc) // 內部調用Goc方法
- func GoC(ctx context.Context, name string, run runFuncC, fallback fallbackFuncC)
- func Do(name string, run runFunc, fallback fallbackFunc) // 內部調用的是Doc方法
- func DoC(ctx context.Context, name string, run runFuncC, fallback fallbackFuncC) // 內部調用Goc方法,處理了異步過程
Go和Do的區別在于異步還是同步,Do方法在調用Doc方法內處理了異步過程,他們最終都是調用的Goc方法。后面我們進行分析。
舉一個例子:我們在Gin框架上加一個接口級的熔斷中間件
- // 代碼已上傳github: 文末查看地址
- var CircuitBreakerName = "api_%s_circuit_breaker"
- func CircuitBreakerWrapper(ctx *gin.Context){
- name := fmt.Sprintf(CircuitBreakerName,ctx.Request.URL)
- hystrix.Do(name, func() error {
- ctx.Next()
- code := ctx.Writer.Status()
- if code != http.StatusOK{
- return errors.New(fmt.Sprintf("status code %d", code))
- }
- return nil
- }, func(err error) error {
- if err != nil{
- // 監控上報(未實現)
- _, _ = io.WriteString(f, fmt.Sprintf("circuitBreaker and err is %s\n",err.Error())) //寫入文件(字符串)
- fmt.Printf("circuitBreaker and err is %s\n",err.Error())
- // 返回熔斷錯誤
- ctx.JSON(http.StatusServiceUnavailable,gin.H{
- "msg": err.Error(),
- })
- }
- return nil
- })
- }
- func init() {
- hystrix.ConfigureCommand(CircuitBreakerName,hystrix.CommandConfig{
- Timeout: int(3*time.Second), // 執行command的超時時間為3s
- MaxConcurrentRequests: 10, // command的最大并發量
- RequestVolumeThreshold: 100, // 統計窗口10s內的請求數量,達到這個請求數量后才去判斷是否要開啟熔斷
- SleepWindow: int(2 * time.Second), // 當熔斷器被打開后,SleepWindow的時間就是控制過多久后去嘗試服務是否可用了
- ErrorPercentThreshold: 20, // 錯誤百分比,請求數量大于等于RequestVolumeThreshold并且錯誤率到達這個百分比后就會啟動熔斷
- })
- if checkFileIsExist(filename) { //如果文件存在
- f, errfile = os.OpenFile(filename, os.O_APPEND, 0666) //打開文件
- } else {
- f, errfile = os.Create(filename) //創建文件
- }
- }
- func main() {
- defer f.Close()
- hystrixStreamHandler := hystrix.NewStreamHandler()
- hystrixStreamHandler.Start()
- go http.ListenAndServe(net.JoinHostPort("", "81"), hystrixStreamHandler)
- r := gin.Default()
- r.GET("/api/ping/baidu", func(c *gin.Context) {
- _, err := http.Get("https://www.baidu.com")
- if err != nil {
- c.JSON(http.StatusInternalServerError, gin.H{"msg": err.Error()})
- return
- }
- c.JSON(http.StatusOK, gin.H{"msg": "success"})
- }, CircuitBreakerWrapper)
- r.Run() // listen and serve on 0.0.0.0:8080 (for windows "localhost:8080")
- }
- func checkFileIsExist(filename string) bool {
- if _, err := os.Stat(filename); os.IsNotExist(err) {
- return false
- }
- return true
- }
指令:wrk -t100 -c100 -d1s http://127.0.0.1:8080/api/ping/baidu
運行結果:
- circuitBreaker and err is status code 500
- circuitBreaker and err is status code 500
- .....
- circuitBreaker and err is hystrix: max concurrency
- circuitBreaker and err is hystrix: max concurrency
- .....
- circuitBreaker and err is hystrix: circuit open
- circuitBreaker and err is hystrix: circuit open
- .....
對錯誤進行分析:
- circuitBreaker and err is status code 500:因為我們關閉了網絡,所以請求是沒有響應的
- circuitBreaker and err is hystrix: max concurrency:我們設置的最大并發量MaxConcurrentRequests是10,我們的壓測工具使用的是100并發,所有會觸發這個熔斷
- circuitBreaker and err is hystrix: circuit open:我們設置熔斷開啟的請求數量RequestVolumeThreshold是100,所以當10s內的請求數量大于100時就會觸發熔斷。
簡單對上面的例子做一個解析:
- 添加接口級的熔斷中間件
- 初始化熔斷相關配置
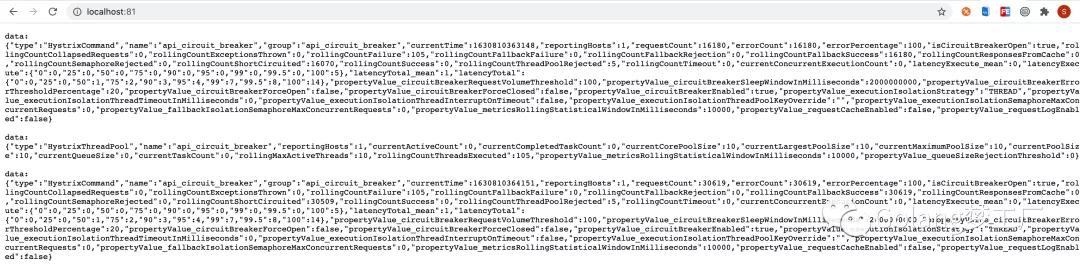
- 開啟dashboard 可視化hystrix的上報信息,瀏覽器打開http://localhost:81,可以看到如下結果:
hystrix-go流程分析
本來想對源碼進行分析,代碼量有點大,所以就針對流程來分析,順便看一些核心代碼。
配置熔斷規則
既然是熔斷,就要有熔斷規則,我們可以調用兩個方法配置熔斷規則,不會最終調用的都是ConfigureCommand,這里沒有特別的邏輯,如果我們沒有配置,系統將使用默認熔斷規則:
- var (
- // DefaultTimeout is how long to wait for command to complete, in milliseconds
- DefaultTimeout = 1000
- // DefaultMaxConcurrent is how many commands of the same type can run at the same time
- DefaultMaxConcurrent = 10
- // DefaultVolumeThreshold is the minimum number of requests needed before a circuit can be tripped due to health
- DefaultVolumeThreshold = 20
- // DefaultSleepWindow is how long, in milliseconds, to wait after a circuit opens before testing for recovery
- DefaultSleepWindow = 5000
- // DefaultErrorPercentThreshold causes circuits to open once the rolling measure of errors exceeds this percent of requests
- DefaultErrorPercentThreshold = 50
- // DefaultLogger is the default logger that will be used in the Hystrix package. By default prints nothing.
- DefaultLogger = NoopLogger{}
- )
配置規則如下:
- Timeout:定義執行command的超時時間,時間單位是ms,默認時間是1000ms;
- MaxConcurrnetRequests:定義command的最大并發量,默認值是10并發量;
- SleepWindow:熔斷器被打開后使用,在熔斷器被打開后,根據SleepWindow設置的時間控制多久后嘗試服務是否可用,默認時間為5000ms;
- RequestVolumeThreshold:判斷熔斷開關的條件之一,統計10s(代碼中寫死了)內請求數量,達到這個請求數量后再根據錯誤率判斷是否要開啟熔斷;
- ErrorPercentThreshold:判斷熔斷開關的條件之一,統計錯誤百分比,請求數量大于等于RequestVolumeThreshold并且錯誤率到達這個百分比后就會啟動熔斷 默認值是50;
這些規則根據command的name進行區分存放到一個map中。
執行command
執行command主要可以調用四個方法,分別是:
- func Go(name string, run runFunc, fallback fallbackFunc)
- func GoC(ctx context.Context, name string, run runFuncC, fallback fallbackFuncC)
- func Do(name string, run runFunc, fallback fallbackFunc)
- func DoC(ctx context.Context, name string, run runFuncC, fallback fallbackFuncC)
Do內部調用的Doc方法,Go內部調用的是Goc方法,在Doc方法內部最終調用的還是Goc方法,只是在Doc方法內做了同步邏輯:
- func DoC(ctx context.Context, name string, run runFuncC, fallback fallbackFuncC) error {
- ..... 省略部分封裝代碼
- var errChan chan error
- if fallback == nil {
- errChan = GoC(ctx, name, r, nil)
- } else {
- errChan = GoC(ctx, name, r, f)
- }
- select {
- case <-done:
- return nil
- case err := <-errChan:
- return err
- }
- }
因為他們最終都是調用的Goc方法,所以我們執行分析Goc方法的內部邏輯;代碼有點長,我們分邏輯來分析:
創建command對象
- cmd := &command{
- run: run,
- fallback: fallback,
- start: time.Now(),
- errChan: make(chan error, 1),
- finished: make(chan bool, 1),
- }
- // 獲取熔斷器
- circuit, _, err := GetCircuit(name)
- if err != nil {
- cmd.errChan <- err
- return cmd.errChan
- }
介紹一下command的數據結構:
- type command struct {
- sync.Mutex
- ticket *struct{}
- start time.Time
- errChan chan error
- finished chan bool
- circuit *CircuitBreaker
- run runFuncC
- fallback fallbackFuncC
- runDuration time.Duration
- events []string
- }
字段介紹:
- ticket:用來做最大并發量控制,這個就是一個令牌
- start:記錄command執行的開始時間
- errChan:記錄command執行錯誤
- finished:標志command執行結束,用來做協程同步
- circuit:存儲熔斷器相關信息
- run:應用程序
- fallback:應用程序執行失敗后要執行的函數
- runDuration:記錄command執行消耗時間
- events:events主要是存儲事件類型信息,比如執行成功的success,或者失敗的timeout、context_canceled等
上段代碼重點是GetCircuit方法,這一步的目的就是獲取熔斷器,使用動態加載的方式,如果沒有就創建一個熔斷器,熔斷器結構如下:
- type CircuitBreaker struct {
- Name string
- open bool
- forceOpen bool
- mutex *sync.RWMutex
- openedOrLastTestedTime int64
- executorPool *executorPool
- metrics *metricExchange
- }
解釋一下這幾個字段:
- name:熔斷器的名字,其實就是創建的command名字
- open:判斷熔斷器是否打開的標志
- forceopen:手動觸發熔斷器的開關,單元測試使用
- mutex:使用讀寫鎖保證并發安全
- openedOrLastTestedTime:記錄上一次打開熔斷器的時間,因為要根據這個時間和SleepWindow時間來做恢復嘗試
- executorPool:用來做流量控制,因為我們有一個最大并發量控制,就是根據這個來做的流量控制,每次請求都要獲取令牌
metrics:用來上報執行狀態的事件,通過它把執行狀態信息存儲到實際熔斷器執行各個維度狀態 (成功次數,失敗次數,超時……) 的數據集合中。
后面會單獨分析executorPool、metrics的實現邏輯。
定義令牌相關的方法和變量
因為我們有一個條件是最大并發控制,采用的是令牌的方式進行流量控制,每一個請求都要獲取一個令牌,使用完畢要把令牌還回去,先看一下這段代碼:
- ticketCond := sync.NewCond(cmd)
- ticketChecked := false
- // When the caller extracts error from returned errChan, it's assumed that
- // the ticket's been returned to executorPool. Therefore, returnTicket() can
- // not run after cmd.errorWithFallback().
- returnTicket := func() {
- cmd.Lock()
- // Avoid releasing before a ticket is acquired.
- for !ticketChecked {
- ticketCond.Wait()
- }
- cmd.circuit.executorPool.Return(cmd.ticket)
- cmd.Unlock()
- }
使用sync.NewCond創建一個條件變量,用來協調通知你可以歸還令牌了。
然后定義一個返回令牌的方法,調用Return方法歸還令牌。
定義上報執行事件的方法
前面我們也提到了,我們的熔斷器會上報執行狀態的事件,通過它把執行狀態信息存儲到實際熔斷器執行各個維度狀態 (成功次數,失敗次數,超時……) 的數據集合中。所以要定義一個上報的方法:
- reportAllEvent := func() {
- err := cmd.circuit.ReportEvent(cmd.events, cmd.start, cmd.runDuration)
- if err != nil {
- log.Printf(err.Error())
- }
- }
開啟協程一:執行應用程序邏輯 - runFunc
協程一的主要目的就是執行應用程序邏輯:
- go func() {
- defer func() { cmd.finished <- true }() // 標志協程一的command執行結束,同步到協程二
- // 當最近執行的并發數量超過閾值并且錯誤率很高時,就會打開熔斷器。
- // 如果熔斷器打開,直接拒絕拒絕請求并返回令牌,當感覺健康狀態恢復時,熔斷器將允許新的流量。
- if !cmd.circuit.AllowRequest() {
- cmd.Lock()
- // It's safe for another goroutine to go ahead releasing a nil ticket.
- ticketChecked = true
- ticketCond.Signal() // 通知釋放ticket信號
- cmd.Unlock()
- // 使用sync.Onece保證只執行一次。
- returnOnce.Do(func() {
- // 返還令牌
- returnTicket()
- // 執行fallback邏輯
- cmd.errorWithFallback(ctx, ErrCircuitOpen)
- // 上報狀態事件
- reportAllEvent()
- })
- return
- }
- // 控制并發
- cmd.Lock()
- select {
- // 獲取到令牌
- case cmd.ticket = <-circuit.executorPool.Tickets:
- // 發送釋放令牌信號
- ticketChecked = true
- ticketCond.Signal()
- cmd.Unlock()
- default:
- // 沒有令牌可用了, 也就是達到最大并發數量則直接處理fallback邏輯
- ticketChecked = true
- ticketCond.Signal()
- cmd.Unlock()
- returnOnce.Do(func() {
- returnTicket()
- cmd.errorWithFallback(ctx, ErrMaxConcurrency)
- reportAllEvent()
- })
- return
- }
- // 執行應用程序邏輯
- runStart := time.Now()
- runErr := run(ctx)
- returnOnce.Do(func() {
- defer reportAllEvent() // 狀態事件上報
- // 統計應用程序執行時長
- cmd.runDuration = time.Since(runStart)
- // 返還令牌
- returnTicket()
- // 如果應用程序執行失敗執行fallback函數
- if runErr != nil {
- cmd.errorWithFallback(ctx, runErr)
- return
- }
- cmd.reportEvent("success")
- })
- }()
總結一下這個協程:
- 判斷熔斷器是否打開,如果打開了熔斷器直接進行熔斷,不在進行后面的請求
- 運行應用程序邏輯
開啟協程二:同步協程一并監聽錯誤
先看代碼:
- go func() {
- // 使用定時器來做超時控制,這個超時時間就是我們配置的,默認1000ms
- timer := time.NewTimer(getSettings(name).Timeout)
- defer timer.Stop()
- select {
- // 同步協程一
- case <-cmd.finished:
- // returnOnce has been executed in another goroutine
- // 是否收到context取消信號
- case <-ctx.Done():
- returnOnce.Do(func() {
- returnTicket()
- cmd.errorWithFallback(ctx, ctx.Err())
- reportAllEvent()
- })
- return
- // command執行超時了
- case <-timer.C:
- returnOnce.Do(func() {
- returnTicket()
- cmd.errorWithFallback(ctx, ErrTimeout)
- reportAllEvent()
- })
- return
- }
- }()
這個協程的邏輯比較清晰明了,目的就是監聽業務執行被取消以及超時。
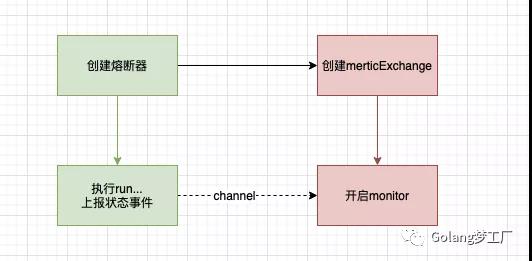
畫圖總結command執行流程
上面我們都是通過代碼來進行分析的,看起來還是有點亂,最后畫個圖總結一下:
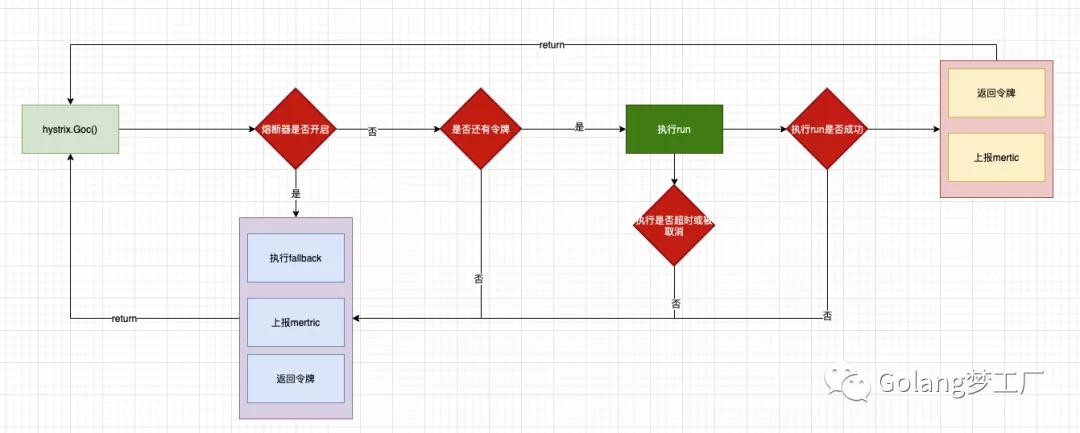
上面我們分析了整個具體流程,接下來我們針對一些核心點就行分析
上報狀態事件
hystrix-go為每一個Command設置了一個默認統計控制器,用來保存熔斷器的所有狀態,包括調用次數、失敗次數、被拒絕次數等,存儲指標結構如下:
- type DefaultMetricCollector struct {
- mutex *sync.RWMutex
- numRequests *rolling.Number
- errors *rolling.Number
- successes *rolling.Number
- failures *rolling.Number
- rejects *rolling.Number
- shortCircuits *rolling.Number
- timeouts *rolling.Number
- contextCanceled *rolling.Number
- contextDeadlineExceeded *rolling.Number
- fallbackSuccesses *rolling.Number
- fallbackFailures *rolling.Number
- totalDuration *rolling.Timing
- runDuration *rolling.Timing
- }
使用rolling.Number結構保存狀態指標,使用rolling.Timing保存時間指標。
最終監控上報都依靠metricExchange來實現,數據結構如下:
- type metricExchange struct {
- Name string
- Updates chan *commandExecution
- Mutex *sync.RWMutex
- metricCollectors []metricCollector.MetricCollector
- }
上報command的信息結構:
- type commandExecution struct {
- Types []string `json:"types"` // 區分事件類型,比如success、failure....
- Start time.Time `json:"start_time"` // command開始時間
- RunDuration time.Duration `json:"run_duration"` // command結束時間
- ConcurrencyInUse float64 `json:"concurrency_inuse"` // command 線程池使用率
- }
說了這么多,大家還是有點懵,其實用一個類圖就能表明他們之間的關系:
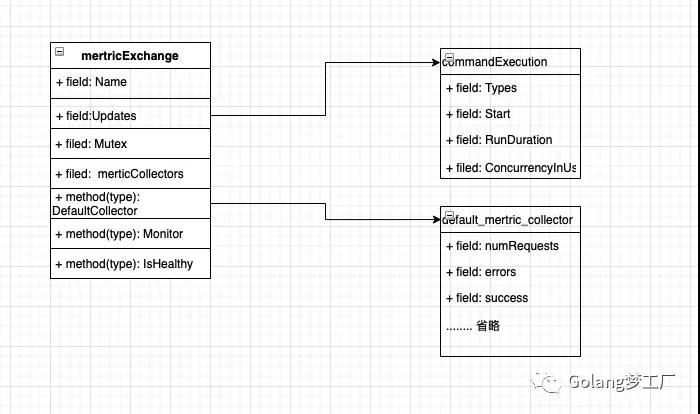
我們可以看到類mertricExchange提供了一個Monitor方法,這個方法主要邏輯就是監聽狀態事件,然后寫入指標,所以整個上報流程就是這個樣子:
流量控制
hystrix-go對流量控制采用的是令牌算法,能得到令牌的就可以執行后繼的工作,執行完后要返還令牌。結構體executorPool就是hystrix-go 流量控制的具體實現。字段Max就是每秒最大的并發值。
- type executorPool struct {
- Name string
- Metrics *poolMetrics // 上報執行數量指標
- Max int // 最大并發數量
- Tickets chan *struct{} // 代表令牌
- }
這里還有一個上報指標,這個又單獨實現一套方法用來統計執行數量,比如執行的總數量、最大并發數等,我們依賴畫一個類圖來表示:

上報執行數量邏輯與上報狀態事件的邏輯是一樣的,使用channel進行數據通信的,上報與返還令牌都在Return方法中:
- func (p *executorPool) Return(ticket *struct{}) {
- if ticket == nil {
- return
- }
- p.Metrics.Updates <- poolMetricsUpdate{
- activeCount: p.ActiveCount(),
- }
- p.Tickets <- ticket
- }
主要邏輯兩步:
- 上報當前可用的令牌數
- 返回令牌
熔斷器
我們最后來分析熔斷器中一個比較重要的方法:AllowRequest,我們在執行Command是會根據這個方法來判斷是否可以執行command,接下來我們就來看一下這個判斷的主要邏輯:
- func (circuit *CircuitBreaker) AllowRequest() bool {
- return !circuit.IsOpen() || circuit.allowSingleTest()
- }
內部就是調用IsOpen()、allowSingleTest這兩個方法:
- IsOpen()
- func (circuit *CircuitBreaker) IsOpen() bool {
- circuit.mutex.RLock()
- o := circuit.forceOpen || circuit.open
- circuit.mutex.RUnlock()
- // 熔斷已經開啟
- if o {
- return true
- }
- // 判斷10s內的并發數是否超過設置的最大并發數,沒有超過時,不需要開啟熔斷器
- if uint64(circuit.metrics.Requests().Sum(time.Now())) < getSettings(circuit.Name).RequestVolumeThreshold {
- return false
- }
- // 此時10s內的并發數已經超過設置的最大并發數了,如果此時系統錯誤率超過了預設值,那就開啟熔斷器
- if !circuit.metrics.IsHealthy(time.Now()) {
- //
- circuit.setOpen()
- return true
- }
- return false
- }
- allowSingleTest()
先解釋一下為什么要有這個方法,還記得我們之前設置了一個熔斷規則中的SleepWindow嗎,如果在開啟熔斷的情況下,在SleepWindow時間后進行嘗試,這個方法的目的就是干這個的:
- func (circuit *CircuitBreaker) allowSingleTest() bool {
- circuit.mutex.RLock()
- defer circuit.mutex.RUnlock()
- // 獲取當前時間戳
- now := time.Now().UnixNano()
- openedOrLastTestedTime := atomic.LoadInt64(&circuit.openedOrLastTestedTime)
- // 當前熔斷器是開啟狀態,當前的時間已經大于 (上次開啟熔斷器的時間 +SleepWindow 的時間)
- if circuit.open && now > openedOrLastTestedTime+getSettings(circuit.Name).SleepWindow.Nanoseconds() {
- // 替換openedOrLastTestedTime
- swapped := atomic.CompareAndSwapInt64(&circuit.openedOrLastTestedTime, openedOrLastTestedTime, now)
- if swapped {
- log.Printf("hystrix-go: allowing single test to possibly close circuit %v", circuit.Name)
- }
- return swapped
- }
這里只看到了熔斷器被開啟的設置了,但是沒有關閉熔斷器的邏輯,因為關閉熔斷器的邏輯是在上報狀態指標的方法ReportEvent內實現,我們最后再看一下ReportEvent的實現:
- func (circuit *CircuitBreaker) ReportEvent(eventTypes []string, start time.Time, runDuration time.Duration) error {
- if len(eventTypes) == 0 {
- return fmt.Errorf("no event types sent for metrics")
- }
- circuit.mutex.RLock()
- o := circuit.open
- circuit.mutex.RUnlock()
- // 上報的狀態事件是success 并且當前熔斷器是開啟狀態,則說明下游服務正常了,可以關閉熔斷器了
- if eventTypes[0] == "success" && o {
- circuit.setClose()
- }
- var concurrencyInUse float64
- if circuit.executorPool.Max > 0 {
- concurrencyInUse = float64(circuit.executorPool.ActiveCount()) / float64(circuit.executorPool.Max)
- }
- select {
- // 上報狀態指標,與上文的monitor呼應
- case circuit.metrics.Updates <- &commandExecution{
- Types: eventTypes,
- Start: start,
- RunDuration: runDuration,
- ConcurrencyInUse: concurrencyInUse,
- }:
- default:
- return CircuitError{Message: fmt.Sprintf("metrics channel (%v) is at capacity", circuit.Name)}
- }
- return nil
- }
可視化hystrix的上報信息
通過上面的分析我們知道hystrix-go上報了狀態事件、執行數量事件,那么這些指標我們可以怎么查看呢?
設計者早就想到了這個問題,所以他們做了一個dashborad,可以查看hystrix的上報信息,使用方法只需在服務啟動時添加如下代碼:
- hystrixStreamHandler := hystrix.NewStreamHandler()
- hystrixStreamHandler.Start()
- go http.ListenAndServe(net.JoinHostPort("", "81"), hystrixStreamHandler)
然后打開瀏覽器:http://127.0.0.1:81/hystrix-dashboard,進行觀測吧。
總結
故事終于接近尾聲了,一個熔斷機制的實現確實不簡單,要考慮的因素也是方方面面,尤其在微服務架構下,熔斷機制是必不可少的,不僅要在框架層面實現熔斷機制,還要根據具體業務場景使用熔斷機制,這些都是值得我們深思熟慮的。本文介紹的熔斷框架實現的還是比較完美的,這種優秀的設計思路值得我們學習。
文中代碼已上傳github:https://github.com/asong2020/Golang_Dream/tree/master/code_demo/hystrix_demo,歡迎star。