HarmonyOS自定義控件之JS進度條
前言
在我們日常開發的里面,很多場景經常會用到進度條,而系統提供的進度條樣式又無法滿足我們的使用,這時候我們就需要自定義一個進度條,自定義JS進度條主要涉及以下知識點:
- 如何自定義組件及引用
- 如何自定義繪制圖形(draw)
- 如何創建并執行動畫(animation)
- 如何設置自定義組件的參數(setter)
- 如何監聽自定義組件的參數(getter)
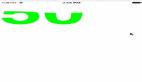
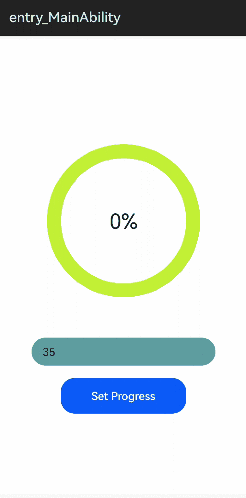
效果演示
代碼實現
如何自定義組件及引用
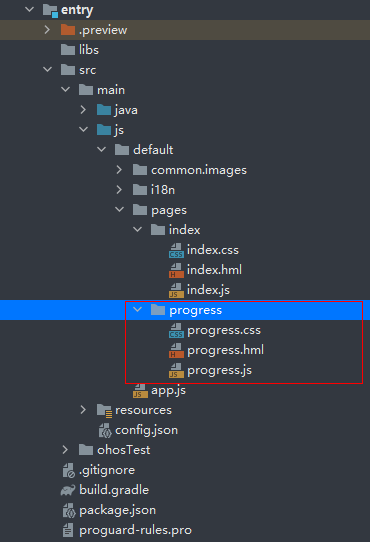
1.Js自定義組件,只需要新創建一個包,直接在里面編寫界面,樣式,邏輯代碼即可。如果需要使用該組件,將其完整拷貝到自己的項目結構下進行引用即可。我們自定義一個Progress進度條控件,項目結構如下圖:
2.使用的時候,我們需要給自定義組件進行標簽聲明,然后就可以使用該標簽了:
<index.hml>
- // src表示我們引用的自定義組件的文件,name表示我們給該自定義組件聲明一個標簽名
- <element src="../progress/progress.hml" name="progress-bar"></element>
- <div class="container">
- // 聲明之后,就可以使用這個自定義的標簽了
- <progress-bar></progress-bar>
- ...
- </div>
如何自定義繪制圖形
說到自定義繪制,自然離不開canvas,首先我們給自定義組件增加一個<canvas>標簽,并在JS文件中描述繪制:
<progress.hml>
- <stack class="frame-layout">
- <canvas id="progress-bar" class="progress-bar" ontouchmove="onTouchEvent"></canvas>
- <text if="{{ display }}" class="progress-bar">{{ progressText }}</text>
- </stack>
在JS中定義一個draw方法,并且傳入一個CanvasRenderingContext2D參數,這個參數我們可以理解為canvas + paint,所有繪制都是通過它進行調用:
<progress.js>
- draw(ctx) {
- this.display = true
- ctx.lineWidth = this.circleWidth
- ctx.lineCap = 'round'
- // ctx可以理解為canvas + paint
- ctx.clearRect(0, 0, this.width, this.height) // 會閃屏,系統渲染問題
- ctx.save() // save1
- ctx.translate(this.width / 2, this.height / 2)
- // draw background
- ctx.beginPath()
- ctx.strokeStyle = this.backgroundColor
- ctx.arc(0, 0, 100, 0, 2 * Math.PI) // r = 100, 參數是弧度,角度 = 弧度 / PI * 180
- ctx.stroke() // 繪制
- ctx.closePath()
- // draw progress
- ctx.save()
- ctx.rotate(-90 / 180 * Math.PI)
- ctx.beginPath()
- ctx.strokeStyle = this.progressColor
- ctx.arc(0, 0, 100, 0, this.angle / 180 * Math.PI) // r = 100, 參數是弧度,角度 = 弧度 / PI * 180
- ctx.stroke() // 繪制
- ctx.closePath()
- ctx.restore()
- ctx.restore() // save1
- this.notifyChanged()
- }
這部分邏輯并不復雜,都有注釋,就是繪制一個圓環背景,然后根據進度參數在圓環上繪制一個圓弧進度,相信做過自定義控件的同學都能夠非常熟悉。
如何創建并執行動畫
1.首先我們需要在init的時候創建一個動畫對象,并且設置好初始的動畫參數:
<progress.js>
- onInit() {
- // 動畫參數(具體參數類型和參數說明參考官方文檔)
- var options = {
- duration: this.animDuration, // 動畫時長
- direction: 'normal', // 播放模式
- easing: 'linear', // 差值器
- fill: 'forwards', // 動畫結束后狀態
- iterations: 1, // 執行次數
- begin: 0, // 起始值
- end: 360.0 // 終止值
- };
- var _this = this
- this.animator = Animator.createAnimator(options)
- this.animator.onframe = function (value) {
- // 動畫每一幀回調,類似我們熟悉的onAnimateUpdate回調
- _this.angle = value
- // 刷新繪制
- _this.draw(_this.ctx)
- }
- ...
- },
2.接著我們需要在特定的時候開啟動畫,例如我們在接收到外部傳進來的進度參數后,我們需要更新動畫的起始值和終止值,并且開始執行動畫:
<progress.js>
- onProgressChanged(oldV, newV) {
- console.log("onProgressChanged from:" + oldV + " to: " + newV)
- this.initWidget()
- // 進度值范圍限定為[0, 1]
- if (oldV >= 1) {
- oldV = 1
- }
- if (newV >= 1) {
- newV = 1
- }
- // 更新動畫的起始和終止參數
- var options = {
- duration: this.animDuration,
- direction: 'alternate-reverse',
- easing: 'linear',
- fill: 'forwards',
- iterations: 1,
- begin: oldV * 360,
- end: newV * 360
- };
- this.animator.update(options)
- // 開始執行動畫
- this.animator.play()
- },
如何設置自定義組件的參數
1.我們自定義組件,并不能像之前一樣簡單的暴露個公開方法給外部調用。由于其數據驅動的設計,我們可以定義一些自定義屬性參數,當外部修改參數時我們就可以接收到信息進行主動動作(setter):
<progress.js>
- props: [
- 'progress', // 進度
- 'backgroundColor', // 圓環背景顏色
- 'progressColor' // 進度前景顏色
- ],
- ...
2.監聽這些對外暴露的屬性值變化(listener):
<progress.js>
- onInit() {
- ...
- // 監聽自定義屬性值變化
- this.$watch('progress', 'onProgressChanged')
- this.$watch('backgroundColor', 'onBackgroundChanged')
- this.$watch('progressColor', 'onForegroundChanged')
- ...
- },
- // backgroundColor變化時會觸發該回調
- onBackgroundChanged(oldV, newV) {
- this.backgroundColor = newV
- },
- // progressColor變化時會觸發該回調
- onForegroundChanged(oldV, newV) {
- this.progressColor = newV
- },
- // progress變化時會觸發該回調
- onProgressChanged(oldV, newV) {
- console.log("onProgressChanged from:" + oldV + " to: " + newV)
- this.initWidget()
- if (oldV >= 1) {
- oldV = 1
- }
- if (newV >= 1) {
- newV = 1
- }
- var options = {
- duration: this.animDuration,
- direction: 'alternate-reverse',
- easing: 'linear',
- fill: 'forwards',
- iterations: 1,
- begin: oldV * 360,
- end: newV * 360
- };
- this.animator.update(options)
- this.animator.play()
- },
3..外部設置參數,當外部改變這些參數時,我們自定義組件內部的回調方法就會觸發,并執行刷新邏輯:
<index.hml>
- <element src="../progress/progress.hml" name="progress-bar"></element>
- <div class="container">
- <progress-bar background-color="#c2f135"
- progress-color="#6bfc33"
- progress="{{ progress }}">
- </progress-bar>
- ...
- </div>
如何監聽自定義組件的參數
上面我們說到了外部如何改變自定義組件內部的屬性,本質上就是一個典型觀察者模式。同理,外部調用者需要監聽我們自定義組件的參數變化,也是通過這種方式:
1.首先我們在自定義組件中需要定義一個被觀察者對象(key),并且在該對象值變化時對外發送消息:
<progress.js>
- notifyChanged() {
- // currentAngle, currentProgress就是被觀察者對象,key-value結構,value就是我們對外發送的值
- // 注意:駝峰命名
- this.$emit("currentAngle", this.angle)
- this.$emit("currentProgress", Math.ceil(this.angle / 3.6) / 100)
- this.progressText = Math.ceil(this.angle / 3.6) + "%"
- },
2.外部使用者需要注冊監聽回調方法,對被觀察者對象(key)進行監聽:
<index.hml>
- <element src="../progress/progress.hml" name="progress-bar"></element>
- <div class="container">
- // 通過@current-angle和@current-progress進行該參數的監聽,注意參數前加"@",并且參數根據駝峰命名方式拆分單詞,每個詞語用"-"隔開
- <progress-bar background-color="#c2f135"
- progress-color="#6bfc33"
- progress="{{ progress }}"
- @current-angle="onAngleChanged"
- @current-progress="onProgressChanged">
- </progress-bar>
- ...
- </div>
<index.js>
- // 當自定義組件內部的 currentAngle, currentProgress變化時,會觸發下面的回調方法通知外部使用者
- onAngleChanged(angle) {
- console.log("onAngleChanged: " + angle.detail)
- },
- onProgressChanged(progress) {
- console.log("onProgressChanged: " + progress.detail)
- }
其他關鍵點
1.<canvas>標簽的繪制內容默認是不顯示的,我們可以在初始化的時候監聽首幀回調,主動進行刷新一次:
<progress.js>
- onInit() {
- ...
- // 監聽首幀,觸發首次繪制,類似attachToWindow的觸發時機
- requestAnimationFrame(function () {
- _this.initWidget()
- _this.draw(_this.ctx)
- })
- },
2.自定義組件如何獲取寬高信息,在API6+系統已經提供相關的方法可以進行獲取,類似onSizeChanged中讀取寬高信息:
<progress.js>
- initWidget() {
- console.log("init widget")
- if (this.ctx === null) {
- // 獲取標簽元素
- let widget = this.$element('progress-bar');
- this.ctx = widget.getContext('2d', {
- antialias: true
- })
- // 獲取寬高,并計算出繪制圓環的寬高,中心點,半徑信息
- this.width = widget.getBoundingClientRect().width
- this.height = widget.getBoundingClientRect().height
- this.centerX = widget.getBoundingClientRect().left + this.width / 2
- this.centerY = widget.getBoundingClientRect().top + this.height / 2
- console.log("canvas size = " + this.width + ", " + this.height)
- console.log("canvas center = " + this.centerX + ", " + this.centerY)
- }
- },
3.canvas畫布和我們通常理解的是不同的,它是存在繪制緩存的,所以每一幀刷新時,我們需要在繪制前先清空之前的繪制內容。目前鴻蒙清空畫布時會概率出現閃屏問題。
以上就是實現一個自定義JS進度條的核心代碼了,源代碼:JsProgress