import 方式隨心轉,感受 Babel 插件的威力
本文轉載自微信公眾號「神光的編程秘籍」,作者神說要有光zxg 。轉載本文請聯系神光的編程秘籍公眾號。
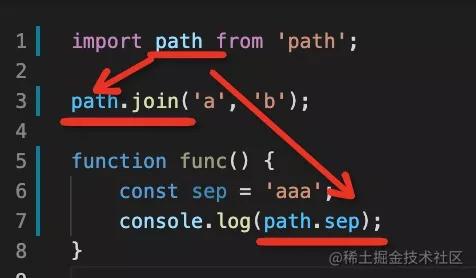
當我們 import 一個模塊的時候,可以這樣默認引入:
- import path from 'path';
- path.join('a', 'b');
- function func() {
- const sep = 'aaa';
- console.log(path.sep);
- }
也可以這樣解構引入:
- import { join, sep as _sep } from 'path';
- join('a', 'b');
- function func() {
- const sep = 'aaa';
- console.log(_sep);
- }
第一種默認引入叫 default import,第二種解構引入叫 named import。
不知道大家習慣用哪一種。
如果有個需求,讓你把所有的 default import 轉成 named import,你會怎么做呢?
可能你會說這個不就是找到所有用到引入變量的地方,修改成直接調用方法,然后那些方法名以解構的方式寫在 import 語句里么。
但如果說要改的項目有 100 多個這種文件呢?(觸發 treeshking 要這樣改)
這時候就可以考慮 babel 插件了,它很適合做這種有規律且數量龐大的代碼的自動修改。
讓我們通過這個例子感受下 babel 插件的威力吧。
因為代碼比較多,大家可能沒耐心看,要不我們先看效果吧:
測試效果
輸入代碼是這樣:
- import path from 'path';
- path.join('a', 'b');
- function func() {
- const sep = 'aaa';
- console.log(path.sep);
- }
我們引入該 babel 插件,讀取輸入代碼并做轉換:
- const { transformFileSync } = require('@babel/core');
- const importTransformPlugin = require('./plugin/importTransform');
- const path = require('path');
- const { code } = transformFileSync(path.join(__dirname, './sourceCode.js'), {
- plugins: [[importTransformPlugin]]
- });
- console.log(code);
打印如下:
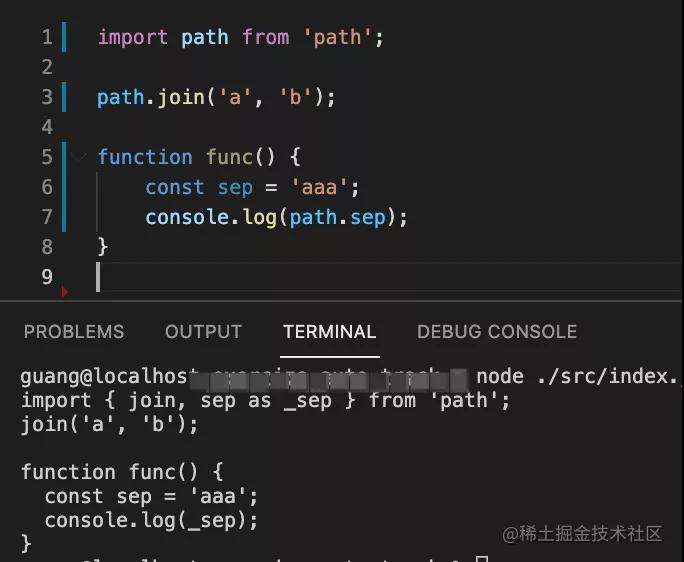
我們完成了 default import 到 named import 的自動轉換。
可能有的同學擔心重名問題,我們測試一下:
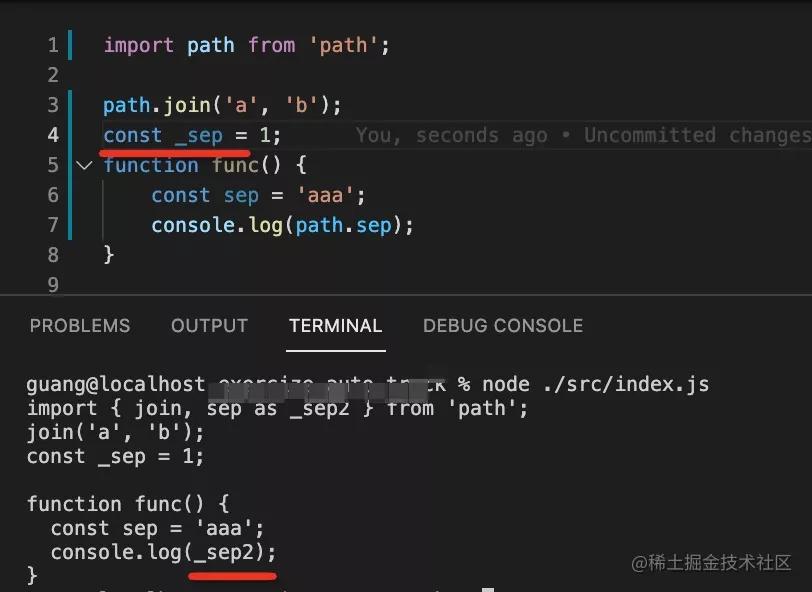
可以看到,插件已經處理了重名問題。
思路分析
import 語句中間的部分叫做 specifier,我們可以通過 astexplorer.net 來可視化的查看它的 AST。
比如這樣一條 import 語句:
- import React, {useState as test, useEffect} from 'react';
它對應的 AST 是這樣的:
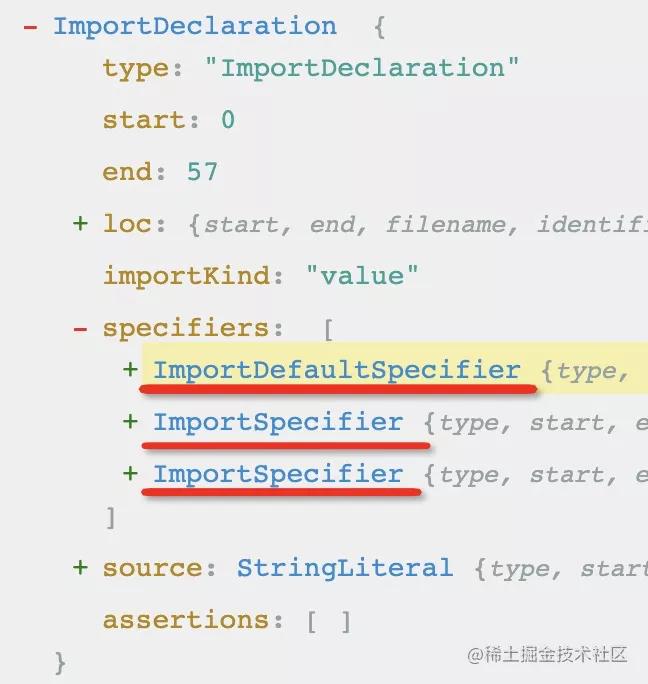
也就是說默認 import 是 ImportDefaultSpecifier,而解構 import 是 ImportSpecifier
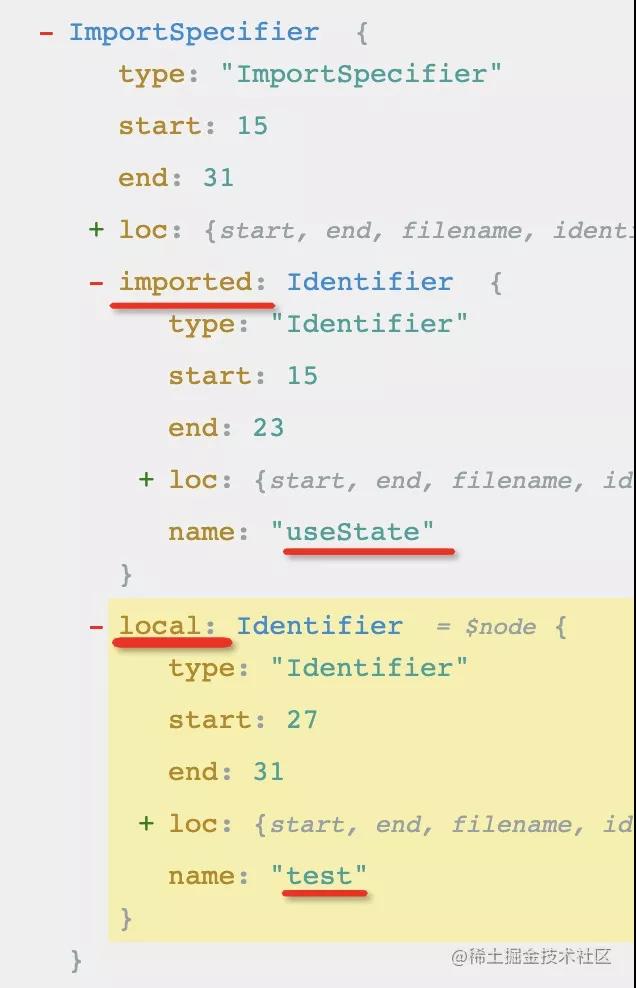
ImportSpecifier 語句有 local 和 imported 屬性,分別代表引入的名字和重命名后的名字:
那我們的目的明確了,就是把 ImportDefaultSpecifier 轉成 ImportSpecifier,并且使用到的屬性方法來設置 imported 屬性,需要重命名的還要設置下 local 屬性。
怎么知道使用到哪些屬性方法呢?也就是如何分析變量的引用呢?
babel 提供了 scope 的 api,用于作用域分析,可以拿到作用域中的聲明,和所有引用這個聲明的地方。
比如這里就可以用 scope.getBinding 方法拿到該變量的聲明:
- const binding = scope.getBinding('path');
然后用 binding.references 就可以拿到所有引用這個聲明的地方,也就是 path.join 和 path.sep。
之后就可以把這兩處引用改為直接的方法調用,然后修改下 import 語句為解構就可以了。
我們總結一下步驟:
- 找到 import 語句中的 ImportDefaultSpecifier
- 拿到 ImportDefaultSpecifier 在作用域的聲明(binding)
- 找到所有引用該聲明的地方(reference)
- 修改各處引用為直接調用函數的形式,收集函數名
- 如果作用域中有重名的變量,則生成一個唯一的函數名
- 根據收集的函數名來修改 ImportDefaultSpecifier 為 ImportSpecifier
原理大概過了一遍,我們來寫下代碼
代碼實現
babel 插件是函數返回對象的形式,返回的對象中主要是通過 visitor 屬性來指定對什么 AST 做什么處理。
我們搭一個 babel 插件的骨架:
- const { declare } = require('@babel/helper-plugin-utils');
- const importTransformPlugin = declare((api, options, dirname) => {
- api.assertVersion(7);
- return {
- visitor: {
- ImportDeclaration(path) {
- }
- }
- }
- });
- module.exports = importTransformPlugin;
這里我們要處理的是 import 語句 ImportDeclaration。
@babel/helper-plugin-utils 包的 declare 方法的作用是給 api 擴充一個 assertVersion 方法。而 assertVersion 的作用是如果這個插件工作在了 babel6 上就會報錯說這個插件只能用在 babel7,可以避免報的錯看不懂。
path 是用于操作 AST 的一些 api,而且也保留了 node 之間的關聯,比如 parent、sibling 等。
接下來進入正題:
我們要先取出 specifiers 的部分,然后找出 ImportDefaultSpecifier:
- ImportDeclaration(path) {
- // 找到 import 語句中的 default import
- const importDefaultSpecifiers = path.node.specifiers.filter(item => api.types.isImportDefaultSpecifier(item));
- // 對每個 default import 做轉換
- importDefaultSpecifiers.forEach(defaultSpecifier => {
- });
- }
然后對每一個 default import 都要根據在作用域中的聲明找到所有引用的地方:
- // import 變量的名字
- const importId = defaultSpecifier.local.name;
- // 該變量的聲明
- const binding = path.scope.getBinding(importId);
- binding.referencePaths.forEach(referencePath=> {
- });
然后對每個引用到該 import 的地方都做修改,改為直接調用函數,并且把函數名收集起來。這里要注意的是,如果作用域中有同名變量還要生成一個新的唯一 id。
- // 該變量的聲明
- const binding = path.scope.getBinding(importId);
- const referedIds = [];
- const transformedIds = [];
- // 收集所有引用該聲明的地方的方法名
- binding.referencePaths.forEach(referencePath=> {
- const currentPath = referencePath.parentPath;
- const methodName = currentPath.node.property.name;
- // 之前方法名
- referedIds.push(currentPath.node.property);
- if (!currentPath.scope.getBinding(methodName)) {// 如果作用域沒有重名變量
- const methodNameNode = currentPath.node.property;
- currentPath.replaceWith(methodNameNode);
- transformedIds.push(methodNameNode); // 轉換后的方法名
- } else {// 如果作用域有重名變量
- const newMethodName = referencePath.scope.generateUidIdentifier(methodName);
- currentPath.replaceWith(newMethodName);
- transformedIds.push(newMethodName); // 轉換后的方法名
- }
- });
這部分邏輯比較多,著重講一下。
我們對每個引用了該變量的地方都要記錄下引用了哪個方法,比如 path.join、path.sep 就引用了 join 和 sep 方法。
然后就要把 path.join 替換成 join,把 path.sep 替換成 sep。
如果作用域中有了 join 或者 sep 的聲明,需要生成一個新的 id,并且記錄下新的 id 是什么。
收集了所有的方法名,就可以修改 import 語句了:
- // 轉換 import 語句為 named import
- const newSpecifiers = referedIds.map((id, index) => api.types.ImportSpecifier(transformedIds[index], id));
- path.node.specifiers = newSpecifiers;
沒有 babel 插件基礎可能看的有點暈,沒關系,知道他是做啥的就行。我們接下來試下效果。
思考和代碼
我們做了 default import 到 named import 的自動轉換,其實反過來也一樣,不也是分析 scope 的 binding 和 reference,然后去修改 AST 么?感興趣的同學可以試下反過來轉換怎么寫。
插件全部代碼如下:
- const { declare } = require('@babel/helper-plugin-utils');
- const importTransformPlugin = declare((api, options, dirname) => {
- api.assertVersion(7);
- return {
- visitor: {
- ImportDeclaration(path) {
- // 找到 import 語句中的 default import
- const importDefaultSpecifiers = path.node.specifiers.filter(item => api.types.isImportDefaultSpecifier(item));
- // 對每個 default import 做轉換
- importDefaultSpecifiers.forEach(defaultSpecifier => {
- // import 變量的名字
- const importId = defaultSpecifier.local.name;
- // 該變量的聲明
- const binding = path.scope.getBinding(importId);
- const referedIds = [];
- const transformedIds = [];
- // 收集所有引用該聲明的地方的方法名
- binding.referencePaths.forEach(referencePath=> {
- const currentPath = referencePath.parentPath;
- const methodName = currentPath.node.property.name;
- // 之前方法名
- referedIds.push(currentPath.node.property);
- if (!currentPath.scope.getBinding(methodName)) {// 如果作用域沒有重名變量
- const methodNameNode = currentPath.node.property;
- currentPath.replaceWith(methodNameNode);
- transformedIds.push(methodNameNode); // 轉換后的方法名
- } else {// 如果作用域有重名變量
- const newMethodName = referencePath.scope.generateUidIdentifier(methodName);
- currentPath.replaceWith(newMethodName);
- transformedIds.push(newMethodName); // 轉換后的方法名
- }
- });
- // 轉換 import 語句為 named import
- const newSpecifiers = referedIds.map((id, index) => api.types.ImportSpecifier(transformedIds[index], id));
- path.node.specifiers = newSpecifiers;
- });
- }
- }
- }
- });
- module.exports = importTransformPlugin;
總結
我們要做 default import 轉 named import,也就是 ImportDefaultSpecifier 轉 ImportSpecifier,要通過 scope 的 api 分析 binding 和 reference,找到所有引用的地方,替換成直接調用函數的形式,然后再去修改 import 語句的 AST 就可以了。
babel 插件特別適合做這種有規律且轉換量比較大的需求,在一些場景下是有很大的威力的。