理性分析 Window、Activity、DecorView 以及 ViewRoot 之間關系
作者: Android開發編程
ViewRoot并不屬于View樹的一部分。從源碼實現上來看,它既非View的子類,也非View Group,但它實現了ViewParent接口,這讓它可以作為View的名義上的父視圖。
文末本文轉載自微信公眾號「 Android開發編程」,作者 Android開發編程。轉載本文請聯系 Android開發編程公眾號。
前言
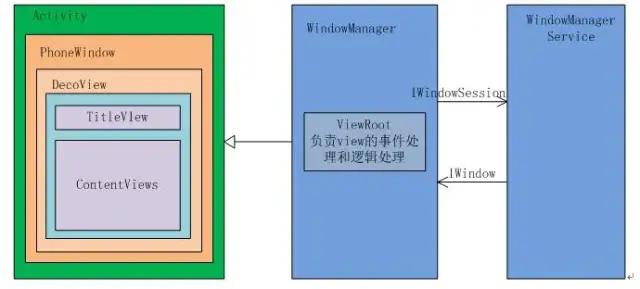
Activity和window,DecorView ,viewRoot是什么關系
今天我們就來講解下,這樣你在面試時候,游刃有余;
一、基本概念介紹
1、Activity
- Activity負責控制生命周期和處理事件;
- 負責統籌視圖的添加與顯示,以及通過一些回調方法與Window和View進行交互;
- 一個Activity包含一個Window,真正控制視圖的是Window,Window才是真正代表一個窗口;
- 統籌視圖的添加與顯示,通過回調與Window和View進行交互;
2、Window
- Window是視圖的承載者,是一個抽象類;
- Activity中持有的實際上是Window的子類PhoneWindow;
- Window通過WindowManager加載了一個DecorView到Window中,并將DecorView交給了ViewRoot;
3、DecorView
- DecorView的父類是FrameLayout,是Android View樹的根節;
- 內部包含一個豎直方向的LinearLayout,它有上下三個部分,上面是個ViewStub,延遲加載的視圖(ActionBar,根據Theme設置),中間的是標題欄(根據Theme設置,有的布局沒有),下面的是內容欄。setContentView所設置的布局文件其實就是被加到內容欄之中的;
- ViewGroup content = (ViewGroup)findViewById(android.R.id.content);
- ViewGroup rootView = (ViewGroup) content.getChildAt(0)
4、ViewRoot
- 控制View的事件處理和邏輯處理;
- ViewRoot子類是ViewRootImpl類,它是連接WindowManagerService和DecorView的紐帶,View的三大流程(測量(measure),布局(layout),繪制(draw))均通過ViewRoot來完成;
- ViewRoot并不屬于View樹的一部分。從源碼實現上來看,它既非View的子類,也非View Group,但它實現了ViewParent接口,這讓它可以作為View的名義上的父視圖;
- RootView繼承了Handler類,可以接收事件并分發;
- Android的所有觸屏事件、按鍵事件、界面刷新等事件都是通過ViewRoot進行分發的;
二、DecorView的創建整個流程詳解
1、attach
Activity的setContentView()開始
- public void setContentView(@LayoutRes int layoutResID) {
- getWindow().setContentView(layoutResID);
- initWindowDecorActionBar();
- }
可以看到實際上是交給Window來裝載視圖的;
- final void attach(Context context, ActivityThread aThread,
- Instrumentation instr, IBinder token, int ident,
- Application application, Intent intent, ActivityInfo info,
- CharSequence title, Activity parent, String id,
- NonConfigurationInstances lastNonConfigurationInstances,
- Configuration config, String referrer, IVoiceInteractor voiceInteractor,
- Window window) {
- ..................................................................
- mWindow = new PhoneWindow(this, window);//創建一個Window對象
- mWindow.setWindowControllerCallback(this);
- mWindow.setCallback(this);//設置回調,向Activity分發點擊或狀態改變等事件
- mWindow.setOnWindowDismissedCallback(this);
- .................................................................
- mWindow.setWindowManager(
- (WindowManager)context.getSystemService(Context.WINDOW_SERVICE),
- mToken, mComponent.flattenToString(),
- (info.flags & ActivityInfo.FLAG_HARDWARE_ACCELERATED) != 0);//給Window設置WindowManager對象
- ....................................................................
- }
在Activity的attach方法中生成了PhoneWindow的實例;
有了Window對象,接下來就將DecorView加載到Window中;
2、setContentView
- public void setContentView(int layoutResID) {
- if (mContentParent == null) {//mContentParent為空,創建一個DecroView
- installDecor();
- } else {
- mContentParent.removeAllViews();//mContentParent不為空,刪除其中的View
- }
- mLayoutInflater.inflate(layoutResID, mContentParent);//為mContentParent添加子View,即Activity中設置的布局文件
- final Callback cb = getCallback();
- if (cb != null && !isDestroyed()) {
- cb.onContentChanged();//回調通知,內容改變
- }
- }
mContentParent就是ContentView所對應的的FrameLayout;
Activity的setContentView的流程大致可以總結為:
Activity首先在Attach方法中生成了PhoneWindow的實例;
在setContentView中直接交給Window來裝載視圖,先在PhoneWindow中創建了一個DecroView;
其中創建的過程中可能根據Theme不同,加載不同的布局格式,即Activity中設置的布局;
3、installDecor
- private void installDecor() {
- if (mDecor == null) {
- mDecor = generateDecor(); //生成DecorView
- mDecor.setDescendantFocusability(ViewGroup.FOCUS_AFTER_DESCENDANTS);
- mDecor.setIsRootNamespace(true);
- if (!mInvalidatePanelMenuPosted && mInvalidatePanelMenuFeatures != 0) {
- mDecor.postOnAnimation(mInvalidatePanelMenuRunnable);
- }
- }
- if (mContentParent == null) {
- mContentParent = generateLayout(mDecor); // 為DecorView設置布局格式,并返回mContentParent
- ...
- }
- }
- }
- protected DecorView generateDecor() {
- return new DecorView(getContext(), -1);
- }
很簡單,創建了一個DecorView;
再看generateLayout;
4、generateLayout
- protected ViewGroup generateLayout(DecorView decor) {
- // 從主題文件中獲取樣式信息
- TypedArray a = getWindowStyle();
- ...................
- if (a.getBoolean(R.styleable.Window_windowNoTitle, false)) {
- requestFeature(FEATURE_NO_TITLE);
- } else if (a.getBoolean(R.styleable.Window_windowActionBar, false)) {
- // Don't allow an action bar if there is no title.
- requestFeature(FEATURE_ACTION_BAR);
- }
- ................
- // 根據主題樣式,加載窗口布局
- int layoutResource;
- int features = getLocalFeatures();
- // System.out.println("Features: 0x" + Integer.toHexString(features));
- if ((features & (1 << FEATURE_SWIPE_TO_DISMISS)) != 0) {
- layoutResource = R.layout.screen_swipe_dismiss;
- } else if(...){
- ...
- }
- View in = mLayoutInflater.inflate(layoutResource, null);//加載layoutResource
- //往DecorView中添加子View,即文章開頭介紹DecorView時提到的布局格式,那只是一個例子,根據主題樣式不同,加載不同的布局。
- decor.addView(in, new ViewGroup.LayoutParams(MATCH_PARENT, MATCH_PARENT));
- mContentRoot = (ViewGroup) in;
- ViewGroup contentParent = (ViewGroup)findViewById(ID_ANDROID_CONTENT);// 這里獲取的就是mContentParent
- if (contentParent == null) {
- throw new RuntimeException("Window couldn't find content container view");
- }
- if ((features & (1 << FEATURE_INDETERMINATE_PROGRESS)) != 0) {
- ProgressBar progress = getCircularProgressBar(false);
- if (progress != null) {
- progress.setIndeterminate(true);
- }
- }
- if ((features & (1 << FEATURE_SWIPE_TO_DISMISS)) != 0) {
- registerSwipeCallbacks();
- }
- // Remaining setup -- of background and title -- that only applies
- // to top-level windows.
- ...
- return contentParent;
- 先從主題中獲取樣式,然后根據樣式;
- 加載對應的布局到DecorView中,然后從中獲取mContentParent;
- 獲得到之后,可以回到上面的代碼,為mContentParent添加View,即Activity中的布局;
5、DecorView的顯示
將DecorView建立起來,通過setContentView設置的界面,如何在onResume后對用戶可見,需要從ActivityThread說起;
- private void handleLaunchActivity(ActivityClientRecord r, Intent customIntent) {
- //就是在這里調用了Activity.attach(),接著調用了Activity.onCreate()和Activity.onStart()生命周期,
- //但是由于只是初始化了mDecor,添加了布局文件,還沒有把
- //mDecor添加到負責UI顯示的PhoneWindow中,所以這時候對用戶來說,是不可見的
- Activity a = performLaunchActivity(r, customIntent);
- ......
- if (a != null) {
- //這里面執行了Activity.onResume()
- handleResumeActivity(r.token, false, r.isForward,
- !r.activity.mFinished && !r.startsNotResumed);
- if (!r.activity.mFinished && r.startsNotResumed) {
- try {
- r.activity.mCalled = false;
- //執行Activity.onPause()
- mInstrumentation.callActivityOnPause(r.activity);
- }
- }
- }
- }
重點看下handleResumeActivity(),在這其中,DecorView將會顯示出來,同時重要的一個角色;ViewRoot也將登場;
6、handleResumeActivity
- final void handleResumeActivity(IBinder token, boolean clearHide,
- boolean isForward, boolean reallyResume) {
- //這個時候,Activity.onResume()已經調用了,但是現在界面還是不可見的
- ActivityClientRecord r = performResumeActivity(token, clearHide);
- if (r != null) {
- final Activity a = r.activity;
- if (r.window == null && !a.mFinished && willBeVisible) {
- r.window = r.activity.getWindow();
- View decor = r.window.getDecorView();
- //decor對用戶不可見
- decor.setVisibility(View.INVISIBLE);
- ViewManager wm = a.getWindowManager();
- WindowManager.LayoutParams l = r.window.getAttributes();
- a.mDecor = decor;
- l.type = WindowManager.LayoutParams.TYPE_BASE_APPLICATION;
- if (a.mVisibleFromClient) {
- a.mWindowAdded = true;
- //被添加進WindowManager了,但是這個時候,還是不可見的
- wm.addView(decor, l);
- }
- if (!r.activity.mFinished && willBeVisible
- && r.activity.mDecor != null && !r.hideForNow) {
- //在這里,執行了重要的操作,使得DecorView可見
- if (r.activity.mVisibleFromClient) {
- r.activity.makeVisible();
- }
- }
- }
- }
- }
當我們執行了Activity.makeVisible()方法之后,界面才對我們是可見的;
- void makeVisible() {
- if (!mWindowAdded) {
- ViewManager wm = getWindowManager();
- wm.addView(mDecor, getWindow().getAttributes());//將DecorView添加到WindowManager
- mWindowAdded = true;
- }
- mDecor.setVisibility(View.VISIBLE);//DecorView可見
- }
- 到此DecorView便可見,顯示在屏幕中;
- 但是在這其中,wm.addView(mDecor, getWindow().getAttributes());
- 起到了重要的作用,因為其內部創建了一個ViewRootImpl對象,負責繪制顯示各個子View;
- 具體來看addView()方法,因為WindowManager是個接口,具體是交給WindowManagerImpl來實現的;
7、addView
- public final class WindowManagerImpl implements WindowManager {
- private final WindowManagerGlobal mGlobal = WindowManagerGlobal.getInstance();
- ...
- @Override
- public void addView(View view, ViewGroup.LayoutParams params) {
- mGlobal.addView(view, params, mDisplay, mParentWindow);
- }
- }
- 交給WindowManagerGlobal 的addView()方法去實現;
- public void addView(View view, ViewGroup.LayoutParams params,
- Display display, Window parentWindow) {
- final WindowManager.LayoutParams wparams = (WindowManager.LayoutParams) params;
- ......
- synchronized (mLock) {
- ViewRootImpl root;
- //實例化一個ViewRootImpl對象
- root = new ViewRootImpl(view.getContext(), display);
- view.setLayoutParams(wparams);
- mViews.add(view);
- mRoots.add(root);
- mParams.add(wparams);
- }
- ......
- try {
- //將DecorView交給ViewRootImpl
- root.setView(view, wparams, panelParentView);
- } catch (RuntimeException e) {
- }
- }
- 看到其中實例化了ViewRootImpl對象,然后調用其setView()方法;
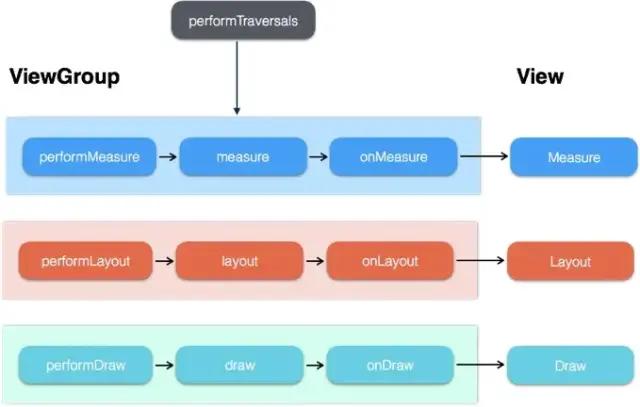
- 其中setView()方法經過一些列折騰,最終調用了performTraversals()方法,完成繪制,最終界面才顯示出來;
總結
- Activity就像個控制器,不負責視圖部分。Window像個承載器,裝著內部視圖;
- DecorView就是個頂層視圖,是所有View的最外層布局;
- ViewRoot像個連接器,負責溝通,通過硬件的感知來通知視圖,進行用戶之間的交互;
責任編輯:武曉燕
來源:
Android開發編程