HDF驅動框架探路(一):工欲善其事,必先利其器(linux驅動開發)
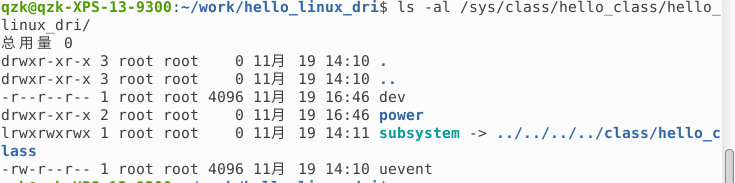
老規矩還是將最終希望跑出來的效果如下:

前言
從本文開始會為記錄一個驅動小白的成長道路。當你已經具備了成熟的驅動開發經驗的話,那么你可以直接跳過,本文對你毫無用處。作為一個沒有接觸過任何驅動開發的小白來說,想要搞清楚openharmony的HDF驅動框架的話,我大概梳理了一下,不對之處各位大佬留言指出。想要徹底搞清楚HDF框架我認為第一步必須需要搞清楚linux驅動,因為linux內核是被廣泛使用的,無論android,ios,還是openharmony。因為linux內核最基礎的用戶態和內核態的概念最存在于各種驅動開發中的。
所以有了上述的認識,正如標題所示工欲善其事,必先利其器。這個器就是首先得知道linux驅動開發。那么本文就是講解linux驅動開發的。
雖然本文是來介紹linux驅動開發的,不過我們還是先來了解一下HDF的概念,只需要知道這個概念,應為我們現在的工作都是為這個概念服務的。那么:什么是HDF驅動框架?HDF(Hardware Driver Foundation)驅動框架,為驅動開發者提供驅動框架能力,包括驅動加載、驅動服務管理和驅動消息機制。旨在構建統一的驅動架構平臺,為驅動開發者提供更精準、更高效的開發環境,力求做到一次開發,多系統部署。
什么是驅動開發?
這個看似不是問題的問題卻很重要,我們必須需要從這一步開始理清楚,見下圖:
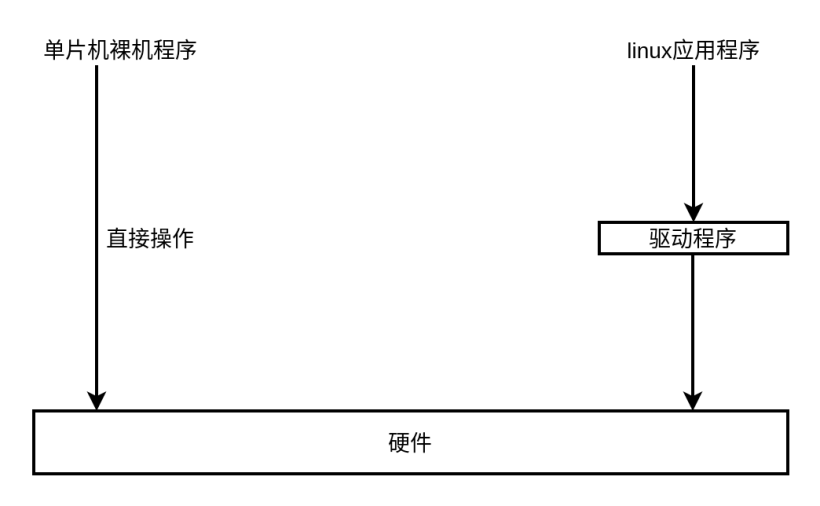
從上圖中可以看出單片機裸機程序是可以直接控制硬件的,而在linux應用程序中這一招就行不通了。linux必須通過驅動程序來控制操作硬件,OK,暫且先知道這么多,更詳細的問題比如linux為什么要這樣子做,我們先留著這些疑問,飯要一口一口吃。
總體架構圖
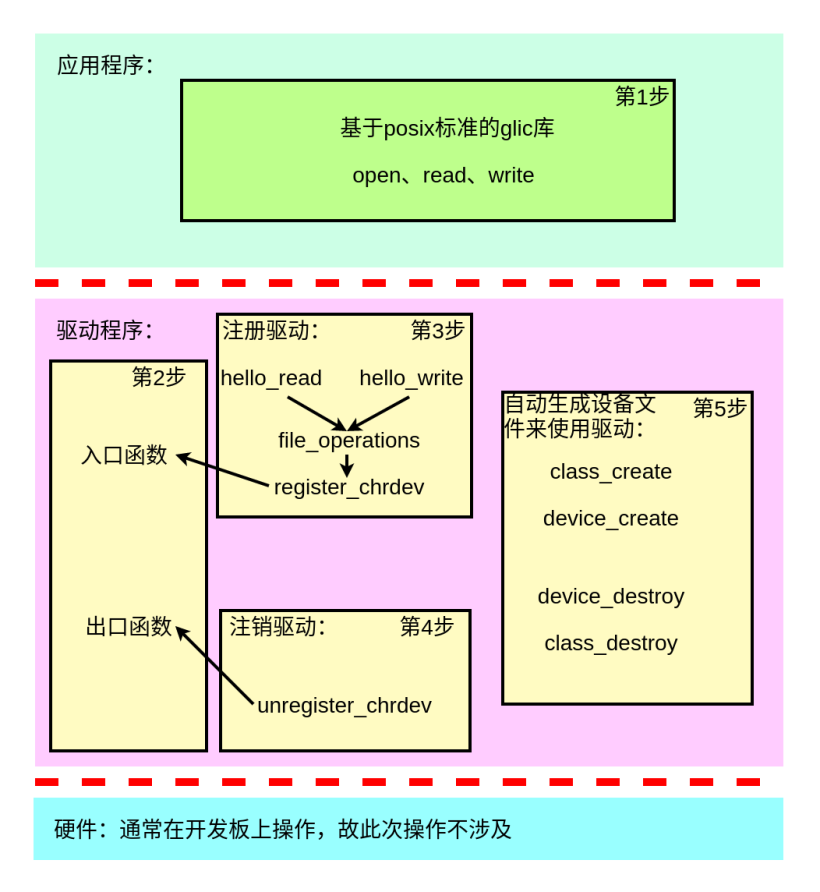
1.應用程序
寫應用程序的目的主要是為了測試驅動程序,測試的方法為調用glibc的open、read、write函數。
代碼見下:
- #include <sys/types.h>
- #include <sys/stat.h>
- #include <fcntl.h>
- #include <unistd.h>
- #include <stdio.h>
- #include <string.h>
- int main(int argc, char **argv)
- {
- int fd;
- char buf[1024];
- int len;
- int ret;
- if (argc < 2) {
- printf("Usage: %s -w <string>\n", argv[0]);
- printf(" %s -r\n",argv[0]);
- return -1;
- }
- fd = open("/dev/hello_linux_dri", O_RDWR);
- if (fd == -1)
- {
- printf("can not open file /dev/hello_linux_dri\n");
- return -1;
- }
- printf("open /dev/hello_linux_dri success\n");
- if ((0 == strcmp(argv[1], "-w")) && (argc == 3))
- {
- len = strlen(argv[2]) + 1;
- len = len < 1024 ? len : 1024;
- ret = write(fd, argv[2], len);
- printf("write driver : %d\n", ret);
- } else {
- len = read(fd, buf, 1024);
- printf("read driver : %d\n", len);
- buf[1023] = '\0';
- printf("APP read : %s\n", buf);
- }
- close(fd);
- return 0;
- }
2.驅動程序總體邏輯
驅動程序屬于模塊寫法:預先注冊自己的的函數任務,以便服務于將來的某個請求,然后它的初始化函數就立即結束
2.1 環境確認
因為驅動程序是調用的內核頭文件,所以首先需要確認頭文件有沒有,下面第一條命令是確認有沒有,沒有的話,使用第二條進行下載。
- apt-cache search linux-headers-$(uname -r)
- sudo apt-get install linux-headers-$(uname -r)
2.2 驅動框架代碼搭建
代碼見下圖:
- #include <linux/module.h>
- #include <linux/fs.h>
- #include <linux/device.h>
- static int major = 0;
- static int ker_val = 123;
- static struct class *hello_for_class;
- static ssize_t hello_read(struct file *file, char __user *buf, size_t size, loff_t *offset)
- {
- printk("%s %s line %d\n",__FILE__,__FUNCTION__, __LINE__);
- return 4;
- }
- static ssize_t hello_write(struct file *file, const char __user *buf, size_t size, loff_t *offset)
- {
- printk("%s %s line %d\n", __FILE__, __FUNCTION__, __LINE__);
- return 4;
- }
- int __init hello_init(void)
- {
- printk("hello_linux_dri init\n");
- return 0;
- }
- void __exit hello_exit(void)
- {
- printk("hello_linux_dri exit\n");
- return;
- }
- module_init(hello_init);
- module_exit(hello_exit);
- MODULE_LICENSE("GPL");
上述就是驅動代碼的一個基本框架
3.注冊驅動
使用file_operations結構體來填充register_chrdev函數來注冊驅動
- static struct file_operations hello_linux_fops = {
- .owner = THIS_MODULE,
- .read = hello_read,
- .write = hello_write,
- };
- int __init hello_init(void)
- {
- printk("hello_linux_dri init\n");
- major = register_chrdev(0,"hello_linux_dri", &hello_linux_fops);
- return 0;
- }
4.注銷驅動
使用unregister_chrdev函數來注銷注冊中的驅動信息
- void __exit hello_exit(void)
- {
- printk("hello_linux_dri exit\n");
- unregister_chrdev(major, "hello_linux_dri");
- return;
- }
5.自動生成設備文件來使用驅動
5.1 生成設備文件
使用class_create和device_create來進行生成,代碼如下:
- int __init hello_init(void)
- {
- printk("hello_linux_dri init\n");
- major = register_chrdev(0,"hello_linux_dri", &hello_linux_fops);
- hello_for_class = class_create(THIS_MODULE, "hello_class");
- device_create(hello_for_class, NULL, MKDEV(major, 0), NULL, "hello_linux_dri");
- return 0;
- }
5.2 撤銷設備文件
使用device_destroy和class_destroy進行撤銷,代碼如下:
- void __exit hello_exit(void)
- {
- printk("hello_linux_dri exit\n");
- device_destroy(hello_for_class, MKDEV(major, 0));
- class_destroy(hello_for_class);
- unregister_chrdev(major, "hello_linux_dri");
- return;
- }
效果如下:
文章相關附件可以點擊下面的原文鏈接前往下載
https://harmonyos.51cto.com/resource/1513