進階全棧的第一步:能實現這五種接口

上一篇文章我們總結了網頁開發的 5 種 http/https 傳輸數據的方式:
- url param
- query
- form urlencoded
- form data
- json
這 5 種方式覆蓋了開發中絕大多數場景,掌握好這些就能輕松應對各種 http/https 數據通信的需求。
如果你想成為一名全棧工程師,那么不能滿足于會寫這幾種方式的前端代碼,后端代碼也得會寫。
所以,這篇文章我們來實現下前后端代碼,把整個鏈路打通,真正掌握它們。
前端使用 axios 發送請求,后端使用 Nest.js 作為服務端框架。
準備工作
首先我們要把 Nest.js 服務端跑起來,并且支持 api 接口、靜態頁面。
Nest.js 創建一個 crud 服務是非常快的,只需要這么幾步:
- 安裝 @nest/cli,使用 nest new xxx 創建一個 Nest.js 的項目,
- 在根目錄執行 nest g resource person 快速生成 person 模塊的 crud 代碼
- npm run start 啟動 Nest.js 服務
這樣一個有 person 的 crud 接口的服務就跑起來了,是不是非常快。
服務跑起來以后是這樣的
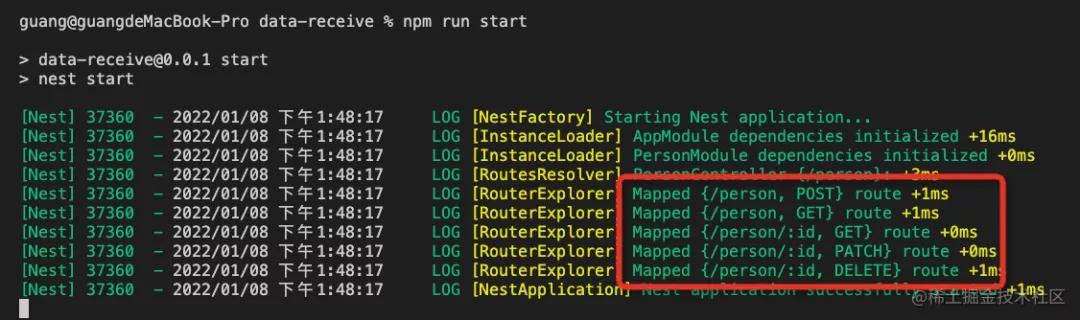
打印出了有哪些接口可以用,可以在 postman 或者瀏覽器來測試下:
api 接口跑通了,再支持下靜態資源的訪問:
main.ts 是負責啟動 Nest.js 的 ioc 容器的,在腳手架生成的代碼的基礎上,調用下 useStaticAssets 就可以支持靜態資源的請求。
- async function bootstrap() {
- const app = await NestFactory.create<NestExpressApplication>(AppModule);
- app.useStaticAssets(join(__dirname, '..', 'public'), { prefix: '/static'});
- await app.listen(3000);
- }
- bootstrap();
我們指定 prefix 為 static,然后再靜態文件目錄 public 下添加一個 html:
- <html>
- <body>hello</body>
- </html>
重啟服務,然后瀏覽器訪問下試試:
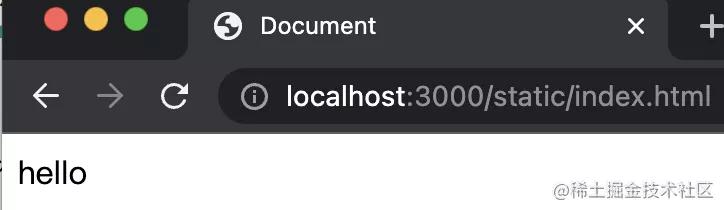
api 接口和靜態資源的訪問都支持了,接下來就分別實現下 5 種前后端 http 數據傳輸的方式吧。
url param
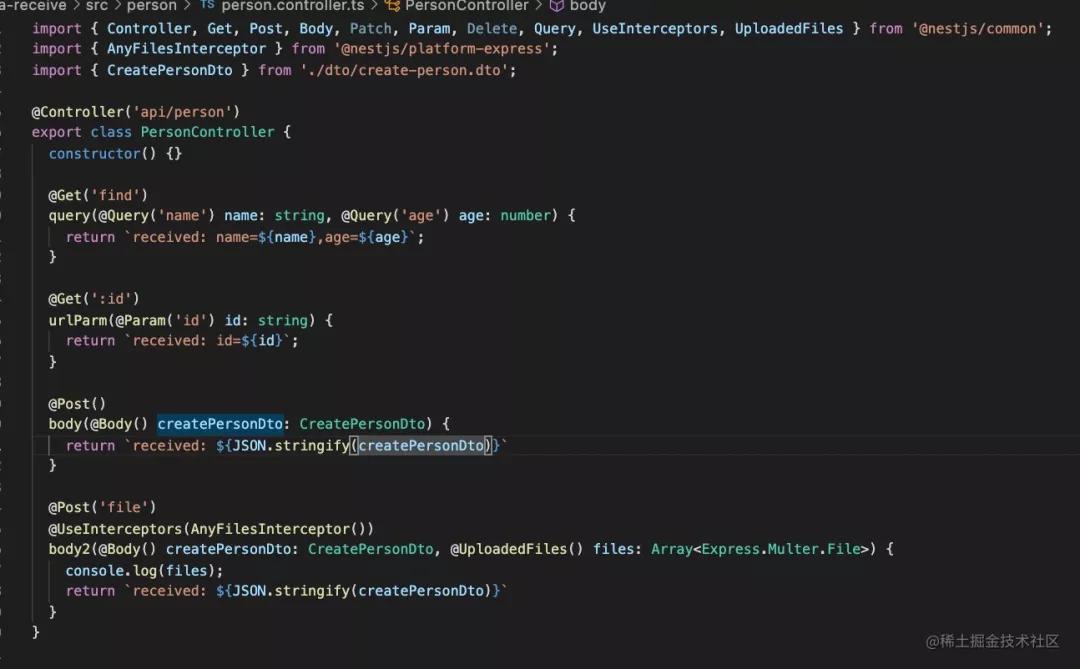
url param 是 url 中的參數,Nest.js 里通過 :參數名 的方式來聲明,然后通過 @Param(參數名) 的裝飾器取出來注入到 controller:
- @Controller('api/person')
- export class PersonController {
- @Get(':id')
- urlParm(@Param('id') id: string) {
- return `received: id=${id}`;
- }
- }
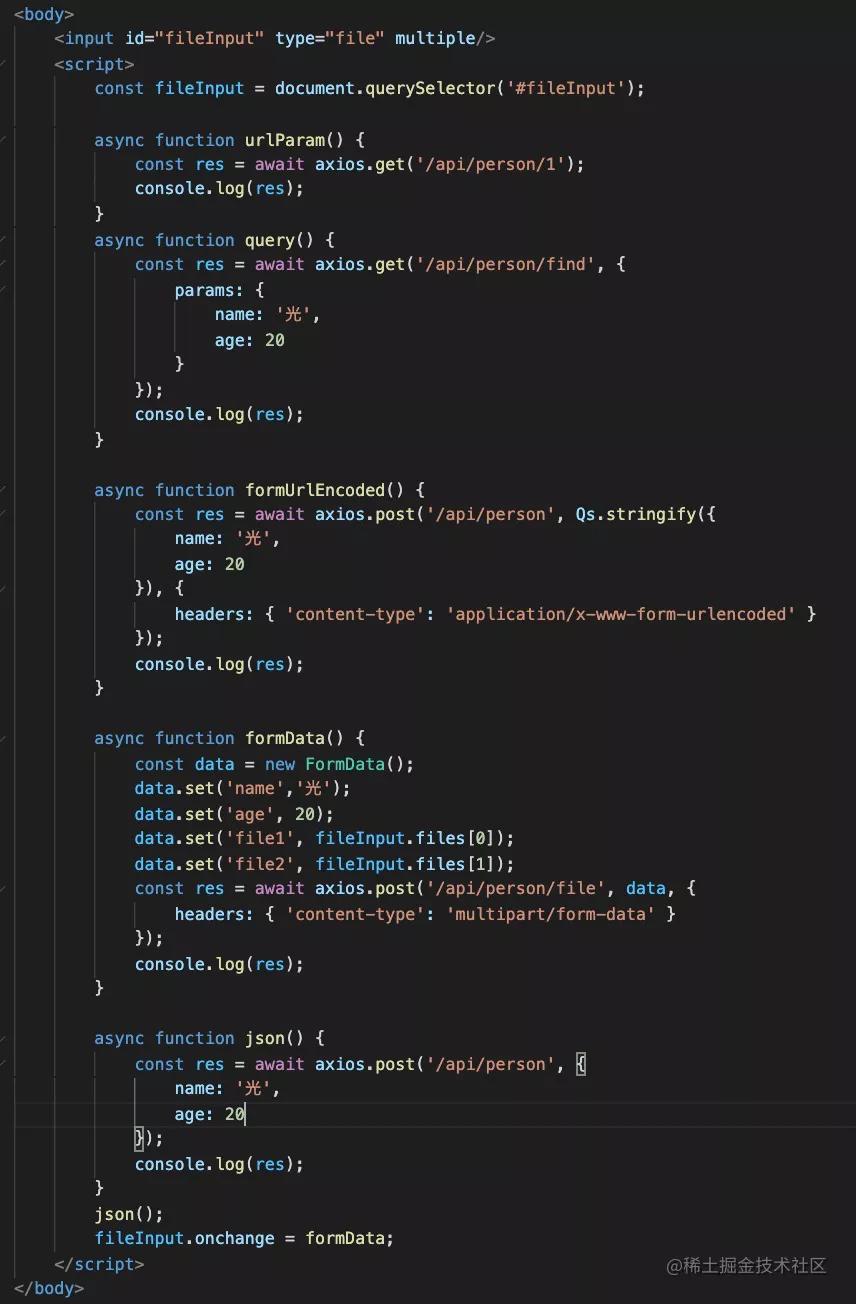
前端代碼就是一個 get 方法,參數放在 url 里:
- <!DOCTYPE html>
- <html lang="en">
- <head>
- <script src="https://unpkg.com/axios@0.24.0/dist/axios.min.js"></script>
- </head>
- <body>
- <script>
- async function urlParam() {
- const res = await axios.get('/api/person/1');
- console.log(res);
- }
- urlParam();
- </script>
- </body>
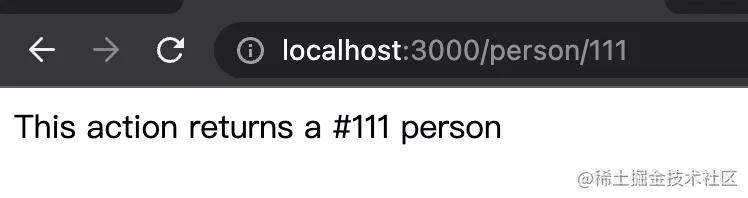
啟動服務,在瀏覽器訪問下:
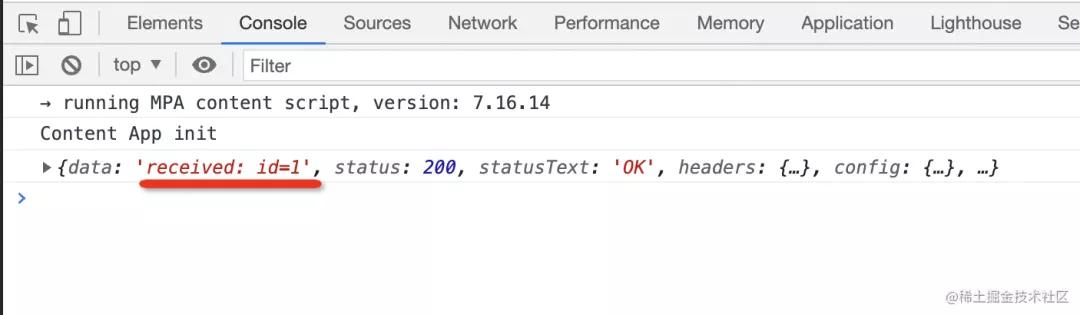
控制臺打印了服務端返回的消息,證明服務端拿到了通過 url param 傳遞的數據。
通過 url 傳遞數據的方式除了 url param 還有 query:
query
query 是 url 中 ? 后的字符串,需要做 url encode。
在 Nest.js 里,通過 @Query 裝飾器來取:
- @Controller('api/person')
- export class PersonController {
- @Get('find')
- query(@Query('name') name: string, @Query('age') age: number) {
- return `received: name=${name},age=${age}`;
- }
- }
前端代碼同樣是通過 axios 發送一個 get 請求:
- <!DOCTYPE html>
- <html lang="en">
- <head>
- <script src="https://unpkg.com/axios@0.24.0/dist/axios.min.js"></script>
- </head>
- <body>
- <script>
- async function query() {
- const res = await axios.get('/api/person/find', {
- params: {
- name: '光',
- age: 20
- }
- });
- console.log(res);
- }
- query();
- </script>
- </body>
- </html>
參數通過 params 指定,axios 會做 url encode,不需要自己做。
然后測試下:

服務端成功接受了我們通過 query 傳遞的數據。
上面兩種(url param、query)是通過 url 傳遞數據的方式,下面 3 種是通過 body 傳遞數據。
html urlencoded
html urlencoded 是通過 body 傳輸數據,其實是把 query 字符串放在了 body 里,所以需要做 url encode:
用 Nest.js 接收的話,使用 @Body 裝飾器,Nest.js 會解析請求體,然后注入到 dto 中。
dto 是 data transfer object,就是用于封裝傳輸的數據的對象:
- export class CreatePersonDto {
- name: string;
- age: number;
- }
- import { CreatePersonDto } from './dto/create-person.dto';
- @Controller('api/person')
- export class PersonController {
- @Post()
- body(@Body() createPersonDto: CreatePersonDto) {
- return `received: ${JSON.stringify(createPersonDto)}`
- }
- }
前端代碼使用 post 方式請求,指定 content type 為 application/x-www-form-urlencoded,用 qs 做下 url encode:
- <!DOCTYPE html>
- <html lang="en">
- <head>
- <script src="https://unpkg.com/axios@0.24.0/dist/axios.min.js"></script>
- <script src="https://unpkg.com/qs@6.10.2/dist/qs.js"></script>
- </head>
- <body>
- <script>
- async function formUrlEncoded() {
- const res = await axios.post('/api/person', Qs.stringify({
- name: '光',
- age: 20
- }), {
- headers: { 'content-type': 'application/x-www-form-urlencoded' }
- });
- console.log(res);
- }
- formUrlEncoded();
- </script>
- </body>
- </html>
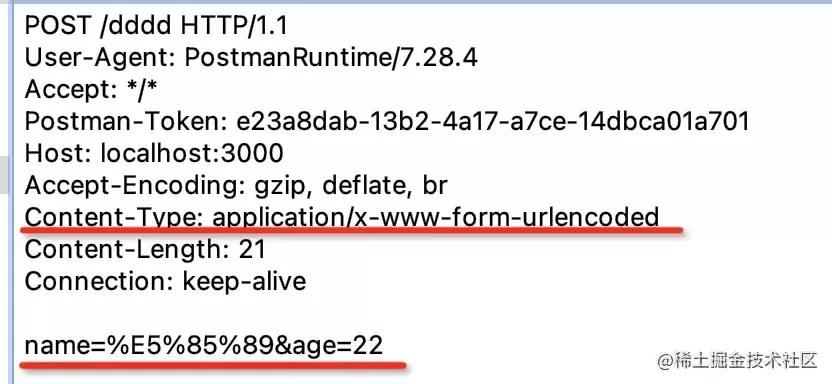
測試下:
服務端成功的接收到了數據。
其實比起 form urlencoded,使用 json 來傳輸更常用一些:
json
json 需要指定 content-type 為 application/json,內容會以 JSON 的方式傳輸:
后端代碼同樣使用 @Body 來接收,不需要做啥變動。form urlencoded 和 json 都是從 body 取值,Nest.js 內部會根據 content type 做區分,使用不同的解析方式。
- @Controller('api/person')
- export class PersonController {
- @Post()
- body(@Body() createPersonDto: CreatePersonDto) {
- return `received: ${JSON.stringify(createPersonDto)}`
- }
- }
前端代碼使用 axios 發送 post 請求,默認傳輸 json 就會指定 content type 為 application/json,不需要手動指定:
- <!DOCTYPE html>
- <html lang="en">
- <head>
- <script src="https://unpkg.com/axios@0.24.0/dist/axios.min.js"></script>
- </head>
- <body>
- <script>
- async function json() {
- const res = await axios.post('/api/person', {
- name: '光',
- age: 20
- });
- console.log(res);
- }
- json();
- </script>
- </body>
- </html>
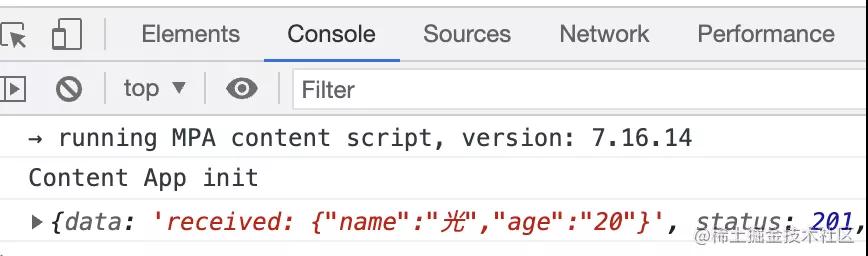
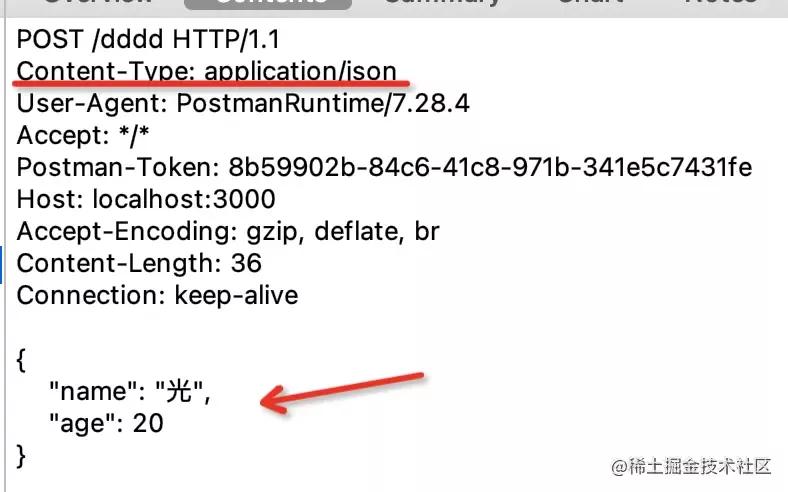
測試下:
服務端成功接收到了通過 json 傳遞的數據。
json 和 form urlencoded 都不適合傳遞文件,想傳輸文件要用 form data:
form data
form data 是用 -------- 作為 boundary 分隔傳輸的內容的:

Nest.js 解析 form data 使用 FilesInterceptor 的攔截器,用 @UseInterceptors 裝飾器啟用,然后通過 @UploadedFiles 來取。非文件的內容,同樣是通過 @Body 來取。
- import { AnyFilesInterceptor } from '@nestjs/platform-express';
- import { CreatePersonDto } from './dto/create-person.dto';
- @Controller('api/person')
- export class PersonController {
- @Post('file')
- @UseInterceptors(AnyFilesInterceptor())
- body2(@Body() createPersonDto: CreatePersonDto, @UploadedFiles() files: Array<Express.Multer.File>) {
- console.log(files);
- return `received: ${JSON.stringify(createPersonDto)}`
- }
- }
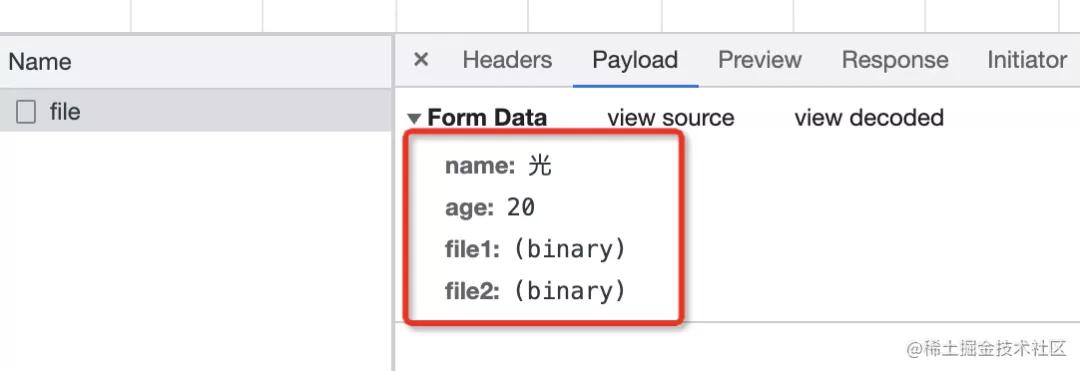
前端代碼使用 axios 發送 post 請求,指定 content type 為 multipart/form-data:
- <!DOCTYPE html>
- <html lang="en">
- <head>
- <script src="https://unpkg.com/axios@0.24.0/dist/axios.min.js"></script>
- </head>
- <body>
- <input id="fileInput" type="file" multiple/>
- <script>
- const fileInput = document.querySelector('#fileInput');
- async function formData() {
- const data = new FormData();
- data.set('name','光');
- data.set('age', 20);
- data.set('file1', fileInput.files[0]);
- data.set('file2', fileInput.files[1]);
- const res = await axios.post('/api/person/file', data, {
- headers: { 'content-type': 'multipart/form-data' }
- });
- console.log(res);
- }
- fileInput.onchange = formData;
- </script>
- </body>
- </html>
file input 指定 multiple 可以選擇多個文件。
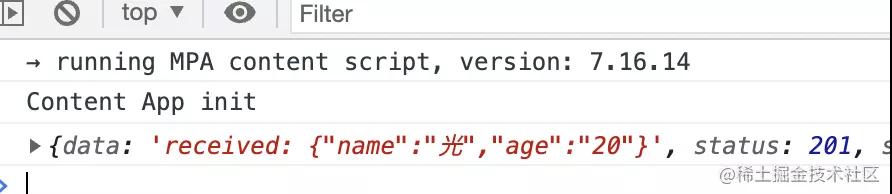
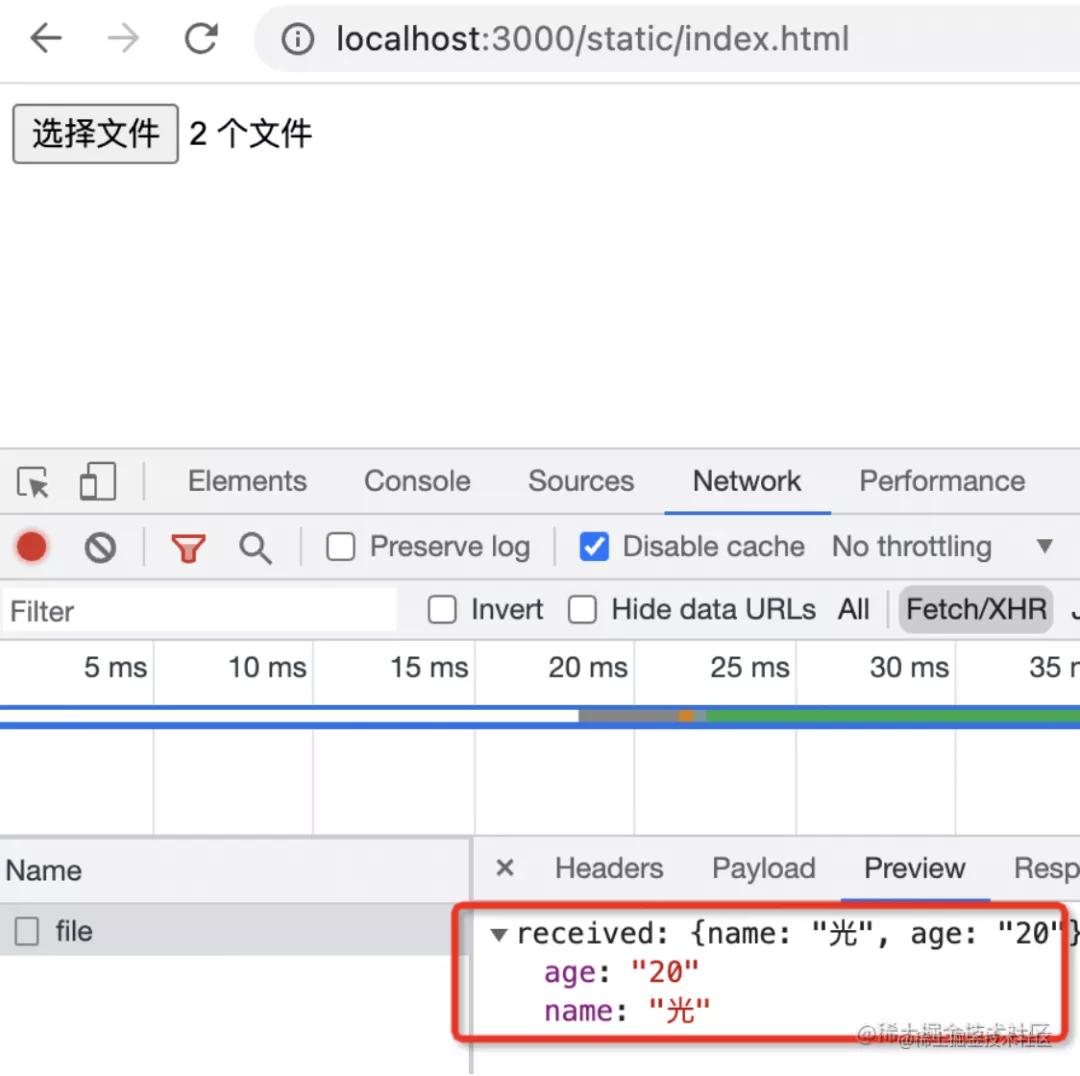
測試下:
服務端接收到了 name 和 age:
去服務器控制臺看下:
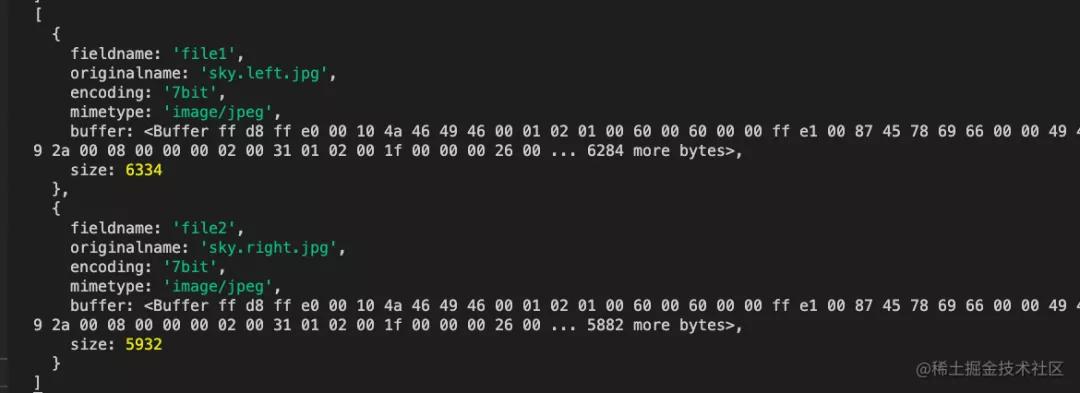
可以看到,服務器成功的接收到了我們上傳的文件。
全部代碼上傳到了 github:https://github.com/QuarkGluonPlasma/nestjs-exercize
總結
我們用 axios 發送請求,使用 Nest.js 起后端服務,實現了 5 種 http/https 的數據傳輸方式:
其中前兩種是 url 中的:
url param:url 中的參數,Nest.js 中使用 @Param 來取
query:url 中 ? 后的字符串,Nest.js 中使用 @Query 來取
后三種是 body 中的:
form urlencoded:類似 query 字符串,只不過是放在 body 中。Nest.js 中使用 @Body 來取,axios 中需要指定 content type 為 application/x-www-form-urlencoded,并且對數據用 qs 做 url encode
json:json 格式的數據。Nest.js 中使用 @Body 來取,axios 中不需要單獨指定 content type,axios 內部會處理。
form data:通過 ----- 作為 boundary 分隔的數據。主要用于傳輸文件,Nest.js 中要使用 FilesInterceptor 來處理,用 @UseInterceptors 來啟用。其余部分用 @Body 來取。axios 中需要指定 content type 為 multipart/form-data,并且用 FormData 對象來封裝傳輸的內容。
這 5 種 http/https 的傳輸數據的方式覆蓋了絕大多數開發場景,如果你想進階全棧,能夠提供這 5 種接口是首先要做到的。