APISIX Ingress 高級使用之 Url Rewrite

前面我們了解了 APISIX Ingress 的基本使用,同樣我們來介紹下如何使用 APISIX 來實現 URL Rewrite 操作,還是以前面測試用過的 Nexus 應用為例進行說明,通過 ApisixRoute 對象來配置服務路由,對應的資源清單如下所示:
- # nexus.yaml
- apiVersion: apps/v1
- kind: Deployment
- metadata:
- name: nexus
- labels:
- app: nexus
- spec:
- selector:
- matchLabels:
- app: nexus
- template:
- metadata:
- labels:
- app: nexus
- spec:
- containers:
- - image: cnych/nexus:3.20.1
- imagePullPolicy: IfNotPresent
- name: nexus
- ports:
- - containerPort: 8081
- ---
- apiVersion: v1
- kind: Service
- metadata:
- labels:
- app: nexus
- name: nexus
- spec:
- ports:
- - name: nexusport
- port: 8081
- targetPort: 8081
- selector:
- app: nexus
- ---
- apiVersion: apisix.apache.org/v2beta2
- kind: ApisixRoute
- metadata:
- name: nexus
- namespace: default
- spec:
- http:
- - name: root
- match:
- hosts:
- - ops.qikqiak.com
- paths:
- - "/*"
- backends:
- - serviceName: nexus
- servicePort: 8081
直接創建上面的資源對象即可:
- ➜ kubectl apply -f nexus.yaml
- ➜ kubectl get apisixroute
- NAME HOSTS URIS AGE
- nexus ["ops.qikqiak.com"] ["/*"] 39s
- ➜ kubectl get pods -l app=nexus
- NAME READY STATUS RESTARTS AGE
- nexus-6f78b79d4c-b79r4 1/1 Running 0 48s
- ➜ kubectl get svc -l app=nexus
- NAME TYPE CLUSTER-IP EXTERNAL-IP PORT(S) AGE
- nexus ClusterIP 10.102.53.243 <none> 8081/TCP 58s
部署完成后,我們根據 ApisixRoute 對象中的配置,只需要將域名 ops.qikqiak.com 解析到 node2 節點(上面通過 port-forward 暴露了 80 端口)即可訪問:
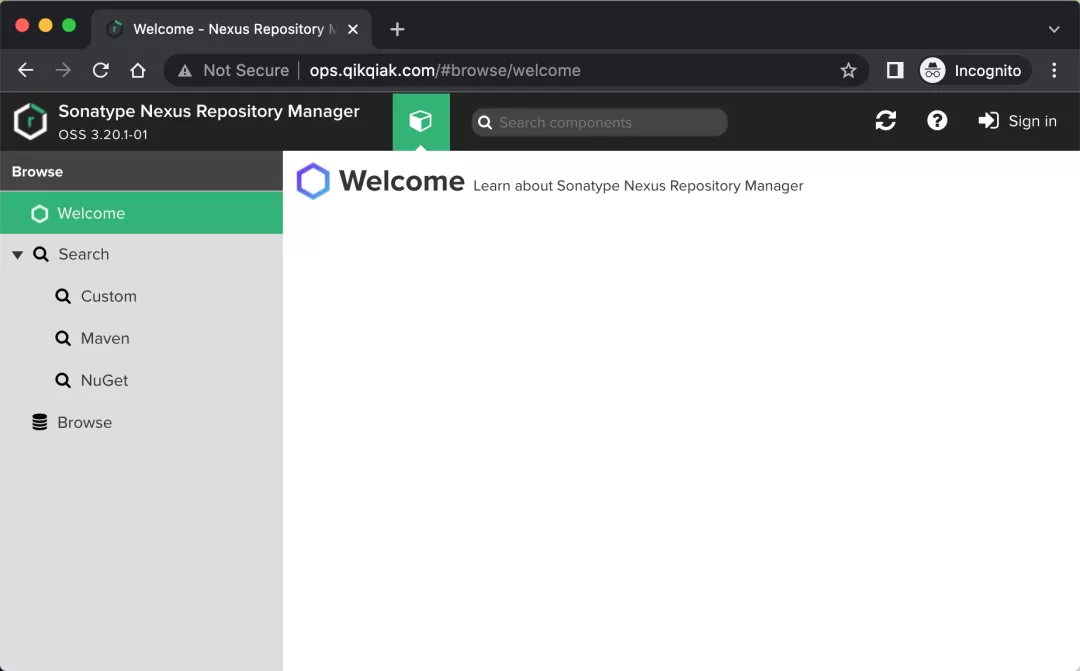
url rewrite
同樣如果現在需要通過一個子路徑來訪問 Nexus 應用的話又應該怎么來實現呢?比如通過 http://ops.qikqiak.com/nexus 來訪問我們的應用,首先我們肯定需要修改 ApisixRoute 對象中匹配的 paths 路徑,將其修改為 /nexus:
- apiVersion: apisix.apache.org/v2beta2
- kind: ApisixRoute
- metadata:
- name: nexus
- namespace: default
- spec:
- http:
- - name: root
- match:
- hosts:
- - ops.qikqiak.com
- paths:
- - "/nexus*"
- backends:
- - serviceName: nexus
- servicePort: 8081
更新后我們可以通過 http://ops.qikqiak.com/nexus 訪問應用:
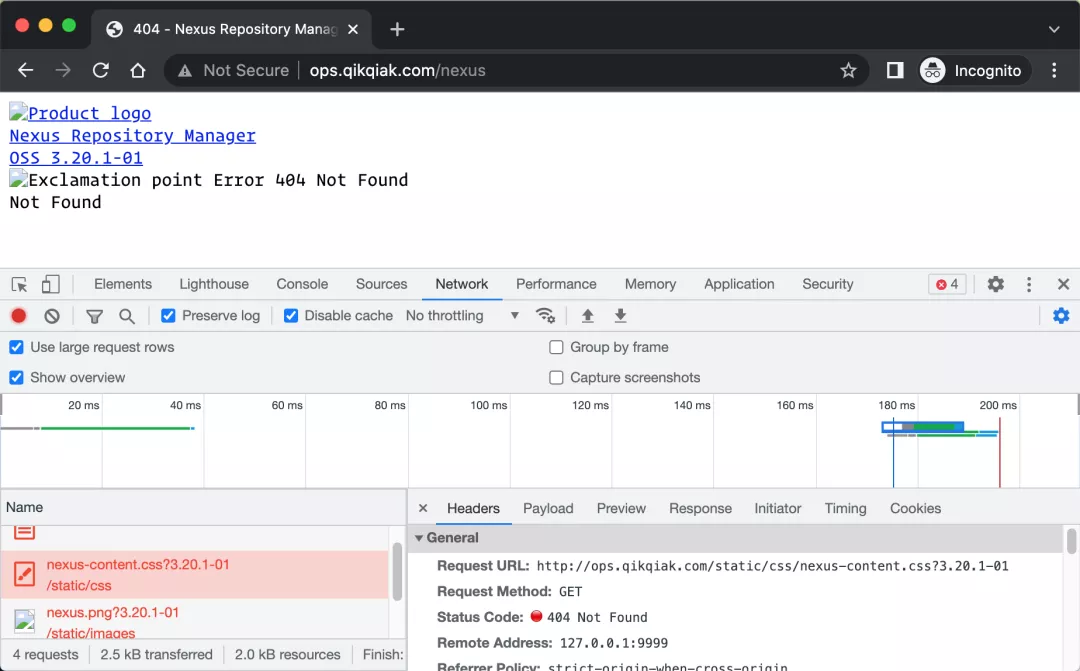
仔細分析發現很多靜態資源404了,這是因為現在我們只匹配了 /nexus 的請求,而我們的靜態資源是 /static 路徑開頭的,當然就匹配不到了,所以就出現了404,所以我們只需要加上這個 /static 路徑的匹配就可以了,同樣更新 ApisixRoute 對象,新增 /static/* 路徑支持:
- apiVersion: apisix.apache.org/v2beta2
- kind: ApisixRoute
- metadata:
- name: nexus
- namespace: default
- spec:
- http:
- - name: root
- match:
- hosts:
- - ops.qikqiak.com
- paths:
- - "/nexus*"
- - "/static/*"
- backends:
- - serviceName: nexus
- servicePort: 8081
更新后發現雖然靜態資源可以正常訪問了,但是當我們訪問 http://ops.qikqiak.com/nexus 的時候依然會出現 404 錯誤。
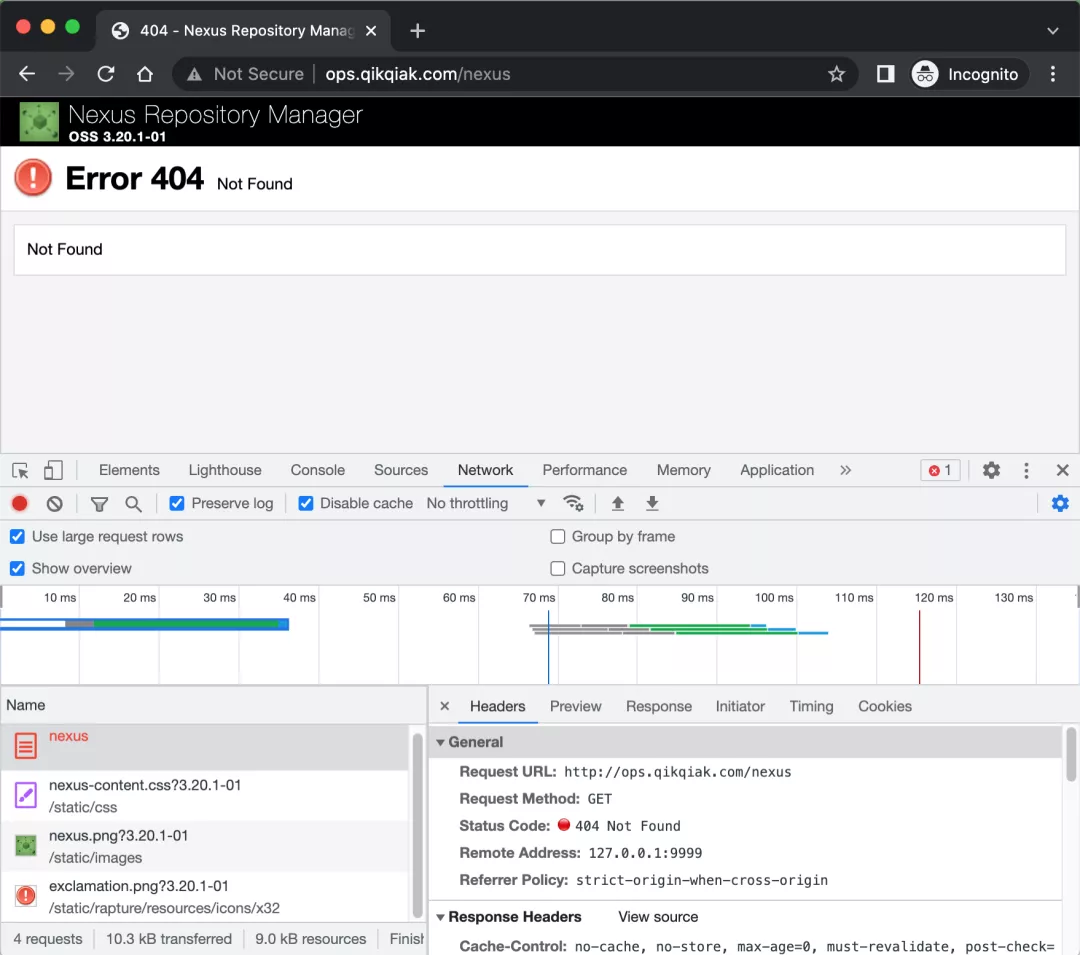
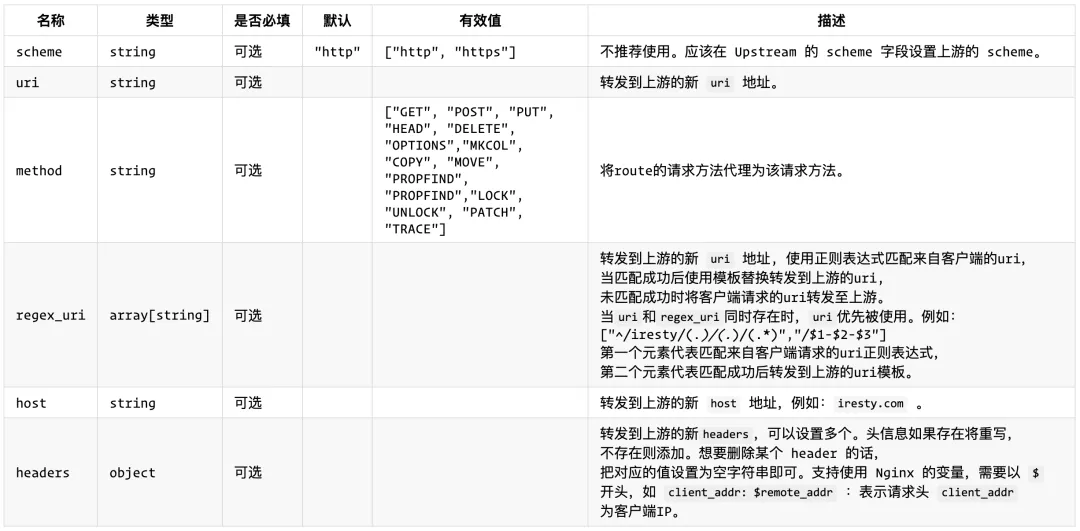
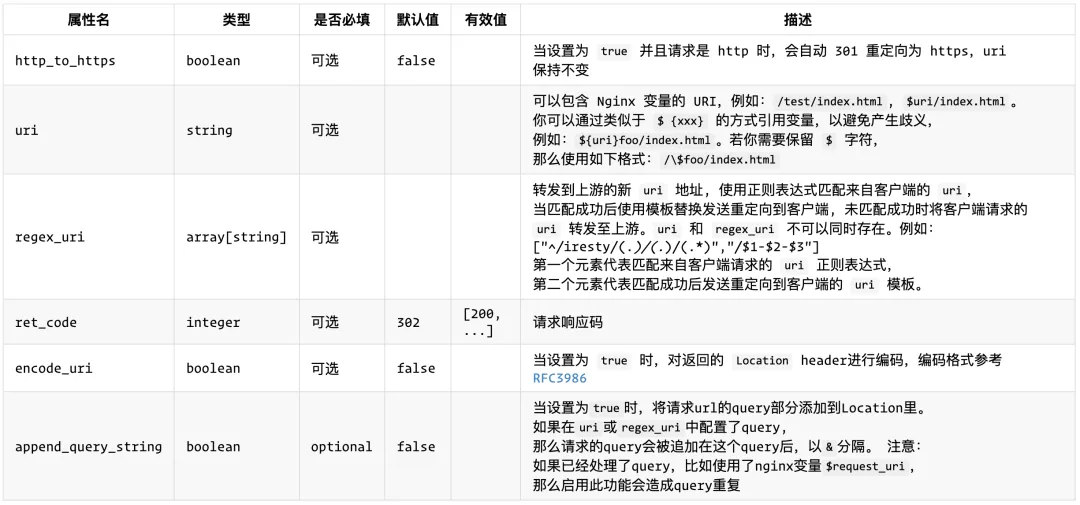
這是因為我們這里是將 /nexus 路徑的請求直接路由到后端服務去了,而后端服務沒有對該路徑做任何處理,所以也就是404的響應了,在之前 ingress-nginx 或者 traefik 中我們是通過 url 重寫來實現的,而在 APISIX 中同樣可以實現這個處理,相當于在請求在真正到達上游服務之前將請求的 url 重寫到根目錄就可以了,這里我們需要用到 proxy-rewrite 這個插件(需要確保在安裝的時候已經包含了該插件),proxy-rewrite 是上游代理信息重寫插件,支持對 scheme、uri、host 等信息的重寫,該插件可配置的屬性如下表所示:
我們現在的需求是希望將所有 /nexus 下面的請求都重寫到根路徑 / 下面去,所以我們應該使用 regex_uri 屬性,轉發到上游的新 uri 地址, 使用正則表達式匹配來自客戶端的 uri,當匹配成功后使用模板替換轉發到上游的 uri, 未匹配成功時將客戶端請求的uri 轉發至上游,重新修改后的 ApisixRoute 對象如下所示,新增 plugins 屬性來配置插件:
- apiVersion: apisix.apache.org/v2beta2
- kind: ApisixRoute
- metadata:
- name: nexus
- namespace: default
- spec:
- http:
- - name: root
- match:
- hosts:
- - ops.qikqiak.com
- paths:
- - "/nexus*"
- - "/static/*"
- plugins:
- - name: proxy-rewrite
- enable: true
- config:
- regex_uri: ["^/nexus(/|$)(.*)", "/$2"]
- backends:
- - serviceName: nexus
- servicePort: 8081
這里我們啟用一個 proxy-rewrite 插件,并且將所有 /nexus 路徑的請求都重寫到了 / 跟路徑下,重新更新后再次訪問 http://ops.qikqiak.com/nexus 應該就可以正常訪問了:
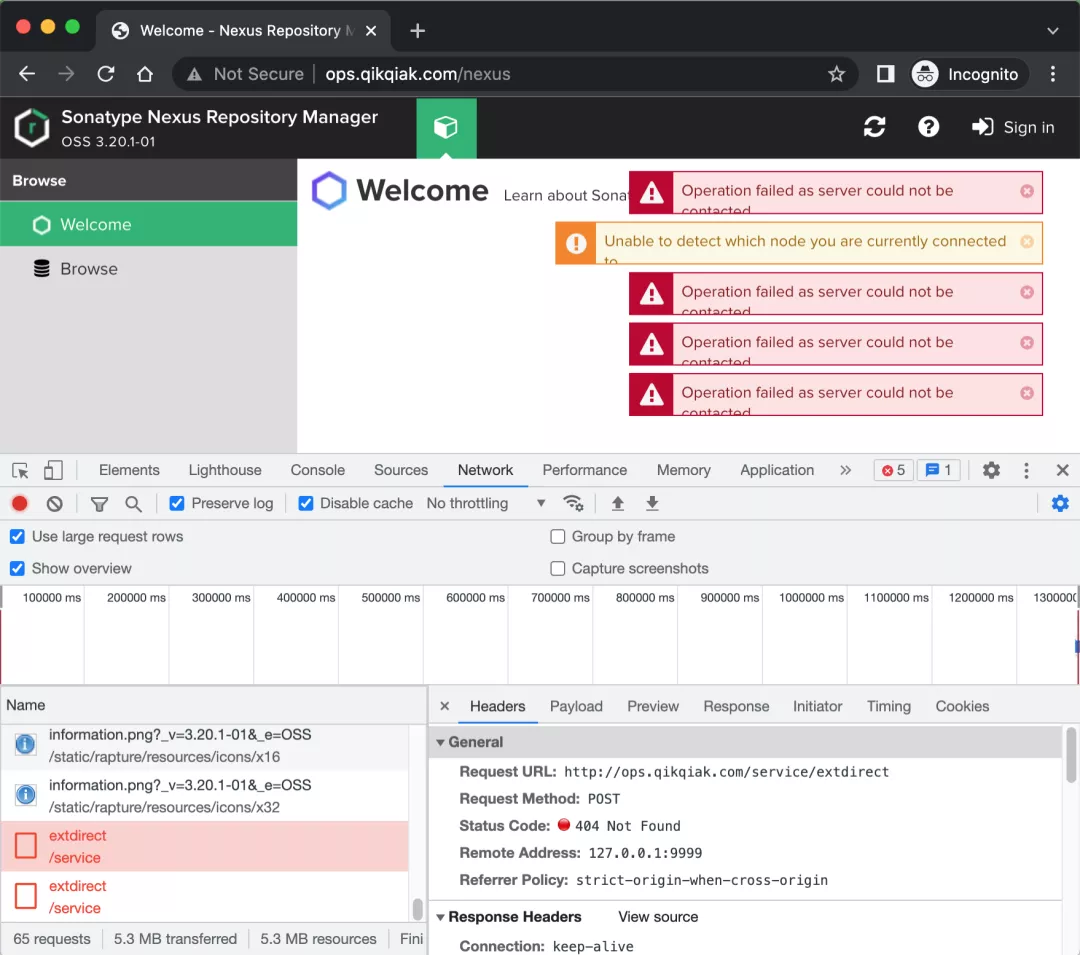
只有最后一個小問題了,從瀏覽器網絡請求中可以看出我們沒有去匹配 /service 這個路徑的請求,只需要配置上該路徑即可,如下所示:
- apiVersion: apisix.apache.org/v2beta2
- kind: ApisixRoute
- metadata:
- name: nexus
- namespace: default
- spec:
- http:
- - name: root
- match:
- hosts:
- - ops.qikqiak.com
- paths:
- - "/nexus*"
- - "/static/*"
- - "/service/*"
- plugins:
- - name: proxy-rewrite
- enable: true
- config:
- regex_uri: ["^/nexus(/|$)(.*)", "/$2"]
- backends:
- - serviceName: nexus
- servicePort: 8081
現在重新訪問子路徑就完成正常了:
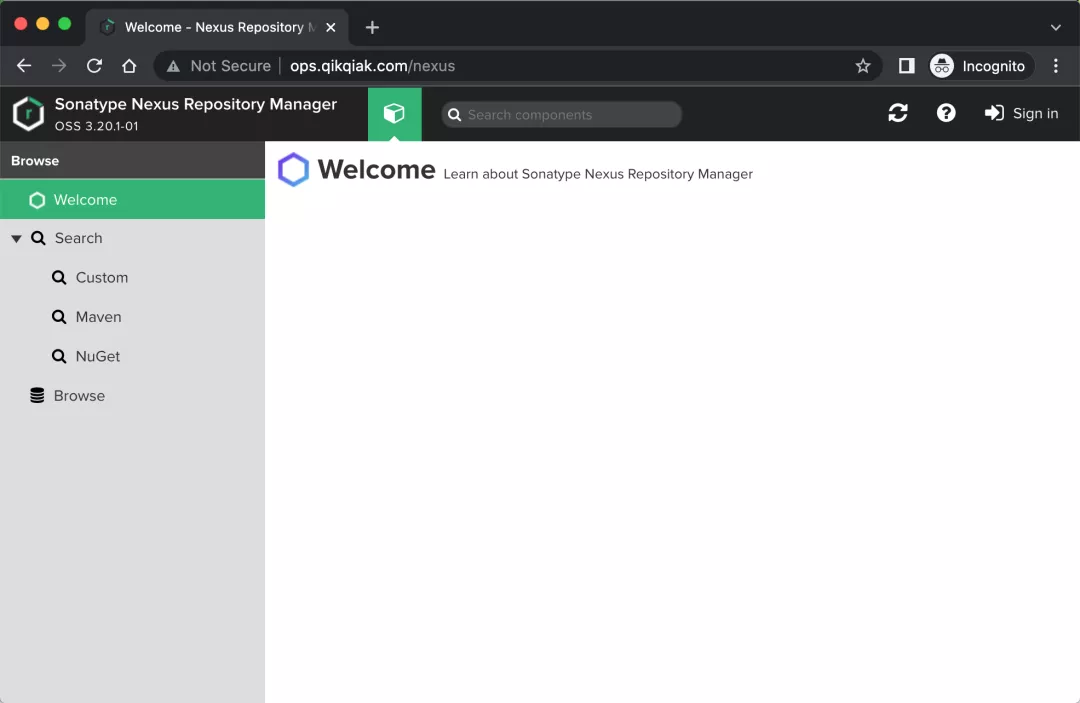
redirect
現在當我們訪問 http://ops.qikqiak.com/nexus 或者 http://ops.qikqiak.com/nexus/ 的時候都可以得到正常的結果,一般來說我們可能希望能夠統一訪問路徑,比如訪問 /nexus 子路徑的時候可以自動跳轉到 /nexus/ 以 Splash 結尾的路徑上去。同樣要實現該需求我們只需要使用一個名為 redirect 的插件即可,該插件是 URI 重定向插件,可配置的屬性如下所示:
要實現我們的需求直接使用 regex_uri 這個屬性即可,只需要去匹配 /nexus 的請求,然后進行跳轉即可,更新 ApisixRoute 對象:
- apiVersion: apisix.apache.org/v2beta2
- kind: ApisixRoute
- metadata:
- name: nexus
- namespace: default
- spec:
- http:
- - name: root
- match:
- hosts:
- - ops.qikqiak.com
- paths:
- - "/nexus*"
- - "/static/*"
- - "/service/*"
- plugins:
- - name: proxy-rewrite
- enable: true
- config:
- regex_uri: ["^/nexus(/|$)(.*)", "/$2"]
- - name: redirect
- enable: true
- config:
- regex_uri: ["^(/nexus)$", "$1/"]
- backends:
- - serviceName: nexus
- servicePort: 8081
我們新啟用了一個 redirect 插件,并配置 regex_uri: ["^(/nexus)$", "$1/"],這樣當訪問 /nexus 的時候會自動跳轉到 /nexus/ 路徑下面去。
同樣如果我們想要重定向到 https,只需要在該插件下面設置 config.http_to_https=true 即可:
- # ... 其他部分省略
- - name: redirect
- enable: true
- config:
- http_to_https: true
tls
通過使用上面的 redirect 插件配置 http_to_https 可以將請求重定向到 https 上去,但是我們現在并沒有對我們的 ops.qikqiak.com 配置 https 證書,這里我們就需要使用 ApisixTls 對象來進行證書管理。
我們先使用 openssl 創建一個自簽名的證書,當然你有正規 CA 機構購買的證書的話直接將證書下載下來使用即可:
- ➜ openssl req -x509 -nodes -days 365 -newkey rsa:2048 -keyout tls.key -out tls.crt -subj "/CN=ops.qikqiak.com"
然后通過 Secret 對象來引用上面創建的證書文件:
- # 要注意證書文件名稱必須是 tls.crt 和 tls.key
- ➜ kubectl create secret tls ops-tls --cert=tls.crt --key=tls.key
然后就可以創建一個 ApisixTls 資源對象,引用上面的 Secret 即可:
- apiVersion: apisix.apache.org/v1
- kind: ApisixTls
- metadata:
- name: ops-tls
- spec:
- hosts:
- - ops.qikqiak.com
- secret:
- name: ops-tls
- namespace: default
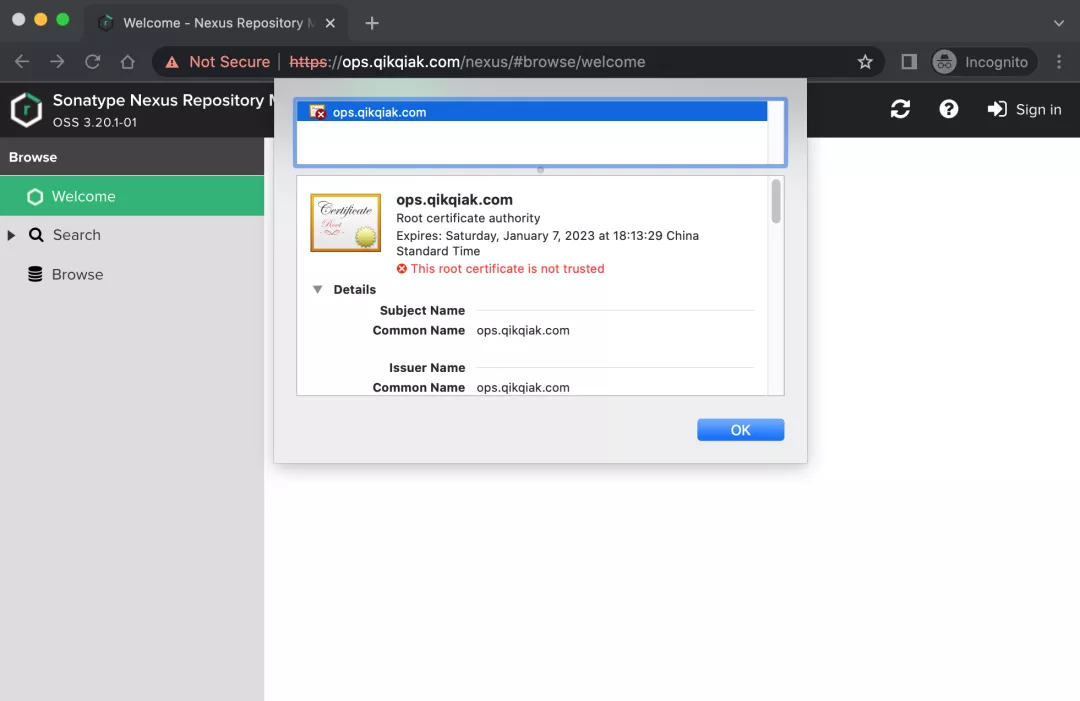
同時 APISIX TLS 還可以配置 spec.client,用于進行 mTLS 雙向認證的配置。上面的資源對象創建完成后,即可訪問 https 服務了(chrome 瀏覽器默認會限制不安全的證書,只需要在頁面上輸入 thisisunsafe 即可訪問了):
而且當訪問 http 的時候也會自動跳轉到 https 上面去,此外我們還可以結合 cert-manager 來實現自動化的 https。
完整的資源對象如下所示:
- apiVersion: apisix.apache.org/v2beta2
- kind: ApisixRoute
- metadata:
- name: nexus
- namespace: default
- spec:
- http:
- - name: root
- match:
- hosts:
- - ops.qikqiak.com
- paths:
- - "/nexus*"
- - "/static/*"
- - "/service/*"
- plugins:
- - name: proxy-rewrite
- enable: true
- config:
- regex_uri: ["^/nexus(/|$)(.*)", "/$2"]
- - name: redirect
- enable: true
- config:
- regex_uri: ["^(/nexus)$", "$1/"]
- - name: redirect
- enable: true
- config:
- http_to_https: true
- backends:
- - serviceName: nexus
- servicePort: 8081
- ---
- apiVersion: apisix.apache.org/v1
- kind: ApisixTls
- metadata:
- name: ops-tls
- spec:
- hosts:
- - ops.qikqiak.com
- secret:
- name: ops-tls
- namespace: default
關于 APISIX Ingress 更多高級用法請繼續關注后續文章。