使用 Python 自定義 APISIX 插件

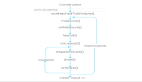
除了 APISIX 官方內置的插件之外,我們也可以根據自己的需求去自定義插件,要自定義插件需要使用到 APISIX 提供的 Runner,目前已經支持 Java、Go 和 Python 語言的 Runner,這個 Runner 相當于是 APISIX 和自定義插件之間的橋梁,比如 apache-apisix-python-runner 這個項目通過 Python Runner 可以把 Python 直接應用到 APISIX 的插件開發中,整體架構如下所示:

其中的 Plugin Runner 就是各語言的插件運行器,當配置 Plugin Runner 后,APISIX 會啟動一個子進程運行 Plugin Runner,該子進程與 APISIX 進程屬于同一個用戶,當我們重啟或重新加載 APISIX 時,Plugin Runner 也將被重啟。
如果你為一個給定的路由配置了 ext-plugin-* 插件,請求命中該路由時將觸發 APISIX 通過 Unix Socket 向 Plugin Runner 發起 RPC 調用。調用分為兩個階段:
- ext-plugin-pre-req:在執行 APISIX 內置插件之前
- ext-plugin-post-req:在執行 APISIX 內置插件之后
接下來我們就以 Python 為例來說明如何自定義插件,首先獲取 apache-apisix-python-runner 項目:
- ➜ git clone https://github.com/apache/apisix-python-plugin-runner.git
- ➜ cd apisix-python-plugin-runner
- ➜ git checkout 0.1.0 # 切換刀0.1.0版本
如果是開發模式,則我們可以直接使用下面的命令啟動 Python Runner:
- ➜ APISIX_LISTEN_ADDRESS=unix:/tmp/runner.sock python3 apisix/main.py start
啟動后需要在 APISIX 配置文件中新增外部插件配置,如下所示:
- ➜ vim /path/to/apisix/conf/config.yaml
- apisix:
- admin_key:
- - name: "admin"
- key: edd1c9f034335f136f87ad84b625c8f1
- role: admin
- ext-plugin:
- path_for_test: /tmp/runner.sock
通過 ext-plugin.path_for_test 指定 Python Runner 的 unix socket 文件路徑即可,如果是生產環境則可以通過 ext-plugin.cmd 來指定 Runner 的啟動命令即可:
- ext-plugin:
- cmd: [ "python3", "/path/to/apisix-python-plugin-runner/apisix/main.py", "start" ]
我們這里的 APISIX 是運行 Kubernetes 集群中的,所以要在 APISIX 的 Pod 中去執行 Python Runner 的代碼,我們自然需要將我們的 Python 代碼放到 APISIX 的容器中去,然后安裝自定義插件的相關依賴,直接在 APISIX 配置文件中添加上面的配置即可,所以我們這里基于 APISIX 的鏡像來重新定制包含插件的鏡像,在 apisix-python-plugin-runner 項目根目錄下新增如下所示的 Dockerfile 文件:
- FROM apache/apisix:2.10.0-alpine
- ADD . /apisix-python-plugin-runner
- RUN apk add --update python3 py3-pip && \
- cd /apisix-python-plugin-runner && \
- python3 -m pip install --upgrade pip && \
- python3 -m pip install -r requirements.txt --ignore-installed && \
- python3 setup.py install --force
基于上面 Dockerfile 構建一個新的鏡像,推送到 Docker Hub:
- ➜ docker build -t cnych/apisix:py3-plugin-2.10.0-alpine .
- # 推送到DockerHub
- ➜ docker push cnych/apisix:py3-plugin-2.10.0-alpine
接下來我們需要使用上面構建的鏡像來安裝 APISIX,我們這里使用的是 Helm Chart 進行安裝的,所以需要通過 Values 文件進行覆蓋,如下所示:
- # ci/prod.yaml
- apisix:
- enabled: true
- image:
- repository: cnych/apisix
- tag: py3-plugin-2.10.0-alpine
- ......
由于官方的 Helm Chart 沒有提供對 ext-plugin 配置的支持,所以需要我們手動修改模板文件 templates/configmap.yaml,在 apisix 屬性同級目錄下面新增 ext-plugin 相關配置,如下所示:
- {{- if .Values.extPlugins.enabled }}
- ext-plugin:
- {{- if .Values.extPlugins.pathForTest }}
- path_for_test: {{ .Values.extPlugins.pathForTest }}
- {{- end }}
- {{- if .Values.extPlugins.cmds }}
- cmd:
- {{- range $cmd := .Values.extPlugins.cmds }}
- - {{ $cmd }}
- {{- end }}
- {{- end }}
- {{- end }}
- nginx_config:
- user: root # fix 執行 python runner沒權限的問題
然后在定制的 Values 文件中添加如下所示的配置:
- # ci/prod.yaml
- extPlugins:
- enabled: true
- cmds: ["python3", "/apisix-python-plugin-runner/apisix/main.py", "start"]
接著就可以重新部署 APISIX 了:
- ➜ helm upgrade --install apisix ./apisix -f ./apisix/ci/prod.yaml -n apisix
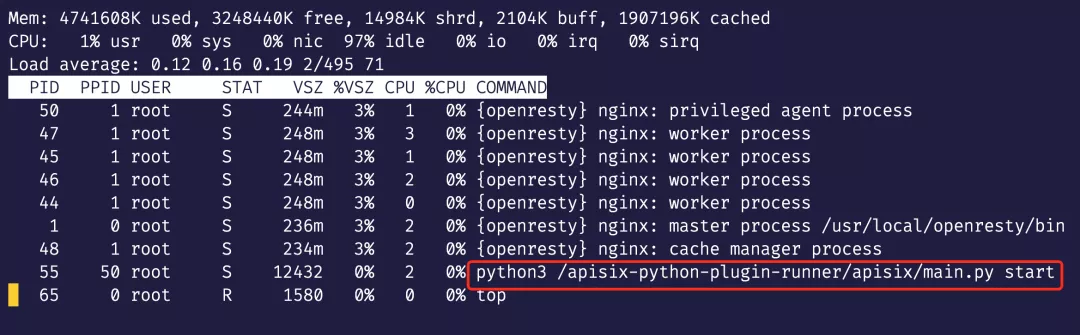
部署完成后在 APISIX 的 Pod 中可以看到會啟動一個 Python Runner 的子進程:
在插件目錄 /apisix-python-plugin-runner/apisix/plugins 中的 .py 文件都會被自動加載,上面示例中有兩個插件 stop.py 和 rewrite.py,我們以 stop.py 為例進行說明,該插件代碼如下所示:
- from apisix.runner.plugin.base import Base
- from apisix.runner.http.request import Request
- from apisix.runner.http.response import Response
- class Stop(Base):
- def __init__(self):
- super(Stop, self).__init__(self.__class__.__name__)
- def filter(self, request: Request, response: Response):
- # 可以通過 `self.config` 獲取配置信息,如果插件配置為JSON將自動轉換為字典結構
- # print(self.config)
- # 設置響應 Header 頭
- response.headers["X-Resp-A6-Runner"] = "Python"
- # 設置響應body
- response.body = "Hello, Python Runner of APISIX"
- # 設置響應狀態碼
- response.status_code = 201
- # 通過調用 `self.stop()` 中斷請求流程,此時將立即響應請求給客戶端
- # 如果未顯示調用 `self.stop()` 或 顯示調用 `self.rewrite()`將繼續將請求
- # 默認為 `self.rewrite()`
- self.stop()
實現插件首先必須要繼承 Base 類,必須實現 filter 函數,插件執行核心業務邏輯就是在 filter 函數中,該函數只包含 Request 和 Response 類對象作為參數,Request 對象參數可以獲取請求信息,Response 對象參數可以設置響應信息 ,self.config 可以獲取插件配置信息,在 filter 函數中調用 self.stop() 時將馬上中斷請求,響應數據,調用 self.rewrite() 時,將會繼續請求。
然后我們在前面的 Nexus 應用中新增一個路由來測試我們上面的 stop 插件,在 ApisixRoute 對象中新增一個路由規則,如下所示:
- apiVersion: apisix.apache.org/v2beta2
- kind: ApisixRoute
- metadata:
- name: nexus
- namespace: default
- spec:
- http:
- - name: ext
- match:
- hosts:
- - ops.qikqiak.com
- paths:
- - "/extPlugin"
- plugins:
- - name: ext-plugin-pre-req # 啟用ext-plugin-pre-req插件
- enable: true
- config:
- conf:
- - name: "stop" # 使用 stop 這個自定義插件
- value: "{\"body\":\"hello\"}"
- backends:
- - serviceName: nexus
- servicePort: 8081
直接創建上面的路由即可,核心配置是啟用 ext-plugin-pre-req 插件(前提是在配置文件中已經啟用該插件,在 Helm Chart 的 Values 中添加上),然后在 config 下面使用 conf 屬性進行配置,conf 為數組格式可以同時設置多個插件,插件配置對象中 name 為插件名稱,該名稱需要與插件代碼文件和對象名稱一致,value 為插件配置,可以為 JSON 字符串。
創建后同樣在 Dashboard 中也可以看到 APISIX 中的路由配置格式:

接著我們可以來訪問 http://ops.qikqiak.com/extPlugin 這個路徑來驗證我們的自定義插件:
- ➜ curl -i http://ops.qikqiak.com/extPlugin
- HTTP/1.1 201 Created
- Date: Thu, 13 Jan 2022 07:04:50 GMT
- Content-Type: text/plain; charset=utf-8
- Transfer-Encoding: chunked
- Connection: keep-alive
- accept: */*
- user-agent: curl/7.64.1
- host: ops.qikqiak.com
- X-Resp-A6-Runner: Python
- Server: APISIX/2.10.0
- Hello, Python Runner of APISIX
訪問請求結果中有一個 X-Resp-A6-Runner: Python 頭信息,返回的 body 數據為 Hello, Python Runner of APISIX,和我們在插件中的定義是符合的。到這里就完成了使用 Python 進行 APISIX 自定義插件,我們有任何的業務邏輯需要處理直接去定義一個對應的插件即可。