Openharmony 設備開發之helloworld (L2)

??https://harmonyos.51cto.com??
一、簡介
- 介紹子系統添加
- 介紹靜態庫編譯
- 介紹動態庫編譯
- 介紹動態庫和靜態庫的調用
入門了解設備開發:
partA/feature1編譯的靜態庫,
partB/module編譯的是動態庫
partA/feature2可執行程序中調用動態庫和靜態庫
二、代碼添加編譯
2.1 子系統添加
配置文件:build/subsystem_config.json
,
"sub_example": {
"project": "hmf/test",
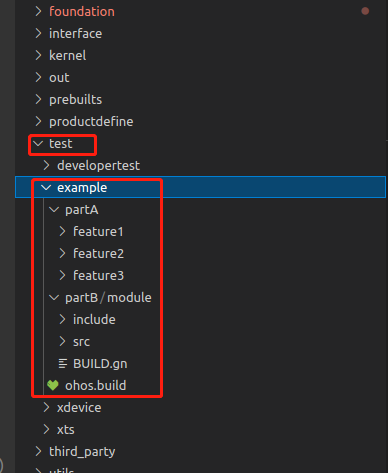
"path": "test/example",
"name": "sub_example",
"dir": "test"
}
如果自己想自定義目錄,test為測試代碼放在目錄路徑。
2.2 子模塊添加
配置文件:productdefine/common/products/Hi3516DV300.json
{
  "product_name": "Hi3516DV300",
  "product_company": "hisilicon",
  "product_device": "hi3516dv300",
  "version": "2.0",
  "type": "standard",
  "product_build_path": "device/hisilicon/build",
  "parts":{
…
    "sub_example:partB":{},
    "sub_example:partA":{}
  }
}
2.3 模塊partA/feature1
目錄結構
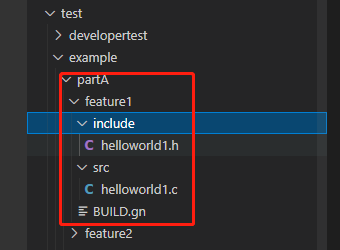
編譯配置文件:test\example\partA\feature1\BUILD.gn
import("http://build/ohos.gni")

config("helloworld1_lib_config") {
 include_dirs = [ "include" ]
}
ohos_static_library("libhelloworl1_lib") {
  output_extension = "a"
  sources = [
    "include/helloworld1.h",
    "src/helloworld1.c"
  ]
  public_configs = [ ":helloworld1_lib_config" ]
  part_name = "partA"
}
其中ohos_static_library標準系統是ninja生成靜態庫的關鍵。
2.4 模塊partB/module
目錄結構
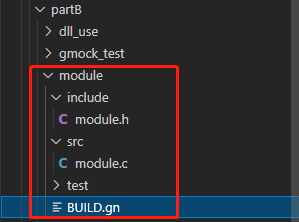
配置文件test\example\partB\module\BUILD.gn
import("http://build/ohos.gni")

config("module_lib_config") {
  include_dirs = [ "include" ]
}

ohos_shared_library("module_lib") {
  sources = [
    "http://test/example/partB/module/include/module.h",
    "http://test/example/partB/module/src/module.c"
  ]
  public_configs = [ ":module_lib_config" ]
  part_name = "partB"
  subsystem_name = "sub_example"
}
其中ohos_shared_library標準系統是ninja生成動態庫的關鍵。
2.5 動態庫和靜態庫調用模塊partA/feature2
目錄結構
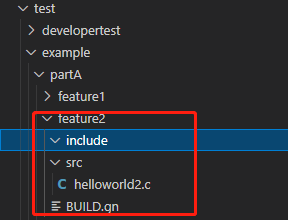
編譯配置:test\example\partA\feature2\BUILD.gn
import("http://build/ohos.gni")

ohos_executable("helloworld2_bin") {
  sources = [
    "src/helloworld2.c"
  ]
  include_dirs = [
    "include",
    "http://test/example/partB/module/include"
  ]
  deps = [                                # 組件內模塊依賴
    "../feature1:libhelloworl1_lib",
    #"http://test/example/partB/module:module_lib",
    "../feature3:feature3_etc",
  ]
  external_deps = [ "partB:module_lib", ]     # 跨組件的依賴,格式為“組件名:模塊名”
  install_enable = true                   # 可執行程序缺省不安裝,需要安裝時需要指定
  part_name = "partA"
  subsystem_name = "sub_example"
}
調用的C代碼:test\example\partA\feature2\src\helloworld2.c
#include "helloworld1.h" // 模塊partA/feature1
#include "module.h" // 模塊partB/module
#include <stdio.h>

void helloworld2(void)
{
    printf("[demo] hello world 2222\n");
    helloworld1(); // partA/feature1
    module(); // partB/module
}

int main()
{
    helloworld2();
    return 0;
}
2.6 編譯配置test\example\ohos.build
配置中的inner_kits是test\example\partA\feature2\BUILD.gn跨組件依賴配置的關鍵。
{
    "subsystem": "sub_example",
    "parts": {
        "partB": {
            "module_list": [
                "http://test/example/partB/module:module_lib"
            ],
            "inner_kits": [
                {
                    "type": "so",
                    "name": "http://test/example/partB/module:module_lib",
                    "header": {
                        "header_files": [
                            "module.h"
                        ],
                        "header_base": "http://test/example/partB/module/include"
                    }
                }
            ],
            "system_kits": [],
            "test_list": []
        },
        "partA": {
            "module_list": [
                "http://test/example/partA/feature1:libhelloworl1_lib",
                "http://test/example/partA/feature2:helloworld2_bin"
            ],
            "inner_kits": [],
            "system_kits": [],
            "test_list": []
        }
    }
}
三、編譯測試運行
3.1 編譯:
./build.sh --product-name Hi3516DV300 --ccache --build-target helloworld2_bin
編譯成功后,可以把編譯好的helloworld2_bin和libmodule_lib.z.so用hdc_std.exe發送到Hi3516DV300開發板中去運行,在串口終端上輸出調用結果。
3.2 修改系統權限,目錄能讀能寫:
mount -o remount,rw /
3.3 發送文件到開發板:
hdc_std.exe file send Z:\L2\out\ohos-arm-release\sub_example\partB\libmodule_lib.z.so /system/lib
//開發板目錄/data/test為自建目錄,沒有的話,先創建。
hdc_std.exe file send Z:\L2\out\ohos-arm-release\sub_example\partA\helloworld2_bin /data/test
3.3 修改成可執行權后:
chmod 0711 /data/test/helloworld2_bin
3.4 運行:
/data/test/helloworld2_bin

文檔中的代碼沒有完全展示,下載??【源代碼】??
重點關注目錄:example\partB\module,example\partA\feature1,example\partA\feature2
代碼庫中的源碼相對于文檔中的代碼有少許調整,基本結構不變.
??https://harmonyos.51cto.com??