盤點(diǎn) Chrome 插件開發(fā)中那些關(guān)鍵的點(diǎn)!
1. 前言
大家好,我是安果!
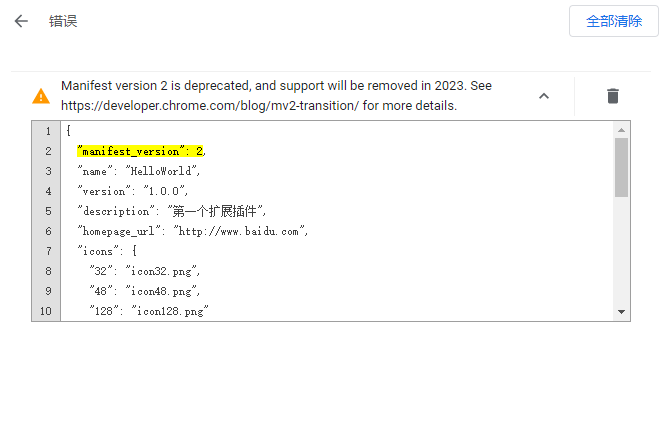
最近在開發(fā)者模式下調(diào)試 Chrome 插件,發(fā)現(xiàn)安裝擴(kuò)展后默認(rèn)會(huì)報(bào)錯(cuò)誤,提示 v2 版本已經(jīng)廢棄,相關(guān) API 功能將在明年不可使用,建議升級(jí)到 v3 版本。
本篇文章將基于 v3 版本,盤點(diǎn) Chrome 插件開發(fā)中的一些關(guān)鍵點(diǎn)供大家進(jìn)行參考。
2. 配置
v2 升級(jí)到 v3 后,manifest.json 配置文件需要進(jìn)行下面修改。
2-1 版本號(hào)
需要將 manifest_version 的值設(shè)置為 3。
2-2 action
action 可以指定 Chrome 擴(kuò)展圖標(biāo)設(shè)置、popup 頁面等內(nèi)容。
在 v3 中使用關(guān)鍵字 action 取代 v2 中的關(guān)鍵字 browser_action。
//v3
...
 "action": {
    "default_icon": {
      "16": "images/icon16.png",
      "32": "images/icon32.png"
    },
    "default_popup": "popup.html",
    "default_title": "HelloWorld"
}
...
2-3 background
在 v2 中,我們可以使用 scripts 關(guān)鍵字指定后臺(tái)運(yùn)行的腳本列表,再使用 persistent 關(guān)鍵字設(shè)置運(yùn)行腳本的生命周期。
當(dāng) persistent 設(shè)置為 true 時(shí),腳本會(huì)一直在后臺(tái)運(yùn)行,因此會(huì)占用系統(tǒng)資源。
//v2
...
 "background": {
    "persistent": false,
    "scripts": ["background.js"]
}
...
所以在 v3 版本中,使用 service_worker 關(guān)鍵字智能化啟動(dòng)腳本。
PS:在 v3 中不能通過關(guān)鍵字 persistent 指定腳本的生命周期。
//v3
...
"background": {
    "service_worker": "background.js"
}
...
3. 緩存
在 v3 中,使用下面的方式,將鍵值對(duì)存儲(chǔ)到緩存中。
//v3
...
//存儲(chǔ)數(shù)據(jù)到緩存
//鍵:
chrome.storage.sync.set({username:'AirPython',password:'123456'},function(){
    console.log("保存成功!")
})
...
從緩存中獲取數(shù)據(jù),也有相應(yīng)的 API。
//v3
...
//獲取緩存
chrome.storage.sync.get({username:"",password:""},function(items){
      //用戶名和密碼不為空
      if(items.username&&items.password){
          ...
      }
})
...
4. 定時(shí)任務(wù)
在 v2 中實(shí)現(xiàn)定時(shí)任務(wù)、延時(shí)任務(wù)非常方便,我們只需要在 background.js 創(chuàng)建一個(gè)定時(shí)任務(wù),然后設(shè)置 persistent 為 true,這樣就能保存定時(shí)任務(wù)一直在后臺(tái)執(zhí)行。
由于 v3 切換成 service_worker 模式,如果想實(shí)現(xiàn)定時(shí)任務(wù),只能使用 alarms 來實(shí)現(xiàn)。
//v3-manifest.json
...
"permissions": [
    ...
    "alarms"
  ]
...
操作步驟如下:
- 在 manifest 設(shè)置 alarms 權(quán)限
- 在 background 中,使用 alarms 創(chuàng)建定時(shí)任務(wù)
//v3 background.js
...
function peroidFunc(){
    ...
}
// 定時(shí)器
chrome.alarms.onAlarm.addListener((alarm) => {
     //執(zhí)行一次
     peroidFunc()
});

//1分鐘執(zhí)行一次定時(shí)任務(wù)
chrome.alarms.create({ periodInMinutes: 1.0 });
...
5. 網(wǎng)絡(luò)請(qǐng)求
網(wǎng)絡(luò)請(qǐng)求主流的 4 種方式包含:
- Ajax
- Jquery
- fetch
- Axios
這里以第三種方式 fetch 為例:
...
function login_do(tab,username,password){
    const url = HOST + 'do_login'
    const params = {
        headers:{
            "content-type":"application/json;charset=UTF-8"
        },
        body:JSON.stringify({
            "username":username,
            "password":password.replace(/(^\s*)|(\s*$)/g, "")     //去掉前后空格
        }),
        method:"POST"
    }
    fetch(url,params)
    .then(data=>{
        return data.json()
    })
    .then(res=>{
        if(res.err_code==0){
            show(res.data.tips,"登錄成功")
        }else{
            warn(res.err_msg)
        }
    })
    .catch(error=>{
        console.log(error)
        warn("重置失敗,請(qǐng)檢查數(shù)據(jù)!")
    })
}
...
6. 自動(dòng)化
Chrome 插件完全可以實(shí)現(xiàn)一些自動(dòng)化場(chǎng)景,以此增加我們工作的效率。
文中模擬文本框輸入的 API 已經(jīng)廢棄,建議使用下面的方式完成文本框的輸入。
...
//輸入
function input(inputElement, content) {
    // 注意:evt.initEvent已經(jīng)廢棄,使用下面的方式替代
    // let evt = document.createEvent('HTMLEvents');
    // evt.initEvent('input', true, true);

    //新的方式
    var evt = new Event("input", {"bubbles":true, "cancelable":false});
    document.dispatchEvent(evt);
    inputElement.value = content;
    inputElement.dispatchEvent(evt)
}
...
7. 最后
還要補(bǔ)充一點(diǎn)的是,在 v3 版本中的 background 不能直接使用 window 對(duì)象,這里建議通過 Tab 標(biāo)簽或消息通信的方式來實(shí)現(xiàn)。
在開發(fā)一些簡(jiǎn)單的工具類插件,原生 HTML + JS + Jquery 完全夠用;但是面對(duì)一些復(fù)雜頁面的需求,這里更推薦使用「 Vue + 預(yù)設(shè)」的方式來快速開發(fā),這部分內(nèi)容有需要的小伙伴可以自行擴(kuò)展:
https://vue-web-extension.netlify.app/intro/setup.html