對于觸摸事件會首先通過findTouchedWindowTargetsLocked找到目標Window,進而通過dispatchEventLocked將消息發送到目標窗口。
這幾天修改input驅動,InputManagerService過程介紹下:
1、輸入驅動系統簡單介紹
- Android設備可以同時連接多個輸入設備,比如說觸摸屏,鍵盤,鼠標等等;
- 用戶在任何一個設備上的輸入就會產生一個中斷,經由Linux內核的中斷處理以及設備驅動轉換成一個Event,并傳遞給用戶空間的應用程序進行處理;
- 每個輸入設備都有自己的驅動程序,數據接口也不盡相同,如何在一個線程里(上面說過只有一個InputReader Thread)把所有的用戶輸入都給捕捉到? 這首先要歸功于Linux 內核的輸入子系統(Input Subsystem);
- 它在各種各樣的設備驅動程序上加了一個抽象層,只要底層的設備驅動程序按照這層抽象接口來實現,上層應用就可以通過統一的接口來訪問所有的輸入設備;
- 這個抽象層有三個重要的概念,input handler, input handle 和 input_dev,

- input_dev代表底層驅動
- input_handler代表某類輸入設備的處理方法,相當于一個上層驅動
- 一個input_dev 可以有多個input_handler,同樣,一個input_handler 可以用于多種輸入設備;
- 用來關聯某個input_dev 和 某個 input_handler, 它對應上圖中的紫色的原點。每個input handle 都會生成一個文件節點;
input $ ls
event0 event1 event2 event3 event4 event5 event6
通過Linux input system獲取用戶輸入的流程簡單如下:
- 設備通過input_register_dev 將自己的驅動注冊到Input 系統。
- 各種Handler 通過 input_register_handler將自己注冊到Input系統中。
- 每一個注冊進來的input_dev 或 Input_handler 都會通過input_connect() 尋找對方,生成對應的 input_handle,并在/dev/input/下產成一個設備節點文件.
- 應用程序通過打開(Open)Input_handle對應的文件節點,打開其對應的input_dev 和 input_handler的驅動。這樣,當用戶按鍵時,底層驅動就能捕捉到,并交給對應的上層驅動(handler)進行處理,然后返回給應用程序。
2、InputManagerService詳解
2.1、InputManagerService啟動
InputManagerService是Android為了處理各種用戶操作而抽象的一個服務,自身可以看做是一個Binder服務實體,在SystemServer進程啟動的時候實例化,并注冊到ServiceManager中去,不過這個服務對外主要是用來提供一些輸入設備的信息的作用,作為Binder服務的作用比較小
private void startOtherServices() {
        ...
        inputManager = new InputManagerService(context);
        wm = WindowManagerService.main(context, inputManager,
                mFactoryTestMode != FactoryTest.FACTORY_TEST_LOW_LEVEL,
                !mFirstBoot, mOnlyCore);
        ServiceManager.addService(Context.WINDOW_SERVICE, wm);
        ServiceManager.addService(Context.INPUT_SERVICE, inputManager);
       ...
       }
InputManagerService跟WindowManagerService幾乎同時被添加,從一定程度上也能說明兩者幾乎是相生的關系;
而觸摸事件的處理也確實同時涉及兩個服務,最好的證據就是WindowManagerService需要直接握著InputManagerService的引用;
如果對照上面的處理模型,InputManagerService主要負責觸摸事件的采集;
而WindowManagerService負責找到目標窗口。接下來,先看看InputManagerService如何完成觸摸事件的采集;
2.2、如何捕獲觸摸事件
InputManagerService會單獨開一個線程專門用來讀取觸摸事件,
NativeInputManager::NativeInputManager(jobject contextObj,
        jobject serviceObj, const sp<Looper>& looper) :
        mLooper(looper), mInteractive(true) {
     ...
    sp<EventHub> eventHub = new EventHub();
    mInputManager = new InputManager(eventHub, this, this);
}
- 這里有個EventHub,它主要是利用Linux的inotify和epoll機制;
- 監聽設備事件:包括設備插拔及各種觸摸、按鈕事件等,可以看做是一個不同設備的集線器,主要面向的是/dev/input目錄下的設備節點,比如說/dev/input/event0上的事件就是輸入事件,通過EventHub的getEvents就可以監聽并獲取該事件:

在new InputManager時候,會新建一個InputReader對象及InputReaderThread Loop線程,這個loop線程的主要作用就是通過EventHub的getEvents獲取Input事件

InputManager::InputManager(
        const sp<EventHubInterface>& eventHub,
        const sp<InputReaderPolicyInterface>& readerPolicy,
        const sp<InputDispatcherPolicyInterface>& dispatcherPolicy) {
    <!--事件分發執行類-->
    mDispatcher = new InputDispatcher(dispatcherPolicy);
    <!--事件讀取執行類-->
    mReader = new InputReader(eventHub, readerPolicy, mDispatcher);
    initialize();
}
void InputManager::initialize() {
    mReaderThread = new InputReaderThread(mReader);
    mDispatcherThread = new InputDispatcherThread(mDispatcher);
}
bool InputReaderThread::threadLoop() {
    mReader->loopOnce();
    return true;
}
void InputReader::loopOnce() {
        int32_t oldGeneration;
        int32_t timeoutMillis;
        bool inputDevicesChanged = false;
        Vector<InputDeviceInfo> inputDevices;
        {
      ...<!--監聽事件-->
        size_t count = mEventHub->getEvents(timeoutMillis, mEventBuffer, EVENT_BUFFER_SIZE);
       ....<!--處理事件-->
           processEventsLocked(mEventBuffer, count);
       ...
       <!--通知派發-->
        mQueuedListener->flush();
    }
輸入事件就可以被讀取,經過processEventsLocked被初步封裝成RawEvent,最后發通知,請求派發消息;
2.3、事件的派發
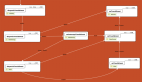
- 在新建InputManager的時候,不僅僅創建了一個事件讀取線程;
- 還創建了一個事件派發線程,雖然也可以直接在讀取線程中派發,但是這樣肯定會增加耗時,不利于事件的及時讀取;
- 因此,事件讀取完畢后,直接向派發線程發個通知,請派發線程去處理,這樣讀取線程就可以更加敏捷,防止事件丟失,因此InputManager的模型就是如下樣式:

InputReader的mQueuedListener其實就是InputDispatcher對象,所以mQueuedListener->flush()就是通知InputDispatcher事件讀取完畢,可以派發事件了, InputDispatcherThread是一個典型Looper線程,基于native的Looper實現了Hanlder消息處理模型,如果有Input事件到來就被喚醒處理事件,處理完畢后繼續睡眠等待,代碼如下:
bool InputDispatcherThread::threadLoop() {
    mDispatcher->dispatchOnce();
    return true;
}
void InputDispatcher::dispatchOnce() {
    nsecs_t nextWakeupTime = LONG_LONG_MAX;
    {
      <!--被喚醒 ,處理Input消息-->
        if (!haveCommandsLocked()) {
            dispatchOnceInnerLocked(&nextWakeupTime);
        }
       ...
    }
    nsecs_t currentTime = now();
    int timeoutMillis = toMillisecondTimeoutDelay(currentTime, nextWakeupTime);
    <!--睡眠等待input事件-->
    mLooper->pollOnce(timeoutMillis);
}
以上就是派發線程的模型,dispatchOnceInnerLocked是具體的派發處理邏輯,這里看其中一個分支,觸摸事件:
void InputDispatcher::dispatchOnceInnerLocked(nsecs_t* nextWakeupTime) {
        ...
    case EventEntry::TYPE_MOTION: {
        MotionEntry* typedEntry = static_cast<MotionEntry*>(mPendingEvent);
        ...
        done = dispatchMotionLocked(currentTime, typedEntry,
                &dropReason, nextWakeupTime);
        break;
    }
bool InputDispatcher::dispatchMotionLocked(
        nsecs_t currentTime, MotionEntry* entry, DropReason* dropReason, nsecs_t* nextWakeupTime) {
    ...
    Vector<InputTarget> inputTargets;
    bool conflictingPointerActions = false;
    int32_t injectionResult;
    if (isPointerEvent) {
    <!--關鍵點1 找到目標Window-->
        injectionResult = findTouchedWindowTargetsLocked(currentTime,
                entry, inputTargets, nextWakeupTime, &conflictingPointerActions);
    } else {
        injectionResult = findFocusedWindowTargetsLocked(currentTime,
                entry, inputTargets, nextWakeupTime);
    }
    ...
    <!--關鍵點2  派發-->
    dispatchEventLocked(currentTime, entry, inputTargets);
    return true;
}
從以上代碼可以看出,對于觸摸事件會首先通過findTouchedWindowTargetsLocked找到目標Window,進而通過dispatchEventLocked將消息發送到目標窗口;
2.4、總結
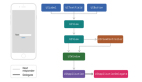
現在把所有的流程跟模塊串聯起來,流程大致如下:
- 點擊屏幕
- InputManagerService的Read線程捕獲事件,預處理后發送給Dispatcher線程
- Dispatcher找到目標窗口
- 通過Socket將事件發送到目標窗口
- 找到目標窗口處理事件