譯者 | 盧鑫旺
51CTO讀者成長計劃社群招募,咨詢小助手(微信號:CTOjishuzhan)
不久前,我們的一個核心Python庫出現了性能問題。
這個特殊的庫構成了我們3D數據處理管道的主要組件。這是一個相當大而復雜的庫,它使用了NumPy和其他科學計算相關的Python包來進行大量的數學和幾何運算。
我們的系統還必須在CPU資源有限的前提下工作,雖然一開始它表現得很好,但隨著并發用戶數量的增長,我們開始遇到問題,系統難以跟上負載。
我們得出的結論是,我們必須讓我們的系統至少快50倍來處理增加的工作負載,我們認為Rust可以幫助我們實現這一目標。
因為我們遇到的性能問題很常見,所以我們可以在這篇(不太短的)文章中復現并解決它們。
所以,喝杯茶(或咖啡),我會帶你了解
- 性能問題背后的潛在問題
- 可以解決這個問題的一些優化迭代
如果你想直接跳到最終代碼,只需要快進到摘要部分即可。
1、運行示例
我們寫一個小庫,來展示我們最初的性能問題(完全是任意的一個示例)。
想象你有一個多邊形列表和一個點列表,都是二維的。出于業務原因,我們希望將每個點“匹配”到一個多邊形。
我們想像中的庫將會是這樣:
- 從點和多邊形(都是2D)的初始化列表開始。
- 對于每個點,根據到中心的距離,找到一個更小的最接近它的多邊形子集。
- 從這些多邊形中,選擇“最佳”的一個(我們將使用“最小面積”作為“最佳”)。
代碼基本是這樣:
from typing import List, Tuple
import numpy as np
from dataclasses import dataclass
from functools import cached_property
Point = np.array
@dataclass
class Polygon:
    x: np.array
    y: np.array
    @cached_property
    def center(self) -> Point: ...
    def area(self) -> float: ...
def find_close_polygons(polygon_subset: List[Polygon], point: Point, max_dist: float) -> List[Polygon]:
    ...
def select_best_polygon(polygon_sets: List[Tuple[Point, List[Polygon]]]) -> List[Tuple[Point, Polygon]]:
    ...
def main(polygons: List[Polygon], points: np.ndarray) -> List[Tuple[Point, Polygon]]:
    ...
關鍵的困難(性能方面)是Python對象和numpy數組的混合。
讓我們對此做深入分析。
值得注意的是,對于這個玩具庫來說,將部分/所有內容轉換為向量化numpy可能是可行的,但對于真正的庫來說,這幾乎是不可能的,因為這會使代碼的可讀性和可修改性大大降低,并且收益有限(這里是一個部分向量化的版本,它更快,但與我們將要實現的結果還很遠)。
此外,使用任何基于JIT的技巧(PyPy / numba)都只能帶來非常小的收益(為了確保我們將進行測量)。
2、為什么不直接全部用Rust重寫?
雖然完全重寫很有吸引力,但它有幾個問題:
庫已經使用numpy進行了大量的計算,所以我們為什么要期望Rust更好呢?它很大并且復雜,有非常重的業務和高度集成的算法,重寫將需要幾個月的工作量,而我們有限的服務器資源已經快撐不住了。
一群友好的研究人員正在積極地研究這個庫,來實現更好的算法,并做了大量的實驗。不過,他們不是很樂意學習一種新的編程語言,等待程序編譯并與借用檢查器進行斗爭。他們會感激我們沒有用Rust完全替代這些Python代碼實現的工作。
3、進入主題
介紹一下我們的好朋友profiler工具。
Python有一個內置的profiler分析器(cProfiler),但是對于這次的工作它并不是一個合適的工具:
- 它將為所有Python代碼引入大量開銷,而對本地代碼不引入任何開銷,因此我們的結果可能有偏差。
- 無法看到本地調用堆棧數據,這意味著我們將無法深入到Rust代碼。
本次我們使用py-spy庫,py-spy是一個采樣性能分析工具,可以深入查看本地調用堆棧。
他們還慷慨地將預先構建的包發布到pypi,這樣我們就可以通過下面的命令安裝py-spy。
pip install py-spy并開始工作。
我們還需要一些衡量標準。
# measure.py
import time
import poly_match
import os

# Reduce noise, actually improve perf in our case.
os.environ["OPENBLAS_NUM_THREADS"] = "1"

polygons, points = poly_match.generate_example()

# We are going to increase this as the code gets faster and faster.
NUM_ITER = 10

t0 = time.perf_counter()
for _ in range(NUM_ITER):
    poly_match.main(polygons, points)
t1 = time.perf_counter()

took = (t1 - t0) / NUM_ITER
print(f"Took and avg of {took * 1000:.2f}ms per iteration")
這不是很科學,但它會讓我們走得更遠。
“好的基準測試很難。不要過于強調擁有完美的基準測試設置,尤其是當你開始優化一個程序時。”
—— ——Nicholas Nethercote 《高性能 Rust》
通過運行這個腳本,我們得到一些基礎數據。
$ python measure.py
Took an avg of 293.41ms per iteration
對于原始庫,我們使用了50個不同的示例,以確保涵蓋了所有情況。
這與整個系統性能相匹配,這意味著我們可以開始努力打破這個數字。
注意:我們還可以使用PyPy進行度量(我們還將添加一個預熱,以允許JIT發揮它的魔力)。
$ conda create -n pypyenv -c conda-forge pypy numpy && conda activate pypyenv
$ pypy measure_with_warmup.py
Took an avg of 1495.81ms per iteration
4、測量先行
讓我們來看看這里有什么慢的地方。
$ py-spy record --native -o profile.svg -- python measure.py

py-spy> Sampling process 100 times a second. Press Control-C to exit.

Took an avg of 365.43ms per iteration

py-spy> Stopped sampling because process exited
py-spy> Wrote flamegraph data to 'profile.svg'. Samples: 391 Errors: 0
可以看到這個工具引入的開銷非常小,為了比較,我們使用cProfile的結果如下:
$ python -m cProfile measure.py
Took an avg of 546.47ms per iteration
7551778 function calls (7409483 primitive calls) in 7.806 seconds
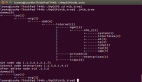
...我們得到了一個漂亮的紅色圖,稱為火焰圖:

每個框都是一個函數,我們可以看到我們在每個函數中花費的相對時間,包括它正在調用的函數(沿著圖/堆棧向下)。試著點擊一個標準框來放大它。
圖中的主要結論如下:
- 絕大多數時間都花在find_close_polygons中。
- 大部分時間都花在代數計算上,這是一個numpy函數。
因此,讓我們看一看find_close_polygons這個函數:
def find_close_polygons(
    polygon_subset: List[Polygon], point: np.array, max_dist: float
) -> List[Polygon]:
    close_polygons = []
    for poly in polygon_subset:
        if np.linalg.norm(poly.center - point) < max_dist:
            close_polygons.append(poly)
    return close_polygons
我們打算用Rust來重寫這個函數。
在深入探討細節之前,有以下幾點需要注意:
- 這個函數的入參和出參都是比較復雜的對象(Polygon類型的numpy.array數組)。
- 對象的大小很重要,拷貝這些對象會帶來成本開銷。
- 這個函數會被大量調用,因此我們必須考慮到自己引入的開銷帶來的影響。
5、我的第一個Rust模塊
pyo3是一個用于Python和Rust之間交互的包。它有非常友好的文檔,在這里說明了基本設置(https://pyo3.rs/v0.18.1/#using-rust-from-python)。
mkdir poly_match_rs && cd "$_"
pip install maturin
maturin init --bindings pyo3
maturin develop
我們將要調用自己的poly_math_rs文件,然后添加一個叫find_close_polygons的函數。
一開始,大概會是這樣:
use pyo3::prelude::*;
#[pyfunction]
fn find_close_polygons() -> PyResult<()> {
    Ok(())
}
#[pymodule]
fn poly_match_rs(_py: Python, m: &PyModule) -> PyResult<()> {
    m.add_function(wrap_pyfunction!(find_close_polygons, m)?)?;
    Ok(())
}
我們要記得在每次更新Rust庫時執行maturin develop。
這樣我們就可以調用我們的新函數了。
>>> poly_match_rs.find_close_polygons(polygons, point, max_dist)
E TypeError: poly_match_rs.poly_match_rs.find_close_polygons() takes no arguments (3 given)
6、V1版:簡單粗暴的使用Rust翻譯代碼
我們從匹配預期的API開始。
PyO3在Python到Rust的轉換非常智能,所以非常容易:
#[pyfunction]
fn find_close_polygons(polygons: Vec<PyObject>, point: PyObject, max_dist: f64) -> PyResult<Vec<PyObject>> {
    Ok(vec![])
}
PyObject(顧名思義)是一個通用的“任意一個”Python對象。我們稍后會嘗試與它交互。
這回讓程序運行起來(盡管有錯誤)。
我只打算拷貝和粘貼原始的Python函數,并修復語法問題。
#[pyfunction]
fn find_close_polygons(polygons: Vec<PyObject>, point: PyObject, max_dist: f64) -> PyResult<Vec<PyObject>> {
    let mut close_polygons = vec![];


    for poly in polygons {
        if norm(poly.center - point) < max_dist {
            close_polygons.push(poly)
        }
    }


    Ok(close_polygons)
}
很不錯,不過出現了編譯錯誤:
% maturin develop
...
error[E0609]: no field `center` on type `Py<PyAny>`
 --> src/lib.rs:8:22
  |
8 |         if norm(poly.center - point) < max_dist {
  |                      ^^^^^^ unknown field
error[E0425]: cannot find function `norm` in this scope
 --> src/lib.rs:8:12
  |
8 |         if norm(poly.center - point) < max_dist {
  |            ^^^^ not found in this scope
error: aborting due to 2 previous errors ] 58/59: poly_match_rs
我們需要三個中間文件來實現我們的功能:
# For Rust-native array operations.
ndarray = "0.15"
# For a `norm` function for arrays.
ndarray-linalg = "0.16"
# For accessing numpy-created objects, based on `ndarray`.
numpy = "0.18"
首先,讓我們將不透明和通用的點:PyObject變成我們可以使用的對象。
就像我們向PyO3請求“Vec of PyObjects”一樣,我們可以請求一個numpy數組,它會為我們自動轉換參數。
use numpy::PyReadonlyArray1;
#[pyfunction]
fn find_close_polygons(
    // An object which says "I have the GIL", so we can access Python-managed memory.
    py: Python<'_>,
    polygons: Vec<PyObject>,
    // A reference to a numpy array we will be able to access.
    point: PyReadonlyArray1<f64>,
    max_dist: f64,
) -> PyResult<Vec<PyObject>> {
    // Convert to `ndarray::ArrayView1`, a fully operational native array.
    let point = point.as_array();
    ...
}
由于point已經成為了ArrayView1,因此我們可以使用它了。比如:
/// Make the `norm` function available.
use ndarray_linalg::Norm;
assert_eq!((point.to_owned() - point).norm(), 0.); // Make the `norm` function available.
現在,我們只需要獲取每個多邊形的中心,并將其“投射”到ArrayView1中。
在PyO3中看起來是這樣:
let center = poly
  .getattr(py, "center")?                 // Python-style getattr, requires a GIL token (`py`).
  .extract::<PyReadonlyArray1<f64>>(py)?  // Tell PyO3 what to convert the result to.
  .as_array()                             // Like `point` before.
  .to_owned();                            // We need one of the sides of the `-` to be "owned".
這有點晦澀難懂,但總的來說,結果是對原始代碼進行了相當清晰的逐行翻譯。
use pyo3::prelude::*;

use ndarray_linalg::Norm;
use numpy::PyReadonlyArray1;

#[pyfunction]
fn find_close_polygons(
    py: Python<'_>,
    polygons: Vec<PyObject>,
    point: PyReadonlyArray1<f64>,
    max_dist: f64,
) -> PyResult<Vec<PyObject>> {
    let mut close_polygons = vec![];
    let point = point.as_array();
    for poly in polygons {
        let center = poly
            .getattr(py, "center")?
            .extract::<PyReadonlyArray1<f64>>(py)?
            .as_array()
            .to_owned();

        if (center - point).norm() < max_dist {
            close_polygons.push(poly)
        }
    }

    Ok(close_polygons)
}
與原來的Python代碼對比:
1.def find_close_polygons(
2.    polygon_subset: List[Polygon], point: np.array, max_dist: float
3.) -> List[Polygon]:
4.    close_polygons = []
5.    for poly in polygon_subset:
6.        if np.linalg.norm(poly.center - point) < max_dist:
7.            close_polygons.append(poly)
8.
9.    return close_polygons
我們期待這個版本可以相對于原始的Python版本會有一些優勢,實際情況是:
1.$ (cd ./poly_match_rs/ && maturin develop)
2.$ python measure.py
3.Took an avg of 609.46ms per iteration
所以使用了Rust只是會更慢嗎?我們只是忘了要提升速度,如果我們執行
maturn develop –release,我們可以得到更好的結果:
$ (cd ./poly_match_rs/ && maturin develop --release)
$ python measure.py
Took an avg of 23.44ms per iteration
現在已經有了比較明顯的加速!
我們還想了解我們的本地代碼運行時的堆棧調用情況,所以我們將在發布時啟用調試符號。這樣我們不妨以最高速度運行。
1.# added to Cargo.toml
2.[profile.release]
3.debug = true       # Debug symbols for our profiler.
4.lto = true         # Link-time optimization.
5.codegen-units = 1  # Slower compilation but faster code.
7、V2版- 使用Rust重寫更多內容
在py-spy使用--native標識能同時給我們展示python和新的本地代碼。
再次執行py-spy
$ py-spy record --native -o profile.svg -- python measure.py
py-spy> Sampling process 100 times a second. Press Control-C to exit.
左右滑動查看完整代碼
我們得到了如下火焰圖(添加了非紅色,這樣我們就可區分以參考它們):

根據本次輸出的結果,我們發現了幾個有意思的事情:
(1)我們可以看到find_close_polygons::... ::trampoline(Python直接調用)和__pyfunction_find_close_polyons(我們的實際實現)的相對大小,它們是95%對88%的樣本,所以開銷很小。
(2)lib_v1.rs:22(右邊一個非常小的框)中展示的真正的處理邏輯 (if (center - point).norm() < max_dist {…})只占了整個運行時的約9%。所以10倍提升還是有可能的。
(3)大部分時間花銷在lib_v1.rs:16,即poly.getattr(…).extract(…),如果我們放大可以看到具體的費時操作是getattr函數以及使用as_array獲取底層數組。
這里的結論是,我們需要專注于解決第三點,而實現這一點的方法是在Rust中重寫Polygon這個類。
首先,看一下原始Python代碼:
@dataclass
class Polygon:
    x: np.array
    y: np.array
    _area: float = None
    @cached_property
    def center(self) -> np.array:
        centroid = np.array([self.x, self.y]).mean(axis=1)
        return centroid
    def area(self) -> float:
        if self._area is None:
            self._area = 0.5 * np.abs(
                np.dot(self.x, np.roll(self.y, 1)) - np.dot(self.y, np.roll(self.x, 1))
            )
        return self._area
我們希望盡可能多地保留現有的API,但目前我們并不需要把area方法變得更快。
真正的類可能具有額外復雜的內容,比如merge方法使用了scipy.spatial中的ConvexHull方法。
為了減少開銷(并限制在這篇已經很長的文章的范圍內),我們只會將Polygon類的核心功能用Rust實現,然后以Python子類的形式去實現API的其余部分。
我們的結構體struct是這樣的:
// `Array1` is a 1d array, and the `numpy` crate will play nicely with it.
use ndarray::Array1;


// `subclass` tells PyO3 to allow subclassing this in Python.
#[pyclass(subclass)]
struct Polygon {
    x: Array1<f64>,
    y: Array1<f64>,
    center: Array1<f64>,
}
現在,我們需要真正的來實現它,我們想暴露poly.{x, y,center}作為:
(1)屬性
(2)Numpy Array數組
我們還需要一個構造函數,以便Python可以創建新的Polygon類。
use numpy::{PyArray1, PyReadonlyArray1, ToPyArray};
#[pymethods]
impl Polygon {
    #[new]
    fn new(x: PyReadonlyArray1<f64>, y: PyReadonlyArray1<f64>) -> Polygon {
        let x = x.as_array();
        let y = y.as_array();
        let center = Array1::from_vec(vec![x.mean().unwrap(), y.mean().unwrap()]);


        Polygon {
            x: x.to_owned(),
            y: y.to_owned(),
            center,
        }
    }
    // the `Py<..>` in the return type is a way of saying "an Object owned by Python".
    #[getter]
    fn x(&self, py: Python<'_>) -> PyResult<Py<PyArray1<f64>>> {
        Ok(self.x.to_pyarray(py).to_owned()) // Create a Python-owned, numpy version of `x`.
    }
    // Same for `y` and `center`.
}
我們需要向模塊中添加新的結構體作為一個類:
#[pymodule]
fn poly_match_rs(_py: Python, m: &PyModule) -> PyResult<()> {
    m.add_class::<Polygon>()?; // new.
    m.add_function(wrap_pyfunction!(find_close_polygons, m)?)?;
    Ok(())
}
然后,我們就可以更新Python代碼來使用這個類:
class Polygon(poly_match_rs.Polygon):
    _area: float = None

    def area(self) -> float:
        ...
編譯之后成功運行,但是速度卻慢了很多(x、y和center現在需要在每次訪問時創建一個新的numpy數組)。
為了能真正提高性能,我們需要從Python實現的Polygon類中提取出原始的基于Rust實現的Polygon類。
PyO3能非常靈活的實現這種類型的操作,所以我們有幾種方法可以做到這一點。但有一個限制是,我們還需要返回Python的Polygon類,并且我們不想對實際數據做任何的拷貝。
在每個PyObject對象上手動調用 .extract::<Polygon>(py)?是可以的,但是我們想讓PyO3直接給我們Python實現的Polygon類。
這是Python所擁有的對象的引用,我們希望該對象包含一個原生Python類結構體的實例或者是它的子類。
#[pyfunction]
fn find_close_polygons(
    py: Python<'_>,
    polygons: Vec<Py<Polygon>>,             // References to Python-owned objects.
    point: PyReadonlyArray1<f64>,
    max_dist: f64,
) -> PyResult<Vec<Py<Polygon>>> {           // Return the same `Py` references, unmodified.
    let mut close_polygons = vec![];
    let point = point.as_array();
    for poly in polygons {
        let center = poly.borrow(py).center // Need to use the GIL (`py`) to borrow the underlying `Polygon`.
            .to_owned();

        if (center - point).norm() < max_dist {
            close_polygons.push(poly)
        }
    }

    Ok(close_polygons)
}
看一下這次改進后的效果:
$ python measure.py
Took an avg of 6.29ms per iteration
已經很接近目標了!
8、V3版:優化內存分配
讓我們再看一下profiler的結果。

我們可以看到select_best_polygon方法在獲取x 和y向量時調用了Rust的代碼。我們可以解決這個問題,但這是一個非常小的潛在改進(可能只是10%的性能提升)。
可以看到有約20%的時間用在了extract_argument方法上(在lib_v2.rs:48的下方),這塊仍是一個較大的開銷。不過大部分時間還是消耗在PyIterator::next和PyTypeInfo::is_type_of上,這個并不容易去修復和提升。
很多時間花在了分配變量上。在lib_v2.rs:58中,我們可以看drop_in_place和to_owned。實際的線路大約占總時間的35%,這比我們預期的要多得多:這應該是所有數據都準備好的“快速位”。
讓我們來解決最后一點。
這是我們有問題的片段:
let center = poly.borrow(py).center
    .to_owned();

if (center - point).norm() < max_dist { ... }
我們想要的是避免to_owned。但我們需要一個擁有的對象作為norm,所以我們必須手動實現。(我們之所以可以改進ndarray,是因為我們知道它實際上只是兩個float32類型的數值)。
這看起來是這樣的:
use ndarray_linalg::Scalar;

let center = &poly.as_ref(py).borrow().center;

if ((center[0] - point[0]).square() + (center[1] - point[1]).square()).sqrt() < max_dist {
    close_polygons.push(poly)
}
不過,Rust的借用檢查器報錯了:
error[E0505]: cannot move out of `poly` because it is borrowed
  --> src/lib.rs:58:33
   |
55 |         let center = &poly.as_ref(py).borrow().center;
   |                       ------------------------
   |                       |
   |                       borrow of `poly` occurs here
   |                       a temporary with access to the borrow is created here ...
...
58 |             close_polygons.push(poly);
   |                                 ^^^^ move out of `poly` occurs here
59 |         }
60 |     }
   |     - ... and the borrow might be used here, when that temporary is dropped and runs the `Drop` code for type `PyRef`
借用檢查器是對的,我們的代碼有內存錯誤。
簡單的修復方式是使用拷貝,然后編譯close_ploygons.push(poly.clone())。
這種拷貝方式幾乎不會帶來額外性能開銷,因為我們只是增加Python對象的引用計數。
然而,在這種情況下,我們也可以通過經典的Rust技巧來減少借用:
let norm = {
    let center = &poly.as_ref(py).borrow().center;

    ((center[0] - point[0]).square() + (center[1] - point[1]).square()).sqrt()
};

if norm < max_dist {
    close_polygons.push(poly)
}
因為poly只在內部范圍內借用,所以一旦我們執行到close_polygons.push,編譯器就可以知道我們不再持有該引用,并正常編譯新版本。
最終的結果是:
$ python measure.py
Took an avg of 2.90ms per iteration
比之前的代碼速度提升了100倍。
9、總結
我們從如下python代碼開始
@dataclass
class Polygon:
    x: np.array
    y: np.array
    _area: float = None

    @cached_property
    def center(self) -> np.array:
        centroid = np.array([self.x, self.y]).mean(axis=1)
        return centroid

    def area(self) -> float:
        ...

def find_close_polygons(
    polygon_subset: List[Polygon], point: np.array, max_dist: float
) -> List[Polygon]:
    close_polygons = []
    for poly in polygon_subset:
        if np.linalg.norm(poly.center - point) < max_dist:
            close_polygons.append(poly)

    return close_polygons

# Rest of file (main, select_best_polygon).
我們使用py-spy對其進行了分析,即使是我們最普通的簡單翻譯find_close_polygons方法為Rust代碼也帶來了超過10倍性能提升的改進。
我們對主要的占核心開銷的代碼片段進行了幾次額外的迭代,直到我們最終在運行時獲得了100倍的改進,同時保持了與原始庫相同的API。

最終的Python代碼如下:
import poly_match_rs
from poly_match_rs import find_close_polygons

class Polygon(poly_match_rs.Polygon):
    _area: float = None

    def area(self) -> float:
        ...

# Rest of file unchanged (main, select_best_polygon).
Rust代碼:
use pyo3::prelude::*;

use ndarray::Array1;
use ndarray_linalg::Scalar;
use numpy::{PyArray1, PyReadonlyArray1, ToPyArray};

#[pyclass(subclass)]
struct Polygon {
    x: Array1<f64>,
    y: Array1<f64>,
    center: Array1<f64>,
}

#[pymethods]
impl Polygon {
    #[new]
    fn new(x: PyReadonlyArray1<f64>, y: PyReadonlyArray1<f64>) -> Polygon {
        let x = x.as_array();
        let y = y.as_array();
        let center = Array1::from_vec(vec![x.mean().unwrap(), y.mean().unwrap()]);

        Polygon {
            x: x.to_owned(),
            y: y.to_owned(),
            center,
        }
    }

    #[getter]
    fn x(&self, py: Python<'_>) -> PyResult<Py<PyArray1<f64>>> {
        Ok(self.x.to_pyarray(py).to_owned())
    }

    // Same for `y` and `center`.
}

#[pyfunction]
fn find_close_polygons(
    py: Python<'_>,
    polygons: Vec<Py<Polygon>>,
    point: PyReadonlyArray1<f64>,
    max_dist: f64,
) -> PyResult<Vec<Py<Polygon>>> {
    let mut close_polygons = vec![];
    let point = point.as_array();
    for poly in polygons {
        let norm = {
            let center = &poly.as_ref(py).borrow().center;

            ((center[0] - point[0]).square() + (center[1] - point[1]).square()).sqrt()
        };

        if norm < max_dist {
            close_polygons.push(poly)
        }
    }

    Ok(close_polygons)
}

#[pymodule]
fn poly_match_rs(_py: Python, m: &PyModule) -> PyResult<()> {
    m.add_class::<Polygon>()?;
    m.add_function(wrap_pyfunction!(find_close_polygons, m)?)?;
    Ok(())
}
10、加餐
Rust(在pyo3的幫助下)以最小的代價為日常Python代碼解鎖了真正的原生性能。
Python對于研究人員來說是一個極好的API,而使用Rust制作快速構建塊是一個非常強大的組合。
Proflier分析工具很不錯,它能幫助你真正理解代碼中發生的一切。
最后一點:計算機的運行速度實在是太快了。下次你在等待某件事完成時,考慮啟動一個Proflier分析器,你可能會學到一些新東西。
原文鏈接:https://ohadravid.github.io/posts/2023-03-rusty-python/
譯者介紹:
盧鑫旺,51CTO社區編輯,編程語言愛好者,對數據庫,架構,云原生有濃厚興趣。