玩轉SpringBoot—Starter組件

學習目標
- 明確starter組件到底是什么?是做什么的?
- 自己實現一個starter組件
- Spring Boot提供的Starter組件和第三方Starter組件
- Spring -Boot-Web-Starter如何自動讓應用部署到Tomcat容器的
第1章 starter組件簡介
starter組件是SpringBoot的一個核心特性,Starter組件的出現極大簡化了項目開發,例如在項目中使用的pom.xm文件下配置:
<dependency>
    <groupId>org.springframework.boot</groupId>
    <artifactId>spring-boot-starter-web</artifactId>
</dependency>
SpringBoot就會自動關聯web開發相關的依賴,如tomcat以及spring-webmvc等,進而對web開發進行支持,同時相關技術也將實現自動配置,避免了繁瑣的配置文件。
Starter組件使開發者不需要關注各種依賴庫的處理,不需要具體的配置信息,由SpringBoot自動完成class類發現并加載需要的Bean。
利用starter實現自動化配置需要兩個條件:Maven依賴、配置文件,Maven依賴實質上就是導入jar包,SpringBoot啟動的時候會找到Starter組件jar包中的
resources/META-INF/spring.factories文件,根據spring.factories文件中的配置,找到需要自動配置的類。
starter組件理解總結:
- 每個不同的starter組件實際上完成自身的功能邏輯,然后對外提供一個bean對象讓別人調用
- 對外提供的bean通過自動裝配原理注入到提供方的IoC容器中
第2章 手寫starter組件
要實現一個自己的starter組件其實也很簡單,要完成一個starter組件的編寫,首先要明確,我們要做的事有哪些:
- 通過配置類提供對外服務的bean對象
- 按照自動裝配原理完成spring.factories的編寫
- starter自動屬性配置
接下來我們就來手寫一個starter組件,流程如下:
創建一個springboot項目redisson-spring-boot-starter
引入依賴:
<?xml version="1.0" encoding="UTF-8"?>

<project xmlns="http://maven.apache.org/POM/4.0.0" xmlns:xsi="http://www.w3.org/2001/XMLSchema-instance"
  xsi:schemaLocation="http://maven.apache.org/POM/4.0.0 http://maven.apache.org/xsd/maven-4.0.0.xsd">
  <modelVersion>4.0.0</modelVersion>

  <groupId>com.gupao.redisson</groupId>
  <artifactId>redisson-spring-boot-starter</artifactId>
  <version>1.0-SNAPSHOT</version>

  <name>redisson-spring-boot-starter</name>
  <!-- FIXME change it to the project's website -->
  <url>http://www.example.com</url>

  <properties>
    <project.build.sourceEncoding>UTF-8</project.build.sourceEncoding>
    <maven.compiler.source>1.8</maven.compiler.source>
    <maven.compiler.target>1.8</maven.compiler.target>
  </properties>

  <dependencies>
    <dependency>
      <groupId>junit</groupId>
      <artifactId>junit</artifactId>
      <version>4.11</version>
      <scope>test</scope>
    </dependency>
    <dependency>
      <groupId>org.springframework.boot</groupId>
      <artifactId>spring-boot-starter</artifactId>
      <version>2.3.2.RELEASE</version>
      <optional>true</optional>
    </dependency>
    <dependency>
      <groupId>org.redisson</groupId>
      <artifactId>redisson</artifactId>
      <version>3.16.1</version>
    </dependency>
    <dependency>
      <groupId>org.springframework.boot</groupId>
      <artifactId>spring-boot-configuration-processor</artifactId>
      <version>2.3.2.RELEASE</version>
    </dependency>

  </dependencies>

  <build>
    <pluginManagement><!-- lock down plugins versions to avoid using Maven defaults (may be moved to parent pom) -->
      <plugins>
        <!-- clean lifecycle, see https://maven.apache.org/ref/current/maven-core/lifecycles.html#clean_Lifecycle -->
        <plugin>
          <artifactId>maven-clean-plugin</artifactId>
          <version>3.1.0</version>
        </plugin>
        <!-- default lifecycle, jar packaging: see https://maven.apache.org/ref/current/maven-core/default-bindings.html#Plugin_bindings_for_jar_packaging -->
        <plugin>
          <artifactId>maven-resources-plugin</artifactId>
          <version>3.0.2</version>
        </plugin>
        <plugin>
          <artifactId>maven-compiler-plugin</artifactId>
          <version>3.8.0</version>
        </plugin>
        <plugin>
          <artifactId>maven-surefire-plugin</artifactId>
          <version>2.22.1</version>
        </plugin>
        <plugin>
          <artifactId>maven-jar-plugin</artifactId>
          <version>3.0.2</version>
        </plugin>
        <plugin>
          <artifactId>maven-install-plugin</artifactId>
          <version>2.5.2</version>
        </plugin>
        <plugin>
          <artifactId>maven-deploy-plugin</artifactId>
          <version>2.8.2</version>
        </plugin>
        <!-- site lifecycle, see https://maven.apache.org/ref/current/maven-core/lifecycles.html#site_Lifecycle -->
        <plugin>
          <artifactId>maven-site-plugin</artifactId>
          <version>3.7.1</version>
        </plugin>
        <plugin>
          <artifactId>maven-project-info-reports-plugin</artifactId>
          <version>3.0.0</version>
        </plugin>
      </plugins>
    </pluginManagement>
  </build>
</project>
創建要注入的bean類和接口
package com.gupao.redisson;

/**
 * @author Eclipse_2019
 * @create 2022/6/11 9:58
 */
public interface Humen {
    String dancing();
}


package com.gupao.redisson;

import org.redisson.Redisson;
import org.redisson.api.RedissonClient;
import org.redisson.config.Config;
import org.springframework.util.StringUtils;

import java.util.Properties;

/**
 * @author Eclipse_2019
 * @create 2022/1/14 22:55
 */
public class Girl implements Humen{

    public static Girl create(String name){
        return new Girl(name);
    }

    private String name;

    public Girl(String name) {
        this.name = name;
    }

    public String getName() {
        return name;
    }

    public void setName(String name) {
        this.name = name;
    }

    @Override
    public String dancing() {
        return name+"喜歡跳舞";
    }
}
創建屬性類
package com.gupao.redisson;

import org.springframework.boot.context.properties.ConfigurationProperties;

/**
 * @author Eclipse_2019
 * @create 2021/8/11 11:28
 */
@ConfigurationProperties(prefix = "gp.girl")
public class GirlProperties {
    private String name = "wentai";

    public String getName() {
        return name;
    }

    public void setName(String name) {
        this.name = name;
    }
}
創建配置類
package com.gupao.redisson;
import org.redisson.Redisson;
import org.redisson.api.RedissonClient;
import org.redisson.config.Config;
import org.redisson.config.SingleServerConfig;
import org.springframework.boot.autoconfigure.condition.ConditionalOnClass;
import org.springframework.boot.context.properties.EnableConfigurationProperties;
import org.springframework.context.annotation.Bean;
import org.springframework.context.annotation.Configuration;
/**
* @author Eclipse_2019
* @create 2021/8/11 11:05
*/
@ConditionalOnClass(Girl.class)//條件裝配
@EnableConfigurationProperties(GirlProperties.class)
@Configuration
public class GirlAutoConfiguration {
@Bean
Humen humen(GirlProperties girlProperties){
return Girl.create(girlProperties.getName());
}
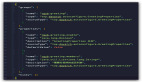
}實現自動裝配流程,在META-INF目錄下創建spring.factories文件
org.springframework.boot.autoconfigure.EnableAutoConfiguration=\
  com.gupao.redisson.RedissonAutoConfiguration,\
  com.gupao.redisson.GirlAutoConfiguration
在META-INF創建屬性默認規范文件additional-spring-configuration-metadata.json
{
  "properties": [
    {
      "name": "gp.redisson.host",
      "type": "java.lang.String",
      "description": "Redis的服務器地址",
      "defaultValue": "localhost"
    },
    {
      "name": "gp.redisson.port",
      "type": "java.lang.Integer",
      "description": "Redis的服務器端口",
      "defaultValue": 6379
    },
    {
      "name": "gp.redisson.pwd",
      "type": "java.lang.String",
      "description": "Redis的服務器密碼",
      "defaultValue": "jingtian"
    },
    {
      "name": "gp.redisson.datasource",
      "type": "java.lang.Integer",
      "description": "Redis的服務器庫",
      "defaultValue": 0
    },
    {
      "name": "gp.girl.name",
      "type": "java.lang.String",
      "description": "默認女孩名",
      "defaultValue": "wentai"
    }
  ]
}
打包發布
測試
通過上面我們實現自己的starter組件案例來看,starter組件的實現其實邏輯并不復雜,核心思想就是在META-INF目錄下創建spring.factories文件,然后配置自定義的配置類。只要按照這個邏輯配置,都可以做到自動注入到IoC容器中去,OK,那我們現在來看看我們的spring-boot-starter-data-redis這個starter組件,你會發現,這個組件里面居然沒有spring.factories文件,為什么呢?沒有這個文件,它是怎么自動裝配的呢?
第3章 自身與第三方維護
其實針對springboot的starter組件分為兩類。
springboot自身維護的starter組件
@ConditionalOnBean(僅僅在當前上下文中存在某個對象時,才會實例化一個Bean)
@ConditionalOnClass(某個class位于類路徑上,才會實例化一個Bean)
@ConditionalOnExpression(當表達式為true的時候,才會實例化一個Bean)
@ConditionalOnMissingBean(僅僅在當前上下文中不存在某個對象時,才會實例化一個Bean)
@ConditionalOnMissingClass(某個class類路徑上不存在的時候,才會實例化一個Bean)
@
ConditionalOnNotWebApplication(不是web應用)
所有的starter組件自身不帶spring.factories文件,集中在spring都是-boot-autoconfigure包下的EnableAutoConfiguration
springboot裝配這些配置類是需要條件的,不可能所有的configuration都注入,假設我沒用到redis的話就不會引包,這樣就根據@ConditionalOnClass(RedisOperations.class)在class path下找不到RedisOperation類,這樣就不會加載該配置類
自身維護的starter組件的命名:spring-boot-starter-XXX
第三方維護的starter組件
- 自己維護spring.factories文件
- 命名方式:XXX-spring-boot-starter
這里有個小知識:@ConditionalOnClass(XXX.class)在我們本地用的時候,如果XXX.class不存在的話壓根編譯不能通過,但是為什么springboot自身維護的能編譯通過呢?
- 其實原因也簡單,因為在starter組件編譯的時候是引入了@ConditionnalOnClass里面的那個類了的,然后在pom文件引入的這個XXX類所在的jar包時加了true,等starter組件編譯打包之后不會將XXX類所在的jar包傳遞依賴給別的項目。
- 這里就可以將spring-boot-autoconfigure包理解成一個starter組件,它在編譯的過程中引入了很多jar包,比如說引入Redis的相關jar包,然后加入了true,當autoconfigure編譯打成jar包之后是沒問題的,但是別的項目依賴autoconfigure之后,必須要引入redis的jar包才能通過@ConditionalOnClass注解。
現在我們會手寫自己的starter組件了,也明白了不同組件的區別,那么接下來讓我們一起來看看springboot中的一個比較重要的組件——spring-boot-starter-web組件,為什么要看它呢?因為它幫我們完成了容器的內置以及啟動。
第4章 內置容器
starter-web
Springboot整合Spring MVC只需要在pom.xml文件中引入。
<dependency>
    <groupId>org.springframework.boot</groupId>
    <artifactId>spring-boot-starter-web</artifactId>
</dependency>
配置文件。
server:
  port: 8080 # web服務端口號
  servlet:
    multipart:
      enabled: true # 啟用文件上傳
      location: # 上傳文件臨時保存位置
      max-file-size: 50MB # 單個文件上傳最大大小限制
      max-request-size: 100MB # 單次請求主體最大大小限制
  mvc:
    format:
      date: yyyy-MM-dd # 日期格式
      date-time: yyyy-MM-dd HH:mm:ss # 日期時間格式
      time: HH:mm:ss # 時間格式
    servlet:
      path: / # servlet路徑
      static-path-pattern: # 匹配靜態資源路徑
    view:
      prefix: # view前綴
      suffix: # view后綴,如:.jsp
以上是Spring MVC常用配置,更多配置可參見https://docs.spring.io/spring-boot/docs/2.3.7.RELEASE/reference/html/appendix-application-properties.html#common-application-properties-web。
我們只配置最簡單的。
spring.mvc.view.suffix=.jsp
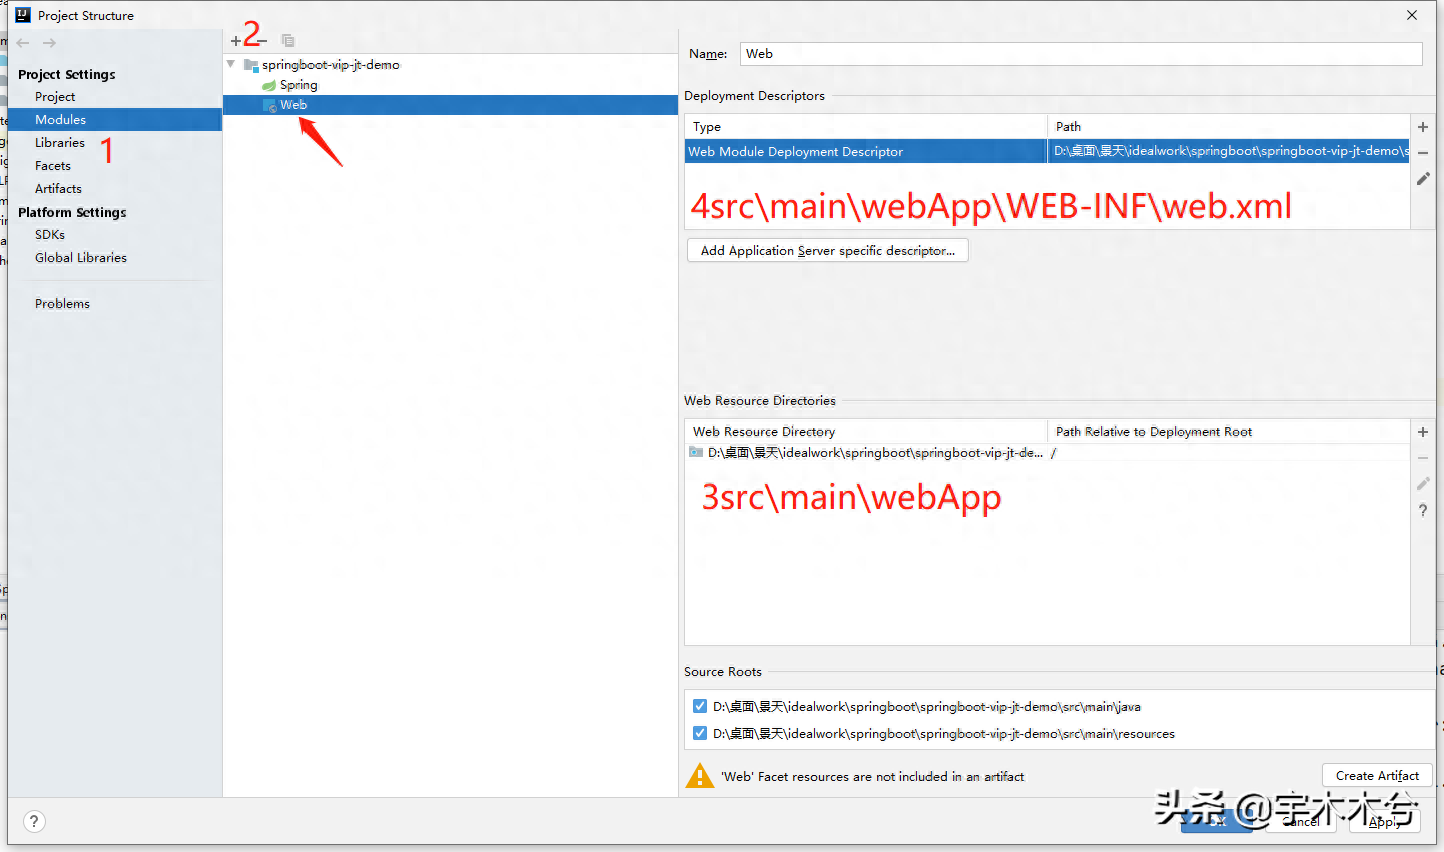
spring.mvc.view.prefix=/WEB-INF/jsp/3.為項目添加WEB-INF目錄和web.xml文件。
service:
package com.example.springbootvipjtdemo.mvcdemo;

import org.springframework.stereotype.Service;

/**
 * @author Eclipse_2019
 * @create 2022/6/11 16:03
 */
@Service
public class JspService {
    public String sayHello(String name){
        return "你真棒!"+name;
    }
}
controller:
package com.example.springbootvipjtdemo.mvcdemo;

import org.springframework.beans.factory.annotation.Autowired;
import org.springframework.web.bind.annotation.RequestMapping;
import org.springframework.web.bind.annotation.RequestParam;
import org.springframework.web.bind.annotation.RestController;
import org.springframework.web.servlet.ModelAndView;

/**
 * @author Eclipse_2019
 * @create 2022/6/11 16:03
 */
@RestController
public class JspController {
    @Autowired
    private JspService jspService;

    @RequestMapping("/jsp")
    public ModelAndView hello(@RequestParam String name){
        ModelAndView modelAndView = new ModelAndView();
        modelAndView.addObject("version","2.X版本");
        modelAndView.addObject("name",name);
        modelAndView.addObject("msg",jspService.sayHello(name));
        modelAndView.setViewName("a");
        return modelAndView;
    }
}
jsp:
<%@page contentType="text/html; charset=UTF-8" language="java" %>
<!DOCTYPE html>
<html lang="en">
<body>
<h2>${version}</h2>
<h2>${name}:${msg}</h2>
</body>
</html>
上面的案例實現了Springboot集成springmvc,但是現在還沒有哪里用到了容器,那容器是怎么啟動的呢?
先來看看spring-boot-starter-web包里面有啥:
- ServletWebServerFactoryAutoConfiguration配置類中Import了ServletWebServerFactoryConfiguration.EmbeddedTomcat.class。
- 當容器啟動的時候也會自動裝配該類,在該配置類中創建了TomcatServletWebServerFactory()。
- WebMvcAutoConfiguration類完成了InternalResourceViewResolver解析器的注入。
然后再來看看springboot啟動的時候是怎么去創建內置容器的
onRefresh
spring容器啟動代碼就不說了,這里主要看一下onRefresh() 這個方法。轉到定義發現這個方法里面啥都沒有,這明顯是一個鉤子方法,它會鉤到它子類重寫onRefresh()方法。所以去看子類里面的onRefresh()
protected void onRefresh() throws BeansException {
    //這是一個空方法,AbstractApplicationContext 這個類是一個抽象類,
    //所以我們要找到集成AbstractApplicationContext的子類,去看子類里面的onRefresh()
	// For subclasses: do nothing by default.
}
我們這里是一個Web項目,所以我們就去看ServletWebServerApplicationContext 這個類 ,我還是把類的關系圖貼一下。
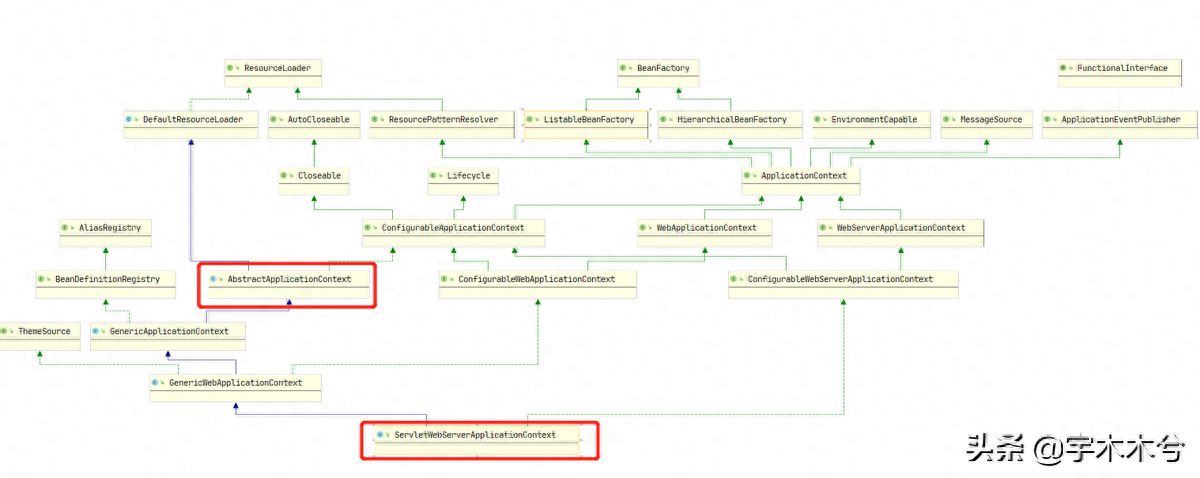
我們就去看ServletWebServerApplicationContext 這個類下面的 onRefresh() 方法。
protected void onRefresh() {
		super.onRefresh();
		try {
            //看到內置容器的影子了,進去看看
			createWebServer();
		}
		catch (Throwable ex) {
			throw new ApplicationContextException("Unable to start web server", ex);
		}

}
createWebServer
private void createWebServer() {
		WebServer webServer = this.webServer;
		ServletContext servletContext = getServletContext();
		if (webServer == null && servletContext == null) {
            //1、這個獲取webServerFactory還是要進去看看
			ServletWebServerFactory factory = getWebServerFactory();
			this.webServer = factory.getWebServer(getSelfInitializer());
		}
		else if (servletContext != null) {
			try {
				getSelfInitializer().onStartup(servletContext);
			}
			catch (ServletException ex) {
				throw new ApplicationContextException("Cannot initialize servlet context",
						ex);
			}
		}
		initPropertySources();

}
我們繼續看下getWebServletFactory() 這個方法,這個里面其實就是選擇出哪種類型的web容器了。
protected ServletWebServerFactory getWebServerFactory() {
		// Use bean names so that we don't consider the hierarchy
		String[] beanNames = getBeanFactory()
				.getBeanNamesForType(ServletWebServerFactory.class);
		if (beanNames.length == 0) {
			throw new ApplicationContextException(
					"Unable to start ServletWebServerApplicationContext due to missing "
							+ "ServletWebServerFactory bean.");
		}
		if (beanNames.length > 1) {
			throw new ApplicationContextException(
					"Unable to start ServletWebServerApplicationContext due to multiple "
							+ "ServletWebServerFactory beans : "
							+ StringUtils.arrayToCommaDelimitedString(beanNames));
		}
		return getBeanFactory().getBean(beanNames[0], ServletWebServerFactory.class);
	}
getWebServer
我們再回頭去看factory.getWebServer(getSelfInitializer()) ,轉到定義就會看到很熟悉的名字tomcat。
public WebServer getWebServer(ServletContextInitializer... initializers) {
        //tomcat這位大哥出現了
		Tomcat tomcat = new Tomcat();
		File baseDir = (this.baseDirectory != null ? this.baseDirectory
				: createTempDir("tomcat"));
		tomcat.setBaseDir(baseDir.getAbsolutePath());
		Connector connector = new Connector(this.protocol);
		tomcat.getService().addConnector(connector);
		customizeConnector(connector);
		tomcat.setConnector(connector);
		tomcat.getHost().setAutoDeploy(false);
		configureEngine(tomcat.getEngine());
		for (Connector additionalConnector : this.additionalTomcatConnectors) {
			tomcat.getService().addConnector(additionalConnector);
		}
		prepareContext(tomcat.getHost(), initializers);
		return getTomcatWebServer(tomcat);

}
內置的Servlet容器就是在onRefresh() 方法里面啟動的,至此一個Servlet容器就啟動OK了。