微服務(wù)部署—Docker Compose搭建高可用雙機(jī)熱備MySQL數(shù)據(jù)庫

一、MySQL 的多種數(shù)據(jù)備份機(jī)制
mysqldump:這是 MySQL 自帶的備份工具,通過導(dǎo)出 SQL 語句來備份數(shù)據(jù)庫。它可以備份整個(gè)數(shù)據(jù)庫、特定表或特定數(shù)據(jù)。使用命令行執(zhí)行 mysqldump 命令可以生成 SQL 文件,然后可以使用該文件還原備份數(shù)據(jù)。備份命令:
# 單個(gè)數(shù)據(jù)庫
mysqldump -h hostname -u username -p dbname > backup.sql
# 多個(gè)數(shù)據(jù)庫
mysqldump -h hostname -u username -p --databases dbname1 dbname2 > backup.sql
MySQL Enterprise Backup:這是 MySQL 官方提供的高級(jí)備份工具【商用收費(fèi)工具】,可用于備份大型數(shù)據(jù)庫。它支持增量備份和并行備份,可以在運(yùn)行時(shí)備份數(shù)據(jù)庫,減少備份期間的停機(jī)時(shí)間。它以block級(jí)別進(jìn)行并行備份,性能大大優(yōu)于邏輯備份工具如mysqldump。
mysqlbackup --host=hostname --user=username --password=password --backup-dir=/path/to/backupdir backupMySQL Workbench:MySQL Workbench是一種圖形化MySQL管理工具,可以進(jìn)行邏輯備份和還原,支持導(dǎo)出SQL腳本、CSV文件和XML文件等。
物理備份:這種備份方法直接復(fù)制數(shù)據(jù)庫文件,包括數(shù)據(jù)文件、日志文件等。可以使用文件系統(tǒng)級(jí)別的工具,如 rsync 或者文件系統(tǒng)快照功能來備份。
復(fù)制(主從復(fù)制 / 多主復(fù)制):
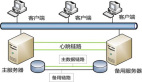
MySQL主從復(fù)制用于將一個(gè)MySQL服務(wù)器(稱為主服務(wù)器)上的數(shù)據(jù)變更同步到其他MySQL服 務(wù)器(稱為從服務(wù)器)。主從復(fù)制提供了數(shù)據(jù)備份、讀寫分離和負(fù)載均衡等功能,以提高系統(tǒng)的可用性和性能。
MySQL多主復(fù)制允許在多個(gè)數(shù)據(jù)庫實(shí)例之間進(jìn)行雙向數(shù)據(jù)同步。它的工作原理是每個(gè)數(shù)據(jù)庫實(shí)例都可以充當(dāng)主服務(wù)器和從服務(wù)器,可以同時(shí)接收和發(fā)送數(shù)據(jù)變更。
第三方備份工具:還有一些第三方工具可用于備份 MySQL 數(shù)據(jù)庫,例如 Percona XtraBackup、MariaDB Backup 等。這些工具提供了更多高級(jí)特性,如并行備份、壓縮備份等。
MySQL 提供的多種數(shù)據(jù)備份機(jī)制各有優(yōu)缺點(diǎn)和適應(yīng)場(chǎng)景,復(fù)制(主從復(fù)制 / 多主復(fù)制)適合我們的應(yīng)用場(chǎng)景,多主復(fù)制比主從復(fù)制會(huì)更為復(fù)雜一些,需要考慮數(shù)據(jù)沖突等問題。在實(shí)際使用過程中,主主復(fù)制存在很多數(shù)據(jù)沖突的問題需要解決,所以這里我們選擇使用主從備份機(jī)制。
二、MySQL 主從復(fù)制原理
MySQL 主從復(fù)制是一種基于日志的復(fù)制機(jī)制,用于將主服務(wù)器(Master)上的數(shù)據(jù)實(shí)時(shí)復(fù)制到一個(gè)或多個(gè)從服務(wù)器(Slave)。主從復(fù)制的原理如下:
- 主服務(wù)器將所有修改操作記錄在二進(jìn)制日志(Binary Log)中。這些修改可以是插入、更新或刪除數(shù)據(jù)的操作。
- 從服務(wù)器連接到主服務(wù)器,并發(fā)送一個(gè)請(qǐng)求,請(qǐng)求成為主服務(wù)器的從服務(wù)器。主服務(wù)器收到請(qǐng)求后,將記錄從服務(wù)器的信息,并開始與從服務(wù)器建立復(fù)制連接。
- 主服務(wù)器將二進(jìn)制日志中的內(nèi)容發(fā)送給從服務(wù)器。從服務(wù)器接收并執(zhí)行這些日志中的操作,將數(shù)據(jù)修改操作反映到自己的數(shù)據(jù)庫上。
- 從服務(wù)器還會(huì)定期向主服務(wù)器發(fā)送心跳信息以維持連接。如果主服務(wù)器長(zhǎng)時(shí)間沒有收到從服務(wù)器的心跳信息,就認(rèn)為從服務(wù)器宕機(jī),不再向其發(fā)送日志。
- 如果主服務(wù)器發(fā)生故障,導(dǎo)致無法提供服務(wù),可以將一個(gè)從服務(wù)器提升為新的主服務(wù)器,以繼續(xù)提供服務(wù)。此時(shí),其他從服務(wù)器將切換到新的主服務(wù)器上進(jìn)行復(fù)制。
通過主從復(fù)制,可以實(shí)現(xiàn)數(shù)據(jù)的實(shí)時(shí)復(fù)制和分布式讀取,提高數(shù)據(jù)庫的可用性和讀取性能。此外,主從復(fù)制還可以用于備份數(shù)據(jù),當(dāng)主服務(wù)器發(fā)生故障時(shí),可以快速切換到從服務(wù)器,減少服務(wù)停機(jī)時(shí)間。
需要注意的是,主從復(fù)制是異步的,從服務(wù)器的數(shù)據(jù)可能稍有延遲。而且主從復(fù)制只復(fù)制數(shù)據(jù)修改操作,不復(fù)制表結(jié)構(gòu)的變更。如果需要同步表結(jié)構(gòu)的變更,可以使用主從復(fù)制搭配其他工具,如 GTID(Global Transaction Identifier)或者基于觸發(fā)器的解決方案。
三、MySQL 主主復(fù)制原理
MySQL主主復(fù)制是一種數(shù)據(jù)同步和高可用性解決方案,它能夠保持多個(gè)MySQL服務(wù)器之間的數(shù)據(jù)一致性。主主復(fù)制的原理如下:
- 配置雙向復(fù)制:在兩臺(tái)MySQL服務(wù)器上分別配置主從復(fù)制,使每臺(tái)服務(wù)器都可以同時(shí)充當(dāng)主服務(wù)器和從服務(wù)器。
- 生成二進(jìn)制日志:當(dāng)有數(shù)據(jù)更新操作(如插入、更新、刪除)時(shí),MySQL服務(wù)器會(huì)將這些操作記錄在二進(jìn)制日志中。
- 傳遞二進(jìn)制日志:每臺(tái)服務(wù)器將自己的二進(jìn)制日志傳遞給另一臺(tái)服務(wù)器。這可以通過網(wǎng)絡(luò)連接實(shí)現(xiàn),通常使用基于TCP/IP的復(fù)制協(xié)議。
- 應(yīng)用二進(jìn)制日志:每臺(tái)服務(wù)器接收到對(duì)方的二進(jìn)制日志后,會(huì)將這些日志應(yīng)用到自己的數(shù)據(jù)庫中,從而使兩臺(tái)服務(wù)器的數(shù)據(jù)保持一致。
- 處理沖突:在主主復(fù)制中,由于兩臺(tái)服務(wù)器都可以接收寫操作,可能會(huì)出現(xiàn)沖突。為了處理沖突,MySQL提供了自動(dòng)事務(wù)回滾和主鍵沖突檢測(cè)等機(jī)制。
三、使用Docker Compose安裝MySQL 主從服務(wù)器
1、環(huán)境準(zhǔn)備
首先準(zhǔn)備至少2臺(tái)Linux服務(wù)器,一臺(tái)作為MySQL主服務(wù)器,一臺(tái)或者多臺(tái)作為MySQL從服務(wù)器。我們這里準(zhǔn)備兩臺(tái)服務(wù)器分別為:
- 192.168.0.210 (MySQL主服務(wù)器)
- 192.168.0.195 (MySQL從服務(wù)器)
2、準(zhǔn)備MySQL文件存放目錄
- 準(zhǔn)備數(shù)據(jù)庫存儲(chǔ)目錄,在兩臺(tái)主從服務(wù)器上分別執(zhí)行一下命令。
mkdir -p /opt/container/mysql/data /opt/container/mysql/config /opt/container/mysql/slave/mysql-files

chmod -R 777 /opt/container/mysql/data /opt/container/mysql/config /opt/container/mysql/slave/mysql-files
/opt/container/mysql/data 用于存放MySQL數(shù)據(jù)文件。
/opt/container/mysql/config 用于存放MySQL配置文件。
/opt/container/mysql/slave/mysql-files 用于存放MySQL數(shù)據(jù)導(dǎo)入/導(dǎo)出的數(shù)據(jù)文件存放目錄。
3、MySQL主、從服務(wù)器docker-compose-mysql.yml文件
version: '3'
services:
    mysql:
        environment:
            ## root賬號(hào)的密碼
            MYSQL_ROOT_PASSWORD: root密碼
            TZ: Asia/Shanghai
            ## 新建mysql賬號(hào)
            MYSQL_USER: 'mysql_user'
            MYSQL_PASSWORD: mysql_user密碼
            MYSQL_DATABASE:  'mysql_db'
        image: "docker.io/mysql:latest"
        container_name: mysql
        restart: always
        ## 映射掛載
        volumes:
            ## 數(shù)據(jù)目錄,要確保先創(chuàng)建好
            - "/opt/container/mysql/data:/var/lib/mysql"
            - "/opt/container/mysql/config/my.cnf:/etc/mysql/my.cnf"
            - "/opt/container/mysql/slave/mysql-files:/var/lib/mysql-files"
            - "/etc/localtime:/etc/localtime"
            - "/usr/share/zoneinfo/Asia/Shanghai:/etc/timezone"
            ## 初始化的腳本,初始化我們存放的init.sql文件
            - "./mysql:/docker-entrypoint-initdb.d/"
        ports:
            - "3306:3306"
        command:
            --max_connections=1000
            --character-set-server=utf8mb4
            --collation-server=utf8mb4_general_ci
            --default-authentication-plugin=mysql_native_password
4、在MySQL主服務(wù)器上新增配置文件
在/opt/container/mysql/config目錄下新增my.cnf文件, 配置文件內(nèi)容:
[mysqld]
pid-file        = /var/run/mysqld/mysqld.pid
socket          = /var/run/mysqld/mysqld.sock
datadir         = /var/lib/mysql
secure-file-priv= NULL
# Disabling symbolic-links is recommended to prevent assorted security risks
symbolic-links=0

# Custom config should go here
!includedir /etc/mysql/conf.d/

sql_mode=STRICT_TRANS_TABLES,NO_ZERO_IN_DATE,NO_ZERO_DATE,ERROR_FOR_DIVISION_BY_ZERO,NO_ENGINE_SUBSTITUTION
server-id=150
log-bin=/var/lib/mysql/mysql-bin
expire_logs_days=60
binlog-format=mixed
max_allowed_packet=256M
relay-log=mysql-relay
log-slave-updates
auto_increment_increment=2     #表示自增長(zhǎng)字段每次遞增的量
auto_increment_offset=1     #表示自增長(zhǎng)字段從那個(gè)數(shù)開始
5、在MySQL從服務(wù)器上新增配置文件
在/opt/container/mysql/config目錄下新增my.cnf文件, 配置文件內(nèi)容:
[mysqld]
pid-file        = /var/run/mysqld/mysqld.pid
socket          = /var/run/mysqld/mysqld.sock
datadir         = /var/lib/mysql
secure-file-priv= NULL
# Disabling symbolic-links is recommended to prevent assorted security risks
symbolic-links=0

# Custom config should go here
!includedir /etc/mysql/conf.d/

sql_mode=STRICT_TRANS_TABLES,NO_ZERO_IN_DATE,NO_ZERO_DATE,ERROR_FOR_DIVISION_BY_ZERO,NO_ENGINE_SUBSTITUTION
server-id=200
# 設(shè)置只讀模式
# read_only = 1
log-bin=/var/lib/mysql/mysql-bin
expire_logs_days=60
binlog-format=mixed
max_allowed_packet=256M
relay-log=mysql-relay
log-slave-updates
auto_increment_increment=2     #表示自增長(zhǎng)字段每次遞增的量
auto_increment_offset=1     #表示自增長(zhǎng)字段從那個(gè)數(shù)開始
6、在兩臺(tái)MySQL主備服務(wù)器上分別執(zhí)行docker-compose安裝啟動(dòng)命令
將docker-compose-mysql.yml上傳至/opt/software目錄,這個(gè)目錄可以自己選擇,然后到目錄下執(zhí)行安裝啟動(dòng)命令
docker-compose -f docker-compose-mysql.yml up -d[root@localhost software]# docker-compose -f docker-compose-mysql.yml up -d
[+] Running 13/13
? mysql Pulled 40.4s
? 72a69066d2fe Pull complete 14.2s
? 93619dbc5b36 Pull complete 14.2s
? 99da31dd6142 Pull complete 14.6s
? 626033c43d70 Pull complete 14.7s
? 37d5d7efb64e Pull complete 14.7s
? ac563158d721 Pull complete 16.2s
? d2ba16033dad Pull complete 16.2s
? 688ba7d5c01a Pull complete 16.2s
? 00e060b6d11d Pull complete 24.5s
? 1c04857f594f Pull complete 24.5s
? 4d7cfa90e6ea Pull complete 24.6s
? e0431212d27d Pull complete 24.6s
WARN[0040] Found orphan containers ([nginx]) for this project. If you removed or renamed this service in your compose file, you can run this command with the --remove-orphans flag to clean it up.
[+] Running 1/1
? Container mysql Started 0.3s通過docker ps命令可以看到mysql已經(jīng)安裝并啟動(dòng)成功。
[root@localhost software]# docker ps
CONTAINER ID   IMAGE          COMMAND                  CREATED          STATUS          PORTS                                                                            NAMES
bf4e482dbc71   mysql:latest   "docker-entrypoint.s…"   21 minutes ago   Up 21 minutes   0.0.0.0:3306->3306/tcp, :::3306->3306/tcp, 33060/tcp                             mysql
四、MySQL 主從復(fù)制配置及測(cè)試
1、登錄主MySQL服務(wù)器查看配置數(shù)據(jù)
- 進(jìn)入docker容器。
[root@localhost software]# docker exec -it bf4e482dbc71 bash- 通過用戶名密碼登錄mysql賬戶。
root@bf4e482dbc71:/# mysql -uroot -p密碼- 查看需同步的主服務(wù)器數(shù)據(jù) show master status,在MySQL從服務(wù)器上配置時(shí)需要用到File和Position的值。
mysql> show master status;
+------------------+----------+--------------+------------------+-------------------+
| File             | Position | Binlog_Do_DB | Binlog_Ignore_DB | Executed_Gtid_Set |
+------------------+----------+--------------+------------------+-------------------+
| mysql-bin.000003 |      156 |              |                  |                   |
+------------------+----------+--------------+------------------+-------------------+
1 row in set (0.00 sec)
2、登錄從MySQL服務(wù)器,并配置數(shù)據(jù)同步
- 進(jìn)入docker容器。
[root@localhost software]# docker exec -it b168db7981c0 bash- 通過用戶名密碼登錄mysql賬戶。
root@bf4e482dbc71:/# mysql -uroot -p密碼- 登錄成功后,執(zhí)行從主數(shù)據(jù)庫同步的配置命令。
CHANGE MASTER TO master_host = '192.168.0.210',
 master_port = 3306,
 master_user = 'root',
 master_password = '密碼',
 master_log_file = 'mysql-bin.000003',
master_log_pos = 156;- 啟動(dòng)從服務(wù)器。
mysql> start slave;
Query OK, 0 rows affected, 1 warning (0.01 sec)- 使用命令 show slave status\G 查看從服務(wù)器狀態(tài), 以下兩項(xiàng)顯示Yes,表示配置成功:
Slave_IO_Running: YesSlave_SQL_Running: Yes。
mysql> show slave status\G
*************************** 1. row ***************************
               Slave_IO_State: Waiting for source to send event
                  Master_Host: 192.168.0.210
                  Master_User: root
                  Master_Port: 3306
                Connect_Retry: 60
              Master_Log_File: mysql-bin.000003
          Read_Master_Log_Pos: 156
               Relay_Log_File: mysql-relay.000002
                Relay_Log_Pos: 324
        Relay_Master_Log_File: mysql-bin.000003
             Slave_IO_Running: Yes
            Slave_SQL_Running: Yes
              Replicate_Do_DB:
          Replicate_Ignore_DB:
           Replicate_Do_Table:
       Replicate_Ignore_Table:
      Replicate_Wild_Do_Table:
  Replicate_Wild_Ignore_Table:
                   Last_Errno: 0
                   Last_Error:
                 Skip_Counter: 0
          Exec_Master_Log_Pos: 156
              Relay_Log_Space: 529
              Until_Condition: None
               Until_Log_File:
                Until_Log_Pos: 0
           Master_SSL_Allowed: No
           Master_SSL_CA_File:
           Master_SSL_CA_Path:
              Master_SSL_Cert:
            Master_SSL_Cipher:
               Master_SSL_Key:
        Seconds_Behind_Master: 0
Master_SSL_Verify_Server_Cert: No
                Last_IO_Errno: 0
                Last_IO_Error:
               Last_SQL_Errno: 0
               Last_SQL_Error:
  Replicate_Ignore_Server_Ids:
             Master_Server_Id: 150
                  Master_UUID: ce0ecbd8-667b-11ee-98e5-0242ac120003
             Master_Info_File: mysql.slave_master_info
                    SQL_Delay: 0
          SQL_Remaining_Delay: NULL
      Slave_SQL_Running_State: Replica has read all relay log; waiting for more updates
           Master_Retry_Count: 86400
                  Master_Bind:
      Last_IO_Error_Timestamp:
     Last_SQL_Error_Timestamp:
               Master_SSL_Crl:
           Master_SSL_Crlpath:
           Retrieved_Gtid_Set:
            Executed_Gtid_Set:
                Auto_Position: 0
         Replicate_Rewrite_DB:
                 Channel_Name:
           Master_TLS_Version:
       Master_public_key_path:
        Get_master_public_key: 0
            Network_Namespace:
1 row in set, 1 warning (0.00 sec)
3、主從數(shù)據(jù)庫復(fù)制測(cè)試
- 在MySQL主服務(wù)器,新建一個(gè)數(shù)據(jù)庫my_test。
mysql> create database my_test;
Query OK, 1 row affected (0.01 sec)- 在MySQL從服務(wù)器,執(zhí)行查看數(shù)據(jù)庫命令,可以看到my_test數(shù)據(jù)庫已經(jīng)同步到MySQL從服務(wù)器。
mysql> show databases;
+--------------------+
| Database           |
+--------------------+
| dbwl               |
| information_schema |
| my_test            |
| mysql              |
| performance_schema |
| sys                |
+--------------------+
6 rows in set (0.00 sec)- 在MySQL主服務(wù)器,新建一個(gè)表t_test并新增一條數(shù)據(jù)。
mysql> use my_test;
Database changed

mysql> create table t_test(id int UNSIGNED NOT NULL AUTO_INCREMENT, name varchar(32) NOT NULL, PRIMARY KEY (id));
Query OK, 0 rows affected (0.04 sec)

mysql> insert into t_test(name) values('Test');
Query OK, 1 row affected (0.02 sec)- 在MySQL從服務(wù)器查詢數(shù)據(jù)庫和表數(shù)據(jù)是否同步,如果配置正常,我們可以看到,在MySQL主服務(wù)器新增的數(shù)據(jù)庫和表數(shù)據(jù),在從服務(wù)器也存在。
mysql> show databases;
+--------------------+
| Database           |
+--------------------+
| dbwl               |
| information_schema |
| my_test            |
| mysql              |
| performance_schema |
| sys                |
+--------------------+
6 rows in set (0.00 sec)

mysql> use my_test;
Database changed
mysql> show tables;
+-------------------+
| Tables_in_my_test |
+-------------------+
| t_test            |
+-------------------+
1 row in set (0.00 sec)

mysql> select * from t_test;
+----+------+
| id | name |
+----+------+
|  1 | Test |
+----+------+
1 row in set (0.00 sec)五、MySQL 主主復(fù)制配置及測(cè)試
MySQL 主主復(fù)制的配置和主從復(fù)制基本一樣,只是需要將原本在從服務(wù)器執(zhí)行的配置命令在主服務(wù)器上再執(zhí)行一遍。
- 在從服務(wù)器上查看狀態(tài) show master status,在MySQL從服務(wù)器上配置時(shí)需要用到File和Position的值
mysql>  show master status;
+------------------+----------+--------------+------------------+-------------------+
| File             | Position | Binlog_Do_DB | Binlog_Ignore_DB | Executed_Gtid_Set |
+------------------+----------+--------------+------------------+-------------------+
| mysql-bin.000003 |     2581 |              |                  |                   |
+------------------+----------+--------------+------------------+-------------------+
1 row in set (0.00 sec)- 在主服務(wù)器上執(zhí)行同步配置命令。
CHANGE MASTER TO master_host = '192.168.0.195',
 master_port = 3306,
 master_user = 'root',
 master_password = '密碼',
 master_log_file = 'mysql-bin.000003',
master_log_pos = 2581;- 在主服務(wù)器上執(zhí)行start slave。
mysql> start slave;
Query OK, 0 rows affected, 1 warning (0.01 sec)- 使用命令 show slave status\G 查看從服務(wù)器狀態(tài), 以下兩項(xiàng)顯示Yes,表示配置成功:
Slave_IO_Running: YesSlave_SQL_Running: Yes。
mysql> show slave status\G
*************************** 1. row ***************************
               Slave_IO_State: Waiting for source to send event
                  Master_Host: 192.168.0.195
                  Master_User: root
                  Master_Port: 3306
                Connect_Retry: 60
              Master_Log_File: mysql-bin.000003
          Read_Master_Log_Pos: 2581
               Relay_Log_File: mysql-relay.000002
                Relay_Log_Pos: 324
        Relay_Master_Log_File: mysql-bin.000003
             Slave_IO_Running: Yes
            Slave_SQL_Running: Yes
              Replicate_Do_DB:
          Replicate_Ignore_DB:
           Replicate_Do_Table:
       Replicate_Ignore_Table:
      Replicate_Wild_Do_Table:
  Replicate_Wild_Ignore_Table:
                   Last_Errno: 0
                   Last_Error:
                 Skip_Counter: 0
          Exec_Master_Log_Pos: 2581
              Relay_Log_Space: 529
              Until_Condition: None
               Until_Log_File:
                Until_Log_Pos: 0
           Master_SSL_Allowed: No
           Master_SSL_CA_File:
           Master_SSL_CA_Path:
              Master_SSL_Cert:
            Master_SSL_Cipher:
               Master_SSL_Key:
        Seconds_Behind_Master: 0
Master_SSL_Verify_Server_Cert: No
                Last_IO_Errno: 0
                Last_IO_Error:
               Last_SQL_Errno: 0
               Last_SQL_Error:
  Replicate_Ignore_Server_Ids:
             Master_Server_Id: 200
                  Master_UUID: c1d65f95-667e-11ee-bc7f-0242ac120003
             Master_Info_File: mysql.slave_master_info
                    SQL_Delay: 0
          SQL_Remaining_Delay: NULL
      Slave_SQL_Running_State: Replica has read all relay log; waiting for more updates
           Master_Retry_Count: 86400
                  Master_Bind:
      Last_IO_Error_Timestamp:
     Last_SQL_Error_Timestamp:
               Master_SSL_Crl:
           Master_SSL_Crlpath:
           Retrieved_Gtid_Set:
            Executed_Gtid_Set:
                Auto_Position: 0
         Replicate_Rewrite_DB:
                 Channel_Name:
           Master_TLS_Version:
       Master_public_key_path:
        Get_master_public_key: 0
            Network_Namespace:
1 row in set, 1 warning (0.00 sec)- 在MySQL從服務(wù)器,新建一個(gè)數(shù)據(jù)庫my_test_slave
mysql> create database my_test_slave;
Query OK, 1 row affected (0.01 sec)- 在MySQL主服務(wù)器,執(zhí)行查看數(shù)據(jù)庫命令,可以看到my_test_slave數(shù)據(jù)庫已經(jīng)同步到MySQL主服務(wù)器
mysql> show databases;
+--------------------+
| Database           |
+--------------------+
| dbwl               |
| information_schema |
| my_test            |
| my_test_slave      |
| mysql              |
| performance_schema |
| sys                |
+--------------------+
7 rows in set (0.00 sec)- 在MySQL從服務(wù)器的my_test_slave數(shù)據(jù)庫,新建一個(gè)表t_test并新增一條數(shù)據(jù)
mysql> use my_test_slave;
Database changed

mysql> create table t_test(id int UNSIGNED NOT NULL AUTO_INCREMENT, name varchar(32) NOT NULL, PRIMARY KEY (id));
Query OK, 0 rows affected (0.04 sec)

mysql> insert into t_test(name) values('Test');
Query OK, 1 row affected (0.02 sec)- 在MySQL主服務(wù)器查詢數(shù)據(jù)庫和表數(shù)據(jù)是否同步,如果配置正常,我們可以看到,在MySQL從服務(wù)器新增的數(shù)據(jù)庫和表數(shù)據(jù),在主服務(wù)器也存在。
mysql> show databases;
+--------------------+
| Database           |
+--------------------+
| dbwl               |
| information_schema |
| my_test            |
| my_test_slave      |
| mysql              |
| performance_schema |
| sys                |
+--------------------+
7 rows in set (0.00 sec)

mysql> use my_test_slave;
Reading table information for completion of table and column names
You can turn off this feature to get a quicker startup with -A

Database changed
mysql> show tables;
+-------------------------+
| Tables_in_my_test_slave |
+-------------------------+
| t_test                  |
+-------------------------+
1 row in set (0.00 sec)

mysql> select * from t_test;
+----+------+
| id | name |
+----+------+
|  1 | Test |
+----+------+
1 row in set (0.00 sec)- 測(cè)試在主數(shù)據(jù)庫插入一條數(shù)據(jù),然后在從數(shù)據(jù)庫查詢,查看是否能夠同步
mysql> insert into t_test(name) values('TestMaster');
Query OK, 1 row affected (0.02 sec)- 在從數(shù)據(jù)庫執(zhí)行查詢命令,可以看到數(shù)據(jù)也同步過來了,說明主主復(fù)制生效。
mysql> select * from t_test;
+----+------------+
| id | name       |
+----+------------+
|  1 | Test       |
|  3 | TestMaster |
+----+------------+
2 rows in set (0.00 sec)
很多業(yè)務(wù)場(chǎng)景中,大多數(shù)人使用主主復(fù)制+keepalived來實(shí)現(xiàn)MySQL服務(wù)器的高可用,但是存在很大的問題是處理數(shù)據(jù)沖突問題,可以通過my.cnf中配置,id自增來解決:
auto_increment_increment=2     #表示自增長(zhǎng)字段每次遞增的量
auto_increment_offset=1     #表示自增長(zhǎng)字段從那個(gè)數(shù)開始
在實(shí)際業(yè)務(wù)處理中會(huì)更加復(fù)雜,所以在數(shù)據(jù)庫到底是使用主從復(fù)制還是主主復(fù)制,需要根據(jù)自己的業(yè)務(wù)場(chǎng)景選擇。