Nacos注冊中心有幾種調用方式?

Spring Cloud Alibaba Nacos 作為近幾年最熱門的注冊中心和配置中心,也被國內無數公司所使用,今天我們就來看下 Nacos 作為注冊中心時,調用它的接口有幾種方式?
1、什么是注冊中心?
注冊中心(Registry)是一種用于服務發現和服務注冊的分布式系統組件。它是在微服務架構中起關鍵作用的一部分,用于管理和維護服務實例的信息以及它們的狀態。
它的執行流程如下圖所示:
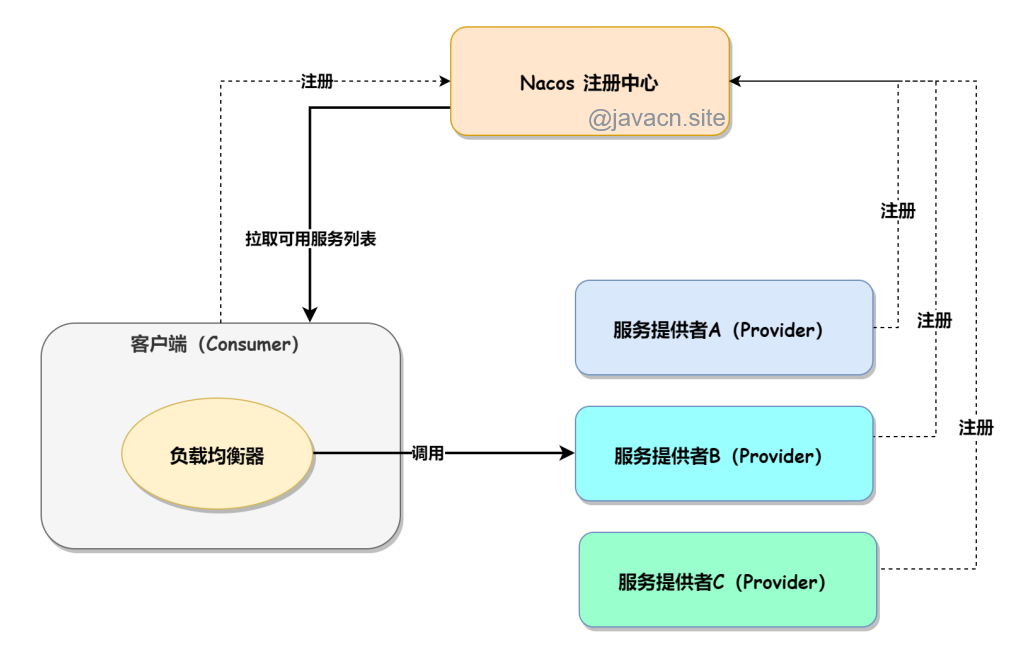
注冊中心充當了服務之間的中介和協調者,它的主要功能有以下這些:
- 服務注冊:服務提供者將自己的服務實例信息(例如 IP 地址、端口號、服務名稱等)注冊到注冊中心。通過注冊中心,服務提供者可以將自己的存在告知其他服務。
- 服務發現:服務消費者通過向注冊中心查詢服務信息,獲取可用的服務實例列表。通過注冊中心,服務消費者可以找到并連接到需要調用的服務。
- 健康檢查與負載均衡:注冊中心可以定期檢查注冊的服務實例的健康狀態,并從可用實例中進行負載均衡,確保請求可以被正確地轉發到可用的服務實例。
- 動態擴容與縮容:在注冊中心中注冊的服務實例信息可以方便地進行動態的增加和減少。當有新的服務實例上線時,可以自動地將其注冊到注冊中心。當服務實例下線時,注冊中心會將其從服務列表中刪除。
使用注冊中心有以下優勢和好處:
- 服務自動發現和負載均衡:服務消費者無需手動配置目標服務的地址,而是通過注冊中心動態獲取可用的服務實例,并通過負載均衡算法選擇合適的實例進行調用。
- 服務彈性和可擴展性:新的服務實例可以動態注冊,并在發生故障或需要擴展時快速提供更多的實例,從而提供更高的服務彈性和可擴展性。
- 中心化管理和監控:注冊中心提供了中心化的服務管理和監控功能,可以對服務實例的狀態、健康狀況和流量等進行監控和管理。
- 降低耦合和提高靈活性:服務間的通信不再直接依賴硬編碼的地址,而是通過注冊中心進行解耦,使得服務的部署和變更更加靈活和可控。
常見的注冊中心包括 ZooKeeper、Eureka、Nacos 等。這些注冊中心可以作為微服務架構中的核心組件,用于實現服務的自動發現、負載均衡和動態擴容等功能。
2、方法概述
當 Nacos 中注冊了 Restful 接口時(一種軟件架構風格,它是基于標準的 HTTP 協議和 URI 的一組約束和原則),其調用方式主要有以下兩種:
- 使用 RestTemplate + Spring Cloud LoadBalancer。
- 使用 OpenFeign + Spring Cloud LoadBalancer。
3、RestTemplate+LoadBalancer調用
此方案的實現有以下 3 個關鍵步驟:
- 添加依賴:nacos + loadbalancer。
- 設置配置文件。
- 編寫調用代碼。
具體實現如下。
(1)添加依賴
<dependency>
    <groupId>com.alibaba.cloud</groupId>
    <artifactId>spring-cloud-starter-alibaba-nacos-discovery</artifactId>
</dependency>
<dependency>
    <groupId>org.springframework.cloud</groupId>
    <artifactId>spring-cloud-starter-loadbalancer</artifactId>
</dependency>
(2)設置配置文件
spring:
  application:
    name: nacos-discovery-business
  cloud:
    nacos:
      discovery:
        server-addr: localhost:8848
        username: nacos
        password: nacos
        register-enabled: false
(3)編寫調用代碼
此步驟又分為以下兩步:
- 給 RestTemplate 增加 LoadBalanced 支持。
- 使用 RestTemplate 調用接口。
RestTemplate添加LoadBalanced
在 Spring Boot 啟動類上添加“@EnableDiscoveryClient”注解,并使用“@LoadBalanced”注解替換 IoC 容器中的 RestTemplate,具體實現代碼如下:
import org.springframework.boot.SpringApplication;
import org.springframework.boot.autoconfigure.SpringBootApplication;
import org.springframework.cloud.client.discovery.EnableDiscoveryClient;
import org.springframework.cloud.client.loadbalancer.LoadBalanced;
import org.springframework.context.annotation.Bean;
import org.springframework.web.client.RestTemplate;

@SpringBootApplication
@EnableDiscoveryClient
public class BusinessApplication {
    @LoadBalanced
    @Bean
    public RestTemplate restTemplate() {
        return new RestTemplate();
    }

    public static void main(String[] args) {
        SpringApplication.run(BusinessApplication.class, args);
    }
}
使用RestTemplate
import org.springframework.beans.factory.annotation.Autowired;
import org.springframework.web.bind.annotation.RequestMapping;
import org.springframework.web.bind.annotation.RestController;
import org.springframework.web.client.RestTemplate;

@RestController
@RequestMapping("/business")
public class BusinessController2 {
    @Autowired
    private RestTemplate restTemplate;
    @RequestMapping("/getnamebyid")
    public String getNameById(Integer id){
        return restTemplate.getForObject("http://nacos-discovery-demo/user/getnamebyid?id="+id,
                String.class);
    }
}
4、OpenFeign+LoadBalancer調用
此步驟又分為以下 5 步:
- 添加依賴:nacos + openfeign + loadbalancer
- 設置配置文件
- 開啟 openfeign 支持
- 編寫 service 代碼
- 調用 service 代碼
具體實現如下。
(1)添加依賴
<dependency>
    <groupId>com.alibaba.cloud</groupId>
    <artifactId>spring-cloud-starter-alibaba-nacos-discovery</artifactId>
</dependency>
 <dependency>
      <groupId>org.springframework.cloud</groupId>
      <artifactId>spring-cloud-starter-openfeign</artifactId>
  </dependency>
<dependency>
    <groupId>org.springframework.cloud</groupId>
    <artifactId>spring-cloud-starter-loadbalancer</artifactId>
</dependency>
(2)設置配置文件
spring:
  application:
    name: nacos-discovery-business
  cloud:
    nacos:
      discovery:
        server-addr: localhost:8848
        username: nacos
        password: nacos
        register-enabled: false
(3)開啟OpenFeign
在 Spring Boot 啟動類上添加 @EnableFeignClients 注解。
(4)編寫Service
import org.springframework.cloud.openfeign.FeignClient;
import org.springframework.stereotype.Service;
import org.springframework.web.bind.annotation.RequestMapping;
import org.springframework.web.bind.annotation.RequestParam;

@Service
@FeignClient(name = "nacos-producer") // name 為生產者的服務名
public interface UserService {
    @RequestMapping("/user/getinfo") // 調用生產者的接口
    String getInfo(@RequestParam String name);
}
(5)調用Service
import com.example.consumer.service.UserService;
import org.springframework.beans.factory.annotation.Autowired;
import org.springframework.web.bind.annotation.RequestMapping;
import org.springframework.web.bind.annotation.RequestParam;
import org.springframework.web.bind.annotation.RestController;

@RestController
public class OrderController {
    @Autowired
    private UserService userService;
    @RequestMapping("/order")
    public String getOrder(@RequestParam String name){
        return userService.getInfo(name);
    }
}
5、獲取本文源碼
因平臺不能上傳附件,所以想要獲取本文完整源碼,請聯系我:gg_stone,備注:Nacos 源碼,不然不予通過。
6、版本說明
本文案例基于以下版本:
- JDK 17
- Spring Boot 3.x
- Spring Cloud Alibaba 2022.0.0.0
- Nacos 2.2.3
7、小結
注冊中心作為微服務中不可或缺的重要組件,在微服務中充當著中介和協調者的作用。而 Nacos 作為近幾年來,國內最熱門的注冊中心,其 Restf 接口調用有兩種方式:RestTemplate + LoadBalancer 和 OpenFeign + LoadBalancer,開發者可以根據自己的實際需求,選擇相應的調用方式。