Compose-Multiplatform在Android和iOS上的實踐
01簡介
之前我們探討過KMM,即Kotlin Multiplatform Mobile,是Kotlin發布的移動端跨平臺框架。當時的結論是KMM提倡將共有的邏輯部分抽出,由KMM封裝成Android(Kotlin/JVM)的aar和iOS(Kotlin/Native)的framework,再提供給View層進行調用,從而節約一部分的工作量。共享的是邏輯而不是UI。(1)
其實在這個時候我們就知道Kotlin在移動端的跨平臺絕對不是想止于邏輯層的共享,隨著Compose的日漸成熟,JetBrains推出了Compose-Multiplatform,從UI層面上實現移動端,Web端,桌面端的跨平臺。考慮到屏幕大小與交互方式的不同,Android和iOS之間的共享會極大的促進開發效率。比如現在已經非常成熟的Flutter。令人興奮的是,Compose-Multiplatform目前已經發布了支持iOS系統的alpha版本,雖然還在開發實驗階段,但我們已經開始嘗試用起來了。
02Jetpack-Compose與Compose-Multiplatform
作為Android開發,Jetpack-Compose我們再熟悉不過了,是Google針對Android推出的新一代聲明式UI工具包,完全基于Kotlin打造,天然具備了跨平臺的使用基礎。JetBrains以Jetpack-Compose為基礎,相繼發布了compose-desktop,compose-web和compose-iOS ,使Compose可以運行在更多不同平臺,也就是我們今天要講的Compose-Multiplatform。在通用的API上Compose-Multiplatform與Jetpack-Compose時刻保持一致,不同的只是包名發生了變化。因此作為Android開發,我們在使用Compose-Multiplatform時,可以將Jetpack-Compose代碼低成本地遷移到Compose-Multiplatform:
 圖片
圖片
03使用
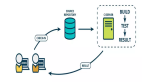
既然是UI框架,那么我們就來實現一個簡單的在移動端非常常規的業務需求:
從服務器請求數據,并以列表形式展現在UI上。
在此我們要說明的是,Compose-Multiplatform是要與KMM配合使用的,其中KMM負責把shared模塊編譯成Android的aar和iOS的framework,Compose-Multiplatform負責UI層面的交互與繪制的實現。
首先我們先回顧一下KMM工程的組織架構:
 圖片
圖片
其中androidApp和iosApp分別為Android和iOS這兩個平臺的主工程模塊,shared為共享邏輯模塊,供androidApp和iosApp調用。shared模塊中:
- commonMain為公共模塊,該模塊的代碼與平臺無關,是通過expected關鍵字對一些api的聲明(聲明的實現在platform module中);
- androidMain和iosMain分別Android和ios這兩個平臺,通過actual關鍵字在平臺模塊進行具體的實現。
關于kmm工程的配置與使用方式,運行方式,編譯過程原理還是請回顧一下之前的文章,在此不做贅述。(2)
接下來我們看Compose-Multiplatform是怎么基于kmm工程進行的實現。
1、添加配置
在settings.gradle文件中聲明compose插件:
plugins{
//...
        val composeVersion = extra["compose.version"] as String
        id("org.jetbrains.compose").version(composeVersion)
    }
其中compose.version在gradle.properties進行了聲明。需要注意的是目前Compose-Multiplatform的版本有要求,目前可以參考官方的具體配置。(3)
#Versions
kotlin.versinotallow=1.8.20
agp.versinotallow=7.4.2
compose.versinotallow=1.4.0
之后在shared模塊的build.gradle文件中引用聲明好的插件如下:
plugins {
//...
    id("org.jetbrains.compose")
}
同時我們需要在build.gradle文件中配置compose靜態資源文件的目錄,方式如下:
- Android:
android {
//...
    sourceSets["main"].resources.srcDirs("src/commonMain/resources")
}- iOS:
cocoapods {
//...
extraSpecAttributes["resources"] =
"['src/commonMain/resources/**', 'src/iosMain/resources/**']"
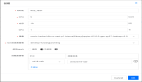
}這意味著在尋找如圖片等資源文件時,將從src/commonMain/resources/這個目錄下尋找,如下圖所示:

由于目前compose-iOS還處于實驗階段,我們需要在gradle.properties文件中添加如下代碼開啟UIKit:
org.jetbrains.compose.experimental.uikit.enabled=true最后我們需要在為commonMain添加compose依賴:
val commonMain by getting {
            dependencies {
//...
                implementation(compose.runtime)
                implementation(compose.foundation)
                implementation(compose.material)
//                //implementation(compose.materialIconsExtended) // TODO not working on iOS for now
                @OptIn(org.jetbrains.compose.ExperimentalComposeLibrary::class)
                implementation(compose.components.resources)
                implementation(compose.ui)

            }
        }
好了到此為止我們的配置就完成了,接下來開始寫業務代碼了。既然是從服務器獲取數據,我們肯定得封裝一個網絡模塊,下面我們將使用ktor封裝一個簡單的網絡模塊。
2、網絡模塊
先我們先在shared模塊的build.gradle文件中添加依賴如下:
val commonMain by getting {
            dependencies {
                implementation("io.ktor:ktor-client-core:$ktor_version")//core
                implementation("io.ktor:ktor-client-cio:$ktor_version")//CIO
                implementation("io.ktor:ktor-client-logging:$ktor_version")//Logging
                implementation("io.ktor:ktor-client-content-negotiation:$ktor_version")
                implementation("io.ktor:ktor-serialization-kotlinx-json:$ktor_version")//Json格式化
//...
            }
        }
接下來我們封裝一個最簡單的HttpUtil,包含post和get請求;
package com.example.sharesample

import io.ktor.client.*
import io.ktor.client.call.*
import io.ktor.client.engine.cio.*
import io.ktor.client.plugins.*
import io.ktor.client.plugins.contentnegotiation.*
import io.ktor.client.plugins.logging.*
import io.ktor.client.request.*
import io.ktor.client.statement.*
import io.ktor.http.*
import io.ktor.serialization.kotlinx.json.*
import kotlinx.coroutines.*
import kotlinx.serialization.json.Json

class HttpUtil{
    companion object{
        val client: HttpClient = HttpClient(CIO) {
            expectSuccess = true
            engine {
                maxConnectionsCount = 1000
                requestTimeout = 30000
                endpoint {
                    maxConnectionsPerRoute = 100
                    pipelineMaxSize = 20
                    keepAliveTime = 30000
                    connectTimeout = 30000
                }
            }
            install(Logging) {
                logger = Logger.DEFAULT
                level = LogLevel.HEADERS
            }

            install(ContentNegotiation) {
                json(Json {
                    ignoreUnknownKeys = true
                    isLenient = true
                    encodeDefaults = false
                })
            }
        }

        suspend inline fun <reified T> get(
            url: String,//請求地址
        ): T?  {
            return try {
                val response: HttpResponse = client.get(url) {//GET請求
                    contentType(ContentType.Application.Json)//content-type
                }
                val data: T = response.body()
                data
            } catch (e: ResponseException) {
                print(e.response)
                null
            } catch (e: Exception) {
                print(e.message)
                null
            }
        }

        suspend inline fun <reified T> post(
            url: String,
        ): T?  {//coroutines 中的IO線程
            return try {
                val response: HttpResponse = client.post(url) {//POST請求
                    contentType(ContentType.Application.Json)//content-type
                }
                val data: T = response.body()
                data
            } catch (e: ResponseException) {
                print(e.response)
                null
            } catch (e: Exception) {
                print(e.message)
                null
            }
        }
    }
}
代碼非常直觀,定義了HttpClient對象,進行了基礎的設置來實現網絡請求。我們來定義一下接口請求返回的數據結構。
3、返回的數據結構
package com.example.sharesample.bean

@kotlinx.serialization.Serializable
class SearchResult {
    var count: Int? = null
    var resInfos: List<ResInfoBean>? = null
}
package com.example.sharesample.bean
@kotlinx.serialization.Serializable
class ResInfoBean {
var name: String? = null
var desc: String? = null
}接下來我們看看是怎么發送的請求。
4、發送請求
然后我們定義個SearchApi:
package com.example.sharesample

import androidx.compose.material.Text
import androidx.compose.runtime.*
import com.example.sharesample.bean.SearchResult
import io.ktor.client.plugins.logging.*
import kotlinx.coroutines.*

class SearchApi {
    suspend fun search(): SearchResult {
        Logger.SIMPLE.log("search2")
        var result: SearchResult? =
            HttpUtil.get(url = "http://h5-yapi.sns.sohuno.com/mock/229/api/v1/resInfo/search")
        if (result == null) {
            result = SearchResult()
        }
        return result
    }
}
實現了search()方法。接著我們來看view層的實現與數據的綁定是如何實現的。
5、View層的實現
我們創建一個SearchCompose:
package com.example.sharesample

import androidx.compose.foundation.Image
import androidx.compose.foundation.background
import androidx.compose.foundation.layout.*
import androidx.compose.runtime.Composable
import androidx.compose.foundation.lazy.LazyColumn
import androidx.compose.foundation.lazy.items
import androidx.compose.foundation.lazy.rememberLazyListState
import androidx.compose.foundation.shape.RoundedCornerShape
import androidx.compose.material.Text
import androidx.compose.runtime.*
import androidx.compose.ui.Alignment
import androidx.compose.ui.Modifier
import androidx.compose.ui.draw.clip
import androidx.compose.ui.graphics.Color
import androidx.compose.ui.graphics.ImageBitmap
import androidx.compose.ui.text.TextStyle
import androidx.compose.ui.unit.dp
import androidx.compose.ui.unit.sp
import com.example.sharesample.bean.SearchResult
import io.ktor.client.plugins.logging.*
import kotlinx.coroutines.CoroutineScope
import kotlinx.coroutines.SupervisorJob
import kotlinx.coroutines.async
import kotlinx.coroutines.job
import kotlinx.coroutines.launch
import org.jetbrains.compose.resources.ExperimentalResourceApi
import org.jetbrains.compose.resources.resource

class SearchCompose {
    private val searchApi = SearchApi()
    private var isInit = false

    @OptIn(ExperimentalResourceApi::class)
    @Composable
    fun searchCompose() {
        var searchResult by remember { mutableStateOf<SearchResult>(SearchResult()) }
        if (!isInit) {
            scope().launch {
                val result = async {
                    searchApi.search()
                }
                searchResult = result.await()
            }
            isInit = true
        }

        Column {
            Text(
                "Total: ${searchResult.count ?: 0}",
                style = TextStyle(fontSize = 20.sp),
                modifier = Modifier.padding(start = 20.dp, top = 20.dp)
            )
            val scrollState = rememberLazyListState()

            if (searchResult.resInfos != null) {
                LazyColumn(
                    state = scrollState,
                    modifier = Modifier.padding(
                        top = 14.dp,
                        bottom = 50.dp,
                        end = 14.dp,
                        start = 14.dp
                    )

                ) {
                    items(searchResult.resInfos!!) { item ->
                        Box(
                            modifier = Modifier.padding(top = 20.dp).fillMaxWidth()
                                .background(color = Color.LightGray, shape = RoundedCornerShape(10.dp))
                                .padding(all = 20.dp)
                        ) {
                            Column {
                                Row(verticalAlignment = Alignment.CenterVertically) {
                                    val picture = "1.jpg"
                                    var imageBitmap: ImageBitmap? by remember(picture) {
                                        mutableStateOf(
                                            null
                                        )
                                    }
                                    LaunchedEffect(picture) {
                                        try {
                                            imageBitmap =
                                                resource(picture).readBytes().toImageBitmap()
                                        } catch (e: Exception) {
                                        }

                                    }
                                    if (imageBitmap != null) {
                                        Image(
                                            bitmap = imageBitmap!!, "", modifier = Modifier
                                                .size(60.dp)
                                                .clip(RoundedCornerShape(10.dp))
                                        )
                                    }

                                    Text(
                                        item.name ?: "name",
                                        style = TextStyle(color = Color.Yellow),
                                        modifier = Modifier.padding(start = 10.dp)
                                    )
                                }
                                Text(item.desc ?: "desc", style = TextStyle(color = Color.White))
                            }

                        }
                    }
                }
            }
        }


    }
}

@Composable
fun scope(): CoroutineScope {
    var viewScope = rememberCoroutineScope()
    return remember {
        CoroutineScope(SupervisorJob(viewScope.coroutineContext.job) + ioDispatcher)
    }
}
在searchCompose()里我們看到了在發送請求時開啟了一個協程,scope()方法指定了作用域,除此之外,我們還定義了ioDispatcher在不同平臺下的實現,具體的聲明如下:
expect val ioDispatcher: CoroutineDispatcher在Android上的實現:
actual val ioDispatcher = Dispatchers.IO在ios上的實現:
actual val ioDispatcher = Dispatchers.IO需要注意的是,Android平臺,Dispatchers.IO在jvmMain/Dispatchers,ios平臺,Dispatchers.IO在nativeMain/Dispatchers下。兩者是不一樣的。在獲取了服務端數據后,我們使用LazyColumn對列表進行實現。其中有圖片和文本的展示。為了方便進行說明,圖片數據我們使用本地resources目錄下的圖片,文本展示的是服務端返回的數據。下面我來說明一下圖片的加載。
6、圖片加載
具體的實現如下:
val picture = "1.jpg"
var imageBitmap: ImageBitmap? by remember(picture) {
    mutableStateOf(
        null
    )
}
LaunchedEffect(picture) {
    try {
        imageBitmap =
            resource(picture).readBytes().toImageBitmap()
    } catch (e: Exception) {
    }

}
if (imageBitmap != null) {
    Image(
        bitmap = imageBitmap!!, "", modifier = Modifier
            .size(60.dp)
            .clip(RoundedCornerShape(10.dp))
    )
}
先創建了一個ImageBitmap的remember對象,由于resource(picture).readBytes()是個掛起函數,我們需要用LaunchedEffect來執行。這段代碼的作用是從resources目錄下讀取資源到內存中,然后我們在不同平臺實現了toImageBitmap()將它轉換成Bitmap。
- toImageBitmap()的聲明:
expect fun ByteArray.toImageBitmap(): ImageBitmap- Android端的實現:
fun ByteArray.toAndroidBitmap(): Bitmap {
    return BitmapFactory.decodeByteArray(this, 0, size)
}- iOS端的實現:
actual fun ByteArray.toImageBitmap(): ImageBitmap =
    Image.makeFromEncoded(this).toComposeImageBitmap()
好了通過以上的方式我們就可以實現對本地圖片的加載,到此為止,Compose的相應實現就完成了。那么它是怎么被Android和ios的view引用的呢?Android端我們已經非常熟悉了,和Jetpack-Compose的調用方式一樣,在MainActivity中直接調用即可:
class MainActivity : ComponentActivity() {
    override fun onCreate(savedInstanceState: Bundle?) {
        super.onCreate(savedInstanceState)
        setContent {
            MyApplicationTheme {
                Surface(
                    modifier = Modifier.fillMaxSize(),
                    color = MaterialTheme.colors.background
                ) {
                    SearchCompose().searchCompose()
                }
            }
        }
    }
}
ios端會稍微麻煩一點。我們先來看一下iosApp模塊下iOSApp.swift的實現:
import UIKit
import shared

@UIApplicationMain
class AppDelegate: UIResponder, UIApplicationDelegate {
    var window: UIWindow?

    func application(_ application: UIApplication, didFinishLaunchingWithOptions launchOptions: [UIApplication.LaunchOptionsKey: Any]?) -> Bool {
        window = UIWindow(frame: UIScreen.main.bounds)
        let mainViewController = Main_iosKt.MainViewController()
        window?.rootViewController = mainViewController
        window?.makeKeyAndVisible()
        return true
    }
}
關鍵代碼是這兩行:
let mainViewController = Main_iosKt.MainViewController()
        window?.rootViewController = mainViewController
創建了一個MainViewController對象,然后賦給window的rootViewController。這個MainViewController是在哪兒怎么定義的呢?我們回到shared模塊,定義一個main.ios的文件,它會在framework編譯成Main_iosKt文件。main.ios的實現如下:
package com.example.sharesample

import androidx.compose.foundation.layout.fillMaxSize
import androidx.compose.material.MaterialTheme
import androidx.compose.material.Surface
import androidx.compose.ui.Modifier
import androidx.compose.ui.window.ComposeUIViewController
import platform.UIKit.UIViewController

@Suppress("FunctionName", "unused")
fun MainViewController(): UIViewController =
    ComposeUIViewController {
        MaterialTheme {
            Surface(
                modifier = Modifier.fillMaxSize(),
                color = MaterialTheme.colors.background
            ) {
                SearchCompose().searchCompose()

            }
        }
    }
我們看到在這兒會創建一個UIViewController對象MainViewController。這個便是ios端和Compose鏈接的橋梁。接下來我們來看看在Android和ios上的效果。
- Android端:
 圖片
圖片
- iOS端:
 圖片
圖片
好了到此為止,我們看到了一個簡單的列表業務邏輯是怎樣實現的了。由于Compose-Multiplatform還未成熟,在業務實現上勢必有很多內容需要自己造輪子。
04Android端的compose繪制原理
由于網上已經有很多Compose的相關繪制原理,下一章我們只是進行簡單的源碼解析,來說明它是如何生成UI樹并進行自繪的。
1、Android端的compose繪制原理
Android端是在從onCreate()里實現setContent()開始的:
setContent {
            MyApplicationTheme {
                Surface(
                    modifier = Modifier.fillMaxSize(),
                    color = MaterialTheme.colors.background
                ) {
                    SearchCompose().searchCompose()
                }
            }
        }
setContent()的實現如下:
public fun ComponentActivity.setContent(
    parent: CompositionContext? = null,
    content: @Composable () -> Unit
) {
    val existingComposeView = window.decorView
        .findViewById<ViewGroup>(android.R.id.content)
        .getChildAt(0) as? ComposeView

    if (existingComposeView != null) with(existingComposeView) {
        setParentCompositionContext(parent)
        setContent(content)
    } else ComposeView(this).apply {
        // Set content and parent **before** setContentView
        // to have ComposeView create the composition on attach
        setParentCompositionContext(parent)
        setContent(content)
        // Set the view tree owners before setting the content view so that the inflation process
        // and attach listeners will see them already present
        setOwners()
        setContentView(this, DefaultActivityContentLayoutParams)
    }
}
我們看到它主要是生成了ComposeView然后通過setContent(content)將compose的內容注冊到ComposeView里,其中ComposeView繼承ViewGroup,然后調用ComponentActivity的setContentView()方法將ComposeView添加到DecorView中相應的子View中。通過追蹤ComposeView的setContent方法:
private fun doSetContent(
    owner: AndroidComposeView,
    parent: CompositionContext,
    content: @Composable () -> Unit
): Composition {
    if (inspectionWanted(owner)) {
        owner.setTag(
            R.id.inspection_slot_table_set,
            Collections.newSetFromMap(WeakHashMap<CompositionData, Boolean>())
        )
        enableDebugInspectorInfo()
    }
   // 創建Composition對象,傳入UiApplier
    val original = Composition(UiApplier(owner.root), parent)
    val wrapped = owner.view.getTag(R.id.wrapped_composition_tag)
        as? WrappedComposition
        ?: WrappedComposition(owner, original).also {
            owner.view.setTag(R.id.wrapped_composition_tag, it)
        }
   // 傳入content函數
    wrapped.setContent(content)
    return wrapped
}
我們發現主要做了兩件事情:
- 創建Composition對象,傳入UiApplier
- 傳入content函數
其中UiApplier的定義如下:
internal class UiApplier(
    root: LayoutNode
) : AbstractApplier<LayoutNode>(root)
持有一個LayoutNode對象,它的說明如下:
An element in the layout hierarchy, built with compose UI
可以看到LayoutNode就是在Compose渲染的時候,每一個組件就是一個LayoutNode,最終組成一個LayoutNode樹,來描述UI界面。LayoutNode是怎么創建的呢?
1)LayoutNode
我們假設創建一個Image,來看看Image的實現:
fun Image(
    painter: Painter,
    contentDescription: String?,
    modifier: Modifier = Modifier,
    alignment: Alignment = Alignment.Center,
    contentScale: ContentScale = ContentScale.Fit,
    alpha: Float = DefaultAlpha,
    colorFilter: ColorFilter? = null
) {
//...
    Layout(
        {},
        modifier.then(semantics).clipToBounds().paint(
            painter,
            alignment = alignment,
            contentScale = contentScale,
            alpha = alpha,
            colorFilter = colorFilter
        )
    ) { _, constraints ->
        layout(constraints.minWidth, constraints.minHeight) {}
    }
}
繼續追蹤Layout()的實現:
@Composable inline fun Layout(
    content: @Composable @UiComposable () -> Unit,
    modifier: Modifier = Modifier,
    measurePolicy: MeasurePolicy
) {
    val density = LocalDensity.current
    val layoutDirection = LocalLayoutDirection.current
    val viewConfiguration = LocalViewConfiguration.current
    ReusableComposeNode<ComposeUiNode, Applier<Any>>(
        factory = ComposeUiNode.Constructor,
        update = {
            set(measurePolicy, ComposeUiNode.SetMeasurePolicy)
            set(density, ComposeUiNode.SetDensity)
            set(layoutDirection, ComposeUiNode.SetLayoutDirection)
            set(viewConfiguration, ComposeUiNode.SetViewConfiguration)
        },
        skippableUpdate = materializerOf(modifier),
        content = content
    )
}

@Composable @ExplicitGroupsComposable
inline fun <T, reified E : Applier<*>> ReusableComposeNode(
    noinline factory: () -> T,
    update: @DisallowComposableCalls Updater<T>.() -> Unit,
    noinline skippableUpdate: @Composable SkippableUpdater<T>.() -> Unit,
    content: @Composable () -> Unit
) {
    if (currentComposer.applier !is E) invalidApplier()
    currentComposer.startReusableNode()
    if (currentComposer.inserting) {
        currentComposer.createNode(factory)
    } else {
        currentComposer.useNode()
    }
    Updater<T>(currentComposer).update()
    SkippableUpdater<T>(currentComposer).skippableUpdate()
    currentComposer.startReplaceableGroup(0x7ab4aae9)
    content()
    currentComposer.endReplaceableGroup()
    currentComposer.endNode()
}
在這里創建了ComposeUiNode對象,而LayoutNode就是ComposeUiNode的實現類。我們再來看看Composition。
2)Composition
從命名來看,Composition的作用就是將LayoutNode組合起來。其中WrappedComposition繼承Composition:
private class WrappedComposition(
    val owner: AndroidComposeView,
    val original: Composition
) : Composition, LifecycleEventObserver
我們來追蹤一下它的setContent()的實現:
override fun setContent(content: @Composable () -> Unit) {
        owner.setOnViewTreeOwnersAvailable {
            if (!disposed) {
                val lifecycle = it.lifecycleOwner.lifecycle
                lastContent = content
                if (addedToLifecycle == null) {
                    addedToLifecycle = lifecycle
                    // this will call ON_CREATE synchronously if we already created
                    lifecycle.addObserver(this)
                } else if (lifecycle.currentState.isAtLeast(Lifecycle.State.CREATED)) {
                    original.setContent {

                        @Suppress("UNCHECKED_CAST")
                        val inspectionTable =
                            owner.getTag(R.id.inspection_slot_table_set) as?
                                MutableSet<CompositionData>
                                ?: (owner.parent as? View)?.getTag(R.id.inspection_slot_table_set)
                                    as? MutableSet<CompositionData>
                        if (inspectionTable != null) {
                            inspectionTable.add(currentComposer.compositionData)
                            currentComposer.collectParameterInformation()
                        }

                        LaunchedEffect(owner) { owner.boundsUpdatesEventLoop() }

                        CompositionLocalProvider(LocalInspectionTables provides inspectionTable) {
                            ProvideAndroidCompositionLocals(owner, content)
                        }
                    }
                }
            }
        }
    }
在頁面的生命周期是CREATED的狀態下,執行original.setContent():
override fun setContent(content: @Composable () -> Unit) {
        check(!disposed) { "The composition is disposed" }
        this.composable = content
        parent.composeInitial(this, composable)
    }
調用parent的composeInitial()方法,這段代碼我們就不再繼續追蹤下去了,它最終的作用就是對布局進行組合,創建父子依賴關系。
3)Measure和Layout
在AndroidComposeView中的dispatchDraw()實現了measureAndLayout()方法:
override fun measureAndLayout(sendPointerUpdate: Boolean) {
        trace("AndroidOwner:measureAndLayout") {
            val resend = if (sendPointerUpdate) resendMotionEventOnLayout else null
            val rootNodeResized = measureAndLayoutDelegate.measureAndLayout(resend)
            if (rootNodeResized) {
                requestLayout()
            }
            measureAndLayoutDelegate.dispatchOnPositionedCallbacks()
        }
    }

    fun measureAndLayout(onLayout: (() -> Unit)? = null): Boolean {
        var rootNodeResized = false
        performMeasureAndLayout {
            if (relayoutNodes.isNotEmpty()) {
                relayoutNodes.popEach { layoutNode ->
                    val sizeChanged = remeasureAndRelayoutIfNeeded(layoutNode)
                    if (layoutNode === root && sizeChanged) {
                        rootNodeResized = true
                    }
                }
                onLayout?.invoke()
            }
        }
        callOnLayoutCompletedListeners()
        return rootNodeResized
    }
調用remeasureAndRelayoutIfNeeded,遍歷relayoutNodes,為每一個LayoutNode去進行measure和layout。具體的實現不分析了。
4)繪制
我們還是以Image舉例:
fun Image(
    bitmap: ImageBitmap,
    contentDescription: String?,
    modifier: Modifier = Modifier,
    alignment: Alignment = Alignment.Center,
    contentScale: ContentScale = ContentScale.Fit,
    alpha: Float = DefaultAlpha,
    colorFilter: ColorFilter? = null,
    filterQuality: FilterQuality = DefaultFilterQuality
) {
    val bitmapPainter = remember(bitmap) { BitmapPainter(bitmap, filterQuality = filterQuality) }
    Image(
        painter = bitmapPainter,
        contentDescription = contentDescription,
        modifier = modifier,
        alignment = alignment,
        contentScale = contentScale,
        alpha = alpha,
        colorFilter = colorFilter
    )
}
主要的繪制工作是由BitmapPainter完成的,它繼承自Painter。
override fun DrawScope.onDraw() {
        drawImage(
            image,
            srcOffset,
            srcSize,
            dstSize = IntSize(
                this@onDraw.size.width.roundToInt(),
                this@onDraw.size.height.roundToInt()
            ),
            alpha = alpha,
            colorFilter = colorFilter,
            filterQuality = filterQuality
        )
    }
在onDraw()方法里實現了drawImage():
override fun drawImage(
        image: ImageBitmap,
        srcOffset: IntOffset,
        srcSize: IntSize,
        dstOffset: IntOffset,
        dstSize: IntSize,
        /*FloatRange(from = 0.0, to = 1.0)*/
        alpha: Float,
        style: DrawStyle,
        colorFilter: ColorFilter?,
        blendMode: BlendMode,
        filterQuality: FilterQuality
    ) = drawParams.canvas.drawImageRect(
        image,
        srcOffset,
        srcSize,
        dstOffset,
        dstSize,
        configurePaint(null, style, alpha, colorFilter, blendMode, filterQuality)
    )
而最終也是在Canvas上進行了繪制。通過以上的分析,我們了解到Compose并不是和原生控件一一映射的關系,而是像Flutter一樣,有自己的UI組織方式,并最終調用自繪引擎直接在Canvas上進行繪制的。在Android和iOS端使用的自繪引擎是skiko。這個skiko是什么呢?它其實是Skia for Kotlin的縮寫(Flutter在移動端也是用的Skia引擎進行的繪制)。事實上不止是在移動端,我們可以通過以下的截圖看到,Compose的桌面端和Web端的繪制實際上也是用了skiko:
 圖片
圖片
關于skiko的更多信息,還請查閱文末的官方鏈接。(4)
好了到此為止,Compose的在Android端的繪制原理我們就講完了。對其他端繪制感興趣的同學可自行查看相應的源碼,細節有不同,但理念都是一致的:創建自己的Compose樹,并最終調用自繪引擎在Canvas上進行繪制。
05Compose-Multiplatform與Flutter
為什么要單拿它倆出來說一下呢?是因為在調研Compose-Multiplatform的過程中,我們發現它跟Flutter的原理類似,那未來可能就會有競爭,有競爭就意味著開發同學若在自己的項目中使用跨平臺框架需要選擇。那么我們來對比一下這兩個框架:在之前KMM的文章中,我們比較過KMM和Flutter,結論是:
- KMM主要實現的是共享邏輯,UI層的實現還是建議平臺各自去處理;
- Flutter是UI層的共享。
當時看來兩者雖然都是跨平臺,但目標不同,看上去并沒有形成競爭。而在Compose-Multiplatform加入之后,結合KMM,成為了邏輯和UI都可以實現共享的結果。而且從繪制原理上來說,Compose和Flutter都是創建自己的View樹,在通過自繪引擎進行渲染,原理上差異不大。再加上Kotlin和Compose作為Android的官方推薦,對于Android同學來說,基本上是沒有什么學習成本的。個人認為若Compose-Multiplatform更加成熟,發布穩定版后與Flutter的競爭會非常大。
06總結
Compose-Multiplatform目前雖然還不成熟,但通過對其原理的分析,我們可以預見的是,結合KMM,未來將成為跨平臺的有力競爭者。特別對于Android開發同學來說,可以把KMM先用起來,結合Compose去實現一些低耦合的業務,待未來Compose-iOS發布穩定版后,可以愉快的進行雙端開發,節約開發成本。
參考:
(1)https://www.jianshu.com/p/e1ae5eaa894e
(2)https://www.jianshu.com/p/e1ae5eaa894e
(3)https://github.com/JetBrains/compose-multiplatform-ios-android-template