SpringBoot3 構建Spring Authorization Server認證服務!
在之前的SpringCloud微服務專欄中,我介紹了基于 Spring Security OAuth2 構建的統一認證服務器。隨著技術的不斷發展,Spring Security OAuth2 已于2022年6月5日宣布停止維護。為了應對這一變化,Spring 官方推出了新產品——Spring Authorization Server。該組件實現了 OAuth 2.1協議 和 OpenID Connect 1.0 規范以及其他相關規范的實現,它構建在 Spring Security 之上,為構建 OpenID Connect 1.0 Identity Provider 和 OAuth2 Authorization Server 產品提供安全、輕量級和可定制的基礎。
接下來我將使用 Spring Authorization Server (以下簡稱SAS) 來更新原專欄的認證服務,今天先讓我們來搭建一個簡單的認證服務認識一下Spring Authorization Server。
概念理解
Oauth2.0
OAuth 2.0(Open Authorization 2.0)是一種授權框架,允許第三方應用程序訪問用戶在另一個服務提供者上托管的資源,而無需共享用戶的憑據(例如用戶名和密碼)。
在Oauth2.0中,定義了四種角色:
?資源所有者(Resource Owner),?客戶端(Client),?資源服務器(Resource Server),?授權服務器(Authorization Server)
以及四種授權模式:
?授權碼授權(Authorization Code Grant),?隱式授權(Implicit Grant),?密碼授權(Resource Owner Password Credentials Grant),?客戶端憑證授權(Client Credentials Grant)。
關于Oauth2.0的詳細概念及認證流程網上已經有大量的文章說明,這里不再贅述。
Oauth2.1
OAuth 2.1 在 OAuth 2.0 的基礎上進行了以下改進:
?推薦使用 Authorization Code+PKCE 模式授權
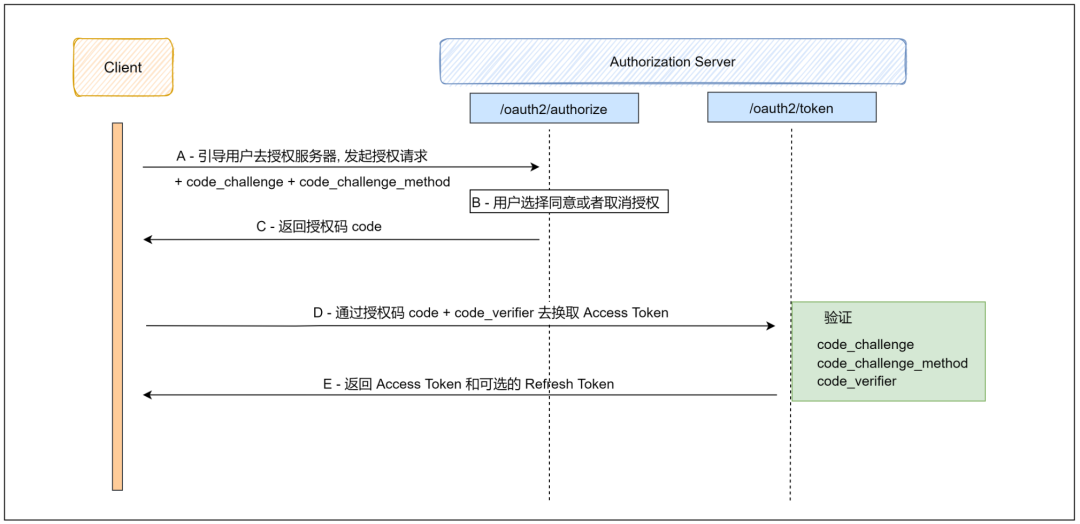
授權碼 (Authorization Code) 模式大家都很熟悉了,也是最安全的授權流程, 那 PKCE 又是什么呢? PKCE 全稱是 Proof Key for Code Exchange, 在 2015 年發布為 RFC 7636, 我們知道, 授權碼模式雖好, 但是它不能給公開的客戶端用, 因為公開的客戶端沒有能力保存好秘鑰(client_secret), 所以在此之前, 對于公開的客戶端, 只能使用隱式模式和密碼模式, PKCE 就是為了解決這個問題而出現的, 另外它也可以防范授權碼攔截攻擊, 實際上它的原理是客戶端提供一個自創建的證明給授權服務器, 授權服務器通過它來驗證客戶端,把訪問令牌(access_token) 頒發給真實的客戶端而不是偽造的,以下是其流程圖
 圖片
圖片
?移除隱式授權模式
?移除密碼模式
OpenID Connect(OIDC)
OIDC是OpenID Connect的簡稱,OIDC=(Identity, Authentication) + OAuth 2.0,它在原Oauth2.0的基礎上構建了一個身份層,是一個基于OAuth2協議的身份認證標準協議。我們都知道OAuth2是一個授權協議,它無法提供完善的身份認證功能。OIDC使用OAuth2的授權服務器來為第三方客戶端提供用戶的身份認證,并把對應的身份認證信息通過一個叫ID Token 的東西傳遞給客戶端,ID Token使用JWT格式來包裝,使得ID Token可以安全的傳遞給第三方客戶端程序并且容易被驗證。如果ID Token返回的內容不夠,授權服務器還提供一個UserInfo接口,可以獲取用戶更完整的信息。在可以選擇 OIDC 的情況下,應該選擇 OIDC。
如下是一個ID_Token解析后的例子,包含不限于以下幾個字段信息
{
  "sub": "dailymart",                # 用戶ID
  "aud": "oidc-client",                # ID Token的受眾,即Client_ID
  "auth_time": 1722780563,          # 完成認證的時間
  "iss": "http://127.0.0.1:9090",   # 發行人,即認證服務器
  "exp": 1722782868,                # 到期時間
  "iat": 1722781068,                # 發布時間
    ...
}
SAS上手體驗
SpringBoot集成SAS
1、引入spring-boot-starter-oauth2-authorization-server
在SpringBoot3.1中提供了對SAS的支持,只需要引入依賴即可完成授權服務器的搭建
<dependency>
    <groupId>org.springframework.boot</groupId>
    <artifactId>spring-boot-starter-oauth2-authorization-server</artifactId>
</dependency>
DDD項目當前使用的SpringBoot版本是3.2.7,對應SAS版本為1.2.5。
如果需要嘗試其他版本,也可以手動引入,如:
<groupId>org.springframework.security</groupId>
    <artifactId>spring-security-oauth2-authorization-server</artifactId>
    <version>1.3.1</version>
</dependency>
2、認證服務器配置AuthorizationServerConfig
@Slf4j
@Configuration(proxyBeanMethods = false)
public class AuthorizationServerConfig {


    /**
     * Security過濾器鏈,用于協議端點
     */
    @Bean
    @Order(Ordered.HIGHEST_PRECEDENCE)
    public SecurityFilterChain authorizationServerSecurityFilterChain (HttpSecurity http) throws Exception {
        OAuth2AuthorizationServerConfiguration.applyDefaultSecurity (http);
        // 開啟OIDC
        http.getConfigurer (OAuth2AuthorizationServerConfigurer.class)
                .oidc (Customizer.withDefaults ());


        http
            .exceptionHandling ((exceptions) -> exceptions
                    .defaultAuthenticationEntryPointFor (
                            new LoginUrlAuthenticationEntryPoint ("/login"),
                            new MediaTypeRequestMatcher (MediaType.TEXT_HTML)
                    )
            )
            //接受用戶信息和/或客戶端注冊的訪問令牌
            .oauth2ResourceServer ((resourceServer) -> resourceServer
                    .jwt (Customizer.withDefaults ()));


        return http.build ();
    }


    /**
     * 配置密碼解析器,使用BCrypt的方式對密碼進行加密和驗證
     */
    @Bean
    public PasswordEncoder passwordEncoder() {
        return new BCryptPasswordEncoder();
    }


    /**
     * 管理客戶端
     * @param passwordEncoder 密碼管理器
     */
    @Bean
    public RegisteredClientRepository registeredClientRepository(PasswordEncoder passwordEncoder) {
        RegisteredClient oidcClient = RegisteredClient.withId(UUID.randomUUID().toString())
                .clientId("oidc-client")
                .clientSecret(passwordEncoder.encode("123456"))
                //客戶端認證基于請求頭
                .clientAuthenticationMethod(ClientAuthenticationMethod.CLIENT_SECRET_BASIC)
                .authorizationGrantType(AuthorizationGrantType.AUTHORIZATION_CODE)
                .authorizationGrantType(AuthorizationGrantType.REFRESH_TOKEN)
                .authorizationGrantType(AuthorizationGrantType.CLIENT_CREDENTIALS)
                .redirectUri("http://127.0.0.1:8080/login/oauth2/code/oidc-client") // 頁面地址需要跟這個保持一致
                .postLogoutRedirectUri("http://127.0.0.1:8080/")
                .scope(OidcScopes.OPENID)
                .scope(OidcScopes.PROFILE)
                .scope("user.info")
                .scope("all")
                // 客戶端設置,設置用戶需要確認授權,設置false后不需要確認
                .clientSettings(ClientSettings.builder().requireAuthorizationConsent(true).build())
                //設置accessToken有效期
                .tokenSettings(TokenSettings.builder().accessTokenTimeToLive(Duration.ofHours(2)).build())
                .build();


        return new InMemoryRegisteredClientRepository(oidcClient);
    }


    /**
     * 用于簽署訪問令牌
     */
    @Bean
    public JWKSource<SecurityContext> jwkSource() {
        KeyPair keyPair = generateRsaKey();
        RSAPublicKey publicKey = (RSAPublicKey) keyPair.getPublic();
        RSAPrivateKey privateKey = (RSAPrivateKey) keyPair.getPrivate();
        RSAKey rsaKey = new RSAKey.Builder(publicKey)
                .privateKey(privateKey)
                .keyID(UUID.randomUUID().toString())
                .build();
        JWKSet jwkSet = new JWKSet(rsaKey);
        return new ImmutableJWKSet<>(jwkSet);
    }


    /**
     * 創建RsaKey
     */
    private static KeyPair generateRsaKey() {
        KeyPair keyPair;
        try {
            KeyPairGenerator keyPairGenerator = KeyPairGenerator.getInstance("RSA");
            keyPairGenerator.initialize(2048);
            keyPair = keyPairGenerator.generateKeyPair();
        }
        catch (Exception ex) {
            log.error ("generateRsaKey Exception", ex);
            throw new IllegalStateException(ex);
        }
        return keyPair;
    }


    /**
     * 解碼簽名訪問令牌
     */
    @Bean
    public JwtDecoder jwtDecoder(JWKSource<SecurityContext> jwkSource) {
        return OAuth2AuthorizationServerConfiguration.jwtDecoder(jwkSource);
    }


    @Bean
    public AuthorizationServerSettings authorizationServerSettings() {
        return AuthorizationServerSettings.builder().build();
    }


}
在 這段代碼中我們基于內存模式(InMemory)構建了一個oidc-client客戶端,客戶端通過請求頭的形式進行認證,并支持授權碼、刷新碼、客戶端三種認證方式,通過tokenSettings將access_token的有效期設置成2小時。
3、Spring Security 安全配置
@EnableWebSecurity
@Configuration(proxyBeanMethods = false)
public class DefaultSecurityConfig {


    /**
     * 用于認證的Spring Security過濾器鏈。
     */
    @Bean
    public SecurityFilterChain defaultSecurityFilterChain(HttpSecurity http)
            throws Exception {
        http
                .authorizeHttpRequests((authorize) ->
                        authorize
                        .requestMatchers("/assets/**","/webjars/**","/actuator/**","/oauth2/**","/login").permitAll()
                        .anyRequest().authenticated()
                )
                .cors(Customizer.withDefaults())
                .csrf(AbstractHttpConfigurer::disable)
                .formLogin(Customizer.withDefaults());


        return http.build();
    }


    /**
     * 配置內存用戶
     * @param passwordEncoder 密碼管理器
     */
    @Bean
    public UserDetailsService users(PasswordEncoder passwordEncoder) {


        UserDetails userDetails = User.withUsername("dailymart")
                .password(passwordEncoder.encode("123456"))
                .roles("USER")
                .build();


        return new InMemoryUserDetailsManager(userDetails);
    }


}
在這里我們構建了一個InMemory的dailymart用戶,這些代碼使用過Spring Security OAuth2的同學來說肯定很熟悉。
通過上面的三步,我們就構建了一個最基礎的認證服務器。
授權碼模式演示
1、啟動認證服務器后(9090)我們訪問如下地址獲取token
http://127.0.0.1:9090/oauth2/authorize?client_id=oidc-client&response_type=code&scope=user.info+openid&redirect_uri=http://127.0.0.1:8080/login/oauth2/code/oidc-client
注意,SAS會校驗redirect_url與客戶端中配置的是否一致,此參數不能亂配置。
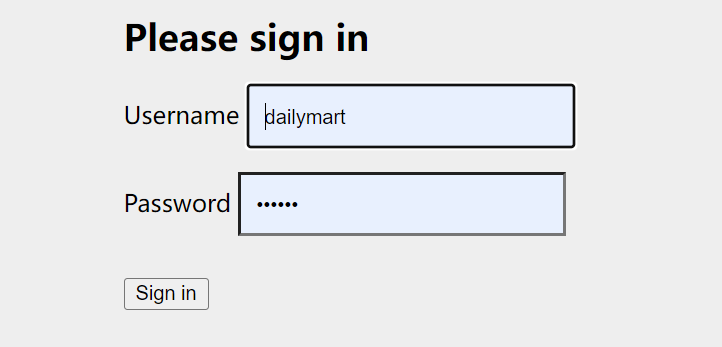
2、SpringSecurity檢測到用戶未登錄,跳轉至登錄頁面
 圖片
圖片
3、登錄以后然后系統會跳轉至確認授權頁面(ClientSettings.builder().requireAuthorizationConsent(true)),確認授權以后再跳轉到redirect_url上,并在參數中返回code

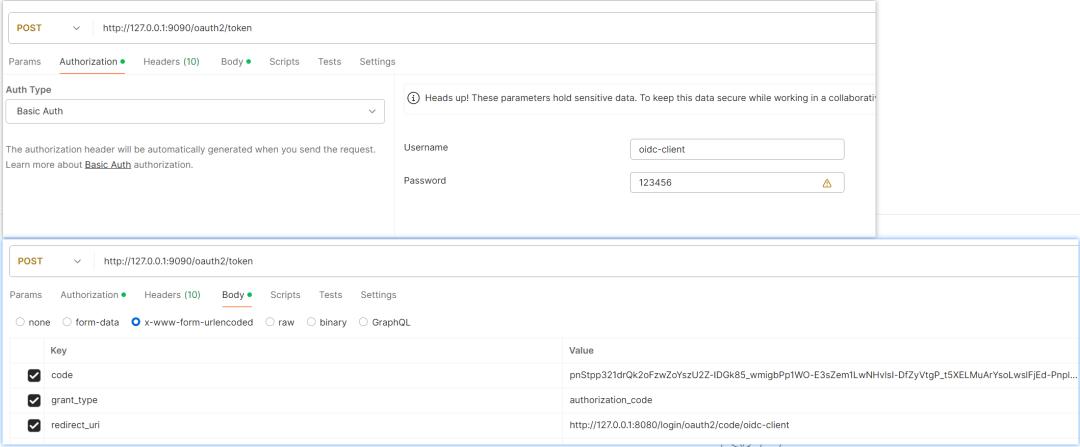
4、通過postman調用oauth2接口獲取access_token
 圖片
圖片
在第一步的scope參數中我們申請了openid權限,這個時候SAS會啟用OIDC協議并返回ID_TOKEN,如果未申請openid則是默認的oauth2協議。
 圖片
圖片
此時我們將id_token解開即可獲得用戶信息。
5、 獲取用戶詳細信息
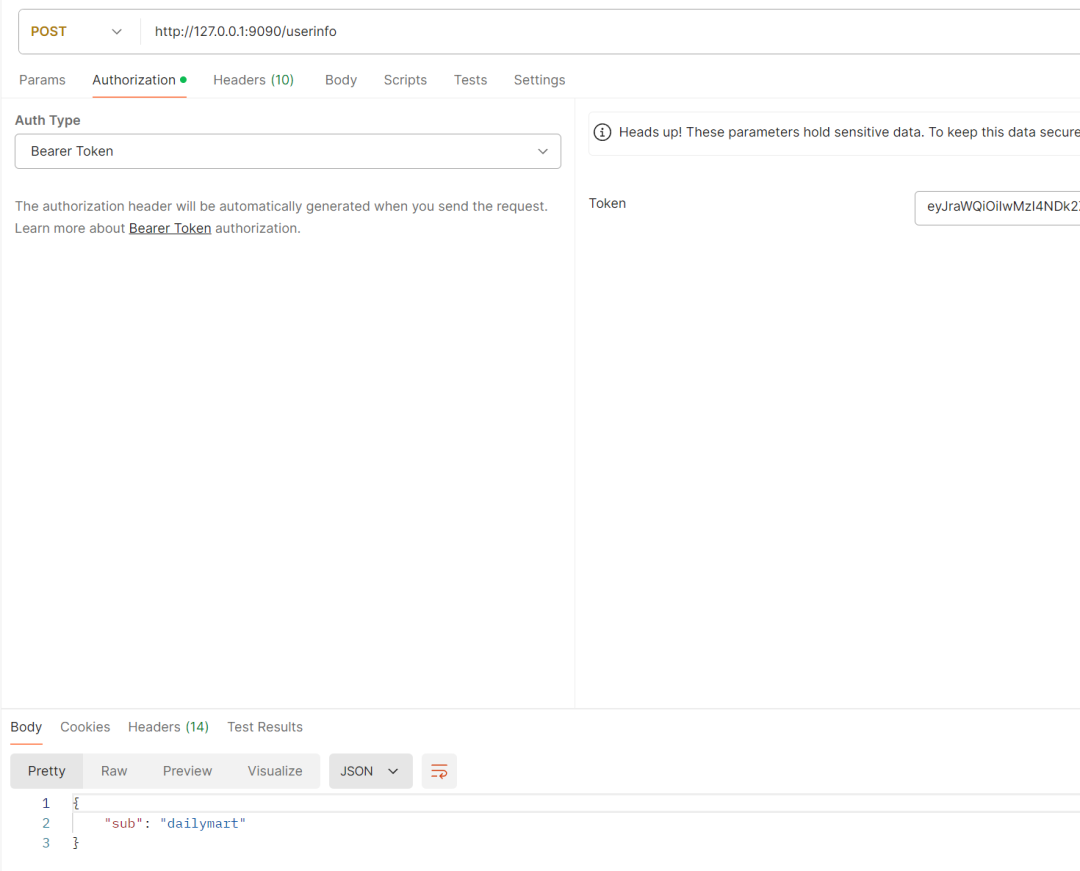
SAS提供一個userInfo接口用于獲取用戶的詳細信息,通過postman調用并在請求頭中設置上一步拿到的access_token
 圖片
圖片
6、我們還可以通過瀏覽器訪問http://127.0.0.1:9090/.well-known/openid-configuration以獲取認證服務器的詳細信息
{
    "issuer": "http://127.0.0.1:9090",
    "authorization_endpoint": "http://127.0.0.1:9090/oauth2/authorize",
    "device_authorization_endpoint": "http://127.0.0.1:9090/oauth2/device_authorization",
    "token_endpoint": "http://127.0.0.1:9090/oauth2/token",
    "token_endpoint_auth_methods_supported": ["client_secret_basic", "client_secret_post", "client_secret_jwt", "private_key_jwt"],
    "jwks_uri": "http://127.0.0.1:9090/oauth2/jwks",
    "userinfo_endpoint": "http://127.0.0.1:9090/userinfo",
    "end_session_endpoint": "http://127.0.0.1:9090/connect/logout",
    "response_types_supported": ["code"],
    "grant_types_supported": ["authorization_code", "client_credentials", "refresh_token", "urn:ietf:params:oauth:grant-type:device_code"],
    "revocation_endpoint": "http://127.0.0.1:9090/oauth2/revoke",
    "revocation_endpoint_auth_methods_supported": ["client_secret_basic", "client_secret_post", "client_secret_jwt", "private_key_jwt"],
    "introspection_endpoint": "http://127.0.0.1:9090/oauth2/introspect",
    "introspection_endpoint_auth_methods_supported": ["client_secret_basic", "client_secret_post", "client_secret_jwt", "private_key_jwt"],
    "code_challenge_methods_supported": ["S256"],
    "subject_types_supported": ["public"],
    "id_token_signing_alg_values_supported": ["RS256"],
    "scopes_supported": ["openid"]
}
小結
本篇文章我們先熟悉一下如何基于spring-boot-starter-oauth2-authorization-server構建認證服務器,后面幾篇文章我們將對其進行改造讓其符合生產使用。


