終于把神經網絡算法搞懂了!
大家好,我是小寒
今天給大家分享一個強大的算法模型,神經網絡
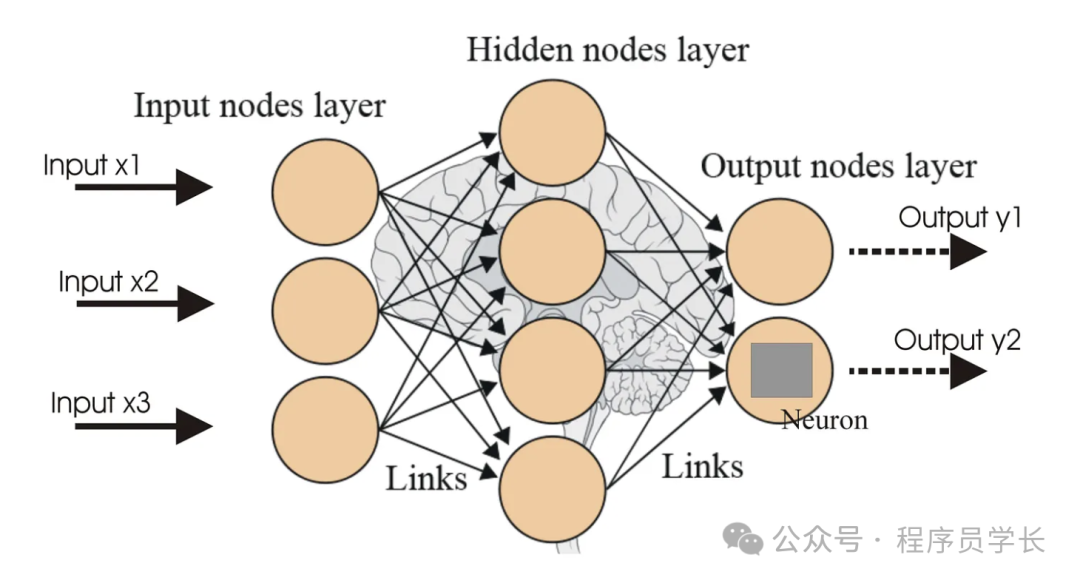
神經網絡(Neural Network)是一類旨在模仿人類大腦結構和功能的計算模型。
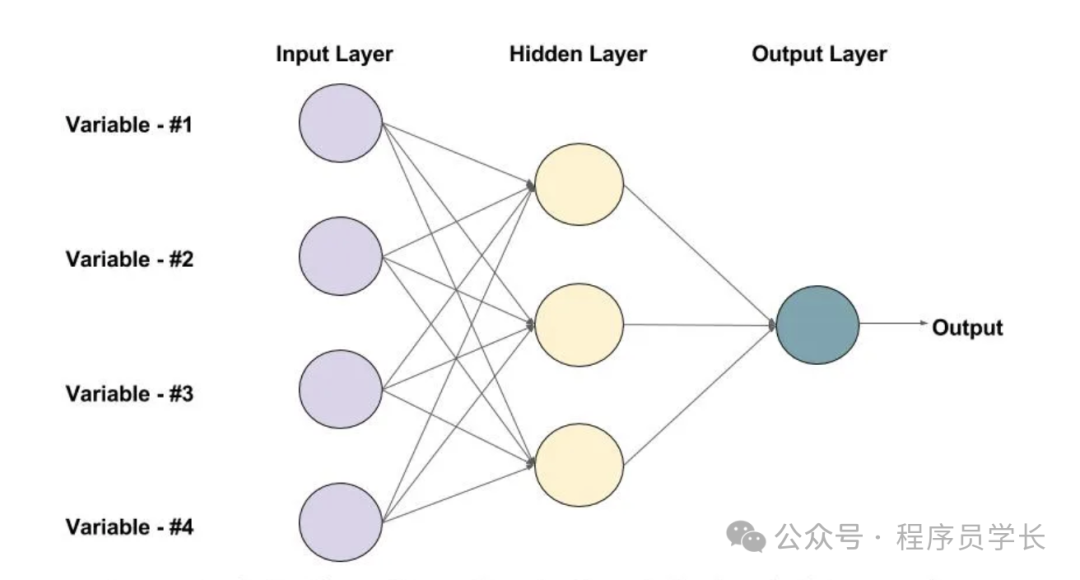
它由一系列相互連接的節點(稱為“神經元”)組成,這些節點按照一定的層級結構組織,通常包括輸入層、隱藏層和輸出層。
 圖片
圖片
基本結構
- 輸入層(Input Layer)
輸入層接收來自外部的數據,每個節點對應一個輸入特征。 - 隱藏層(Hidden Layers)
隱藏層位于輸入層和輸出層之間。神經網絡的復雜性通常來源于隱藏層的數量和每一層中神經元的數量。
每個隱藏層中的節點通過加權連接接收來自上一層的輸入信號,并通過激活函數進行非線性變換。 - 輸出層(Output Layer)
輸出層的節點輸出最終的結果,這些結果可以是分類標簽、回歸值等。
 圖片
圖片
神經元的工作原理
為了更好地理解神經網絡的工作原理,我們首先放大單個節點(神經元)。
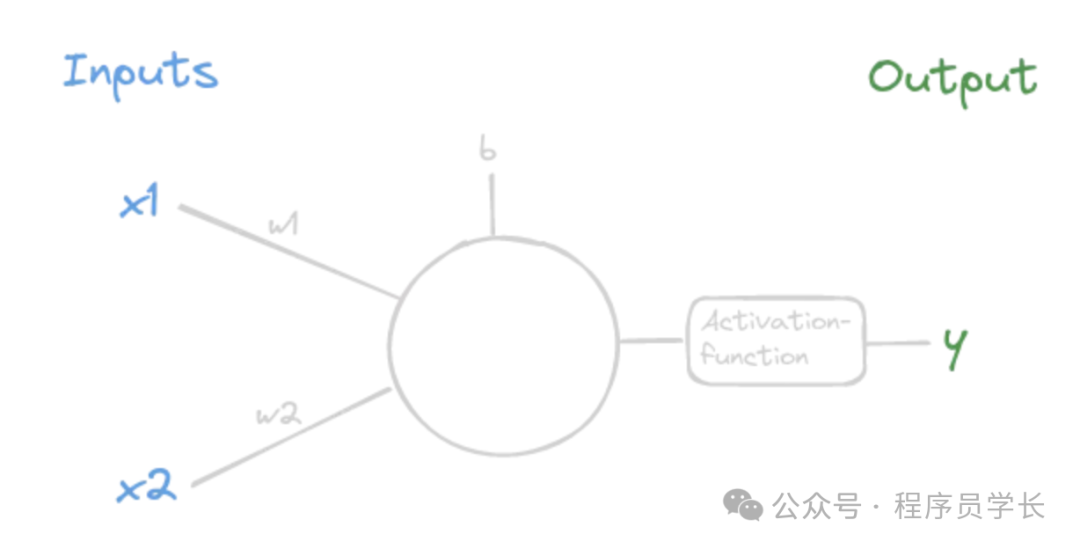
每個神經元接收來自前一層的輸入,執行以下步驟。

案例分享
下面是一個使用 numpy 來從頭構建一個神經網絡的示例代碼。
import numpy as np
import matplotlib.pyplot as plt

# sigmoidfunction
def sigmoid(x):
    return 1 / (1 + np.exp(-x))

# define the derivative of the sigmoid function
def sigmoid_derivative(x):
    return x * (1 - x)


class NeuralNetwork:
    def __init__(self, input_size, hidden_size, output_size):
        self.input_size = input_size
        self.hidden_size = hidden_size
        self.output_size = output_size

        # Weights and biases
        self.W1 = np.random.randn(self.input_size, self.hidden_size)  # Weights between input and hidden layer
        self.b1 = np.ones((1, self.hidden_size))  # Biases for the hidden layer
        self.W2 = np.random.randn(self.hidden_size, self.output_size)  # Weights between hidden and output layer
        self.b2 = np.ones((1, self.output_size))  # Biases for the output layer

    # Forward Pass
    def forward(self, X):
        self.z1 = np.dot(X, self.W1) + self.b1  # Linear combination for hidden layer
        self.a1 = sigmoid(self.z1)  # Apply activation function to hidden layer
        self.z2 = np.dot(self.a1, self.W2) + self.b2  # Linear combination for output layer
        self.a2 = self.z2  # Output layer (no activation for regression)
        return self.a2

    def backward(self, X, y, output, learning_rate):
        m = X.shape[0]  # Number of training examples

        # Error and delta calculations
        self.error = y - output  # Error at the output layer
        self.delta_output = self.error  # Delta for the output layer
        self.error_hidden = np.dot(self.delta_output, self.W2.T)  # Error at the hidden layer
        self.delta_hidden = self.error_hidden * sigmoid_derivative(self.a1)  # Delta for the hidden layer

        # Gradient calculations
        self.W2_grad = np.dot(self.a1.T, self.delta_output) / m
        self.b2_grad = np.sum(self.delta_output, axis=0, keepdims=True) / m
        self.W1_grad = np.dot(X.T, self.delta_hidden) / m
        self.b1_grad = np.sum(self.delta_hidden, axis=0, keepdims=True) / m

        # Update weights and biases
        self.W2 += learning_rate * self.W2_grad
        self.b2 += learning_rate * self.b2_grad
        self.W1 += learning_rate * self.W1_grad
        self.b1 += learning_rate * self.b1_grad

# create a networkobjekt
nn = NeuralNetwork(input_size=2, hidden_size=4, output_size=1)

# define data
# [size, age]
X = np.array([
    [100, 5], [120, 10], [80, 15], [150, 2], [90, 20],
    [110, 7], [95, 12], [130, 8], [140, 5], [75, 18],
    [85, 14], [125, 6], [100, 10], [135, 4], [105, 9],
    [115, 11], [140, 3], [80, 20], [90, 22], [120, 14]
])

# Price in thousand euros
y = np.array([
    [200], [220], [170], [280], [160],
    [210], [175], [225], [270], [155],
    [185], [230], [195], [265], [175],
    [215], [275], [165], [185], [225]
])

# normalize data
X_mean, X_std = X.mean(axis=0), X.std(axis=0)
y_mean, y_std = y.mean(), y.std()

X_normalized = (X - X_mean) / X_std
y_normalized = (y - y_mean) / y_std

# Training loop
epochs = 2000
learning_rate = 0.01
losses = []

for epoch in range(epochs):
    # Forward pass
    output = nn.forward(X_normalized)

    # Backward pass
    nn.backward(X_normalized, y_normalized, output, learning_rate)

    # Calculate and print loss
    mse = np.mean(np.square(y_normalized - output))
    losses.append(mse)
    if epoch % 100 == 0:
        print(f"Epoch {epoch}, Loss: {mse}")

# Prediction function
def predict(size, age):
    """
    Predicts the house price based on size and age.

    Args:
        size: Size of the house.
        age: Age of the house.

    Returns:
        The predicted price in thousand euros.
    """
    input_normalized = (np.array([[size, age]]) - X_mean) / X_std
    output_normalized = nn.forward(input_normalized)
    return output_normalized * y_std + y_mean

plt.plot(losses)
plt.xlabel("Epoch")
plt.ylabel("Loss")
plt.title("Loss while training")
plt.show()

# Test Prediction
print("\nPredictions:")
print(f"House with 110 m2 and 7 years: {predict(110, 7)[0][0]:.2f} t€")
print(f"House with 85 m2 and 12 years: {predict(85, 12)[0][0]:.2f} t€")
神經網絡的類型
1.前饋神經網絡(FNN)
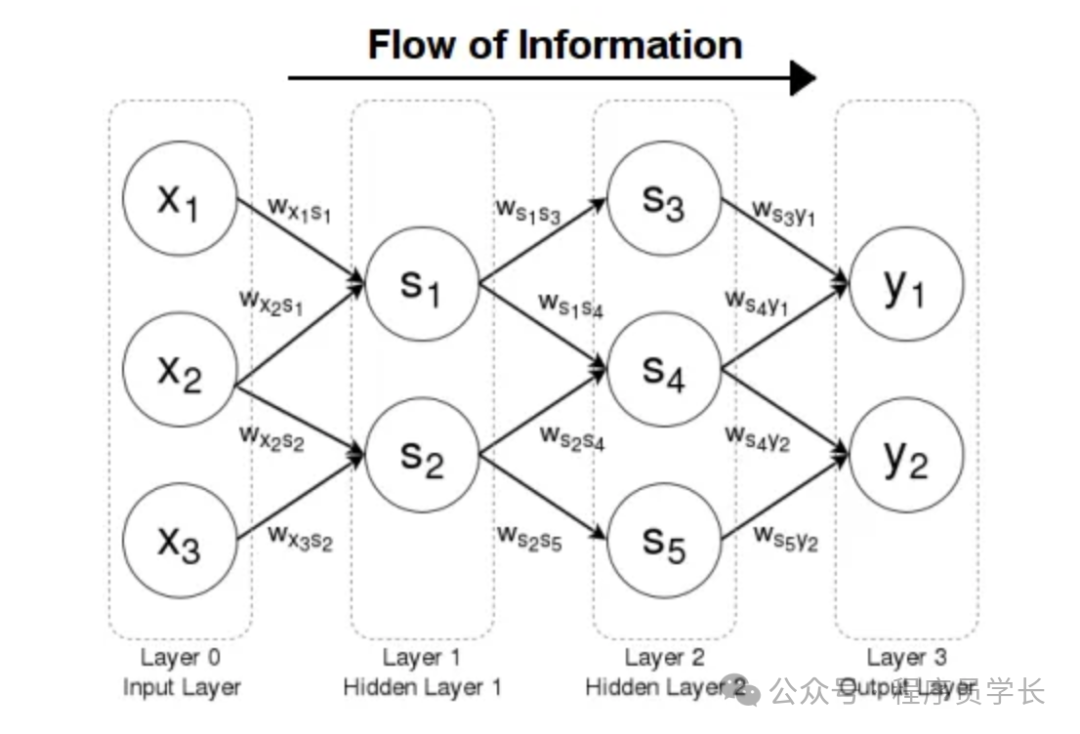
前饋神經網絡 (FNN) 是最簡單的人工神經網絡,其中信息只朝一個方向移動,即向前移動,從輸入節點,經過隱藏節點(如果有),最后到達輸出節點。
網絡中沒有循環或環路,因此是一種簡單的架構。
 圖片
圖片
工作原理
- 輸入層:
輸入特征(例如,圖像的像素值)被輸入到網絡中。 - 隱藏層
每個隱藏層由處理來自前一層的輸入的神經元組成。
每個神經元計算其輸入的加權和,添加偏差,并將結果傳遞給激活函數(例如 ReLU、sigmoid)。 - 輸出層
最后一層提供網絡的輸出(例如,分類中的類概率或回歸中的連續值)。
from tensorflow.keras.models import Sequential
from tensorflow.keras.layers import Dense

# Build a simple Feedforward Neural Network
model = Sequential([
    Dense(64, activatinotallow='relu', input_shape=(10,)),  # Hidden layer with 64 neurons
    Dense(64, activatinotallow='relu'),                     # Another hidden layer
    Dense(1, activatinotallow='sigmoid')                    # Output layer for binary classification
])

# Compile the model
model.compile(optimizer='adam', loss='binary_crossentropy', metrics=['accuracy'])

# Summary of the model
model.summary()
2.卷積神經網絡(CNN)
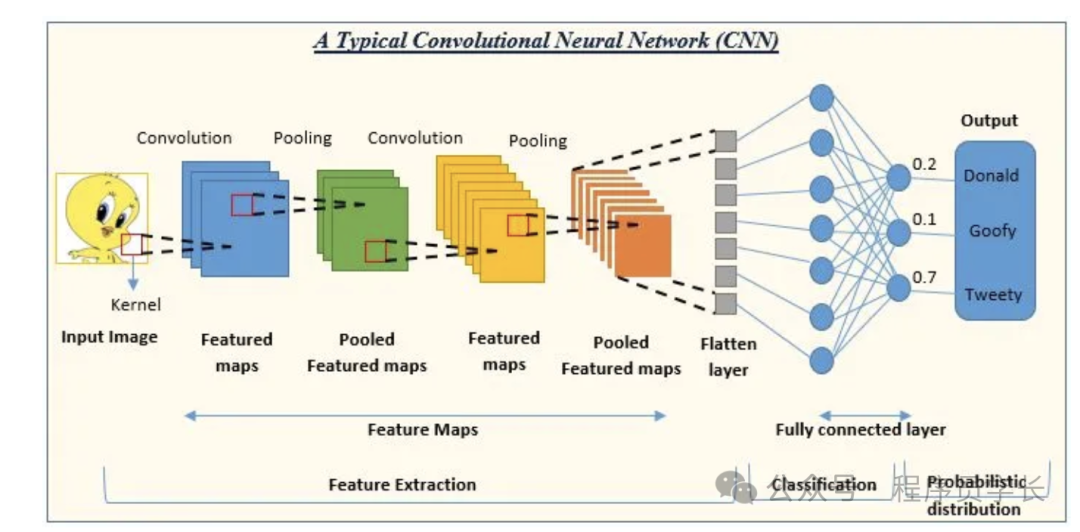
卷積神經網絡 (CNN) 是一類深度神經網絡,專門用于處理結構化網格狀數據(例如圖像)。
它們使用卷積層自動且自適應地從輸入數據中學習特征的空間層次結構。
- 卷積層
將一組過濾器(核)應用于輸入,這些過濾器在輸入數據上滑動以生成特征圖。 - 池化層
降低特征圖的維數,使得網絡的計算效率更高,并且對輸入中的小平移具有不變性。
工作原理
- 輸入層
CNN 的輸入通常是以像素值矩陣表示的圖像。
對于彩色圖像,這通常是 3D 矩陣(高度 × 寬度 × 通道)。 - 卷積層
CNN 的核心思想是卷積運算,其中一個稱為過濾器或內核的小矩陣在輸入圖像上滑動,并計算過濾器與其覆蓋的圖像塊之間的點積。
此操作生成特征圖。 - 池化層
池化層減少了特征圖的空間維度(高度和寬度),使計算更易于管理,并允許網絡專注于最重要的特征。
最常見的類型是最大池化,它從特征圖的每個塊中獲取最大值。 - 全連接層
經過幾個卷積層和池化層之后,神經網絡中的高級推理通過全連接層完成。 - 輸出層
輸出層使用特定的激活函數(對于分類任務,通常是 Softmax)來產生最終預測。輸出是所有可能類別的概率分布。
from tensorflow.keras.datasets import mnist
from tensorflow.keras.utils import to_categorical

# Load dataset
(X_train, y_train), (X_test, y_test) = mnist.load_data()
X_train = X_train.reshape(X_train.shape[0], 28, 28, 1)
X_test = X_test.reshape(X_test.shape[0], 28, 28, 1)
X_train = X_train.astype('float32') / 255
X_test = X_test.astype('float32') / 255
y_train = to_categorical(y_train, 10)
y_test = to_categorical(y_test, 10)

# Build the CNN model
model = Sequential([
    Conv2D(32, kernel_size=(3, 3), activatinotallow='relu', input_shape=(28, 28, 1)),
    MaxPooling2D(pool_size=(2, 2)),
    Conv2D(64, (3, 3), activatinotallow='relu'),
    MaxPooling2D(pool_size=(2, 2)),
    Flatten(),
    Dense(128, activatinotallow='relu'),
    Dense(10, activatinotallow='softmax')
])

# Compile the model
model.compile(optimizer='adam', loss='categorical_crossentropy', metrics=['accuracy'])

# Train the model
model.fit(X_train, y_train, validation_data=(X_test, y_test), epochs=10, batch_size=200)

# Evaluate the model
score = model.evaluate(X_test, y_test)
print(f'Test accuracy: {score[1]*100:.2f}%')
3.循環神經網絡(RNN)
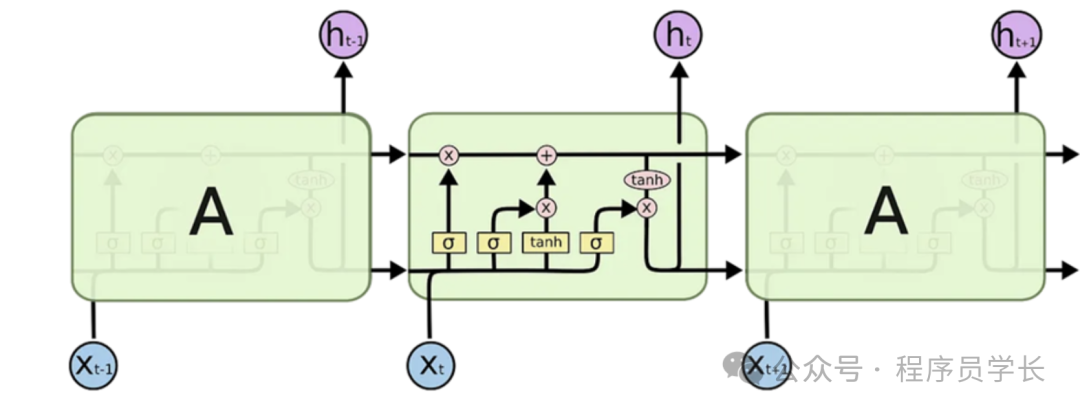
循環神經網絡 (RNN) 是一類用于處理順序數據的神經網絡。與標準神經網絡不同,RNN 具有循環,可讓其保留先前輸入的“記憶”,因此非常適合處理涉及序列的任務。
 圖片
圖片
- LSTM(長短期記憶)
一種 RNN,可以通過維護隨每次輸入更新的記憶單元來學習長期依賴關系。LSTM 解決了標準 RNN 的梯度消失問題。 - GRU(門控循環單元)
LSTM 的簡化版本,將遺忘門和輸入門組合成單個更新門。
GRU 計算效率高,性能通常與 LSTM 一樣好。
from tensorflow.keras.models import Sequential
from tensorflow.keras.layers import LSTM, Dense

# Build an LSTM for time series prediction
model = Sequential([
    LSTM(50, activatinotallow='relu', input_shape=(10, 1)),  # LSTM layer
    Dense(1)                                           # Output layer
])

# Compile the model
model.compile(optimizer='adam', loss='mse')

# Summary of the model
model.summary()


