Spring Boot 自動裝配原理以及實踐
在當今的軟件開發領域,Spring Boot 以其強大的功能和便捷性成為了眾多開發者的首選框架。而其中最為關鍵且令人著迷的特性之一,便是自動裝配。自動裝配猶如一把神奇的鑰匙,開啟了高效開發的大門。

在這篇文章中,我們將深入探究 Spring Boot 自動裝配背后的原理。了解它是如何巧妙地將各種組件和功能無縫整合到我們的應用程序中,使得開發過程變得如此輕松和高效。同時,我們也將通過實際的案例和實踐,親身體驗自動裝配在項目中的具體應用和強大威力。讓我們一同踏上這場探索 Spring Boot 自動裝配的精彩旅程,揭開其神秘面紗,掌握這一核心技術,為我們的開發工作注入新的活力和效率。
一、自動裝配兩個核心
1. @Import注解的作用
@Import說Spring框架經常會看到的注解,它可用于導入一個或者多個組件,是與<import/>配置等效的一個注解:
- 導入@Configuration類下所有的@bean方法中創建的bean。
- 導入該注解指定的bean,例如@Import(AService.class),就會生成AService的bean,并將其導入到Spring容器中。
- 結合ImportSelector接口類導入指定類,這個比較重點后文會會展開介紹。
Indicates one or more component classes to import — typically @Configuration classes. Provides functionality equivalent to theelement in Spring XML. Allows for importing @Configuration classes, ImportSelector and ImportBeanDefinitionRegistrar implementations, as well as regular component classes (as of 4.2; analogous to AnnotationConfigApplicationContext. register).
2. 詳解ImportSelector
ImportSelector接口則是@Import的輔助者,如果我們希望可以選擇性的導入一些類,我們就可以繼承ImportSelector接口編寫一個ImportSelector類,告知容器需要導入的類。 我們以Spring Boot源碼中@EnableAutoConfiguration為例講解一下它的使用,它基于Import注解將AutoConfigurationImportSelector導入容器中:
//......
@Import({AutoConfigurationImportSelector.class})
public @interface EnableAutoConfiguration {
    String ENABLED_OVERRIDE_PROPERTY = "spring.boot.enableautoconfiguration";
 //......
}
這樣在IOC階段,Spring就會調用其selectImports方法獲取需要導入的類的字符串數組并將這些類導入容器中:
@Override
 public String[] selectImports(AnnotationMetadata annotationMetadata) {
  if (!isEnabled(annotationMetadata)) {
   return NO_IMPORTS;
  }
  AutoConfigurationEntry autoConfigurationEntry = getAutoConfigurationEntry(annotationMetadata);
  //返回需要導入的類的字符串數組
  return StringUtils.toStringArray(autoConfigurationEntry.getConfigurations());
 }
3. ImportSelector使用示例
可能上文的原理對沒有接觸源碼的讀者比較模糊,所以我們不妨寫一個demo來了解一下這個注解。我們現在有一個需求,希望通過import注解按需將Student類或者User類導入容器中。首先我們看看user類代碼,沒有任何實現,代碼示例如下:
public class User {
}
Student 類代碼同理,沒有任何實現僅僅做測試使用
public class Student {
}
完成測試類的創建之后,我們就以用戶類為例,創建UserConfig 代碼如下:
@Configuration
public class UserConfig {

    @Bean
    public User getUser() {
        return new User();
    }
}
然后編寫ImportSelector 首先類,編寫自己的導入邏輯,可以看到筆者簡單實現了一個selectImports方法返回UserConfig的類路徑。
public class CustomImportSelector implements ImportSelector {

     privatestatic Logger logger = LoggerFactory.getLogger(CustomImportSelector.class);

    /**
     * importingClassMetadata:被修飾的類注解信息
     */
    @Override
    public String[] selectImports(AnnotationMetadata importingClassMetadata) {


        logger.info("獲取到的注解類型:{}",importingClassMetadata.getAnnotationTypes().toArray());

        // 如果被CustomImportSelector導入的組件是類,那么我們就實例化UserConfig
        if (!importingClassMetadata.isInterface()) {
            returnnew String[] { "com.example.UserConfig" };
        }

        // 此處不要返回null
        returnnew String[] { "com.example.StudentConfig" };
    }
}
完成這些步驟我們就要來到最關鍵的一步了,在Spring Boot啟動類中使用@Import導入CustomImportSelector:
@SpringBootApplication
@Configuration
@Import(CustomImportSelector.class)
public class DemoApplication {

 public static void main(String[] args) {
  SpringApplication.run(DemoApplication.class, args);
 }

}
為了測試我們編寫這樣一個controller看看bean是否會導入到容器中
@RestController
publicclass MyController {

    privatestatic Logger logger = LoggerFactory.getLogger(MyController.class);

    @Autowired
    private User user;

    @RequestMapping("hello")
    public String hello() {
        logger.info("user:{}", user);
        return"hello";
    }
}
結果測試我們發現user不為空,說明CustomImportSelector確實將UserConfig導入到容器中,并將User導入到容器中了。
4. 從源碼角度了解ImportSelector工作原理
我們以上文筆者所給出的UserConfig導入作為示例講解一下源碼的工作流程:
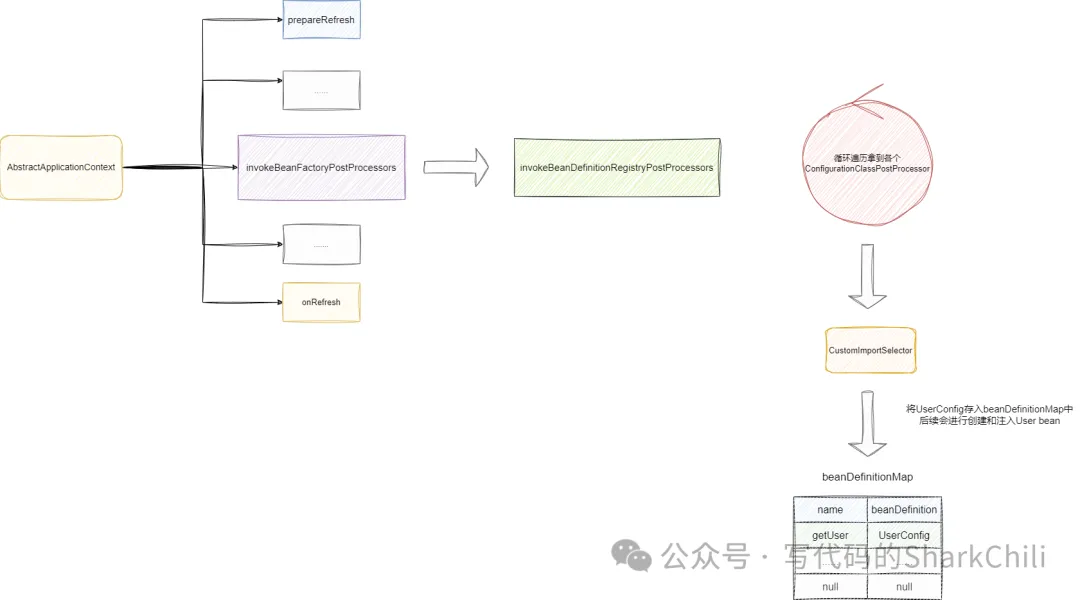
- 在Spring初始化容器階段,AbstractApplicationContext執行invokeBeanFactoryPostProcessors開始調用上下文中關于BeanFactory的處理器。
- 執行到BeanDefinitionRegistryPostProcessor的處理,在循環過程中就會得到一個ConfigurationClassPostProcessor處理器它會拿到所有帶有@Import注解的類
- 得到我們的啟動類由此執行到我們所實現的CustomImportSelector得到要注入的配置類。
- 將其放入beanDefinitionMap中讓Spring完成后續java bean的創建和注入:
對此我們給出入口源碼即AbstractApplicationContext的refresh()方法,它會調用一個invokeBeanFactoryPostProcessors(beanFactory);進行bean工廠后置操作:
@Override
 public void refresh() throws BeansException, IllegalStateException {
  synchronized (this.startupShutdownMonitor) {
  .........
   //執行bean工廠后置操作
    invokeBeanFactoryPostProcessors(beanFactory);

   ........

}
}
步入代碼,可以看到容器會不斷遍歷各個postProcessor 即容器后置處理器,然后執行他們的邏輯
for (BeanFactoryPostProcessor postProcessor : beanFactoryPostProcessors) {
   .....
   //執行各個postProcessor 的邏輯
   invokeBeanDefinitionRegistryPostProcessors(currentRegistryProcessors, registry, beanFactory.getApplicationStartup());
}
重點來了,遍歷過程中得到一個ConfigurationClassPostProcessor,這個類就會得到我們的CustomImportSelector,然后執行selectImports獲取需要導入的類信息,最終會生成一個Set<ConfigurationClass> configClasses = new LinkedHashSet<>(parser.getConfigurationClasses());
如下圖所示可以看到configClasses就包含UserConfig

sharkChili
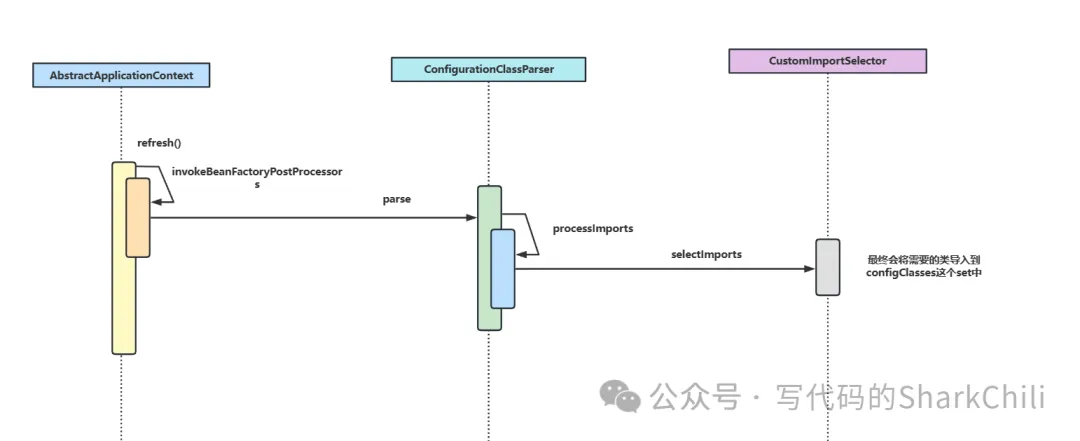
總結一下核心流程的時序圖
完成上述步驟后ConfigurationClassPostProcessor就會通過這個set集合執行loadBeanDefinitions方法將需要的bean導入到容器中,進行后續IOC操作:
  //configClasses 中就包含了UserConfig類
Set<ConfigurationClass> configClasses = new LinkedHashSet<>(parser.getConfigurationClasses());
   configClasses.removeAll(alreadyParsed);

   //執行 loadBeanDefinitions
   this.reader.loadBeanDefinitions(configClasses);
二、Spring Boot自動裝配原理(重點)
了解了import原理后,我們了解Spring Boot自動裝配原理也很簡單了,我們不妨看看Spring Boot的@SpringBootApplication這個注解中包含一個@EnableAutoConfiguration注解,我們不妨點入看看,可以看到它包含一個@Import(AutoConfigurationImportSelector.class)注解,從名字上我們可以知曉這是一個ImportSelector的實現類。
所以我們不妨看看它的selectImports邏輯,可以看到它會通過getAutoConfigurationEntry方法獲取需要裝配的類,然后通過StringUtils.toStringArray切割返回。所以我們不妨看看getAutoConfigurationEntry
@Override
public String[] selectImports(AnnotationMetadata annotationMetadata) {
if (!isEnabled(annotationMetadata)) {
return NO_IMPORTS;
}
AutoConfigurationEntry autoConfigurationEntry = getAutoConfigurationEntry(annotationMetadata);
return StringUtils.toStringArray(autoConfigurationEntry.getConfigurations());
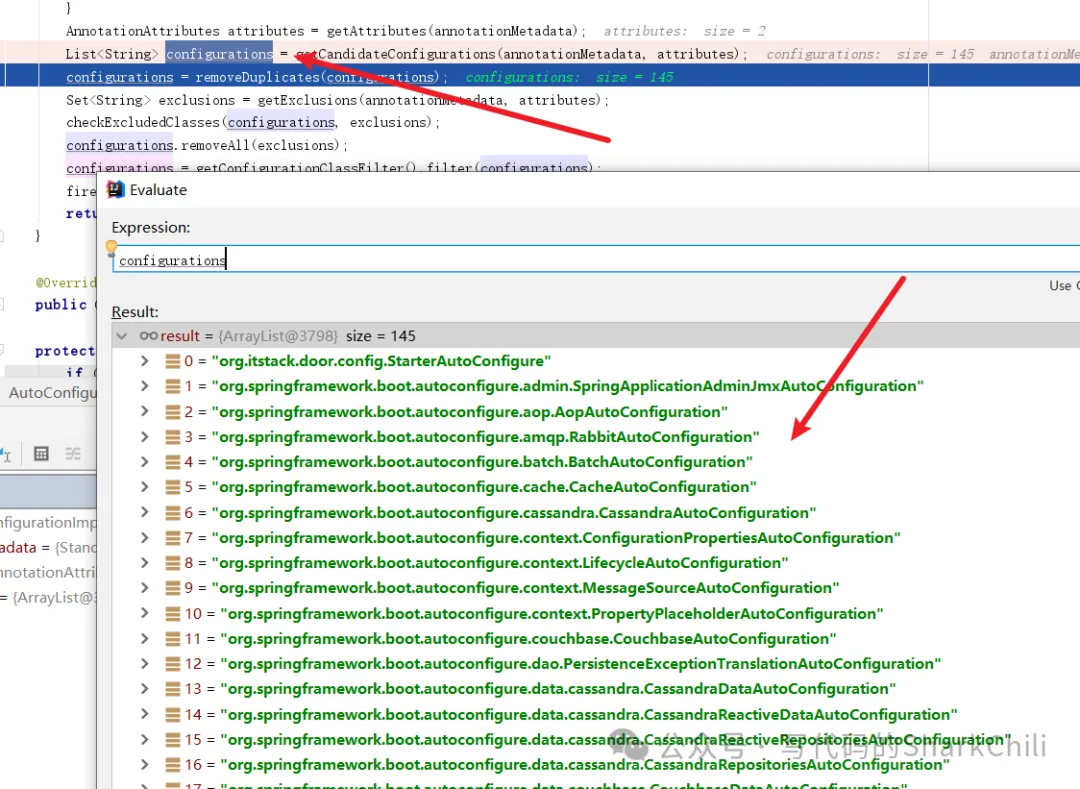
}查看getAutoConfigurationEntry方法,我們可以看到它通過getCandidateConfigurations獲取各個xxxxAutoConfigure,并返回結果:
protected AutoConfigurationEntry getAutoConfigurationEntry(AnnotationMetadata annotationMetadata) {
if (!isEnabled(annotationMetadata)) {
   return EMPTY_ENTRY;
  }
  AnnotationAttributes attributes = getAttributes(annotationMetadata);
//獲取所有xxxxAutoConfigure
  List<String> configurations = getCandidateConfigurations(annotationMetadata, attributes);
//移除不需要的
  configurations = removeDuplicates(configurations);
  Set<String> exclusions = getExclusions(annotationMetadata, attributes);
  checkExcludedClasses(configurations, exclusions);
  configurations.removeAll(exclusions);
  configurations = getConfigurationClassFilter().filter(configurations);
  fireAutoConfigurationImportEvents(configurations, exclusions);
//返回結果
returnnew AutoConfigurationEntry(configurations, exclusions);
 }
而getCandidateConfigurations實際上是會通過一個loadSpringFactories方法,如下所示遍歷獲取所有含有META-INF/spring.factories的jar包
private static Map<String, List<String>> loadSpringFactories(ClassLoader classLoader) {
        Map<String, List<String>> result = (Map)cache.get(classLoader);
        if (result != null) {
            return result;
        } else {
            HashMap result = new HashMap();

            try {
            //解析這個配置文件獲取所有配置類然后返回
                Enumeration urls = classLoader.getResources("META-INF/spring.factories");

              .....
                return result;
            } catch (IOException var14) {
                thrownew IllegalArgumentException("Unable to load factories from location [META-INF/spring.factories]", var14);
            }
        }
    }
最終結果過濾解析,回到我們上文說的beanDefinitionMap中,最終通過IOC完成自動裝配。
三、(實踐)落地通用日志組件
1. 需求介紹
微服務項目中,基于日志排查問題是非常重要的手段,而日志屬于非功能范疇的一個職責,所以我們希望將日志打印和功能解耦。AOP就是非常不錯的手段,但是在每個服務中都編寫一個切面顯然是非常不可取的。 所以我們希望通過某種手段會編寫一個通用日志打印工具,只需一個注解即可實現對方法的請求響應進行日志打印。 所以我們這個例子仍然是利用自動裝配原理編寫一個通用日志組件。
2. 實現步驟
(1) 搭建工程
cloud-component-logging-starter,并引入我們需要的依賴,如下所示,因為筆者要對spring-web應用進行攔截所以用到的starter-web和aop模塊,以及為了打印響應結果,筆者也用到hutool,完整的依賴配置如下所示:
 <dependencies>
        <dependency>
            <groupId>org.springframework.boot</groupId>
            <artifactId>spring-boot-starter-web</artifactId>
        </dependency>

        <dependency>
            <groupId>org.springframework.boot</groupId>
            <artifactId>spring-boot-starter-aop</artifactId>
        </dependency>


        <dependency>
            <groupId>cn.hutool</groupId>
            <artifactId>hutool-all</artifactId>
        </dependency>
    </dependencies>
(2) 編寫日志注解
如下所示,該注解的value用于記錄當前方法要執行的操作,例如某方法上@SysLog("獲取用戶信息"),當我們的aop攔截到之后,就基于該注解的value打印該方法的功能。
@Target(ElementType.METHOD)
@Retention(RetentionPolicy.RUNTIME)
public @interface SysLog {
    /**
     * 記錄方法要執行的操作
     *
     * @return
     */
    String value();
}
(3) 編寫環繞切面邏輯
邏輯非常簡單,攔截到了切面后若報錯則打印報錯的邏輯,反之打印正常請求響應結果:
@Aspect
publicclass SysLogAspect {

     privatestatic Logger logger = LoggerFactory.getLogger(SysLogAspect.class);

    @Pointcut("@annotation(com.sharkChili.annotation.SysLog)")
    public void logPointCut() {

    }


    @Around("logPointCut()")
    public Object around(ProceedingJoinPoint joinPoint) throws Throwable {
        MethodSignature signature = (MethodSignature) joinPoint.getSignature();
        Method method = signature.getMethod();
        //類名
        String className = joinPoint.getTarget().getClass().getName();
        //方法名
        String methodName = signature.getName();

        SysLog syslog = method.getAnnotation(SysLog.class);
        //獲取當前方法進行的操作
        String operator =syslog.value();

        long beginTime = System.currentTimeMillis();

        Object returnValue = null;
        Exception ex = null;
        try {
            returnValue = joinPoint.proceed();
            return returnValue;
        } catch (Exception e) {
            ex = e;
            throw e;
        } finally {
            long cost = System.currentTimeMillis() - beginTime;
            if (ex != null) {
                logger.error("業務請求:[類名: {}][執行方法: {}][執行操作: {}][耗時: {}ms][請求參數: {}][發生異常]",
                        className, methodName, operator, joinPoint.getArgs(), ex);
            } else {
                logger.info("業務請求:[類名: {}][執行方法: {}][執行操作: {}][耗時: {}ms][請求參數: {}][響應結果: {}]",
                        className, methodName, operator, cost, joinPoint.getArgs(), JSONUtil.toJsonStr(returnValue));
            }
        }

    }
}
(4) 編寫配置類
最后我們給出后續自動裝配會掃描到的配置類,并基于bean注解創建SysLogAspect切面:
@Configuration
public class SysLogAutoConfigure {

    @Bean
    public SysLogAspect getSysLogAspect() {
        return new SysLogAspect();
    }
}
(5) 新建spring.factories
該配置文件,告知要導入Spring容器的類,內容如下
org.springframework.boot.autoconfigure.EnableAutoConfiguration=\
com.sharkChili.config.SysLogAutoConfigure
(6) 服務測試
服務引入進行測試,以筆者為例,方法如下
@SysLog("獲取用戶信息")
    @GetMapping("getByCode/{accountCode}")
    public ResultData<AccountDTO> getByCode(@PathVariable(value = "accountCode") String accountCode) {
        log.info("遠程調用feign接口,請求參數:{}", accountCode);
        return accountFeign.getByCode(accountCode);
    }
請求之后輸出結果如下:
2023-02-16 00:08:08,085 INFO SysLogAspect:58 - 業務請求:[類名: com.sharkChili.order.controller.OrderController][執行方法: getByCode][執行操作: 獲取用戶信息][耗時: 892ms][請求參數: [sharkChili]][響應結果: {"data":{"accountCode":"sharkChili","amount":10000,"accountName":"sharkChili","id":1},"message":"操作成功","success":true,"status":100,"timestamp":1676477287856}]