


ASP.NET控件設計時操作列表與模板編輯淺析
ASP.NET控件設計時操作列表與模板編輯的基本內容:
ASP.NET控件設計時操作列表與模板編輯一.智能標記
先看一張圖.
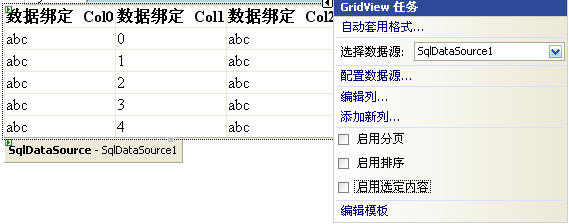
GridView右側的小三角可以很輕松的幫助我們設置常用的屬性,如下面的啟動分頁,啟用排序等,通過這樣的方式我們可以很快的完成工作。我們稱這樣的任務菜單為智能標記.
下面來看看ASP.NET控件設計時操作列表與模板編輯如何實現
1.重寫ControlDesigner的ActionLists屬性
你必須重寫這個屬性,返回你自定義的智能標記集合(即DesignerActionListCollection),這里假設CustomControlActionList為自定義的智能
- public class SampleControlDesigner : ControlDesigner
- {
- public SampleControlDesigner()
- : base()
- {
- }
- //創建一個自定義操作列表集合
- public override DesignerActionListCollection ActionLists
- {
- get
- {
- DesignerActionListCollection actionLists = new DesignerActionListCollection();
- actionLists.Add(new CustomControlActionList(this));
- return actionLists;
- }
- }
- }
2.CustomControlActionList 自定義項列表
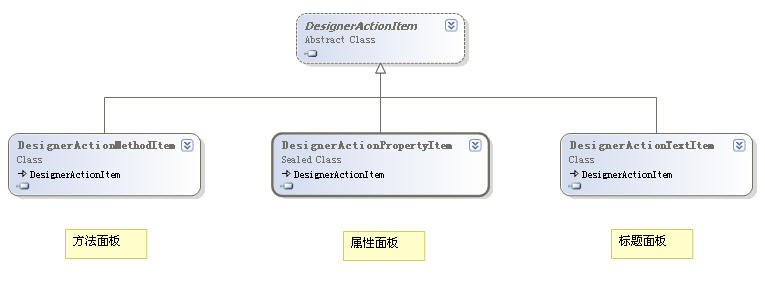
2.1項列表分類
(1)標題面板
(2)屬性面板
(3)方法面板
類圖如下
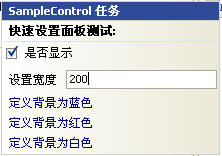
看個效果圖,你就明白怎么回事了
2.2實現
(1)繼承DesignerActionList類,重寫GetSortedActionItems方法添加自定義項面板集合,即2.1的三種項面板
- public override DesignerActionItemCollection GetSortedActionItems()
- {
- if (items == null)
- {
- items = new DesignerActionItemCollection();
- // 添加標題面板
- items.Add(new DesignerActionHeaderItem("快速設置面板測試:"));
- //添加屬性相關面板
- items.Add(new DesignerActionPropertyItem("Visible",
- "是否顯示"));
- items.Add(new DesignerActionPropertyItem("Width",
- "設置寬度"));
- items.Add(new DesignerActionPropertyItem("Height",
- "設置高度"));
- // 添加方法相關面板
- items.Add(new DesignerActionMethodItem(this, "FormatBlue", "定義背景為藍色", true));
- items.Add(new DesignerActionMethodItem(this, "FormatRed", "定義背景為紅色", true));
- items.Add(new DesignerActionMethodItem(this, "FormatWhite", "定義背景為白色", true));
- }
- return items;
- }
(2)屬性,方法項面板的實現
如果你設置屬性的話,則必須在CustomControlActionList定義屬性,方法也相同,代碼如下
- #region 自定義方法
- public void FormatBlue()
- {
- SampleControl ctrl = (SampleControl)_parent.Component;
- TransactedChangeCallback toCall = new TransactedChangeCallback(DoFormat);
- ControlDesigner.InvokeTransactedChange(ctrl, toCall, "FormatBlue", "FormatBlue");
- }
- public void FormatRed()
- {
- SampleControl ctrl = (SampleControl)_parent.Component;
- TransactedChangeCallback toCall = new TransactedChangeCallback(DoFormat);
- ControlDesigner.InvokeTransactedChange(ctrl, toCall, "FormatRed", "FormatRed");
- }
- public void FormatWhite()
- {
- SampleControl ctrl = (SampleControl)_parent.Component;
- //定義委托
- TransactedChangeCallback toCall = new TransactedChangeCallback(DoFormat);
- ControlDesigner.InvokeTransactedChange(ctrl, toCall, "FormatWhite", "FormatWhite");
- }
- #endregion
- #region 自定義屬性
- public bool Visible
- {
- get
- {
- SampleControl ctrl = (SampleControl)_parent.Component;
- return ctrl.Visible;
- }
- set
- {
- PropertyDescriptor propDesc = TypeDescriptor.GetProperties(_parent.Component)["Visible"];
- propDesc.SetValue(_parent.Component, value);
- }
- }
- public Unit Width
- {
- get
- {
- SampleControl ctrl = (SampleControl)_parent.Component;
- return ctrl.Width;
- }
- set
- {
- PropertyDescriptor propDesc = TypeDescriptor.GetProperties(_parent.Component)["Width"];
- propDesc.SetValue(_parent.Component, value);
- }
- }
- public Unit Height
- {
- get
- {
- SampleControl ctrl = (SampleControl)_parent.Component;
- return ctrl.Height;
- }
- set
- {
- PropertyDescriptor propDesc = TypeDescriptor.GetProperties(_parent.Component)["Height"];
- propDesc.SetValue(_parent.Component, value);
- }
- }
- #endregion
- public bool DoFormat(object arg)
- {
- SampleControl ctl = (SampleControl)_parent.Component;
- string fmt = (string)arg;
- PropertyDescriptor backColorProp = TypeDescriptor.GetProperties(ctl)["BackColor"];
- switch (fmt)
- {
- case "FormatBlue":
- backColorProp.SetValue(ctl, Color.Blue);
- break;
- case "FormatRed":
- backColorProp.SetValue(ctl, Color.Red);
- break;
- case "FormatWhite":
- backColorProp.SetValue(ctl, Color.White);
- break;
- }
- //刷新設計時html標記
- _parent.UpdateDesignTimeHtml();
- return true;
- }
以上步驟完成以后就大功告成了,接著則與相關控件關聯起來就可以了,效果圖在上面已經看過了.
[DesignerAttribute(typeof(SampleControlDesigner))]
ASP.NET控件設計時操作列表與模板編輯二.模板編輯器
上面的模板編輯界面相信大家都很熟悉吧.設置支持怎么少的了模板呢.設置時模板編輯實現比較簡單,下面來看下如何實現
這里自定義的模板控件不再列出
1.重寫ControlDesigner類的TemplateGroups返回自定義模板組集合即(TemplateGroupCollection)
添加步驟跟表格的添加類似,td add tr然后table add td
模板則是TemplateGroup add TemplateDefinition 然后TemplateGroupCollection add TemplateGroup
代碼如下
- public override TemplateGroupCollection TemplateGroups
- {
- get
- {
- if (col == null)
- {
- col = base.TemplateGroups;
- TemplateGroup tempGroup;
- TemplateDefinition tempDef;
- TemplateGroupsSample ctl;
- ctl = (TemplateGroupsSample)Component;
- // 創建模板分組一
- tempGroup = new TemplateGroup("模板A組");
- //提供在設置時編輯模板
- tempDef = new TemplateDefinition(this, "Template A1",
- ctl, "Template1", false);
- tempGroup.AddTemplateDefinition(tempDef);
- tempDef = new TemplateDefinition(this, "Template A2",
- ctl, "Template2", false);
- tempGroup.AddTemplateDefinition(tempDef);
- col.Add(tempGroup);
- // 創建模板分組二
- tempGroup = new TemplateGroup("模板B組");
- tempDef = new TemplateDefinition(this, "Template B1",
- ctl, "Template3", true);
- tempGroup.AddTemplateDefinition(tempDef);
- tempDef = new TemplateDefinition(this, "Template B2",
- ctl, "Template4", true);
- tempGroup.AddTemplateDefinition(tempDef);
- col.Add(tempGroup);
- }
- return col;
- }
- }
這里注意TemplateDefinition構造函數的***一個屬性,true則在設計時編輯只能添加服務器控件
2.初始化啟用設計時模板編輯
我們還需要在Initialize方法中調用SetViewFlags方法啟用設計時模板編輯
- public override void Initialize(IComponent component)
- {
- base.Initialize(component);
- SetViewFlags(ViewFlags.TemplateEditing, true);
- }
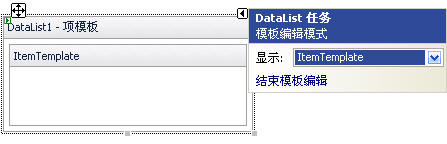
3.提供默認矩形標識符,為控件提供說明
如下圖,DataList默認情況下給予如下提示
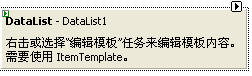
我們可以通過重寫GetDesignTimeHtml方法調用CreatePlaceHolderDesignTimeHtml方法創建一個矩形標識符來實現
- public override string GetDesignTimeHtml()
- {
- return CreatePlaceHolderDesignTimeHtml("右擊或選擇編輯模板面板來編輯模板內容");
- }
好了,完成了,接著要做的就是與相關模板控件關聯起來了
平時大家都太忙了,上面功能有跟沒有沒多大關系,不過常用控件屬性和功能,有設計時支持一定會讓使用的更加有效.
ASP.NET控件設計時操作列表與模板編輯的相關內容就向你介紹到這里,希望對你了解ASP.NET控件設計時操作列表與模板編輯有所幫助。
【編輯推薦】
- ASP.NET模板控件開發淺析
- ASP.NET數據綁定控件開發淺析
- ASP.NET控件設計時支持淺析
- ASP.NET2.0數據源控件的用法淺析
- ASP.NET控件設計時支持之自動格式設置淺析


