


C#Windows服務之添加文件監(jiān)視服務
C#Windows服務之添加文件監(jiān)視服務:
了解了Windows服務的基本體系結構和創(chuàng)建方法后,我們就可以試著往服務中添加一些實際的功能了。下面我將向大家介紹一個能監(jiān)視本地文件系統(tǒng)的文件監(jiān)視服務-FileMonitorService。該服務能根據(jù)預先設定的本地目錄路徑監(jiān)視其中的文件包括子文件夾中的任何變化:文件創(chuàng)建、文件刪除、文件改名、文件修改。同時,該服務還為每種變化創(chuàng)建了一個相對應的計數(shù)器,計數(shù)器的作用就是反映該種變化的頻度。
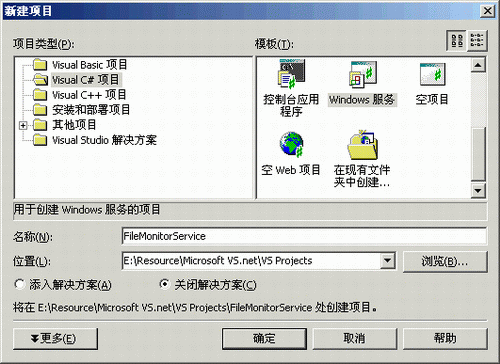
首先,我們打開Visual Studio.Net,新建一個Visual C#的Windows服務的項目,如圖所示:
在重載Windows服務的OnStart()函數(shù)之前,我們先給其類添加一些計數(shù)器對象,這些計數(shù)器分別對應了文件的創(chuàng)建、刪除、改名以及修改等變化。一旦指定目錄中的文件發(fā)生以上的某種變化,與其相對應的計數(shù)器就會自動加1。所有的這些計數(shù)器都是定義為PerformanceCounter類型的變量的,該類是包含在System.Diagnostics命名空間中的。
- private System.Diagnostics.PerformanceCounter fileCreateCounter;
- private System.Diagnostics.PerformanceCounter fileDeleteCounter;
- private System.Diagnostics.PerformanceCounter fileRenameCounter;
- private System.Diagnostics.PerformanceCounter fileChangeCounter;
之后我們便在類的InitializeComponent()方法中創(chuàng)建以上定義的各個計數(shù)器對象并確定其相關屬性。同時我們將該Windows服務的名稱設置為“FileMonitorService”,設定其即是允許暫停并恢復的又是允許停止的。
- private void InitializeComponent()
- {
- this.components = new System.ComponentModel.Container();
- this.fileChangeCounter = new System.Diagnostics.PerformanceCounter();
- this.fileDeleteCounter = new System.Diagnostics.PerformanceCounter();
- this.fileRenameCounter = new System.Diagnostics.PerformanceCounter();
- this.fileCreateCounter = new System.Diagnostics.PerformanceCounter();
- fileChangeCounter.CategoryName = "File Monitor Service";
- fileDeleteCounter.CategoryName = "File Monitor Service";
- fileRenameCounter.CategoryName = "File Monitor Service";
- fileCreateCounter.CategoryName = "File Monitor Service";
- fileChangeCounter.CounterName = "Files Changed";
- fileDeleteCounter.CounterName = "Files Deleted";
- fileRenameCounter.CounterName = "Files Renamed";
- fileCreateCounter.CounterName = "Files Created";
- this.ServiceName = "FileMonitorService";
- this.CanPauseAndContinue = true;
- this.CanStop = true;
- servicePaused = false;
- }
接著就是重載OnStart()函數(shù)和OnStop()函數(shù),OnStart()函數(shù)完成了一些必要的初始化工作。在.Net框架下,文件的監(jiān)視功能可以由FileSystemWatcher類來完成,該類是包含在System.IO命名空間下的。該Windows服務所要完成的功能包括了監(jiān)視文件的創(chuàng)建、刪除、改名和修改等變化,而FileSystemWatcher類包含所有了對應于這些變化的處理函數(shù)。
- protected override void OnStart(string[] args)
- {
- FileSystemWatcher curWatcher = new FileSystemWatcher();
- curWatcher.BeginInit();
- curWatcher.IncludeSubdirectories = true;
- curWatcher.Path =
- System.Configuration.ConfigurationSettings.AppSettings
- ["FileMonitorDirectory"];
- curWatcher.Changed += new FileSystemEventHandler(OnFileChanged);
- curWatcher.Created += new FileSystemEventHandler(OnFileCreated);
- curWatcher.Deleted += new FileSystemEventHandler(OnFileDeleted);
- curWatcher.Renamed += new RenamedEventHandler(OnFileRenamed);
- curWatcher.EnableRaisingEvents = true;
- curWatcher.EndInit();
- }
注意其中被監(jiān)視的目錄是存放在一個應用程序配置文件中的,該文件是一個XML類型的文件。這種做法的好處就是我們不必重新編譯并發(fā)布該Windows服務而只要直接修改其配置文件就可以達到更改所要監(jiān)視的目錄的功能了。
當該Windows服務啟動后,一旦被監(jiān)視的目錄中的文件發(fā)生某種變化,與其相對應的計數(shù)器的值便會相應的增加,方法很簡單,只要調(diào)用計數(shù)器對象的IncrementBy()即可。
- private void OnFileChanged(Object source, FileSystemEventArgs e)
- {
- if( servicePaused == false )
- {
- fileChangeCounter.IncrementBy(1);
- }
- }
- private void OnFileRenamed(Object source, RenamedEventArgs e)
- {
- if( servicePaused == false )
- {
- fileRenameCounter.IncrementBy(1);
- }
- }
- private void OnFileCreated(Object source, FileSystemEventArgs e)
- {
- if( servicePaused == false )
- {
- fileCreateCounter.IncrementBy(1);
- }
- }
- private void OnFileDeleted(Object source, FileSystemEventArgs e)
- {
- if( servicePaused == false )
- {
- fileDeleteCounter.IncrementBy(1);
- }
- }
OnStop()函數(shù)即是停止Windows服務的,在該Windows服務中,服務一旦停止,所有的計數(shù)器的值都應歸零,但是計數(shù)器并不提供一個Reset()方法,所以我們只好將計數(shù)器中的值減去當前值來達到這個目的。
- protected override void OnStop()
- {
- if( fileChangeCounter.RawValue != 0 )
- {
- fileChangeCounter.IncrementBy(-fileChangeCounter.RawValue);
- }
- if( fileDeleteCounter.RawValue != 0 )
- {
- fileDeleteCounter.IncrementBy(-fileDeleteCounter.RawValue);
- }
- if( fileRenameCounter.RawValue != 0 )
- {
- fileRenameCounter.IncrementBy(-fileRenameCounter.RawValue);
- }
- if( fileCreateCounter.RawValue != 0 )
- {
- fileCreateCounter.IncrementBy(-fileCreateCounter.RawValue);
- }
- }
C#Windows服務中添加文件監(jiān)視服務需要注意的:因為我們的Windows服務是允許暫停并恢復的,所以我們還得重載OnPause()函數(shù)和OnContinue()函數(shù),方法很簡單,只要設定前面定義的布爾值servicePaused即可。
- protected override void OnPause()
- {
- servicePaused = true;
- }
- protected override void OnContinue()
- {
- servicePaused = false;
- }
這樣,該Windows服務的主體部分已經(jīng)完成了,不過它并不有用,我們還必須為其添加安裝文件監(jiān)視。安裝文件為Windows服務的正確安裝做好了工作,它包括了一個Windows服務的安裝類,該類是重System.Configuration.Install.Installer繼承過來的。安裝類中包括了Windows服務運行所需的帳號信息,用戶名、密碼信息以及Windows服務的名稱,啟動方式等信息。
- [RunInstaller(true)]
- public class Installer1 : System.Configuration.Install.Installer
- {
- /// <summary>
- /// 必需的設計器變量。
- /// </summary>
- private System.ComponentModel.Container components = null;
- private System.ServiceProcess.ServiceProcessInstaller spInstaller;
- private System.ServiceProcess.ServiceInstaller sInstaller;
- public Installer1()
- {
- // 該調(diào)用是設計器所必需的。
- InitializeComponent();
- // TODO: 在 InitComponent 調(diào)用后添加任何初始化
- }
- #region Component Designer generated code
- /// <summary>
- /// 設計器支持所需的方法 - 不要使用代碼編輯器修改
- /// 此方法的內(nèi)容。
- /// </summary>
- private void InitializeComponent()
- {
- components = new System.ComponentModel.Container();
- // 創(chuàng)建ServiceProcessInstaller對象和ServiceInstaller對象
- this.spInstaller =
- new System.ServiceProcess.ServiceProcessInstaller();
- this.sInstaller = new System.ServiceProcess.ServiceInstaller();
- // 設定ServiceProcessInstaller對象的帳號、用戶名和密碼等信息
- this.spInstaller.Account =
- System.ServiceProcess.ServiceAccount.LocalSystem;
- this.spInstaller.Username = null;
- this.spInstaller.Password = null;
- // 設定服務名稱
- this.sInstaller.ServiceName = "FileMonitorService";
- // 設定服務的啟動方式
- this.sInstaller.StartType =
- System.ServiceProcess.ServiceStartMode.Automatic;
- this.Installers.AddRange(
- new System.Configuration.Install.Installer[]
- {this.spInstaller, this.sInstaller });
- }
- #endregion
- }
同樣,因為該Windows服務中運用到了計數(shù)器對象,我們也要為其添加相應的安裝文件,安裝文件的內(nèi)容和作用與前面的類似。限于篇幅,這里就不給出相應的代碼了,有興趣的讀者可以參考文后附帶的源代碼文件。
到此為止,整個Windows服務已經(jīng)構建完畢,不過Windows服務程序和一般的應用程序不同,它不能直接調(diào)試運行。如果你直接在IDE下試圖調(diào)試運行之,就會報出如圖所示提示。

根據(jù)其中提示,我們知道安裝Windows服務需要用到一個名為InstallUtil.exe的命令行工具。而運用該工具安裝Windows服務的方法是非常簡單的,安裝該Windows服務的命令如下:
- installutil FileMonitorService.exe
而要卸載該Windows服務,你只要輸入如下的命令即可:
- installutil /u FileMonitorService.exe
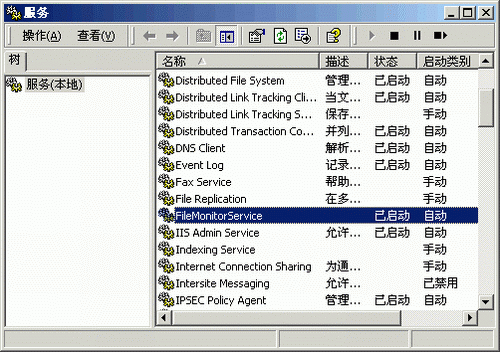
Windows服務安裝成功后,它便會出現(xiàn)在服務控制管理器中,如圖所示。
這樣,該文件監(jiān)視的C#Windows服務就完成了,一旦我們對被監(jiān)視的目錄中的文件進行操作,相應的計數(shù)器就會運作,起到監(jiān)視文件變化的作用。不過這個功能對于一般的用戶而言沒多大意義,然而你可以在此基礎上添加新的功能,比如構建一個后臺的文件處理系統(tǒng),一旦被監(jiān)視的目錄中的文件發(fā)生某種變化,Windows服務便對其進行特定的操作,而最終用戶就不必去關心后臺處理程序是如何實現(xiàn)的了。
C#Windows服務中添加文件監(jiān)視服務的相關內(nèi)容就向你介紹到這里,希望對你學習和了解C#Windows服務中添加文件監(jiān)視服務有所幫助。
【編輯推薦】


