Maven Web項目部署到Tomcat
通過Maven來搭建項目是越來越多人的選擇,我也就湊了一下熱鬧,用maven來搭建了項目,發現還挺好用,但是也遇到了很多問題,下面記錄一下Web項目部署到Tomcat下的問題。
1、普通的WEB項目,就是雖然是用maven搭建的,但是沒有使用profiles.xml文件來配置參數。這樣的項目可以通過以下的方式進行部署:
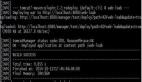
直接mvn clean package -DskipTests,進行打包,
1) 然后在可以把war包拷到tomcat目錄下的Webapp目錄下
2)修改tomcat目錄下的conf目錄下的server.xml文件,在Host標簽之間添加如下一句話:
- <Context docBase="D:\IdeaProjects\Test\example\example-web\target\example- web" reloadable="false" path=""/>
2、使用profiles.xml配置了默認參數,而在web的配置文件中使用到了這些參數,這個時候使用命令打包的時候要指定你要使用哪一個profiles id來裝配你的項目,命令如下mvn clean package -P development ,其中-p是指啟用哪一個profiles id。然后下面部署到tomcat的方法和上面的就一樣了
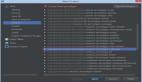
使用maven的話推薦一個IDE工具 Intellij IDEA,他可以直接通過視圖話的方式進行指定profiles id。
下面轉一篇文章,講profile的
Profiles是maven的一個很關鍵的術語:profile是用來定義一些在build lifecycle中使用的environmental variations,profile可以設置成在不同的環境下激活不同的profile(例如:不同的OS激活不同的profile,不同的JVM激活不同的profile,不同的dabase激活不同的profile等等)。
定義Profiles
你可以把profiles定義在4個地方:
1、%M2_HOME%/conf/settings.xml,這是針對該部電腦的所有user的profiles,是global profiles,它會影響所有的maven project build
2、<your -home-directory>/.m2/settings.xml,這是針對per user的profiles,是user級的profiles,它會影響當前user的所有maven project build
3、定義在pom.xml文件里面,這是僅針對該project的profiles,是project級的profiles
4、profiles.xml,它和pom.xml在同一個目錄下,也是project級的profiles,使用profiles.xml的目的是希望把profiles的設置從pom.xml里抽離出來設置。
定義在這4個地方的profiles中,涉及范圍越窄的profiles會覆蓋范圍越寬的profiles。即:定義在pom.xml里profiles會覆蓋profiles.xml的,profiles.xml的會覆蓋<your -home-directory>/.m2/settings.xml的,<your -home-directory>/.m2/settings.xml的會覆蓋%M2_HOME%/conf/settings.xml的。
不過請注意:設置在pom.xml里的profiles是最最推薦的,因為pom.xml會被deploy到repository里,所以pom.xml里的profiles才會available for subsequent builds originating from the repository or as transitive dependencies。而settings.xml和profiles.xml里定義的profiles不會被deploy到repository,則有諸多限制,因此,只有下面幾個profiles能夠在settings.xml和profiles.xml里定義:
repositories

pluginRepositories

properties
其他類型的profiles必須在pom.xml里定義(上面3個profiles也可以在pom.xml里定義)。
Pom.xml能夠定義的profiles包括:
- <repositories>
- <pluginRepositories>
- <dependencies>
- <plugins>
- <properties> (not actually available in the main POM, but used behind the scenes)
- <modules>
- <reporting>
- <dependencyManagement>
- <distributionManagement>
- a subset of the <build> element, which consists of:
- <defaultGoal>
- <resources>
- <testResources>
- <finalName>
2、激活Profiles
激活profiles有下列幾種方式:
Explicitly
Through Maven settings
Based on environment variables
OS settings
Present or missing files
1)通過mvn命令的-P參數來顯示激活profiles,該參數值是profile id list(之間用逗號連接)。如:
- mvn groupId:artifactId:goal -P profileId-1,profileId-2
2) 通過在settings.xml里設置<activeProfiles> element來激活(當然<profiles>也必須在settings.xml里定義)
- <settings>
- ...
- <profiles>
- <profile>
- <id>profile1</id>
- ...
- </profile>
- </profiles>
- <activeProfiles>
- <activeProfile>profile-1</activeProfile>
- </activeProfiles>
- ...
- </settings>
列在<activeProfiles>里的profiles list會在每一個project執行時被激活
3)Profiles還可以基于detect到的build environment 的state來自動激活,而不需要象上面2種方式顯式激活。這只需要在profile定義時使用<activation> element。如:
- <profiles>
- <profile>
- <activation>
- <jdk>1.4</jdk>
- </activation>
- ...
- </profile>
- </profiles>
上面的代碼表示:如果JDK version start with 1.4 (eg. "1.4.0_08", "1.4.2_07", "1.4"),該profile會被激活
- <profiles>
- <profile>
- <activation>
- <property>
- <name>debug</name>
- </property>
- </activation>
- ...
- </profile>
- </profiles>
上面的代碼表示:如果存在system propertie “debug”,該profile會被激活。為了激活它,輸入的命令類似于:
- mvn groupId:artifactId:goal –Ddebug
- <profiles>
- <profile>
- <activation>
- <property>
- <name>environment</name>
- <value>test</value>
- </property>
- </activation>
- ...
- </profile>
- </profiles>
上面的代碼表示:如果存在system propertie “environment”的值為test,該profile會被激活。為了激活它,輸入的命令類似于:
- mvn groupId:artifactId:goal -Denvironment=test
4)Profiles還可以基于OS setting來自動激活
- <profiles>
- <profile>
- <activation>
- <os>
- <name>Windows XP</name>
- <family>Windows</family>
- <arch>x86</arch>
- <version>5.1.2600</version>
- </os>
- </activation>
- ...
- </profile>
- </profiles>
上面的代碼表示:如果OS為windows xp,該profile會被激活
5)根據某個file不存在而激活profile。例如下面定義的profile是在target/generated-sources/axistools/wsdl2java/org/apache/maven不存在時激活
- <profiles>
- <profile>
- <activation>
- <file>
- <missing>target/generated-sources/axistools/wsdl2java/org/apache/maven</missing>
- </file>
- </activation>
- ...
- </profile>
- </profiles>
使用Profiles時要注意的2個問題
第一、external properties
不是定義在pom.xml里的properties都稱為external properties。舉例說明最明了:
pom.xml:
- <project>
- ...
- <build>
- <plugins>
- <plugin>
- <groupId>org.myco.plugins</groupId>
- <artifactId>spiffy-integrationTest-plugin</artifactId>
- <version>1.0</version>
- <configuration>
- <appserverHome>${appserver.home}</appserverHome>
- </configuration>
- </plugin>
- ...
- </plugins>
- </build>
- ...
- </project>
~/.m2/settings.xml
- <settings>
- ...
- <profiles>
- <profile>
- <id>appserverConfig</id>
- <properties>
- <appserver.home>/path/to/appserver</appserver.home>
- </properties>
- </profile>
- </profiles>
- <activeProfiles>
- <activeProfile>appserverConfig</activeProfile>
- </activeProfiles>
- ...
- </settings>
當你執行該pom時,運行正常。但如果another user執行時,則運行失敗,因為無法解析${appserver.home}(這是由于該properties是定義在user級別的settings.xml)。
解決方法就是把該profile放到pom.xml里定義,但這樣做的缺點是所有使用該profile的pom.xml每個都要定義一次該profile。
最好的解決方法是:Since Maven provides good support for project inheritance, it's possible to stick this sort of configuration in the pluginManagement section of a team-level POM or similar, and simply inherit the paths
第二、pom.xml里定義的profiles不符合激活條件
依然是舉個例子:
pom.xml:
- <project>
- ...
- <profiles>
- <profile>
- <id>appserverConfig-dev</id>
- <activation>
- <property>
- <name>env</name>
- <value>dev</value>
- </property>
- </activation>
- <properties>
- <appserver.home>/path/to/dev/appserver</appserver.home>
- </properties>
- </profile>
- <profile>
- <id>appserverConfig-dev-2</id>
- <activation>
- <property>
- <name>env</name>
- <value>dev-2</value>
- </property>
- </activation>
- <properties>
- <appserver.home>/path/to/dev/appserver2</appserver.home>
- </properties>
- </profile>
- </profiles>
- <build>
- <plugins>
- <plugin>
- <groupId>org.myco.plugins</groupId>
- <artifactId>spiffy-integrationTest-plugin</artifactId>
- <version>1.0</version>
- <configuration>
- <appserverHome>${appserver.home}</appserverHome>
- </configuration>
- </plugin>
- ...
- </plugins>
- </build>
- ...
- </project>
上面定義的pom.xml定義了兩個profile:不同的”env”參數值會激活不同的profile。當執行命令:
- mvn -Denv=dev-2 integration-test
就會激活profile “appserverConfig-dev-2”
當執行命令:
- mvn -Denv=dev integration-test
就會激活profile “appserverConfig-dev”
而當執行命令:
- mvn -Denv=production integration-test
則運行失敗,因為沒有激活任何一個profile,因此無法解析${appserver.home}。
查看build time過程中使用了哪些Profiles
執行help plugin的active-profiles goal,使用命令:
- mvn help:active-profiles
例子:
對于上面的例子,如果輸入命令:
- mvn help:active-profiles -Denv=dev
則輸出的是:
- The following profiles are active:
- - appserverConfig-dev (source: pom)
如果有一個profile定義在settings.xml里并使用<activeProfile>激活,那么輸入命令:
- mvn help:active-profiles
則輸出的是:
- The following profiles are active:
- - appserverConfig (source: settings.xml)
如果輸入命令:
- mvn help:active-profiles -P appserverConfig-dev
那么輸出的是:
- The following profiles are active:
- - appserverConfig-dev (source: pom)
- - appserverConfig (source: settings.xml)
原文鏈接:http://wcp88888888.iteye.com/blog/1330692
【編輯推薦】