Laravel學習筆記之Middleware源碼解析

說明:本文主要學習Laravel的Middleware的源碼設計思想,并將學習心得分享出來,希望對別人有所幫助。Laravel學習筆記之Decorator Pattern已經聊過Laravel使用了Decorator Pattern來設計Middleware,看Laravel源碼發現其巧妙用了Closure和PHP的一些數組函數來設計Middleware。
開發環境:Laravel5.3 + PHP7 + OS X 10.11
PHP內置函數array_reverse、array_reduce、call_user_func和call_user_func_array
看Laravel源碼之前,先看下這幾個PHP內置函數的使用。首先array_reverse()函數比較簡單,倒置數組,看測試代碼:
- $pipes = [
- 'Pipe1',
- 'Pipe2',
- 'Pipe3',
- 'Pipe4',
- 'Pipe5',
- 'Pipe6',
- ];
- $pipes = array_reverse($pipes);
- var_dump($pipes);
- // output
- array(6) {
- [0] =>
- string(5) "Pipe6"
- [1] =>
- string(5) "Pipe5"
- [2] =>
- string(5) "Pipe4"
- [3] =>
- string(5) "Pipe3"
- [4] =>
- string(5) "Pipe2"
- [5] =>
- string(5) "Pipe1"
- }
array_reduce內置函數主要是用回調函數去迭代數組中每一個值,并且每一次回調得到的結果值作為下一次回調的初始值,***返回最終迭代的值:
- /**
- * @link http://php.net/manual/zh/function.array-reduce.php
- * @param int $v
- * @param int $w
- *
- * @return int
- */
- function rsum($v, $w)
- {
- $v += $w;
- return $v;
- }
- $a = [1, 2, 3, 4, 5];
- // 10為初始值
- $b = array_reduce($a, "rsum", 10);
- // ***輸出 (((((10 + 1) + 2) + 3) + 4) + 5) = 25
- echo $b . PHP_EOL;
call_user_func()是執行回調函數,并可輸入參數作為回調函數的參數,看測試代碼:
- class TestCallUserFunc
- {
- public function index($request)
- {
- echo $request . PHP_EOL;
- }
- }
- /**
- * @param $test
- */
- function testCallUserFunc($test)
- {
- echo $test . PHP_EOL;
- }
- // [$class, $method]
- call_user_func(['TestCallUserFunc', 'index'], 'pipes'); // 輸出'pipes'
- // Closure
- call_user_func(function ($passable) {
- echo $passable . PHP_EOL;
- }, 'pipes'); // 輸出'pipes'
- // function
- call_user_func('testCallUserFunc' , 'pipes'); // 輸出'pipes'
call_user_func_array與call_user_func基本一樣,只不過傳入的參數是數組:
- class TestCallUserFuncArray
- {
- public function index($request)
- {
- echo $request . PHP_EOL;
- }
- }
- /**
- * @param $test
- */
- function testCallUserFuncArray($test)
- {
- echo $test . PHP_EOL;
- }
- // [$class, $method]
- call_user_func_array(['TestCallUserFuncArray', 'index'], ['pipes']); // 輸出'pipes'
- // Closure
- call_user_func_array(function ($passable) {
- echo $passable . PHP_EOL;
- }, ['pipes']); // 輸出'pipes'
- // function
- call_user_func_array('testCallUserFuncArray' , ['pipes']); // 輸出'pipes'
Middleware源碼解析
了解了幾個PHP內置函數后再去看下Middleware源碼就比較簡單了。Laravel學習筆記之IoC Container實例化源碼解析已經聊過Application的實例化,得到index.php中的$app變量,即\Illuminate\Foundation\Application的實例化對象。然后繼續看下index.php的源碼:
- /**
- * @var \App\Http\Kernel $kernel
- */
- $kernel = $app->make(Illuminate\Contracts\Http\Kernel::class);
- $response = $kernel->handle(
- $request = Illuminate\Http\Request::capture()
- );
- $response->send();
- $kernel->terminate($request, $response);
首先從容器中解析出Kernel對象,對于\App\Http\Kernel對象的依賴:\Illuminate\Foundation\Application和\Illuminate\Routing\Router,容器會自動解析。看下Kernel的構造函數:
- /**
- * Create a new HTTP kernel instance.
- *
- * @param \Illuminate\Contracts\Foundation\Application $app
- * @param \Illuminate\Routing\Router $router
- */
- public function __construct(Application $app, Router $router)
- {
- $this->app = $app;
- $this->router = $router;
- foreach ($this->middlewareGroups as $key => $middleware) {
- $router->middlewareGroup($key, $middleware);
- }
- foreach ($this->routeMiddleware as $key => $middleware) {
- $router->middleware($key, $middleware);
- }
- }
- // \Illuminate\Routing\Router內的方法
- public function middlewareGroup($name, array $middleware)
- {
- $this->middlewareGroups[$name] = $middleware;
- return $this;
- }
- public function middleware($name, $class)
- {
- $this->middleware[$name] = $class;
- return $this;
- }
構造函數初始化了幾個中間件數組,$middleware[ ], $middlewareGroups[ ]和$routeMiddleware[ ],Laravel5.0的時候記得中間件數組還沒有分的這么細。然后就是Request的實例化:
- $request = Illuminate\Http\Request::capture()
這個過程以后再聊吧,不管咋樣,得到了Illuminate\Http\Request對象,然后傳入Kernel中:
- /**
- * Handle an incoming HTTP request.
- *
- * @param \Illuminate\Http\Request $request
- * @return \Illuminate\Http\Response
- */
- public function handle($request)
- {
- try {
- $request->enableHttpMethodParameterOverride();
- $response = $this->sendRequestThroughRouter($request);
- } catch (Exception $e) {
- $this->reportException($e);
- $response = $this->renderException($request, $e);
- } catch (Throwable $e) {
- $this->reportException($e = new FatalThrowableError($e));
- $response = $this->renderException($request, $e);
- }
- $this->app['events']->fire('kernel.handled', [$request, $response]);
- return $response;
- }
主要是sendRequestThroughRouter($request)函數執行了轉換操作:把\Illuminate\Http\Request對象轉換成了\Illuminate\Http\Response,然后通過Kernel的send()方法發送給客戶端。同時,順便觸發了kernel.handled內核已處理請求事件。OK,重點關注下sendRequestThroughRouter($request)方法:
- /**
- * Send the given request through the middleware / router.
- *
- * @param \Illuminate\Http\Request $request
- * @return \Illuminate\Http\Response
- */
- protected function sendRequestThroughRouter($request)
- {
- $this->app->instance('request', $request);
- Facade::clearResolvedInstance('request');
- /* 依次執行$bootstrappers中每一個bootstrapper的bootstrap()函數,做了幾件準備事情:
- 1. 環境檢測
- 2. 配置加載
- 3. 日志配置
- 4. 異常處理
- 5. 注冊Facades
- 6. 注冊Providers
- 7. 啟動服務
- protected $bootstrappers = [
- 'Illuminate\Foundation\Bootstrap\DetectEnvironment',
- 'Illuminate\Foundation\Bootstrap\LoadConfiguration',
- 'Illuminate\Foundation\Bootstrap\ConfigureLogging',
- 'Illuminate\Foundation\Bootstrap\HandleExceptions',
- 'Illuminate\Foundation\Bootstrap\RegisterFacades',
- 'Illuminate\Foundation\Bootstrap\RegisterProviders',
- 'Illuminate\Foundation\Bootstrap\BootProviders',
- ];*/
- $this->bootstrap();
- return (new Pipeline($this->app))
- ->send($request)
- ->through($this->app->shouldSkipMiddleware() ? [] : $this->middleware)
- ->then($this->dispatchToRouter());
- }
$this->bootstrap()主要是做了程序初始化工作,以后再聊具體細節。然后是Pipeline來傳輸Request,Laravel中把Pipeline管道單獨拿出來作為一個service(可看Illuminate/Pipeline文件夾),說明Pipeline做的事情還是很重要的:主要就是作為Request的傳輸管道,依次通過$middlewares[ ], 或middlewareGroups[ ], 或$routeMiddleware[ ]這些中間件的前置操作,和控制器的某個action或者直接閉包處理得到Response,然后又帶著Reponse依次通過$middlewares[ ], 或middlewareGroups[ ], 或$routeMiddleware[ ]這些中間件的后置操作得到準備就緒的Response,然后通過send()發送給客戶端。
這個過程有點像汽車工廠的生產一樣,Pipeline是傳送帶,起初Request可能就是個汽車空殼子,經過傳送帶旁邊的一個個機械手middleware@before的過濾和操作(如檢查零件剛度是不是合格,殼子尺寸是不是符合要求,給殼子噴個漆或抹個油啥的),然后進入中央控制區加個發動機(Controller@action,或Closure),然后又繼續經過檢查和附加操作middleware@after(如添加個擋風鏡啥的),然后通過門外等著的火車直接運送到消費者手里send()。在每一步裝配過程中,都需要Service來支持,Service是通過Container來解析{make()}提供的,并且Service是通過ServiceProvider注冊綁定{bind(),singleton(),instance()}到Container中的。
看下Pipeline的send()和through()源碼:
- public function send($passable)
- {
- $this->passable = $passable;
- return $this;
- }
- public function through($pipes)
- {
- $this->pipes = is_array($pipes) ? $pipes : func_get_args();
- return $this;
- }
send()傳送的對象是Request,through()所要通過的對象是$middleware[ ],OK,再看下dispatchToRouter()的源碼直接返回一個Closure:
- protected function dispatchToRouter()
- {
- return function ($request) {
- $this->app->instance('request', $request);
- return $this->router->dispatch($request);
- };
- }
然后重點看下then()函數源碼:
- public function then(Closure $destination)
- {
- $firstSlice = $this->getInitialSlice($destination);
- $pipes = array_reverse($this->pipes);
- // $this->passable = Request對象
- return call_user_func(
- array_reduce($pipes, $this->getSlice(), $firstSlice), $this->passable
- );
- }
- protected function getInitialSlice(Closure $destination)
- {
- return function ($passable) use ($destination) {
- return call_user_func($destination, $passable);
- };
- }
這里假設$middlewares為(盡管源碼中$middlewares只有一個CheckForMaintenanceMode::class):
- $middlewares = [
- CheckForMaintenanceMode::class,
- AddQueuedCookiesToResponse::class,
- StartSession::class,
- ShareErrorsFromSession::class,
- VerifyCsrfToken::class,
- ];
先獲得***個slice(這里作者是比作'洋蔥',一層層的穿過,從一側穿過到另一側,比喻倒也形象)并作為array_reduce()的初始值,就像上文中array_reduce()測試例子中的10這個初始值,這個初始值現在是個閉包:
- $destination = function ($request) {
- $this->app->instance('request', $request);
- return $this->router->dispatch($request);
- };
- $firstSlice = function ($passable) use ($destination) {
- return call_user_func($destination, $passable);
- };
OK,然后要對$middlewares[ ]進行翻轉,為啥要翻轉呢?
看過這篇Laravel學習筆記之Decorator Pattern文章就會發現,在Client類利用Decorator Pattern進行依次裝飾的時候,是按照$middlewares[ ]數組中值倒著new的:
- public function wrapDecorator(IMiddleware $decorator)
- {
- $decorator = new VerifyCsrfToken($decorator);
- $decorator = new ShareErrorsFromSession($decorator);
- $decorator = new StartSession($decorator);
- $decorator = new AddQueuedCookiesToResponse($decorator);
- $response = new CheckForMaintenanceMode($decorator);
- return $response;
- }
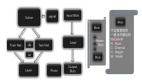
這樣才能得到一個符合$middlewares[ ]順序的$response對象:
- $response = new CheckForMaintenanceMode(
- new AddQueuedCookiesToResponse(
- new StartSession(
- new ShareErrorsFromSession(
- new VerifyCsrfToken(
- new Request()
- )
- )
- )
- )
- );
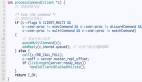
看下array_reduce()中的迭代回調函數getSlice(){這個迭代回調函數比作剝洋蔥時獲取每一層洋蔥slice,初始值是$firstSlice}:
- protected function getSlice()
- {
- return function ($stack, $pipe) {
- return function ($passable) use ($stack, $pipe) {
- if ($pipe instanceof Closure) {
- return call_user_func($pipe, $passable, $stack);
- } elseif (! is_object($pipe)) {
- list($name, $parameters) = $this->parsePipeString($pipe);
- $pipe = $this->container->make($name);
- $parameters = array_merge([$passable, $stack], $parameters);
- } else{
- $parameters = [$passable, $stack];
- }
- return call_user_func_array([$pipe, $this->method], $parameters);
- };
- };
- }
返回的是個閉包,仔細看下第二層閉包里的邏輯,這里$middlewares[ ]傳入的是每一個中間件的名字,然后通過容器解析出每一個中間件對象:
- $pipe = $this->container->make($name);
并***用call_user_func_array([$class, $method], array $parameters)來調用這個$class里的$method方法,參數是$parameters。
Demo
接下來寫個demo看下整個流程。先簡化下getSlice()函數,這里就默認$pipe傳入的是類名稱(整個demo中所有class都在同一個文件內):
- // PipelineTest.php
- // Get the slice in every step.
- function getSlice()
- {
- return function ($stack, $pipe) {
- return function ($passable) use ($stack, $pipe) {
- /**
- * @var Middleware $pipe
- */
- return call_user_func_array([$pipe, 'handle'], [$passable, $stack]);
- };
- };
- }
再把$middlewares[ ]中五個中間件類寫上,對于前置操作和后置操作做個簡化,直接echo字符串:
- // PipelineTest.php
- <?php
- interface Middleware
- {
- public static function handle($request, Closure $closure);
- }
- class CheckForMaintenanceMode implements Middleware
- {
- public static function handle($request, Closure $next)
- {
- echo $request . ': Check if the application is in the maintenance status.' . PHP_EOL;
- $next($request);
- }
- }
- class AddQueuedCookiesToResponse implements Middleware
- {
- public static function handle($request, Closure $next)
- {
- $next($request);
- echo $request . ': Add queued cookies to the response.' . PHP_EOL;
- }
- }
- class StartSession implements Middleware
- {
- public static function handle($request, Closure $next)
- {
- echo $request . ': Start session of this request.' . PHP_EOL;
- $next($request);
- echo $request . ': Close session of this response.' . PHP_EOL;
- }
- }
- class ShareErrorsFromSession implements Middleware
- {
- public static function handle($request, Closure $next)
- {
- $next($request);
- echo $request . ': Share the errors variable from response to the views.' . PHP_EOL;
- }
- }
- class VerifyCsrfToken implements Middleware
- {
- public static function handle($request, Closure $next)
- {
- echo $request . ': Verify csrf token when post request.' . PHP_EOL;
- $next($request);
- }
- }
給上完整的一個Pipeline類,這里的Pipeline對Laravel中的Pipeline做了稍微簡化,只選了幾個重要的函數:
- // PipelineTest.php
- class Pipeline
- {
- /**
- * @var array
- */
- protected $middlewares = [];
- /**
- * @var int
- */
- protected $request;
- // Get the initial slice
- function getInitialSlice(Closure $destination)
- {
- return function ($passable) use ($destination) {
- return call_user_func($destination, $passable);
- };
- }
- // Get the slice in every step.
- function getSlice()
- {
- return function ($stack, $pipe) {
- return function ($passable) use ($stack, $pipe) {
- /**
- * @var Middleware $pipe
- */
- return call_user_func_array([$pipe, 'handle'], [$passable, $stack]);
- };
- };
- }
- // When process the Closure, send it as parameters. Here, input an int number.
- function send(int $request)
- {
- $this->request = $request;
- return $this;
- }
- // Get the middlewares array.
- function through(array $middlewares)
- {
- $this->middlewares = $middlewares;
- return $this;
- }
- // Run the Filters.
- function then(Closure $destination)
- {
- $firstSlice = $this->getInitialSlice($destination);
- $pipes = array_reverse($this->middlewares);
- $run = array_reduce($pipes, $this->getSlice(), $firstSlice);
- return call_user_func($run, $this->request);
- }
- }
OK,現在開始傳入Request,這里簡化為一個整數而不是Request對象了:
- // PipelineTest.php
- /**
- * @return \Closure
- */
- function dispatchToRouter()
- {
- return function ($request) {
- echo $request . ': Send Request to the Kernel, and Return Response.' . PHP_EOL;
- };
- }
- $request = 10;
- $middlewares = [
- CheckForMaintenanceMode::class,
- AddQueuedCookiesToResponse::class,
- StartSession::class,
- ShareErrorsFromSession::class,
- VerifyCsrfToken::class,
- ];
- (new Pipeline())->send($request)->through($middlewares)->then(dispatchToRouter());
執行php PipelineTest.php得到Response:
- 10: Check if the application is in the maintenance status.
- 10: Start session of this request.
- 10: Verify csrf token when post request.
- 10: Send Request to the Kernel, and Return Response.
- 10: Share the errors variable from response to the views.
- 10: Close session of this response.
- 10: Add queued cookies to the response.
一步一步分析下執行過程:
1.首先獲取$firstSlice
- $destination = function ($request) {
- echo $request . ': Send Request to the Kernel, and Return Response.' . PHP_EOL;
- };
- $firstSlice = function ($passable) use ($destination) {
- return call_user_func($destination, $passable);
- };
這時經過初始化后:
- $this->request = 10;
- $pipes = [
- VerifyCsrfToken::class,
- ShareErrorsFromSession::class,
- StartSession::class,
- AddQueuedCookiesToResponse::class,
- CheckForMaintenanceMode::class,
- ];
2.執行***次getSlice()后的結果作為新的$stack,其值為:
- $stack = $firstSlice;
- $pipe = VerifyCsrfToken::class;
- $stack_1 = function ($passable) use ($stack, $pipe) {
- /**
- * @var Middleware $pipe
- */
- return call_user_func_array([$pipe, 'handle'], [$passable, $stack]);
- };
3.執行第二次getSlice()后的結果作為新的$stack,其值為:
- $stack = $stack_1;
- $pipe = ShareErrorsFromSession::class;
- $stack_2 = function ($passable) use ($stack, $pipe) {
- /**
- * @var Middleware $pipe
- */
- return call_user_func_array([$pipe, 'handle'], [$passable, $stack]);
- };
4.執行第三次getSlice()后的結果作為新的$stack,其值為:
- $stack = $stack_2;
- $pipe = StartSession::class;
- $stack_3 = function ($passable) use ($stack, $pipe) {
- /**
- * @var Middleware $pipe
- */
- return call_user_func_array([$pipe, 'handle'], [$passable, $stack]);
- };
5.執行第四次getSlice()后的結果作為新的$stack,其值為:
- $stack = $stack_3;
- $pipe = AddQueuedCookiesToResponse::class;
- $stack_4 = function ($passable) use ($stack, $pipe) {
- /**
- * @var Middleware $pipe
- */
- return call_user_func_array([$pipe, 'handle'], [$passable, $stack]);
- };
6.執行第五次getSlice()后的結果作為新的$stack,其值為:
- $stack = $stack_4;
- $pipe = CheckForMaintenanceMode::class;
- $stack_5 = function ($passable) use ($stack, $pipe) {
- /**
- * @var Middleware $pipe
- */
- return call_user_func_array([$pipe, 'handle'], [$passable, $stack]);
- };
這時,$stack_5也就是then()里的$run,然后執行call_user_func($run, 10),看執行過程:
1.$stack_5(10) = CheckForMaintenanceMode::handle(10, $stack_4)
- echo '10: Check if the application is in the maintenance status.' . PHP_EOL;
- stack_4(10);
2.$stack_4(10) = AddQueuedCookiesToResponse::handle(10, $stack_3)
- $stack_3(10);
- echo '10: Add queued cookies to the response.' . PHP_EOL;
3.$stack_3(10) = StartSession::handle(10, $stack_2)
- echo '10: Start session of this request.' . PHP_EOL;
- $stack_2(10);
- echo '10: Close session of this response.' . PHP_EOL;
4.$stack_2(10) = ShareErrorsFromSession::handle(10, $stack_1)
- $stack_1(10);
- echo '10: Share the errors variable from response to the views.' . PHP_EOL;
5.$stack_1(10) = VerifyCsrfToken::handle(10, $firstSlice)
- echo '10: Verify csrf token when post request.' . PHP_EOL;
- $firstSlice(10);
6.$firstSlice(10) =
- $firstSlice(10) = call_user_func($destination, 10) = echo '10: Send Request to the Kernel, and Return Response.' . PHP_EOL;
OK,再把上面執行順序整理一下:
- 1. echo '10: Check if the application is in the maintenance status.' . PHP_EOL; // ***個step
- 3_1. echo '10: Start session of this request.' . PHP_EOL; // 第三個step
- 5. echo '10: Verify csrf token when post request.' . PHP_EOL; // 第五個step
- 6.echo '10: Send Request to the Kernel, and Return Response.' . PHP_EOL; //第六個step
- 4. echo '10: Share the errors variable from response to the views.' . PHP_EOL; // 第四個step
- 3_2. echo '10: Close session of this response.' . PHP_EOL; // 第三個step
- 2. echo '10: Add queued cookies to the response.' . PHP_EOL; // 第二個step
經過上面的一步步分析,就能很清楚Laravel源碼中Middleware的執行步驟了。再復雜的步驟只要一步步拆解,就很清晰每一步的邏輯,然后把步驟組裝,就能知道全貌了。
總結:本文主要學習了Laravel的Middleware的源碼,學習完后就知道沒有什么神秘之處,只需要動手一步步拆解就行。后面再學習下Container的源碼,到時見。