用Kotlin優(yōu)雅地開發(fā)Android應(yīng)用
寫在前面
在之前的一篇文章,我們簡單的知道了Kotlin這門新語言的優(yōu)勢(shì),也接觸了一些常見的語法及其簡單的使用,相信你會(huì)對(duì)它有濃厚的興趣,暫且理解為對(duì)它感興趣吧,哈哈哈。那么,我們?cè)撊绾卧贏ndroid中應(yīng)用這門新的語言呢?今天的這篇文章帶你學(xué)習(xí)使用Kotlin開發(fā)Android應(yīng)用,并對(duì)比我們傳統(tǒng)語言Java,讓你真真切切的感受到他的美和優(yōu)雅。
配置
項(xiàng)目gradle文件
- apply plugin: 'com.android.application'
- apply plugin:'kotlin-android'
- apply plugin:'kotlin-android-extensions'
- dependencies {
- classpath 'org.jetbrains.kotlin:kotlin-gradle-plugin:1.1.1'
- }
app Gradle文件:
- compile 'org.jetbrains.kotlin:kotlin-stdlib:1.1.1'
- compile 'org.jetbrains.anko:anko-sdk25:0.10.0-beta-1'// sdk15, sdk19, sdk21, sdk23 are also available
- compile 'org.jetbrains.anko:anko-appcompat-v7:0.10.0-beta-1'
Anko
通過上面的配置,你會(huì)發(fā)現(xiàn)引入的有anko的依賴。Anko是JetBrains開發(fā)的一個(gè)強(qiáng)大的庫,說起JetBrains ,那就牛逼了,Kotlin語言是他們開發(fā)的,***的的開發(fā)工具intellij idea都是他們開發(fā)的,AS也是基于IDEA的。好了,言歸正傳,Anko是Kotlin官方開發(fā)的一個(gè)讓開發(fā)Android應(yīng)用更快速更簡單的Kotlin庫,并且能讓我們書寫的代碼更簡單清楚更容易閱讀。它包括多個(gè)部分,如下
- Anko Commons: a lightweight library full of helpers for intents, dialogs, logging and so on;
- Anko Layouts: a fast and type-safe way to write dynamic Android layouts;
- Anko SQLite: a query DSL and parser collection for Android SQLite;
- Anko Coroutines: utilities based on the kotlinx.coroutines library
那么接下來,我們就通過代碼來理解Kotlin語言開發(fā)Android的優(yōu)勢(shì)所在。
再也不用findViewById
做過Android開發(fā)的人都知道,布局文件寫的多了,findViewById也是一個(gè)很大的工作量,而且還要先聲明變量,在findViewById然后再強(qiáng)轉(zhuǎn)成我們的控件,使用方式一般如下
- TextView username;
- username=(TextView)findViewById(R.id.user);
- username.setText("我是一個(gè)TextView");
有時(shí)候?qū)懙氖遣皇窍胪拢赡苡行┤苏f現(xiàn)在不是有一些注解的庫,如butterknife,當(dāng)我們使用注解時(shí)可以不用findViewById了,使用方式如下
- @BindView(R.id.user)
- TextView username;
- username.setText("我是一個(gè)TextView");
確實(shí)是這樣,使用注解后確實(shí)給我們少了一些工作量,不過這依然沒有最簡單化,最簡單的就是我們可以直接給id為user的控件直接賦值,或許你會(huì)感覺這有點(diǎn)不可思議。不過Kotlin確實(shí)做到了。我們可以直接這樣寫
- user.text="我是一個(gè)TextView"
看到這你是不是有一種相見恨晚的感覺,太Tama的簡潔了。user就是我們布局文件聲明的id,.text就想當(dāng)與setText()給,在Kotlin語言中,我們看不到了像Java中的set/get方法了。需要注意的是,當(dāng)我們想這樣使用的時(shí)候(不用findViewById,直接使用xml控件我們需要在gradle加入apply plugin: ‘kotlin-android-extensions’),需要加入下面一句代碼
- //activity_login就是我們的布局
- import kotlinx.android.synthetic.main.activity_login.*
Anko Layout
通常我們使用xml文件寫我們的布局,但是他有一些缺點(diǎn)如不是類型安全,不是空安全,解析xml文件消耗更多的CPU和電量等等。而Anko Layout可以使用DSL動(dòng)態(tài)創(chuàng)建我們的UI,并且它比我們使用Java動(dòng)態(tài)創(chuàng)建布局方便很多主要是更簡潔,它和擁有xml創(chuàng)建布局的層級(jí)關(guān)系,能讓我們更容易閱讀。
- verticalLayout {
- val textView=textView("我是一個(gè)TextView")
- val name = editText("EditText")
- button("Button") {
- onClick { toast("${name.text}!") }
- }
- }
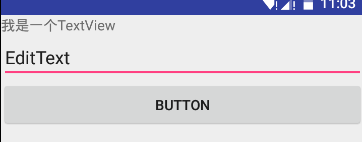
我們?cè)贠nCreate方法中可以去掉setContentView,然后加入上面代碼就可以顯示如下圖的效果,即一個(gè)垂直的線性布局中,放了一個(gè)TextView,一個(gè)EditText,和一個(gè)Button。并且Button中有一個(gè)點(diǎn)擊事件,當(dāng)點(diǎn)擊時(shí)將EditText的內(nèi)容
以toast顯示。
上面的代碼是不是很簡單易懂,當(dāng)然,默認(rèn)的控件并不能滿足我們的需求,例如我們會(huì)更改字體的顏色及大小,會(huì)設(shè)置寬度和高度,會(huì)設(shè)置margin,padding值,那么該如何實(shí)行呢,當(dāng)然也很簡單,因?yàn)樗倪壿嫼蛒ml書寫布局是一個(gè)套路。例如以下實(shí)現(xiàn)
- val textView=textView("我是一個(gè)TextView"){
- textSize = sp(17).toFloat()
- textColor=context.resources.getColor(R.color.red)
- }.lparams{
- margin=dip(10)
- height= dip(40)
- width= matchParent
- }
我想我不需要說明上面的代碼,你就應(yīng)該看得出控件實(shí)行的效果。因?yàn)樗膶傩院臀覀冊(cè)趚ml設(shè)置屬性的名字對(duì)應(yīng)的。
在上面創(chuàng)建UI過程中,我們直接把創(chuàng)建UI的代碼寫在onCreate方法中了,當(dāng)然,還有一種寫法。我們創(chuàng)建一個(gè)內(nèi)部類實(shí)行AnkoComponent接口,并重寫createView方法,該方法返回一個(gè)View,也就是我們創(chuàng)建的布局。修改如下
- inner class UI : AnkoComponent<LoginActivity> {
- override fun createView(ui: AnkoContext<LoginActivity>): View {
- return with(ui){
- verticalLayout {
- val textView=textView("我是一個(gè)TextView"){
- textSize = sp(17).toFloat()
- textColor=context.resources.getColor(R.color.red)
- }.lparams{
- margin=dip(10)
- height= dip(40)
- width= matchParent
- }
- val name = editText("EditText")
- button("Button") {
- onClick { view ->
- toast("Hello, ${name.text}!")
- }
- }
- }
- }
- }
- }
然后在onCreate方法中加一句代碼,即可創(chuàng)建我們的布局頁面了。如下
- UI().setContentView(this@LoginActivity)
現(xiàn)在我們編譯運(yùn)行,發(fā)現(xiàn)效果和布局文件寫的界面是一樣的。但是它的性能是有優(yōu)勢(shì)的,其實(shí)吧并沒有發(fā)覺性能優(yōu)勢(shì)。不管怎樣,這種DSL確實(shí)便于閱讀,也很容易上手,在上面的代碼中,你可能注意到了dip(10),它表示將10dp轉(zhuǎn)換為像素的意思,是Anko的擴(kuò)展函數(shù),說的擴(kuò)展函數(shù),如果閱讀過Anko的源碼我們發(fā)現(xiàn)里面大量的使用擴(kuò)展函數(shù),這也是Kotlin語言的優(yōu)勢(shì)之一。確實(shí)很強(qiáng)大,例如dip擴(kuò)展(摘取View擴(kuò)展)
- inline fun View.dip(value: Int): Int = context.dip(value)
- fun Context.dip(value: Int): Int = (value * resources.displayMetrics.density).toInt()
在上面resources.displayMetrics.density和我們Java getResources().getDisplayMetrics().density是一個(gè)效果,不過看著你會(huì)不會(huì)感覺比Java書寫舒服多了,反正我是這么感覺的。
在上面的我們給Button加了一個(gè)點(diǎn)擊事件,我們發(fā)現(xiàn)它支持lambda表達(dá)式。我們想顯示一個(gè)Toast,只需要toast(“內(nèi)容”)就可以了,是不是又很簡潔。其實(shí)它也是擴(kuò)展函數(shù),實(shí)現(xiàn)
- inline fun AnkoContext<*>.toast(message: CharSequence) = ctx.toast(message)
- fun Context.toast(message: CharSequence) = Toast.makeText(this, message, Toast.LENGTH_SHORT).show()
當(dāng)然創(chuàng)建dialog依然也很簡單,如下
- alert ("我是Dialog"){
- yesButton { toast("yes")}
- noButton { toast("no")}
- }.show()
真是越看越舒心,哈哈。再來一個(gè)強(qiáng)大而又很簡單很簡單很簡潔的一段代碼實(shí)現(xiàn)。
- doAsync {
- //后臺(tái)執(zhí)行代碼
- uiThread {
- //UI線程
- toast("線程${Thread.currentThread().name}") }
- }
該段代碼實(shí)現(xiàn)的就是AsyncTask 的效果,但是你應(yīng)該發(fā)現(xiàn)它比Java的實(shí)現(xiàn)簡潔多了,當(dāng)然除非是色盲,要不然你會(huì)看出簡潔的。
如果你使用Kotlin開發(fā)Android一段時(shí)間后,會(huì)發(fā)現(xiàn)它給我們減少了很多的代碼量,當(dāng)然更多的優(yōu)勢(shì)及用法需要我們自己去探索。相信經(jīng)過探索后它會(huì)讓你大吃一驚。
實(shí)現(xiàn)一個(gè)簡單的登錄界面
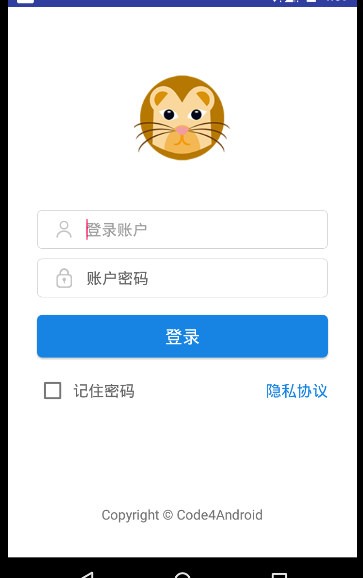
界面很簡單,偽代碼
- <LinearLayout>
- <ImageView/>
- <LinearLayout> <ImageView/><EditText賬號(hào)/><LinearLayout>
- <LinearLayout> <ImageView/><EditText密碼/><LinearLayout>
- <Button 登錄/>
- <LinearLayout> <CheckBox 記住密碼/><TextView 隱私協(xié)議xieu/><LinearLayout>
- <TextView/>
- </LinearLayout>
看著并不復(fù)雜的,那么xml實(shí)現(xiàn)的代碼就不在這貼出了,如果你想看xml實(shí)現(xiàn)可看點(diǎn)擊查,那么接下來來只看Anko在Kotlin代碼中實(shí)現(xiàn)這個(gè)布局。
- lateinit var et_account: EditText
- lateinit var et_password: EditText
- inner class LoginUi : AnkoComponent<LoginActivity> {
- override fun createView(ui: AnkoContext<LoginActivity>) = with(ui) {
- verticalLayout {
- backgroundColor = context.resources.getColor(android.R.color.white)
- gravity = Gravity.CENTER_HORIZONTAL
- imageView(R.mipmap.ic_launcher).lparams {
- width = dip(100)
- height = dip(100)
- topMargin = dip(64)
- }
- linearLayout {
- gravity = Gravity.CENTER_VERTICAL
- orientation = HORIZONTAL
- backgroundResource = R.drawable.bg_frame_corner
- imageView {
- image = resources.getDrawable(R.mipmap.ic_username)
- }.lparams(width = wrapContent, height = wrapContent) {
- leftMargin = dip(12)
- rightMargin = dip(15)
- }
- et_account = editText {
- hint = "登錄賬戶"
- hintTextColor = Color.parseColor("#666666")
- textSize = 16f
- background = null
- }
- }.lparams(width = dip(300), height = dip(40)) {
- topMargin = dip(45)
- }
- linearLayout {
- orientation = HORIZONTAL
- backgroundResource = R.drawable.bg_frame_corner
- gravity = Gravity.CENTER_VERTICAL
- imageView {
- image = resources.getDrawable(R.mipmap.ic_password)
- }.lparams {
- leftMargin = dip(12)
- rightMargin = dip(15)
- }
- et_password = editText {
- hint = "登錄密碼"
- hintTextColor = Color.parseColor("#666666")
- textSize = 16f
- background = null
- }
- }.lparams {
- width = dip(300)
- height = dip(40)
- topMargin = dip(10)
- }
- button("登錄") {
- gravity = Gravity.CENTER
- background = resources.getDrawable(R.drawable.bg_login_btn)
- textColor = Color.parseColor("#ffffff")
- onClick {
- if (et_account.text.toString().isNotEmpty() && et_password.text.toString().isNotEmpty())
- startActivity<MainActivity>() else toast("請(qǐng)輸入賬戶或者密碼")
- }
- }.lparams(width = dip(300), height = dip(44)) {
- topMargin = dip(18)
- }
- linearLayout {
- orientation = HORIZONTAL
- gravity = Gravity.CENTER_VERTICAL
- checkBox("記住密碼") {
- textColor = Color.parseColor("#666666")
- textSize = 16f
- leftPadding = dip(5)
- }
- textView("隱私協(xié)議") {
- textColor = Color.parseColor("#1783e3")
- gravity = Gravity.RIGHT
- textSize = 16f
- }.lparams(width = matchParent)
- }.lparams(width = dip(300)) {
- topMargin = dip(18)
- }
- textView("Copyright © Code4Android") {
- textSize = 14f
- gravity = Gravity.CENTER or Gravity.BOTTOM
- }.lparams {
- bottomMargin = dip(35)
- weight = 1f
- }
- }
- }
- }
看到上面的代碼怎么樣,看起來還不錯(cuò)吧,即使現(xiàn)在你不會(huì)寫,但是你也能讀懂它。在上面我們給登錄按鈕設(shè)置一個(gè)打開MainActivity的事件。startActivity的中寫的是我們要跳轉(zhuǎn)的Activity,如果給打開的界面?zhèn)鬟f參數(shù),直接寫在()中。例如我們將輸入的賬號(hào)和密碼傳到跳轉(zhuǎn)的界面,則實(shí)現(xiàn)為
- startActivity<MainActivity>("account" to et_account.text.toString(),"password" to et_password.text.toString())
其實(shí)Anko的強(qiáng)大之處遠(yuǎn)不止于此,值得我們細(xì)細(xì)品味。想更深入學(xué)習(xí)可以去GitHub Anko(https://github.com/Kotlin/anko),到此呢,本篇文章也就結(jié)束了,若在閱讀時(shí)發(fā)現(xiàn)錯(cuò)誤之處,歡迎指出,謝謝,Have a wonderful day.