獨家 | 教你在R中使用Keras和TensorFlow構建深度學習模型
引言:
在R和Python之間如何進行選擇一直是一個熱議的話題。機器學習世界也被不同語言偏好所劃分。但是隨著深度學習的盛行,天平逐漸向Python傾斜,因為截至目前為止Python具有大量R所沒有的深度學習的資源庫和框架。
我個人從R轉到Python是因為我想更加深入機器學習的領域,而僅僅使用R的話,這(在之前)是幾乎不可能實現的事情。不過也僅此而已!
隨著Keras在R中的實現,語言選擇的斗爭又重新回到舞臺中央。Python幾乎已經慢慢變成深度學習建模的默認語言,但是隨著在R中以TensorFlow(CPU和GPU均兼容)為后端的Keras框架的發行, 即便是在深度學習領域,R與Python搶占舞臺的戰爭也再一次打響。
下面我們將會看到怎樣在R中安裝以TensorFlow為基礎的Keras框架,然后在RStudio中構建我們基于經典MNIST數據集的***個神經網絡模型。
內容列表:
- 以TensorFlow為后端的Keras框架安裝
- 在R中可以使用Keras來構建模型的不同類型
- 在R中使用MLP將MNIST手寫數字進行歸類
- 將MNIST結果與Python中同等代碼結果進行比較
- 結語
一、以TensorFlow為后端的Keras框架安裝
在RStudio中安裝Keras的步驟非常簡單。只要跟著以下步驟,你就可以在R中構建你的***個神經網絡模型。
- install.packages("devtools")
- devtools::install_github("rstudio/keras")
以上步驟會從Github資源庫下載Keras。現在是時候把keras加載進R,然后安裝TensorFlow。
- library(keras)
在默認情況下,RStudio會加載CPU版本的TensorFlow。如果沒有成功加載CPU版本的TensorFlow, 使用以下指令來下載。
- install_tensorflow()
如要為單獨用戶或桌面系統安裝GPU支持的TensorFlow,使用以下指令。
- install_tensorflow(gpu=TRUE)
為多重用戶安裝,請參考這個指南:https://tensorflow.rstudio.com/installation_gpu.html。
現在在我們的RStudio里,keras和TensorFlow都安裝完畢了。讓我們開始構建***個在R中的神經網絡來處理MNIST數據集吧。
二、在R中可以使用keras來構建模型的不同類型
以下是可以在R中使用Keras構建的模型列表
- 多層感知器(Multi-Layer Perceptrons)
- 卷積神經網絡(Convoluted Neural Networks)
- 遞歸神經網絡(Recurrent Neural Networks)
- Skip-Gram模型
- 使用預訓練的模型(比如VGG16、RESNET等)
- 微調預訓練的模型
讓我們從構建僅有一個隱藏層的簡單MLP模型開始,來試著對手寫數字進行歸類。
三、在R中使用MLP將MNIST手寫數字進行歸類
- #loading keras library
- library(keras)
- #loading the keras inbuilt mnist dataset
- data<-dataset_mnist()
- #separating train and test file
- train_x<-data$train$x
- train_y<-data$train$y
- test_x<-data$test$x
- test_y<-data$test$y
- rm(data)
- # converting a 2D array into a 1D array for feeding into the MLP and normalising the matrix
- train_x <- array(train_x, dim = c(dim(train_x)[1], prod(dim(train_x)[-1]))) / 255
- test_x <- array(test_x, dim = c(dim(test_x)[1], prod(dim(test_x)[-1]))) / 255
- #converting the target variable to once hot encoded vectors using keras inbuilt function
- train_y<-to_categorical(train_y,10)
- test_y<-to_categorical(test_y,10)
- #defining a keras sequential model
- model <- keras_model_sequential()
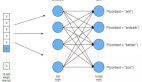
- #defining the model with 1 input layer[784 neurons], 1 hidden layer[784 neurons] with dropout rate 0.4 and 1 output layer[10 neurons]
- #i.e number of digits from 0 to 9
- model %>%
- layer_dense(units = 784, input_shape = 784) %>%
- layer_dropout(rate=0.4)%>%
- layer_activation(activation = 'relu') %>%
- layer_dense(units = 10) %>%
- layer_activation(activation = 'softmax')
- #compiling the defined model with metric = accuracy and optimiser as adam.
- model %>% compile(
- loss = 'categorical_crossentropy',
- optimizer = 'adam',
- metrics = c('accuracy')
- )
- #fitting the model on the training dataset
- model %>% fit(train_x, train_y, epochs = 100, batch_size = 128)
- #Evaluating model on the cross validation dataset
- loss_and_metrics <- model %>% evaluate(test_x, test_y, batch_size = 128)
以上的代碼獲得了99.14%的訓練精度和96.89%的驗證精度。在我的i5處理器上跑這段代碼完整訓練一次用時13.5秒,而在TITANx GPU上,驗證精度可以達到98.44%,訓練一次平均用時2秒。
四、使用keras來構建MLP模型——R Vs. Python
為了更好地比較,我同樣使用Python來實現解決以上的MINIST歸類問題。結果不應當有任何差別,因為R會創建一個進程(conda instance)并在其中運行keras。但你仍然可以嘗試以下同等的Python代碼。
- #importing the required libraries for the MLP model
- import keras
- from keras.models import Sequential
- import numpy as np
- #loading the MNIST dataset from keras
- from keras.datasets import mnist
- (x_train, y_train), (x_test, y_test) = mnist.load_data()
- #reshaping the x_train, y_train, x_test and y_test to conform to MLP input and output dimensions
- x_train=np.reshape(x_train,(x_train.shape[0],-1))/255
- x_test=np.reshape(x_test,(x_test.shape[0],-1))/255
- import pandas as pd
- y_train=pd.get_dummies(y_train)
- y_test=pd.get_dummies(y_test)
- #performing one-hot encoding on target variables for train and test
- y_train=np.array(y_train)
- y_test=np.array(y_test)
- #defining model with one input layer[784 neurons], 1 hidden layer[784 neurons] with dropout rate 0.4 and 1 output layer [10 #neurons]
- model=Sequential()
- from keras.layers import Dense
- model.add(Dense(784, input_dim=784, activation='relu'))
- keras.layers.core.Dropout(rate=0.4)
- model.add(Dense(10,input_dim=784,activation='softmax'))
- # compiling model using adam optimiser and accuracy as metric
- model.compile(loss='categorical_crossentropy', optimizer="adam", metrics=['accuracy'])
- # fitting model and performing validation
- model.fit(x_train,y_train,epochs=50,batch_size=128,validation_data=(x_test,y_test))
以上模型在同樣的GPU上達到了98.42%的驗證精度。所以,就像我們在一開始猜測的那樣,結果是相同的。
五、結語
如果這是你用R構建的***個深度學習模型,我希望你很享受這個過程。使用很簡單的代碼,你就可以對手寫數值進行精確度達到98%的分類。這應該可以給你足夠的動力讓你在機器學習的領域探索。
如果你已經在Python中使用過keras深度學習框架,那么你會發現R中keras框架的句式和結構跟其在Python中非常相似。事實上,R中的keras安裝包創造了一個conda環境而且安裝了在該環境下運行keras所需要的所有東西。但是,更讓我興奮的是:看到現在數據科學家們使用R構建有關現實生活的深度學習模型。就像有句話說的一樣,競爭永不停歇。