iOS開發3年只用5分鐘搞定面試官
序言
假輿馬者,非利足也,而致千里;假舟楫者,非能水也,而絕江河。君子生非異也,善假于物也。
我們曾借白茶清歡等一個人,曾借花開花落嘆寵辱不驚。
程序(Program)是一個可以運行的文件, 一個程序至少有一個進程,一個進程至少有一個線程,即主線程
正文
- 程序(Program)是一個可以運行的文件, 一個程序至少有一個進程,一個進程至少有一個線程,即主線程
- 進程:正在進行的程序被稱為進程,負責程序運行的內存分配,每個進程都有自己的獨立虛擬內存空間.一個程序的一次運行,在執行過程中擁有獨立的內存單元,而多個線程共享一塊內存
- 什么是線程:線程是進程中的基本單元(可執行的代碼段),線程可以并發運行,提高執行效率
- 創建線程的目的:就是為了開啟一條新的可執行的代碼段,與主線程中的代碼實現同時運行,防止界面假死,是實現異步的技術的主要手段,比如網絡異步下載
一 Runloop知識點補充
1 在模擬器中拖拽UITextView的時候對RunLoop模式的影響
1.1 performSelector: 方法
—-對該方法的解釋: 該方法運行的時候回受到runloop運行模式的影響,默認設置為defaulmode,當拖拽的時候,runloop切換模式,所以不執行
代碼塊和解釋一:
- //由于該方法設置了RunLoop的運行模式為兩種,當用戶滑動UITextView的時候RunLoop切換模式并且繼續執行,所以能設置出圖片
- [self.imageView1 performSelector:@selector(setImage:) withObject:[UIImage imageNamed:@"/Users/xiaofeng/Desktop/Snip20160319_18.png"] afterDelay:5.0 inModes:@[UITrackingRunLoopMode,NSDefaultRunLoopMode]];
代碼塊和解釋二:
- //該方法的執行會受到外界的影響,當用戶滑動UITextView的時候,并不會經過2秒設置圖片,runloop運行的模式是默認的模式,當用戶滑動UITextView的時候,切換了模式,所以不會設置圖片
- [self.imageView1 performSelector:@selector(setImage:) withObject:[UIImage imageNamed:@"/Users/xiaofeng/Desktop/Snip20160319_15.png"] afterDelay:2.0];
2 問題:怎么能讓一個線程一直活著,然后在特定的情況下,讓線程跳轉任務
二 常駐線程
3 保證線程不死的方法:創建一個RunLoop循環;然后設置數據源或者定時器
- 3.1 ***種方法:開啟一個死循環—>比如while死循環,保持線程不死亡,這樣雖然能保證線程不死,但是不能保證線程去執行其它的任務(不可取)
- 3.2 第二種方法:開啟一個RunLoop循環,也可以保證讓線程不死,但是開啟了需要手動執行,并且需要設置運行模式,否則單單只是開啟了RunLoop循環,并沒有設置模式的話,RunLoop開啟了就直接退出,并不會一直往下執行(開啟RunLoop需要完成指定的三個步驟)
4 需求:當點擊創建線程的按鈕的時候,開始創建一條線程,然后點擊讓子線程開始干其他的工作的時候,子線程開始執行其他工作
1 創建子線程按鈕:
- #pragma mark - 創建子線程按鈕
- - (IBAction)creatBtnClick:(id)sender
- {
- //創建子線程
- NSThread *thread = [[NSThread alloc] initWithTarget:self selector:@selector(task) object:nil];
- [thread start];
- //如果不加入這句代碼,線程在執行完task方法之后就會立刻被釋放,這里寫這句代碼目的就是保證線程不死,能繼續執行其他的任務
- self.thread = thread;
- }
創建子線程按鈕中的方法實現: 在task方法中我們只要求打印當前線程就行.
讓子線程開始繼續工作:
- #pragma mark - 讓線程繼續工作
- - (IBAction)goOnBtnClick:(id)sender
- {
- [self performSelector:@selector(task2) onThread:self.thread withObject:nil waitUntilDone:YES];
- }
問題:如果就這樣運行的話,就會報錯.
報錯原因:雖然上面在創建子線程中已經寫了一句self.thread = thread保證子線程不會被釋放,但是由于沒有開啟runloop循環,那么子線程其實是處于死亡狀態,所以當在點擊讓子線程繼續工作的話就會報錯.
解決辦法:創建子線程的RunLoop,讓子線程一直在運行,然后通過設置在方法里面的調用其它的需要子線程工作的方法,讓子線程去工作
- #pragma mark - 工作在線程中的任務
- - (void)task
- {
- NSLog(@"1------%@",[NSThread currentThread]);
- //創建RunLoop
- NSRunLoop *runLoop = [NSRunLoop currentRunLoop];
- //創建timer(這種方法需要手動設置模式)
- NSTimer *timer = [NSTimer timerWithTimeInterval:2.0 target:self selector:@selector(timeRun) userInfo:nil repeats:YES];
- //
- // //添加到runloop中,并設置模式
- [runLoop addTimer:timer forMode:NSDefaultRunLoopMode];
- // [runLoop addPort:[NSPort port] forMode:NSDefaultRunLoopMode];
- //開啟runloop
- [runLoop run];
- NSLog(@"%s-------2-----%@",__func__,[NSThread currentThread]);
- }
注意:上面創建時鐘的代碼和添加時鐘到runloop中的代碼可以寫成下面一句,同樣也能保證線程不處于死亡狀態
- [runLoop addPort:[NSPort port] forMode:NSDefaultRunLoopMode];
5 RunLoop的自動釋放池
- ***次創建 RunLoop啟動的時候
- ***一次 RunLoop退出的時候
- 其它時間的創建和銷毀:當RunLoop即將休眠的時候會把之前的自動釋放池銷毀,重新創建一個新的
6 RunLoop在網絡中的應用(直接看代碼就可以)
- - (void)delegate1
- {
- //確定請求路徑
- NSURL *url = [NSURL URLWithString:@"http://120.25.226.186:32812/login?username=520it&pwd=520it&type=JSON"];
- //創建可變的請求對象
- NSMutableURLRequest *request = [NSMutableURLRequest requestWithURL:url];
- //設置代理
- NSURLConnection *connention = [[NSURLConnection alloc] initWithRequest:request delegate:self startImmediately:YES];
- //加入該段代碼可以改變代理方法執行的線程,默認是在主線程中執行,但是加入該段代碼之后,代理方法會在子線程中執行
- [connention setDelegateQueue:[[NSOperationQueue alloc] init]];
- //開始發送請求
- //1)該方法內部會吧connention對象作為一個source添加到runloop中,并且制定運行模式為默認
- //2)如果發現當前的runloop不存在,那么該方法內部會自動的創建并開啟當前子線程的runloop
- [connention start];
三 網絡
1 GET和POST對比:
- GET請求參數直接跟在URL后面(?)
- POST請求參數是在請求體里面
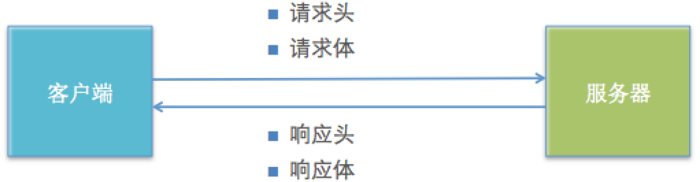
2 HTTP基本通信過程:客戶端—>請求—->服務器;服務器—>響應—->客戶端
- 具體的操作步驟:
- 2.1 確定請求路徑
- 2.2 獲取主機名
- 2.3 DNS域名解析
- 2.4 獲得端口號
- 2.5 鏈接到120.25.226.186的端口80
- 2.6 發送一個HTTP GET請求
- 2.7 接收服務器的響應
- 2.8 關閉鏈接
3 請求和響應
請求:
- 請求頭:包含了客戶端的環境描述,客戶端請求信息等
- 請求體:客戶端發給服務器的具體數據,比如文件數據(POST請求才會有)
響應:
- 響應頭:包含了對服務器的描述,對返回數據的描述
- 響應體:服務器返回給客戶端的具體數據,比如文件數據
如圖:
4 HTTP請求
HTTP請求的第三方框架:ASIHttpRequest(已經棄用);AFNetworking(主用);MKNetworking
蘋果自帶的:
- NSURLConnection:用法簡單,最古老最經典最直接的一種方案
- NSURLSession:功能比NSURLConnection更強大,蘋果目前比較推薦的使用技術(重要)
- CFNetwork:NSURL*的底層,純C語言
第三方框架:(企業開發基本使用的是第三方框架)
- ASIHttpRequest:外號”HTTP終結者”,功能極其強大,可惜已經停止更新了
- AFNetworking:簡單易用,提供了基本夠用的常用功能,維護和使用者多(重要)
- MKNsetworking:簡單易用,產生三哥的故鄉印度,維護和使用者少
四 GET方式
- 概念:發送網絡請求的兩種方式,主要區別上面已經有寫
- 發送同步請求
具體步驟:
- 1> 確定請求路徑
- 2> 創建請求對象
- 3> 發送請求
- 4 > 解析接收數據
- #pragma mark - 發送同步請求
- - (void)sendSync
- {
- //確定請求路徑
- NSURL *url = [NSURL URLWithString:@"http://120.25.226.186:32812/login?username=520it&pwd=520it&type=JSON"];
- //創建請求對象
- NSURLRequest *request = [NSURLRequest requestWithURL:url];
- //初始化響應頭信息(設置為空)
- NSHTTPURLResponse *response = nil;
- //初始化錯誤信息
- NSError *error = nil;
- //發送請求
- /**
- * ***個參數:請求對象
- *
- * 第二個參數:響應頭信息(傳入的是地址)
- *
- * 第三個參數:錯誤信息(如果發送請求失敗,那么error就有值)(傳入的是地址)
- */
- NSData *data = [NSURLConnection sendSynchronousRequest:request returningResponse:&response error:&error];
- //解析返回的響應數據
- NSLog(@"%@",[[NSString alloc] initWithData:data encoding:NSUTF8StringEncoding]);
- }
3 發送異步請求
注意:同步請求和異步請求的主要區別就是發送請求中的方法不同.
- #pragma mark - 發送異步請求
- - (void)sendAsync
- {
- //確定請求路徑
- NSURL *url = [NSURL URLWithString:@"http://120.25.226.186:32812/login?username=520it&pwd=520it&type=JSON"];
- //創建請求對象
- NSURLRequest *resquest = [NSURLRequest requestWithURL:url];
- //發送請求
- /**
- * 參數一:請求對象
- *
- * 參數二:隊列(作用在completionHandler上面)
- *
- * 參數三:響應的信息(響應頭;響應的數據)
- response 響應頭信息
- data 響應體信息
- connectionError 錯誤信息
- */
- [NSURLConnection sendAsynchronousRequest:resquest queue:[[NSOperationQueue alloc] init] completionHandler:^(NSURLResponse * _Nullable response, NSData * _Nullable data, NSError * _Nullable connectionError) {
- //解析數據
- NSLog(@"%@",[[NSString alloc] initWithData:data encoding:NSUTF8StringEncoding]);
- }];
- }
4 用代理的方法發送網絡請求
注意:需要遵守協議:
- <nsurlconnectiondatadelegate></nsurlconnectiondatadelegate>
代理方法發送,里面包括了設置代理的三種方式
- #pragma mark - 代理方法發送請求
- - (void)sendAsyncDelegate
- {
- //確定請求路徑
- NSURL *url = [NSURL URLWithString:@"http://120.25.226.186:32812/login?username=520it&pwd=520it&type=JSON"];
- //創建請求對象
- NSURLRequest *request = [NSURLRequest requestWithURL:url];
- //設置代理
- //***種設置代理:
- [NSURLConnection connectionWithRequest:request delegate:self];
- //第二種設置代理:
- NSURLConnection *connecttion1 = [[NSURLConnection alloc] initWithRequest:request delegate:self];
- //第三種設置代理:
- NSURLConnection *connecttion2 = [[NSURLConnection alloc] initWithRequest:request delegate:self startImmediately:YES];
- [connecttion2 start];
- }
實現代理中的方法
- #pragma mark - 代理方法
- //請求失敗的時候調用
- - (void)connection:(NSURLConnection *)connection didFailWithError:(NSError *)error
- {
- NSLog(@"%s------%@",__func__,[NSThread currentThread]);
- }
- //接收響應頭信息
- - (void)connection:(NSURLConnection *)connection didReceiveResponse:(NSURLResponse *)response
- {
- NSLog(@"%s------%@",__func__,[NSThread currentThread]);
- //創建接收可變的二進制數據
- self.responseData = [NSMutableData data];
- }
- //接收響應體(如果數據足夠大那么這個方法會調用多次)
- - (void)connection:(NSURLConnection *)connection didReceiveData:(NSData *)data
- {
- NSLog(@"%s------%@",__func__,[NSThread currentThread]);
- //拼接二進制數據
- [self.responseData appendData:data];
- }
- //接收完成(不管成功還是失敗)
- - (void)connectionDidFinishLoading:(NSURLConnection *)connection
- {
- NSLog(@"%s------%@",__func__,[NSThread currentThread]);
- //解析數據
- NSLog(@"%@",[[NSString alloc] initWithData:self.responseData encoding:NSUTF8StringEncoding]);
- }
五 POST方式
1 直接看代碼,上面都標明了
- - (void)touchesBegan:(NSSet*)touches withEvent:(UIEvent *)event
- {
- //創建請求路徑
- NSURL *url = [NSURL URLWithString:@"http://120.25.226.186:32812/login"];
- //創建可變的請求對象
- NSMutableURLRequest *request = [NSMutableURLRequest requestWithURL:url];
- //修改請求方式
- request.HTTPMethod = @"POST";
- //設置請求超時
- request.timeoutInterval = 10;
- NSURLResponse *response = nil;
- NSError *error = nil;
- //設置請求頭信息
- [request setValue:@"jjjj" forHTTPHeaderField:@"uuuuu"];
- //設置請求體(參數)
- request.HTTPBody = [@"username=520it&pwd=520it&type=JSON" dataUsingEncoding:NSUTF8StringEncoding];
- //***種方法:發送請求(異步請求)
- [NSURLConnection sendAsynchronousRequest:request queue:[[NSOperationQueue alloc] init] completionHandler:^(NSURLResponse * _Nullable response, NSData * _Nullable data, NSError * _Nullable connectionError) {
- //解析數據
- if (connectionError == nil) {
- NSLog(@"%@",[[NSString alloc] initWithData:data encoding:NSUTF8StringEncoding]);
- }else{
- NSLog(@"%@",connectionError);
- }
- }];
- //第二種方法:發送請求(同步請求)
- NSData *data = [NSURLConnection sendSynchronousRequest:request returningResponse:&response error:&error];
- //解析數據
- NSLog(@"%@",[[NSString alloc] initWithData:data encoding:NSUTF8StringEncoding]);
- }
六 中文轉碼
- 判斷需不需要轉碼操作:看請求路徑是否含有中文,含有的話,就需要轉碼
- 設置代理的多一個參數的方法中:如果設置的為NO,那么手動開啟的時候,底層start會把線程加入到runloop中,但是如果設置的為yes,那么和沒有參數的時候一樣,需要手動創建runloop.
GET轉碼:
- #pragma mark - GET轉碼
- - (void)get
- {
- //確定請求字符串
- NSString *strurl = @"http://120.25.226.186:32812/login2?username=(需要轉的漢字)&pwd=520it&type=JSON";
- //轉碼
- strurl = [strurl stringByAddingPercentEscapesUsingEncoding:NSUTF8StringEncoding];
- //確定路徑
- NSURL *url = [NSURL URLWithString:strurl];
- //創建可變的請求對象
- NSMutableURLRequest *request = [NSMutableURLRequest requestWithURL:url];
- //發送請求--->GET請求
- [NSURLConnection sendAsynchronousRequest:request queue:[[NSOperationQueue alloc] init] completionHandler:^(NSURLResponse * _Nullable response, NSData * _Nullable data, NSError * _Nullable connectionError) {
- //解析數據
- if (connectionError == nil) {
- NSLog(@"%@",[[NSString alloc] initWithData:data encoding:NSUTF8StringEncoding]);
- }else{
- NSLog(@"%@",connectionError);
- }
- }];
- }
POST轉碼:
- #pragma mark - POST轉碼
- - (void)post
- {
- //確定請求路徑的字符串
- NSString *urlstr = @"http://120.25.226.186:32812/login2";
- //確定url
- NSURL *url = [NSURL URLWithString:urlstr];
- //創建請求對象
- NSMutableURLRequest *request = [NSMutableURLRequest requestWithURL:url];
- //轉為POST格式
- request.HTTPMethod = @"POST";
- //轉碼
- request.HTTPBody = [@"username=(需要轉的漢字)&pwd=520it&type=JSON" dataUsingEncoding:NSUTF8StringEncoding ];
- NSURLResponse *response = nil;
- NSError *error = nil;
- //發送請求(同步請求)
- NSData *data = [NSURLConnection sendSynchronousRequest:request returningResponse:&response error:&error];
- //解析數據
- NSLog(@"%@",[[NSString alloc] initWithData:data encoding:NSUTF8StringEncoding]);
- //發送請求(異步請求)
- [NSURLConnection sendAsynchronousRequest:request queue:[NSOperationQueue mainQueue] completionHandler:^(NSURLResponse * _Nullable response, NSData * _Nullable data, NSError * _Nullable connectionError) {
- //解析數據
- if (connectionError == nil) {
- NSLog(@"%@",[[NSString alloc] initWithData:data encoding:NSUTF8StringEncoding]);
- }else{
- NSLog(@"%@",connectionError);
- }
- }];
- }
七 NSURLSession簡單使用
1 NSURLSession —->GET用法:
- - (void)get
- {
- //確定請求路徑
- NSURL *url = [NSURL URLWithString:@"http://120.25.226.186:32812/login?username=520it&pwd=520it&type=JSON"];
- //創建請求對象
- NSMutableURLRequest *request = [NSMutableURLRequest requestWithURL:url ];
- //獲取會話對象(是一個單例)
- NSURLSession *session = [NSURLSession sharedSession];
- //根據會話對象創建task
- /**
- * 參數一:請求對象
- *
- * 參數二:響應頭response信息;響應體data信息;error錯誤信息
- *
- *
- */
- NSURLSessionDataTask *dataTask = [session dataTaskWithRequest:request completionHandler:^(NSData * _Nullable data, NSURLResponse * _Nullable response, NSError * _Nullable error) {
- //解析數據
- NSLog(@"%@",[[NSString alloc] initWithData:data encoding:NSUTF8StringEncoding]);
- //該block塊是在子線程中調用
- NSLog(@"%@",[NSThread currentThread]);
- } ];
- //執行task
- [dataTask resume];
- }
2 GET用法二:
- - (void)get1
- {
- //確定請求路徑
- NSURL *url = [NSURL URLWithString:@"http://120.25.226.186:32812/login?username=520it&pwd=520it&type=JSON"];
- //創建請求對象
- // NSMutableURLRequest *request = [NSMutableURLRequest requestWithURL:url];
- //創建會話對象
- NSURLSession *session = [NSURLSession sharedSession];
- //根據會話對象創建task
- NSURLSessionDataTask *dataTask = [session dataTaskWithURL:url completionHandler:^(NSData * _Nullable data, NSURLResponse * _Nullable response, NSError * _Nullable error) {
- NSLog(@"%@",[[NSString alloc] initWithData:data encoding:NSUTF8StringEncoding]);
- //該block塊是在子線程中調用
- NSLog(@"%@",[NSThread currentThread]);
- }];
- //開啟task
- [dataTask resume];
- }
3 GET1和GET2的區別是根據會話對象創建task不同,其實用法還是一樣的.
4 POST用法:
- - (void)post
- {
- //確定請求路徑
- NSURL *url = [NSURL URLWithString:@"http://120.25.226.186:32812/login"];
- //創建可變的請求對象
- NSMutableURLRequest *resquest = [NSMutableURLRequest requestWithURL:url];
- //轉換格式
- resquest.HTTPMethod = @"POST";
- //設置請求體信息
- resquest.HTTPBody = [@"username=520it&pwd=520it&type=JSON" dataUsingEncoding:NSUTF8StringEncoding];
- //獲取會話
- NSURLSession *session = [NSURLSession sharedSession];
- //用會話對象創建task
- NSURLSessionDataTask *dataTask = [session dataTaskWithRequest:resquest completionHandler:^(NSData * _Nullable data, NSURLResponse * _Nullable response, NSError * _Nullable error) {
- //解析數據
- if (error == nil) {
- NSLog(@"%@",[[NSString alloc] initWithData:data encoding:NSUTF8StringEncoding]);
- }else{
- NSLog(@"%@",error);
- }
- //該block塊是在子線程中調用
- NSLog(@"%@",[NSThread currentThread]);
- }];
- //執行task任務 resume------>恢復
- [dataTask resume];
- }
八 NSURLSession的代理方法
1 主方法(在里面設置代理)
- - (void)sessionGet
- {
- //確定請求路徑
- NSURL *url = [NSURL URLWithString:@"http://120.25.226.186:32812/login?username=520it&pwd=520it&type=JSON"];
- //創建可變的請求對象
- NSURLRequest *request = [NSURLRequest requestWithURL:url];
- //獲取會話(delegateQueue:決定了代理的任務是在子線程還是主線程中執行的)
- NSURLSession *session = [NSURLSession sessionWithConfiguration:[NSURLSessionConfiguration defaultSessionConfiguration] delegate:self delegateQueue:[NSOperationQueue mainQueue]];
- //創建task
- NSURLSessionDataTask *dataTask = [session dataTaskWithRequest:request];
- //執行task任務
- [dataTask resume];
- }
2 代理方法
注意: 此代理方法要特別的注意***個代理方法,因為需要回調告訴系統怎么樣處理服務器返回的數據,如果沒有寫的話,后面兩個代理方法是不會調用的,因為completionHandler并沒有告訴系統,服務器的數據怎么處理.
- #pragma mark - 代理方法
- //接收響應
- - (void)URLSession:(NSURLSession *)session dataTask:(NSURLSessionDataTask *)dataTask didReceiveResponse:(NSURLResponse *)response completionHandler:(void (^)(NSURLSessionResponseDisposition))completionHandler
- {
- NSLog(@"%s-------%@",__func__,[NSThread currentThread]);
- self.data = [NSMutableData data];
- //在該方法中需要通過completionHandler回調告訴系統應該如何處理服務器返回的數據
- completionHandler(NSURLSessionResponseAllow);
- }
- //接收到二進制數據(如果數據量大會調用多次)
- - (void)URLSession:(NSURLSession *)session dataTask:(NSURLSessionDataTask *)dataTask didReceiveData:(NSData *)data
- {
- NSLog(@"%s-----%@",__func__,[NSThread currentThread]);
- //拼接數據
- [self.data appendData:data];
- }
- //完成或者失敗的時候調用
- - (void)URLSession:(NSURLSession *)session task:(NSURLSessionTask *)task didCompleteWithError:(NSError *)error
- {
- NSLog(@"%s------%@",__func__,[[NSString alloc] initWithData:self.data encoding:NSUTF8StringEncoding]);
- NSLog(@"%@",[NSThread currentThread]);
- }