限流降級神器,帶你解讀阿里巴巴開源 Sentinel 實現(xiàn)原理

Sentinel 是阿里中間件團隊開源的,面向分布式服務架構的輕量級高可用流量控制組件,主要以流量為切入點,從流量控制、熔斷降級、系統(tǒng)負載保護等多個維度來幫助用戶保護服務的穩(wěn)定性。
大家可能會問:Sentinel 和之前常用的熔斷降級庫 Netflix Hystrix 有什么異同呢?Sentinel官網(wǎng)有一個對比的文章,這里摘抄一個總結的表格,具體的對比可以點此 鏈接 查看。
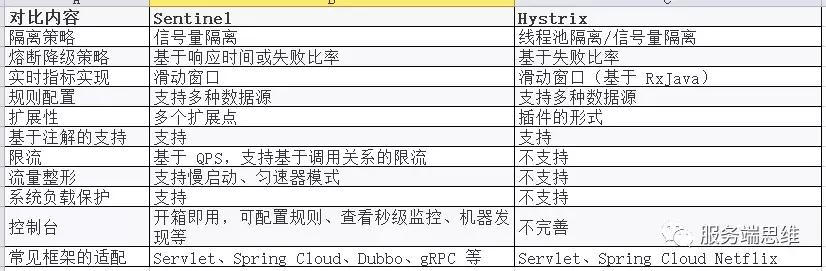
從對比的表格可以看到,Sentinel比Hystrix在功能性上還要強大一些,本文讓我們一起來了解下Sentinel的源碼,揭開Sentinel的神秘面紗。
項目結構
將Sentinel的源碼fork到自己的github庫中,接著把源碼clone到本地,然后開始源碼閱讀之旅吧。
首先我們看一下Sentinel項目的整個結構:
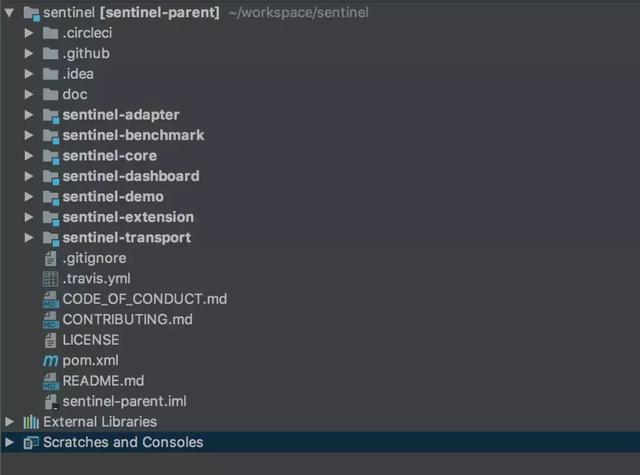
- sentinel-core 核心模塊,限流、降級、系統(tǒng)保護等都在這里實現(xiàn)
- sentinel-dashboard 控制臺模塊,可以對連接上的sentinel客戶端實現(xiàn)可視化的管理
- sentinel-transport 傳輸模塊,提供了基本的監(jiān)控服務端和客戶端的API接口,以及一些基于不同庫的實現(xiàn)
- sentinel-extension 擴展模塊,主要對DataSource進行了部分擴展實現(xiàn)
- sentinel-adapter 適配器模塊,主要實現(xiàn)了對一些常見框架的適配
- sentinel-demo 樣例模塊,可參考怎么使用sentinel進行限流、降級等
- sentinel-benchmark 基準測試模塊,對核心代碼的精確性提供基準測試
運行樣例
基本上每個框架都會帶有樣例模塊,有的叫example,有的叫demo,sentinel也不例外。
那我們從sentinel的demo中找一個例子運行下看看大致的情況吧,上面說過了sentinel主要的核心功能是做限流、降級和系統(tǒng)保護,那我們就從“限流”開始看sentinel的實現(xiàn)原理吧。
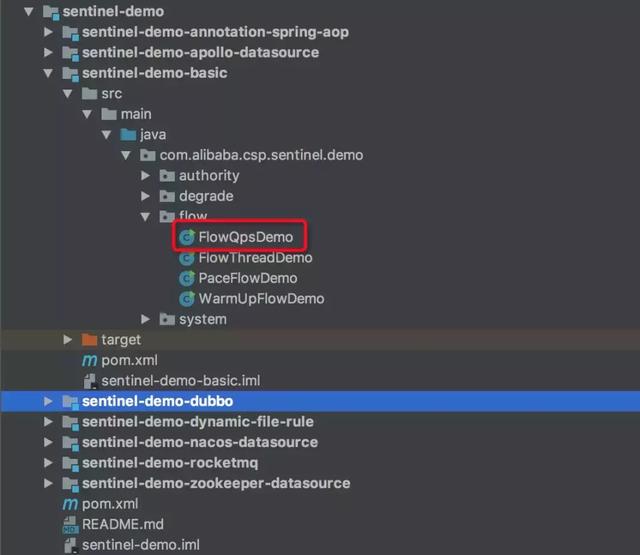
可以看到sentinel-demo模塊中有很多不同的樣例,我們找到basic模塊下的flow包,這個包下面就是對應的限流的樣例,但是限流也有很多種類型的限流,我們就找根據(jù)qps限流的類看吧,其他的限流方式原理上都大差不差。
- public class FlowQpsDemo {
- private static final String KEY = "abc";
- private static AtomicInteger pass = new AtomicInteger();
- private static AtomicInteger block = new AtomicInteger();
- private static AtomicInteger total = new AtomicInteger();
- private static volatile boolean stop = false;
- private static final int threadCount = 32;
- private static int seconds = 30;
- public static void main(String[] args) throws Exception {
- initFlowQpsRule();
- tick();
- // first make the system run on a very low condition
- simulateTraffic();
- System.out.println("===== begin to do flow control");
- System.out.println("only 20 requests per second can pass");
- }
- private static void initFlowQpsRule() {
- List<FlowRule> rules = new ArrayList<FlowRule>();
- FlowRule rule1 = new FlowRule();
- rule1.setResource(KEY);
- // set limit qps to 20
- rule1.setCount(20);
- // 設置限流類型:根據(jù)qps
- rule1.setGrade(RuleConstant.FLOW_GRADE_QPS);
- rule1.setLimitApp("default");
- rules.add(rule1);
- // 加載限流的規(guī)則
- FlowRuleManager.loadRules(rules);
- }
- private static void simulateTraffic() {
- for (int i = 0; i < threadCount; i++) {
- Thread t = new Thread(new RunTask());
- t.setName("simulate-traffic-Task");
- t.start();
- }
- }
- private static void tick() {
- Thread timer = new Thread(new TimerTask());
- timer.setName("sentinel-timer-task");
- timer.start();
- }
- static class TimerTask implements Runnable {
- @Override
- public void run() {
- long start = System.currentTimeMillis();
- System.out.println("begin to statistic!!!");
- long oldTotal = 0;
- long oldPass = 0;
- long oldBlock = 0;
- while (!stop) {
- try {
- TimeUnit.SECONDS.sleep(1);
- } catch (InterruptedException e) {
- }
- long globalTotal = total.get();
- long oneSecondTotal = globalTotal - oldTotal;
- oldTotal = globalTotal;
- long globalPass = pass.get();
- long oneSecondPass = globalPass - oldPass;
- oldPass = globalPass;
- long globalBlock = block.get();
- long oneSecondBlock = globalBlock - oldBlock;
- oldBlock = globalBlock;
- System.out.println(seconds + " send qps is: " + oneSecondTotal);
- System.out.println(TimeUtil.currentTimeMillis() + ", total:" + oneSecondTotal
- + ", pass:" + oneSecondPass
- + ", block:" + oneSecondBlock);
- if (seconds-- <= 0) {
- stop = true;
- }
- }
- long cost = System.currentTimeMillis() - start;
- System.out.println("time cost: " + cost + " ms");
- System.out.println("total:" + total.get() + ", pass:" + pass.get()
- + ", block:" + block.get());
- System.exit(0);
- }
- }
- static class RunTask implements Runnable {
- @Override
- public void run() {
- while (!stop) {
- Entry entry = null;
- try {
- entry = SphU.entry(KEY);
- // token acquired, means pass
- pass.addAndGet(1);
- } catch (BlockException e1) {
- block.incrementAndGet();
- } catch (Exception e2) {
- // biz exception
- } finally {
- total.incrementAndGet();
- if (entry != null) {
- entry.exit();
- }
- }
- Random random2 = new Random();
- try {
- TimeUnit.MILLISECONDS.sleep(random2.nextInt(50));
- } catch (InterruptedException e) {
- // ignore
- }
- }
- }
- }
- }
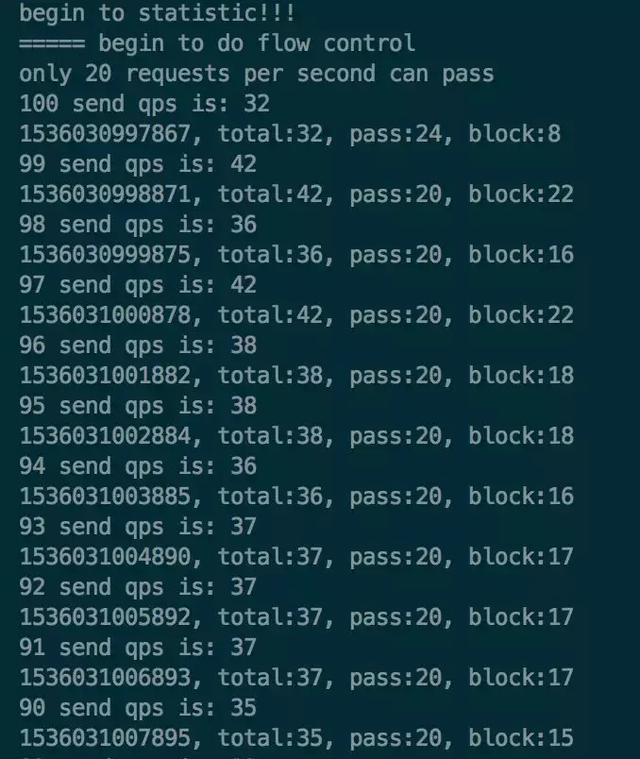
執(zhí)行上面的代碼后,打印出如下的結果:

可以看到,上面的結果中,pass的數(shù)量和我們的預期并不相同,我們預期的是每秒允許pass的請求數(shù)是20個,但是目前有很多pass的請求數(shù)是超過20個的。
原因是,我們這里測試的代碼使用了多線程,注意看 threadCount 的值,一共有32個線程來模擬,而在RunTask的run方法中執(zhí)行資源保護時,即在 SphU.entry 的內(nèi)部是沒有加鎖的,所以就會導致在高并發(fā)下,pass的數(shù)量會高于20。
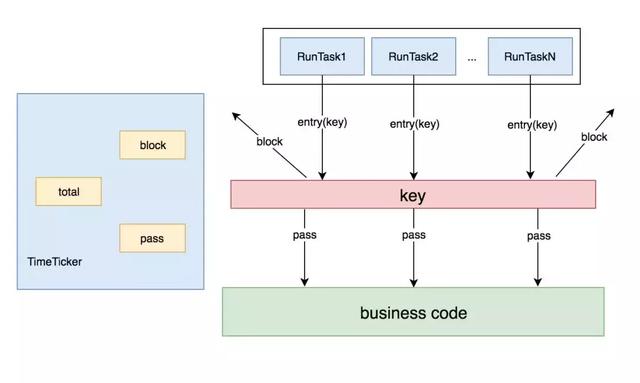
可以用下面這個模型來描述下,有一個TimeTicker線程在做統(tǒng)計,每1秒鐘做一次。有N個RunTask線程在模擬請求,被訪問的business code被資源key保護著,根據(jù)規(guī)則,每秒只允許20個請求通過。
由于pass、block、total等計數(shù)器是全局共享的,而多個RunTask線程在執(zhí)行SphU.entry申請獲取entry時,內(nèi)部沒有鎖保護,所以會存在pass的個數(shù)超過設定的閾值。
那為了證明在單線程下限流的正確性與可靠性,那我們的模型就應該變成了這樣:
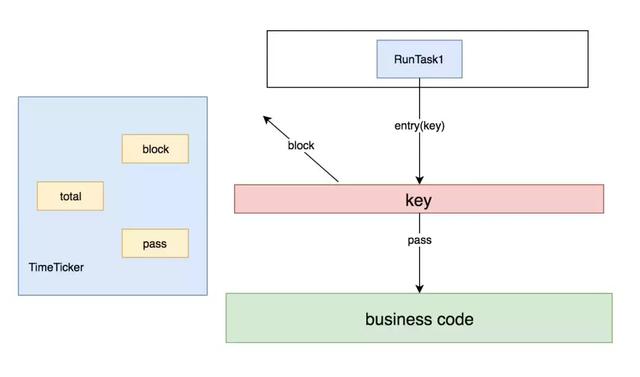
那接下來我把 threadCount 的值改為1,只有一個線程來執(zhí)行這個方法,看下具體的限流結果,執(zhí)行上面的代碼后打印的結果如下:
可以看到pass數(shù)基本上維持在20,但是***次統(tǒng)計的pass值還是超過了20。這又是什么原因?qū)е碌哪兀?/p>
其實仔細看下Demo中的代碼可以發(fā)現(xiàn),模擬請求是用的一個線程,統(tǒng)計結果是用的另外一個線程,統(tǒng)計線程每1秒鐘統(tǒng)計一次結果,這兩個線程之間是有時間上的誤差的。從TimeTicker線程打印出來的時間戳可以看出來,雖然每隔一秒進行統(tǒng)計,但是當前打印時的時間和上一次的時間還是有誤差的,不完全是1000ms的間隔。
要真正驗證每秒限制20個請求,保證數(shù)據(jù)的精準性,需要做基準測試,這個不是本篇文章的重點,有興趣的同學可以去了解下jmh,sentinel中的基準測試也是通過jmh做的。
深入原理
通過一個簡單的示例程序,我們了解了sentinel可以對請求進行限流,除了限流外,還有降級和系統(tǒng)保護等功能。那現(xiàn)在我們就撥開云霧,深入源碼內(nèi)部去一窺sentinel的實現(xiàn)原理吧。
首先從入口開始: SphU.entry() 。這個方法會去申請一個entry,如果能夠申請成功,則說明沒有被限流,否則會拋出BlockException,表面已經(jīng)被限流了。
從 SphU.entry() 方法往下執(zhí)行會進入到 Sph.entry() ,Sph的默認實現(xiàn)類是 CtSph ,在CtSph中最終會執(zhí)行到 entry(ResourceWrapperresourceWrapper,intcount,Object...args)throwsBlockException 這個方法。
我們來看一下這個方法的具體實現(xiàn):
- public Entry entry(ResourceWrapper resourceWrapper, int count, Object... args) throws BlockException {
- Context context = ContextUtil.getContext();
- if (context instanceof NullContext) {
- // Init the entry only. No rule checking will occur.
- return new CtEntry(resourceWrapper, null, context);
- }
- if (context == null) {
- context = MyContextUtil.myEnter(Constants.CONTEXT_DEFAULT_NAME, "", resourceWrapper.getType());
- }
- // Global switch is close, no rule checking will do.
- if (!Constants.ON) {
- return new CtEntry(resourceWrapper, null, context);
- }
- // 獲取該資源對應的SlotChain
- ProcessorSlot<Object> chain = lookProcessChain(resourceWrapper);
- /*
- * Means processor cache size exceeds {@link Constants.MAX_SLOT_CHAIN_SIZE}, so no
- * rule checking will be done.
- */
- if (chain == null) {
- return new CtEntry(resourceWrapper, null, context);
- }
- Entry e = new CtEntry(resourceWrapper, chain, context);
- try {
- // 執(zhí)行Slot的entry方法
- chain.entry(context, resourceWrapper, null, count, args);
- } catch (BlockException e1) {
- e.exit(count, args);
- // 拋出BlockExecption
- throw e1;
- } catch (Throwable e1) {
- RecordLog.info("Sentinel unexpected exception", e1);
- }
- return e;
- }
這個方法可以分為以下幾個部分:
- 1.對參數(shù)和全局配置項做檢測,如果不符合要求就直接返回了一個CtEntry對象,不會再進行后面的限流檢測,否則進入下面的檢測流程。
- 2.根據(jù)包裝過的資源對象獲取對應的SlotChain
- 3.執(zhí)行SlotChain的entry方法
- 3.1.如果SlotChain的entry方法拋出了BlockException,則將該異常繼續(xù)向上拋出
- 3.2.如果SlotChain的entry方法正常執(zhí)行了,則***會將該entry對象返回
- 4.如果上層方法捕獲了BlockException,則說明請求被限流了,否則請求能正常執(zhí)行
其中比較重要的是第2、3兩個步驟,我們來分解一下這兩個步驟。
創(chuàng)建SlotChain
首先看一下lookProcessChain的方法實現(xiàn):
- private ProcessorSlot<Object> lookProcessChain(ResourceWrapper resourceWrapper) {
- ProcessorSlotChain chain = chainMap.get(resourceWrapper);
- if (chain == null) {
- synchronized (LOCK) {
- chain = chainMap.get(resourceWrapper);
- if (chain == null)
- // Entry size limit.
- if (chainMap.size() >= Constants.MAX_SLOT_CHAIN_SIZE) {
- return null;
- }
- // 具體構造chain的方法
- chain = Env.slotsChainbuilder.build();
- Map<ResourceWrapper, ProcessorSlotChain> newMap = new HashMap<ResourceWrapper, ProcessorSlotChain>(chainMap.size() + 1);
- newMap.putAll(chainMap);
- newMap.put(resourceWrapper, chain);
- chainMap = newMap;
- }
- }
- }
- return chain;
- }
該方法使用了一個HashMap做了緩存,key是資源對象。這里加了鎖,并且做了 doublecheck 。具體構造chain的方法是通過: Env.slotsChainbuilder.build() 這句代碼創(chuàng)建的。那就進入這個方法看看吧。
- public ProcessorSlotChain build() {
- ProcessorSlotChain chain = new DefaultProcessorSlotChain();
- chain.addLast(new NodeSelectorSlot());
- chain.addLast(new ClusterBuilderSlot());
- chain.addLast(new LogSlot());
- chain.addLast(new StatisticSlot());
- chain.addLast(new SystemSlot());
- chain.addLast(new AuthoritySlot());
- chain.addLast(new FlowSlot());
- chain.addLast(new DegradeSlot());
- return chain;
- }
Chain是鏈條的意思,從build的方法可看出,ProcessorSlotChain是一個鏈表,里面添加了很多個Slot。具體的實現(xiàn)需要到DefaultProcessorSlotChain中去看。
- public class DefaultProcessorSlotChain extends ProcessorSlotChain {
- AbstractLinkedProcessorSlot<?> first = new AbstractLinkedProcessorSlot<Object>() {
- @Override
- public void entry(Context context, ResourceWrapper resourceWrapper, Object t, int count, Object... args)
- throws Throwable {
- super.fireEntry(context, resourceWrapper, t, count, args);
- }
- @Override
- public void exit(Context context, ResourceWrapper resourceWrapper, int count, Object... args) {
- super.fireExit(context, resourceWrapper, count, args);
- }
- };
- AbstractLinkedProcessorSlot<?> end = first; @Override public void addFirst(AbstractLinkedProcessorSlot<?> protocolProcessor) { protocolProcessor.setNext(first.getNext()); first.setNext(protocolProcessor); if (end == first) { end = protocolProcessor; } } @Override
- public void addLast(AbstractLinkedProcessorSlot<?> protocolProcessor)
- end.setNext(protocolProcessor);
- end = protocolProcessor;
- }
- }
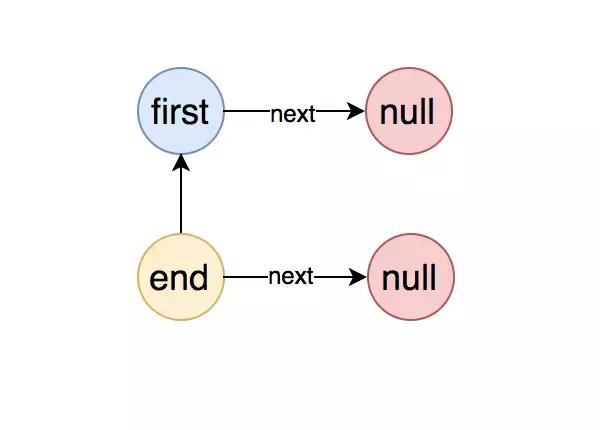
DefaultProcessorSlotChain中有兩個AbstractLinkedProcessorSlot類型的變量:first和end,這就是鏈表的頭結點和尾節(jié)點。
創(chuàng)建DefaultProcessorSlotChain對象時,首先創(chuàng)建了首節(jié)點,然后把首節(jié)點賦值給了尾節(jié)點,可以用下圖表示:
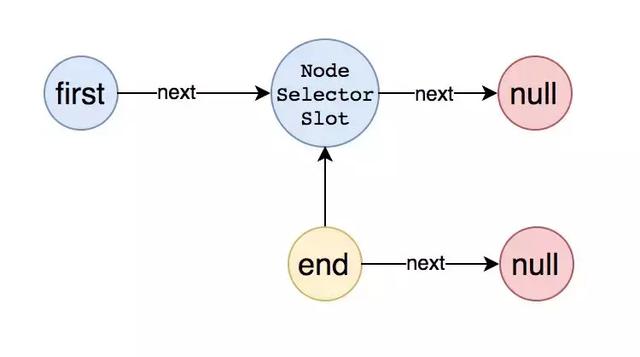
將***個節(jié)點添加到鏈表中后,整個鏈表的結構變成了如下圖這樣:
將所有的節(jié)點都加入到鏈表中后,整個鏈表的結構變成了如下圖所示:
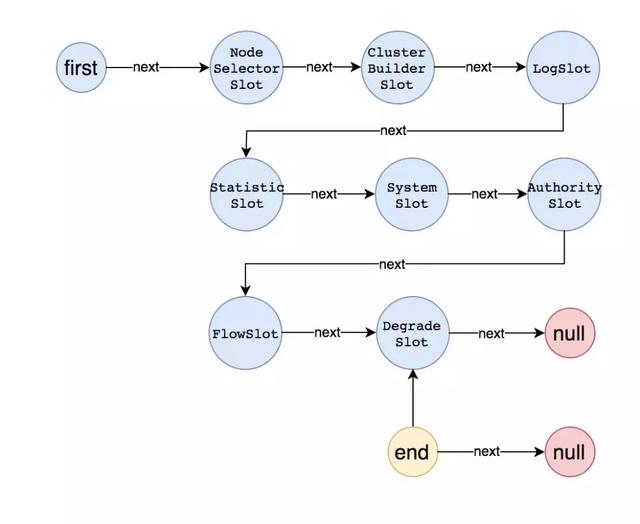
這樣就將所有的Slot對象添加到了鏈表中去了,每一個Slot都是繼承自AbstractLinkedProcessorSlot。而AbstractLinkedProcessorSlot是一種責任鏈的設計,每個對象中都有一個next屬性,指向的是另一個AbstractLinkedProcessorSlot對象。其實責任鏈模式在很多框架中都有,比如Netty中是通過pipeline來實現(xiàn)的。
知道了SlotChain是如何創(chuàng)建的了,那接下來就要看下是如何執(zhí)行Slot的entry方法的了。
執(zhí)行SlotChain的entry方法
lookProcessChain方法獲得的ProcessorSlotChain的實例是DefaultProcessorSlotChain,那么執(zhí)行chain.entry方法,就會執(zhí)行DefaultProcessorSlotChain的entry方法,而DefaultProcessorSlotChain的entry方法是這樣的:
- @Override
- public void entry(Context context, ResourceWrapper resourceWrapper, Object t, int count, Object... args)
- throws Throwable {
- first.transformEntry(context, resourceWrapper, t, count, args);
- }
也就是說,DefaultProcessorSlotChain的entry實際是執(zhí)行的first屬性的transformEntry方法。
而transformEntry方法會執(zhí)行當前節(jié)點的entry方法,在DefaultProcessorSlotChain中first節(jié)點重寫了entry方法,具體如下:
- @Override
- public void entry(Context context, ResourceWrapper resourceWrapper, Object t, int count, Object... args)
- throws Throwable {
- super.fireEntry(context, resourceWrapper, t, count, args);
- }
first節(jié)點的entry方法,實際又是執(zhí)行的super的fireEntry方法,那繼續(xù)把目光轉(zhuǎn)移到fireEntry方法,具體如下:
- @Override
- public void fireEntry(Context context, ResourceWrapper resourceWrapper, Object obj, int count, Object... args)
- throws Throwable {
- if (next != null) {
- next.transformEntry(context, resourceWrapper, obj, count, args);
- }
- }
從這里可以看到,從fireEntry方法中就開始傳遞執(zhí)行entry了,這里會執(zhí)行當前節(jié)點的下一個節(jié)點transformEntry方法,上面已經(jīng)分析過了,transformEntry方法會觸發(fā)當前節(jié)點的entry,也就是說fireEntry方法實際是觸發(fā)了下一個節(jié)點的entry方法。具體的流程如下圖所示:
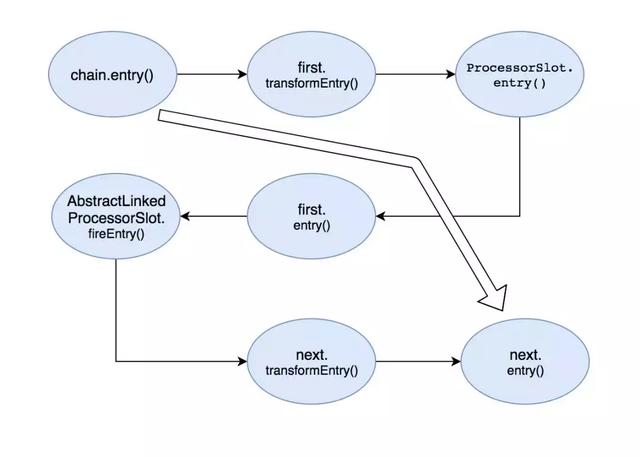
從圖中可以看出,從最初的調(diào)用Chain的entry()方法,轉(zhuǎn)變成了調(diào)用SlotChain中Slot的entry()方法。從上面的分析可以知道,SlotChain中的***個Slot節(jié)點是NodeSelectorSlot。
執(zhí)行Slot的entry方法
現(xiàn)在可以把目光轉(zhuǎn)移到SlotChain中的***個節(jié)點NodeSelectorSlot的entry方法中去了,具體的代碼如下:
- @Override
- public void entry(Context context, ResourceWrapper resourceWrapper, Object obj, int count, Object... args)
- throws Throwable {
- DefaultNode node = map.get(context.getName());
- if (node == null) {
- synchronized (this) {
- node = map.get(context.getName());
- if (node == null) {
- node = Env.nodeBuilder.buildTreeNode(resourceWrapper, null);
- HashMap<String, DefaultNode> cacheMap = new HashMap<String, DefaultNode>(map.size());
- cacheMap.putAll(map);
- cacheMap.put(context.getName(), node);
- map = cacheMap;
- }
- // Build invocation tree
- ((DefaultNode)context.getLastNode()).addChild(node);
- }
- }
- context.setCurNode(node);
- // 由此觸發(fā)下一個節(jié)點的entry方法
- fireEntry(context, resourceWrapper, node, count, args);
- }
從代碼中可以看到,NodeSelectorSlot節(jié)點做了一些自己的業(yè)務邏輯處理,具體的大家可以深入源碼繼續(xù)追蹤,這里大概的介紹下每種Slot的功能職責:
- NodeSelectorSlot 負責收集資源的路徑,并將這些資源的調(diào)用路徑,以樹狀結構存儲起來,用于根據(jù)調(diào)用路徑來限流降級;
- ClusterBuilderSlot 則用于存儲資源的統(tǒng)計信息以及調(diào)用者信息,例如該資源的 RT, QPS, thread count 等等,這些信息將用作為多維度限流,降級的依據(jù);
- StatistcSlot 則用于記錄,統(tǒng)計不同緯度的 runtime 信息;
- FlowSlot 則用于根據(jù)預設的限流規(guī)則,以及前面 slot 統(tǒng)計的狀態(tài),來進行限流;
- AuthorizationSlot 則根據(jù)黑白名單,來做黑白名單控制;
- DegradeSlot 則通過統(tǒng)計信息,以及預設的規(guī)則,來做熔斷降級;
- SystemSlot 則通過系統(tǒng)的狀態(tài),例如 load1 等,來控制總的入口流量;
執(zhí)行完業(yè)務邏輯處理后,調(diào)用了fireEntry()方法,由此觸發(fā)了下一個節(jié)點的entry方法。此時我們就知道了sentinel的責任鏈就是這樣傳遞的:每個Slot節(jié)點執(zhí)行完自己的業(yè)務后,會調(diào)用fireEntry來觸發(fā)下一個節(jié)點的entry方法。
所以可以將上面的圖完整了,具體如下:
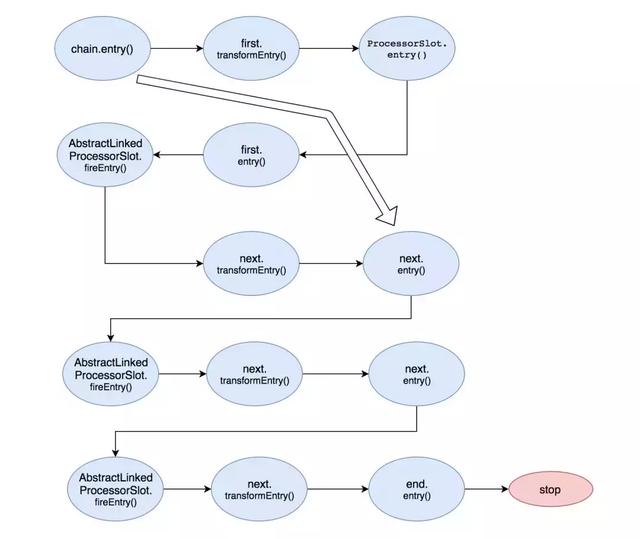
至此就通過SlotChain完成了對每個節(jié)點的entry()方法的調(diào)用,每個節(jié)點會根據(jù)創(chuàng)建的規(guī)則,進行自己的邏輯處理,當統(tǒng)計的結果達到設置的閾值時,就會觸發(fā)限流、降級等事件,具體是拋出BlockException異常。
總結
sentinel主要是基于7種不同的Slot形成了一個鏈表,每個Slot都各司其職,自己做完分內(nèi)的事之后,會把請求傳遞給下一個Slot,直到在某一個Slot中***規(guī)則后拋出BlockException而終止。
前三個Slot負責做統(tǒng)計,后面的Slot負責根據(jù)統(tǒng)計的結果結合配置的規(guī)則進行具體的控制,是Block該請求還是放行。
控制的類型也有很多可選項:根據(jù)qps、線程數(shù)、冷啟動等等。
然后基于這個核心的方法,衍生出了很多其他的功能:
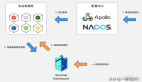
- 1、dashboard控制臺,可以可視化的對每個連接過來的sentinel客戶端 (通過發(fā)送heartbeat消息)進行控制,dashboard和客戶端之間通過http協(xié)議進行通訊。
- 2、規(guī)則的持久化,通過實現(xiàn)DataSource接口,可以通過不同的方式對配置的規(guī)則進行持久化,默認規(guī)則是在內(nèi)存中的
- 3、對主流的框架進行適配,包括servlet,dubbo,rRpc等
Dashboard控制臺
sentinel-dashboard是一個單獨的應用,通過spring-boot進行啟動,主要提供一個輕量級的控制臺,它提供機器發(fā)現(xiàn)、單機資源實時監(jiān)控、集群資源匯總,以及規(guī)則管理的功能。
我們只需要對應用進行簡單的配置,就可以使用這些功能。
1 啟動控制臺
1.1 下載代碼并編譯控制臺
- 下載 控制臺 工程
- 使用以下命令將代碼打包成一個 fat jar: mvn cleanpackage
1.2 啟動
使用如下命令啟動編譯后的控制臺:
$ java -Dserver.port=8080 -Dcsp.sentinel.dashboard.server=localhost:8080 -jar target/sentinel-dashboard.jar
上述命令中我們指定了一個JVM參數(shù), -Dserver.port=8080 用于指定 Spring Boot 啟動端口為 8080。
2 客戶端接入控制臺
控制臺啟動后,客戶端需要按照以下步驟接入到控制臺。
2.1 引入客戶端jar包
通過 pom.xml 引入 jar 包:
- <dependency>
- <groupId>com.alibaba.csp</groupId>
- <artifactId>sentinel-transport-simple-http</artifactId>
- <version>x.y.z</version>
- </dependency>
2.2 配置啟動參數(shù)
啟動時加入 JVM 參數(shù) -Dcsp.sentinel.dashboard.server=consoleIp:port 指定控制臺地址和端口。若啟動多個應用,則需要通過 -Dcsp.sentinel.api.port=xxxx 指定客戶端監(jiān)控 API 的端口(默認是 8719)。
除了修改 JVM 參數(shù),也可以通過配置文件取得同樣的效果。更詳細的信息可以參考 啟動配置項。
2.3 觸發(fā)客戶端初始化
確保客戶端有訪問量,Sentinel 會在客戶端***調(diào)用的時候進行初始化,開始向控制臺發(fā)送心跳包。
sentinel-dashboard是一個獨立的web應用,可以接受客戶端的連接,然后與客戶端之間進行通訊,他們之間使用http協(xié)議進行通訊。他們之間的關系如下圖所示:
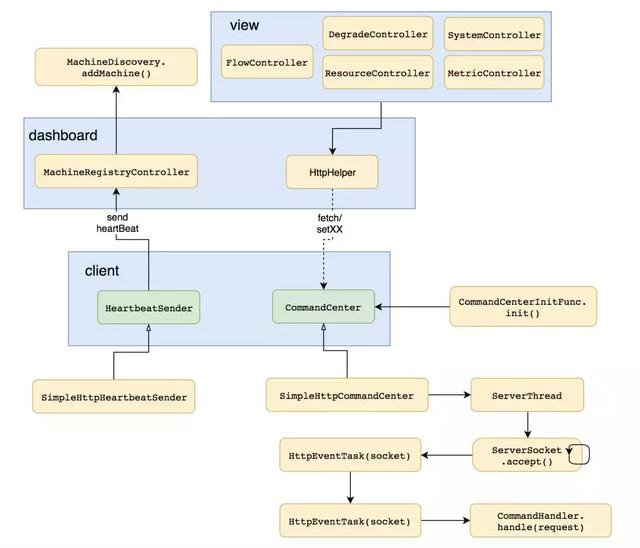
dashboard
dashboard啟動后會等待客戶端的連接,具體的做法是在 MachineRegistryController 中有一個 receiveHeartBeat 的方法,客戶端發(fā)送心跳消息,就是通過http請求這個方法。
dashboard接收到客戶端的心跳消息后,會把客戶端的傳遞過來的ip、port等信息封裝成一個 MachineInfo對象,然后將該對象通過 MachineDiscovery 接口的 addMachine 方法添加到一個ConcurrentHashMap中保存起來。
這里會有問題,因為客戶端的信息是保存在dashboard的內(nèi)存中的,所以當dashboard應用重啟后,之前已經(jīng)發(fā)送過來的客戶端信息都會丟失掉。
client
client在啟動時,會通過CommandCenterInitFunc選擇一個,并且只選擇一個CommandCenter進行啟動。
啟動之前會通過spi的方式掃描獲取到所有的CommandHandler的實現(xiàn)類,然后將所有的CommandHandler注冊到一個HashMap中去,待后期使用。
PS:考慮一下,為什么CommandHandler不需要做持久化,而是直接保存在內(nèi)存中。
注冊完CommandHandler之后,緊接著就啟動CommandCenter了,目前CommandCenter有兩個實現(xiàn)類:
- SimpleHttpCommandCenter 通過ServerSocket啟動一個服務端,接受socket連接
- NettyHttpCommandCenter 通過Netty啟動一個服務端,接受channel連接
CommandCenter啟動后,就等待dashboard發(fā)送消息過來了,當接收到消息后,會把消息通過具體的CommandHandler進行處理,然后將處理的結果返回給dashboard。
這里需要注意的是,dashboard給client發(fā)送消息是通過異步的httpClient進行發(fā)送的,在HttpHelper類中。
但是詭異的是,既然通過異步發(fā)送了,又通過一個CountDownLatch來等待消息的返回,然后獲取結果,那這樣不就失去了異步的意義的嗎?具體的代碼如下:
- private String httpGetContent(String url) { final HttpGet httpGet = new HttpGet(url); final CountDownLatch latch = new CountDownLatch(1);
- final AtomicReference<String> reference = new AtomicReference<>();
- httpclient.execute(httpGet, new FutureCallback<HttpResponse>() {
- @Override
- public void completed(final HttpResponse response) {
- try {
- reference.set(getBody(response));
- } catch (Exception e) {
- logger.info("httpGetContent " + url + " error:", e);
- } finally {
- latch.countDown();
- }
- }
- @Override
- public void failed(final Exception ex) {
- latch.countDown();
- logger.info("httpGetContent " + url + " failed:", ex);
- }
- @Override
- public void cancelled() {
- latch.countDown();
- }
- });
- try {
- latch.await(5, TimeUnit.SECONDS);
- } catch (Exception e) {
- logger.info("wait http client error:", e);
- }
- return reference.get();
- }
主流框架的適配
sentinel也對一些主流的框架進行了適配,使得在使用主流框架時,也可以享受到sentinel的保護。目前已經(jīng)支持的適配器包括以下這些:
- Web Servlet
- Dubbo
- Spring Boot / Spring Cloud
- gRPC
- Apache RocketMQ
其實做適配就是通過那些主流框架的擴展點,然后在擴展點上加入sentinel限流降級的代碼即可。拿Servlet的適配代碼看一下,具體的代碼是:
- public class CommonFilter implements Filter {
- @Override
- public void init(FilterConfig filterConfig) {
- }
- @Override
- public void doFilter(ServletRequest request, ServletResponse response, FilterChain chain)
- throws IOException, ServletException
- HttpServletRequest sRequest = (HttpServletRequest)request;
- Entry entry = null;
- try {
- // 根據(jù)請求生成的資源
- String target = FilterUtil.filterTarget(sRequest);
- target = WebCallbackManager.getUrlCleaner().clean(target);
- // “申請”該資源
- ContextUtil.enter(target);
- entry = SphU.entry(target, EntryType.IN);
- // 如果能成功“申請”到資源,則說明未被限流
- // 則將請求放行
- chain.doFilter(request, response);
- } catch (BlockException e) {
- // 否則如果捕獲了BlockException異常,說明請求被限流了
- // 則將請求重定向到一個默認的頁面
- HttpServletResponse sResponse = (HttpServletResponse)response;
- WebCallbackManager.getUrlBlockHandler().blocked(sRequest, sResponse);
- } catch (IOException e2) {
- // 省略部分代碼
- } finally {
- if (entry != null) {
- entry.exit();
- }
- ContextUtil.exit();
- }
- }
- @Override
- public void destroy() {
- }
- }
通過Servlet的Filter進行擴展,實現(xiàn)一個Filter,然后在doFilter方法中對請求進行限流控制,如果請求被限流則將請求重定向到一個默認頁面,否則將請求放行給下一個Filter。
規(guī)則持久化,動態(tài)化
Sentinel 的理念是開發(fā)者只需要關注資源的定義,當資源定義成功,可以動態(tài)增加各種流控降級規(guī)則。
Sentinel 提供兩種方式修改規(guī)則:
- 通過 API 直接修改 ( loadRules)
- 通過 DataSource適配不同數(shù)據(jù)源修改
通過 API 修改比較直觀,可以通過以下三個 API 修改不同的規(guī)則:
FlowRuleManager.loadRules(List<FlowRule> rules); // 修改流控規(guī)則
DegradeRuleManager.loadRules(List<DegradeRule> rules); // 修改降級規(guī)則
SystemRuleManager.loadRules(List<SystemRule> rules); // 修改系統(tǒng)規(guī)則
DataSource 擴展
上述 loadRules() 方法只接受內(nèi)存態(tài)的規(guī)則對象,但應用重啟后內(nèi)存中的規(guī)則就會丟失,更多的時候規(guī)則***能夠存儲在文件、數(shù)據(jù)庫或者配置中心中。
DataSource 接口給我們提供了對接任意配置源的能力。相比直接通過 API 修改規(guī)則,實現(xiàn) DataSource 接口是更加可靠的做法。
官方推薦通過控制臺設置規(guī)則后將規(guī)則推送到統(tǒng)一的規(guī)則中心,用戶只需要實現(xiàn) DataSource 接口,來監(jiān)聽規(guī)則中心的規(guī)則變化,以實時獲取變更的規(guī)則。
DataSource 拓展常見的實現(xiàn)方式有:
- 拉模式:客戶端主動向某個規(guī)則管理中心定期輪詢拉取規(guī)則,這個規(guī)則中心可以是 SQL、文件,甚至是 VCS 等。這樣做的方式是簡單,缺點是無法及時獲取變更;
- 推模式:規(guī)則中心統(tǒng)一推送,客戶端通過注冊監(jiān)聽器的方式時刻監(jiān)聽變化,比如使用 Nacos、Zookeeper 等配置中心。這種方式有更好的實時性和一致性保證。
至此,sentinel的基本情況都已經(jīng)分析了,更加詳細的內(nèi)容,可以繼續(xù)閱讀源碼來研究。