深入理解Netty編解碼、粘包拆包、心跳機(jī)制
前言
Netty系列文章:
- BIO 、NIO 、AIO 總結(jié)
- Unix網(wǎng)絡(luò)編程中的五種IO模型
- 深入理解IO多路復(fù)用實(shí)現(xiàn)機(jī)制
- Netty核心功能與線程模型
前面我們講了 BIO、NIO、AIO 等一些基礎(chǔ)知識(shí)和Netty核心功能與線程模型,本篇重點(diǎn)來(lái)理解Netty的編解碼、粘包拆包、心跳機(jī)制等實(shí)現(xiàn)原理進(jìn)行講解。
Netty編解碼
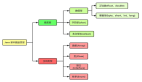
Netty 涉及到編解碼的組件有 Channel 、 ChannelHandler 、 ChannelPipe 等,我們先大概了解下這幾個(gè)組件的作用。
ChannelHandler
ChannelHandler 充當(dāng)來(lái)處理入站和出站數(shù)據(jù)的應(yīng)用程序邏輯容器。例如,實(shí)現(xiàn) ChannelInboundHandler 接口(或 ChannelInboundHandlerAdapter),你就可以接收入站事件和數(shù)據(jù),這些數(shù)據(jù)隨后會(huì)被你的應(yīng)用程序的業(yè)務(wù)邏輯處理。當(dāng)你要給連接的客戶端發(fā)送響應(yīng)時(shí),也可以從 ChannelInboundHandler 刷數(shù)據(jù)。你的業(yè)務(wù)邏輯通常下在一個(gè)或者多個(gè) ChannelInboundHandler 中。
ChannelOutboundHandler 原理一樣,只不過(guò)它是用來(lái)處理出站數(shù)據(jù)的。
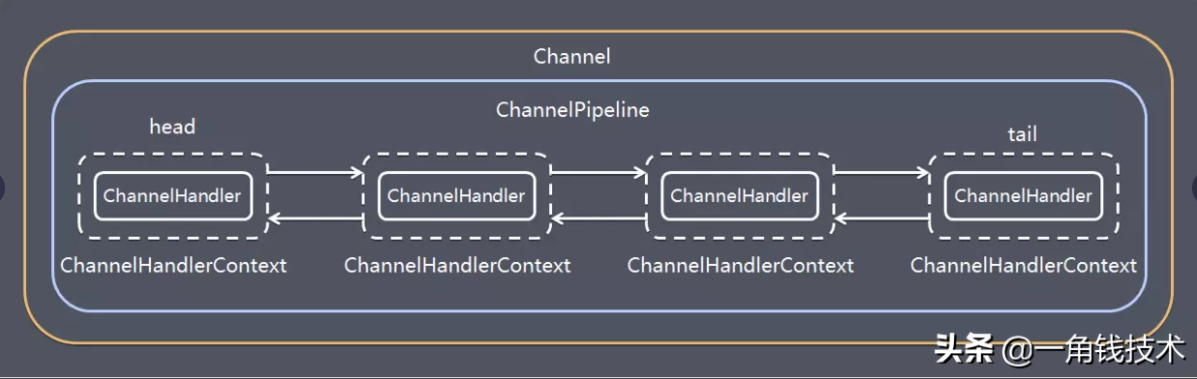
ChannelPipeline
ChannelPipeline 提供了 ChannelHandler 鏈的容器。以客戶端應(yīng)用程序?yàn)槔绻惺录倪\(yùn)動(dòng)方向是從客戶端到服務(wù)端,那么我們稱這些事件為出站的,即客戶端發(fā)送給服務(wù)端的數(shù)據(jù)會(huì)通過(guò) pipeline 中的一系列 ChannelOutboundHandler (ChannelOutboundHandler 調(diào)用是從 tail 到 head 方向逐個(gè)調(diào)用每個(gè) handler 的邏輯),并被這些 Hadnler 處理,反之稱為入站的,入站只調(diào)用 pipeline 里的 ChannelInboundHandler 邏輯(ChannelInboundHandler 調(diào)用是從 head 到 tail 方向 逐個(gè)調(diào)用每個(gè) handler 的邏輯。)
編解碼器
當(dāng)你通過(guò)Netty發(fā)送或者接受一個(gè)消息的時(shí)候,就將會(huì)發(fā)生一次數(shù)據(jù)轉(zhuǎn)換。入站消息會(huì)被解碼:從字節(jié)轉(zhuǎn)換為另一種格式(比如java對(duì)象);如果是出站消息,它會(huì)被編碼成字節(jié)。
Netty提供了一系列實(shí)用的編碼解碼器,它們都實(shí)現(xiàn)了ChannelInboundHadnler或者ChannelOutboundHandler接口。在這些類中, channelRead方法已經(jīng)被重寫(xiě)了。
以入站為例,對(duì)于每個(gè)從入站Channel讀取的消息,這個(gè)方法會(huì)被調(diào)用。隨后,它將調(diào)用由已知解碼器所提供的decode()方法進(jìn)行解碼,并將已經(jīng)解碼的字節(jié)轉(zhuǎn)發(fā)給ChannelPipeline中的下一個(gè)ChannelInboundHandler。
Netty提供了很多編解碼器,比如編解碼字符串的StringEncoder和StringDecoder,編解碼對(duì)象的ObjectEncoder和ObjectDecoder 等。
當(dāng)然也可以通過(guò)集成ByteToMessageDecoder自定義編解碼器。
示例代碼
完整代碼在 Github :
https://github.com/Niuh-Study/niuh-netty.git
對(duì)應(yīng)的包 com.niuh.netty.codec
Netty粘包拆包
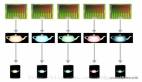
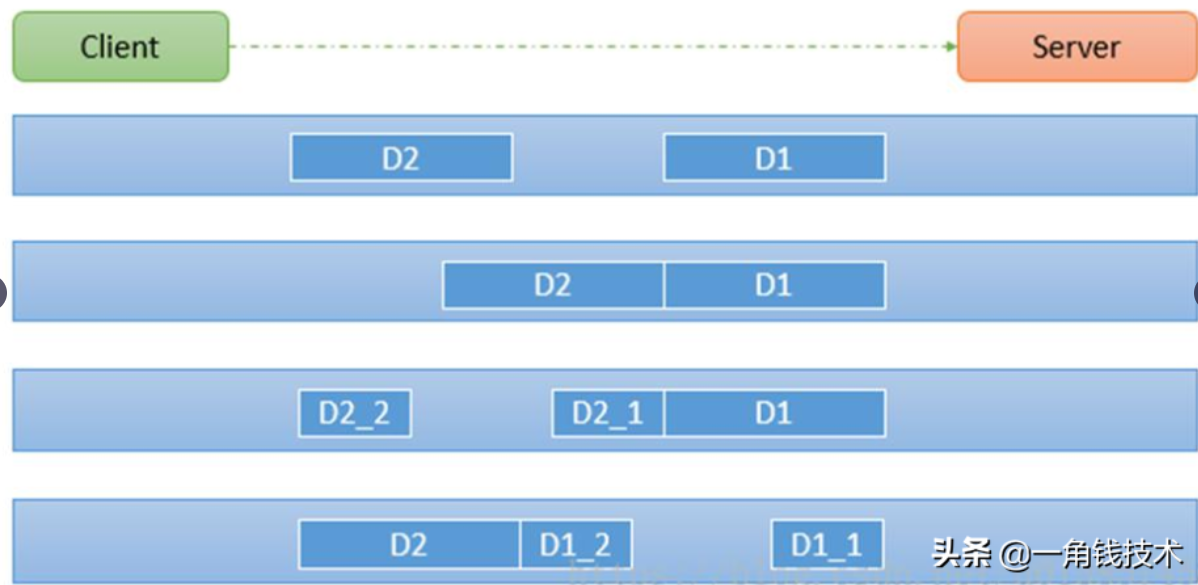
TCP 粘包拆包是指發(fā)送方發(fā)送的若干包數(shù)據(jù)到接收方接收時(shí)粘成一包或某個(gè)數(shù)據(jù)包被拆開(kāi)接收。如下圖所示,client 發(fā)送了兩個(gè)數(shù)據(jù)包 D1 和 D2,但是 server 端可能會(huì)收到如下幾種情況的數(shù)據(jù)。
程序演示
首先準(zhǔn)備客戶端負(fù)責(zé)發(fā)送消息,連續(xù)發(fā)送5次消息,代碼如下:
- public void channelActive(ChannelHandlerContext ctx) throws Exception {
- for (int i = 1; i <= 5; i++) {
- ByteBuf byteBuf = Unpooled.copiedBuffer("msg No" + i + " ", Charset.forName("utf-8"));
- ctx.writeAndFlush(byteBuf);
- }
- }
然后服務(wù)端作為接收方,接收并且打印結(jié)果:
- // count 變量,用于計(jì)數(shù)
- private int count;
- @Override
- public void channelRead(ChannelHandlerContext ctx, Object msg) throws Exception {
- System.out.println("服務(wù)器讀取線程 " + Thread.currentThread().getName());
- ByteBuf buf = (ByteBuf) msg;
- byte[] bytes = new byte[buf.readableBytes()];
- // 把ByteBuf的數(shù)據(jù)讀到bytes數(shù)組中
- buf.readBytes(bytes);
- String message = new String(bytes, Charset.forName("utf-8"));
- System.out.println("服務(wù)器接收到數(shù)據(jù):" + message);
- // 打印接收的次數(shù)
- System.out.println("接收到的數(shù)據(jù)量是:" + (++this.count));
- }
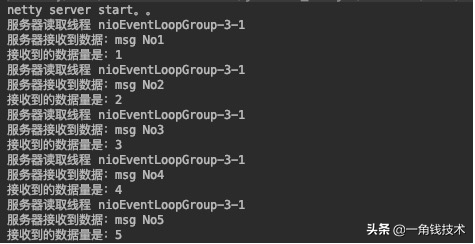
啟動(dòng)服務(wù)端,再啟動(dòng)兩個(gè)客戶端發(fā)送消息,服務(wù)端的控制臺(tái)可以看到這樣:
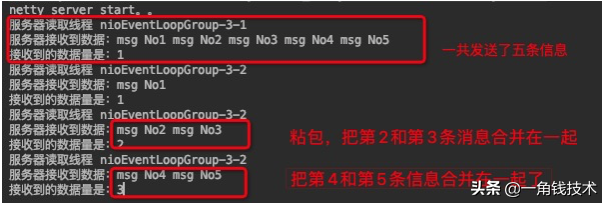
粘包的問(wèn)題其實(shí)是隨機(jī)的,所以每次結(jié)果都不太一樣。
完整代碼在 Github :
https://github.com/Niuh-Study/niuh-netty.git
對(duì)應(yīng)的包 com.niuh.splitpacket0
為什么出現(xiàn)粘包現(xiàn)象?
TCP 是面向連接的,面向流的,提供高可靠性服務(wù)。收發(fā)兩端(客戶端和服務(wù)器端)都要有成對(duì)的 socket,因此,發(fā)送端為了將多個(gè)發(fā)送給接收端的包,更有效的發(fā)送給對(duì)方,使用了優(yōu)化方法(Nagle算法),將多次間隔較少且數(shù)據(jù)量小的數(shù)據(jù),合并成一個(gè)大的數(shù)據(jù)塊,然后進(jìn)行封包,這樣做雖然提供了效率,但是接收端就難以分辨出完整的數(shù)據(jù)包了,因?yàn)槊嫦蛄鞯耐ㄐ攀菬o(wú)消息保護(hù)邊界的。
如何理解TCP是面向字節(jié)流的
- 應(yīng)用程序和 TCP 的交互是一次一個(gè)數(shù)據(jù)塊(大小不等),但 TCP 把應(yīng)用程序交下來(lái)的數(shù)據(jù)僅僅看成是一連串的無(wú)結(jié)構(gòu)的字節(jié)流。TCP 并不知道所傳送的字節(jié)流的含義;
- 因此 TCP 不保證接收方應(yīng)用程序所收到的數(shù)據(jù)塊和發(fā)送方應(yīng)用程序所發(fā)出的數(shù)據(jù)塊具有對(duì)應(yīng)大小的關(guān)系(例如,發(fā)送方應(yīng)用程序交給發(fā)送方的 TCP 共 10 個(gè)數(shù)據(jù)塊,但接收方的 TCP 可能只用了 4 個(gè)就把收到的字節(jié)流交付上層的應(yīng)用程序);
- 同時(shí),TCP 不關(guān)心應(yīng)用進(jìn)程一次把多長(zhǎng)的報(bào)文發(fā)送到 TCP 的緩存中,而是根據(jù)對(duì)方給出的窗口值和當(dāng)前網(wǎng)絡(luò)阻塞的程度來(lái)決定一個(gè)報(bào)文段應(yīng)包含多少個(gè)字節(jié)(UDP 發(fā)送的報(bào)文長(zhǎng)度是應(yīng)用進(jìn)程給出的)。如果應(yīng)用進(jìn)程傳送到 TCP 緩存的數(shù)據(jù)塊太長(zhǎng),TCP 就可以把它劃分短一點(diǎn)再傳送。如果應(yīng)用程序一次只發(fā)來(lái)一個(gè)字節(jié),TCP 也可以等待積累有足夠多的字節(jié)后再構(gòu)成報(bào)文段發(fā)送出去。
TCP發(fā)送報(bào)文一般是 3 個(gè)時(shí)機(jī)
- 緩沖區(qū)數(shù)據(jù)達(dá)到,最大報(bào)文長(zhǎng)度 MSS;
- 由發(fā)送端的應(yīng)用進(jìn)程指明要求發(fā)送報(bào)文段,即 TCP 支持的推送(push)操作;
- 當(dāng)發(fā)送方的一個(gè)計(jì)時(shí)器期限到了,即使長(zhǎng)度不超過(guò) MSS,也發(fā)送。
解決方案
一般解決粘包拆包問(wèn)題有 4 種辦法
1.在數(shù)據(jù)的末尾添加特殊的符號(hào)標(biāo)識(shí)數(shù)據(jù)包的邊界。通常會(huì)加\n、\r、\t或者其他的符號(hào)
學(xué)習(xí) HTTP、FTP 等,使用回車(chē)換行符號(hào);
2.在數(shù)據(jù)的頭部聲明數(shù)據(jù)的長(zhǎng)度,按長(zhǎng)度獲取數(shù)據(jù)
將消息分為 head 和 body,head 中包含 body 長(zhǎng)度的字段,一般 head 的第一個(gè)字段使用 int 值來(lái)表示 body 長(zhǎng)度;
3.規(guī)定報(bào)文的長(zhǎng)度,不足則補(bǔ)空位。讀取時(shí)按規(guī)定好的長(zhǎng)度來(lái)讀取。比如 100 字節(jié),如果不夠就補(bǔ)空格;
4.使用更復(fù)雜的應(yīng)用層協(xié)議。
使用LineBasedFrameDecoder
LineBasedFrameDecoder 是Netty內(nèi)置的一個(gè)解碼器,對(duì)應(yīng)的編碼器是 LineEncoder。
原理是上面講的第一種思路,在數(shù)據(jù)末尾加上特殊符號(hào)以標(biāo)識(shí)邊界。默認(rèn)是使用換行符\n。
用法很簡(jiǎn)單,發(fā)送方加上編碼器:
- @Override
- protected void initChannel(SocketChannel ch) throws Exception {
- //添加編碼器,使用默認(rèn)的符號(hào)\n,字符集是UTF-8
- ch.pipeline().addLast(new LineEncoder(LineSeparator.DEFAULT, CharsetUtil.UTF_8));
- ch.pipeline().addLast(new TcpClientHandler());
- }
接收方加上解碼器:
- @Override
- protected void initChannel(SocketChannel ch) throws Exception {
- //解碼器需要設(shè)置數(shù)據(jù)的最大長(zhǎng)度,我這里設(shè)置成1024
- ch.pipeline().addLast(new LineBasedFrameDecoder(1024));
- //給pipeline管道設(shè)置業(yè)務(wù)處理器
- ch.pipeline().addLast(new TcpServerHandler());
- }
然后在發(fā)送方,發(fā)送消息時(shí)在末尾加上標(biāo)識(shí)符:
- @Override
- public void channelActive(ChannelHandlerContext ctx) throws Exception {
- for (int i = 1; i <= 5; i++) {
- //在末尾加上默認(rèn)的標(biāo)識(shí)符\n
- ByteBuf byteBuf = Unpooled.copiedBuffer("msg No" + i + StringUtil.LINE_FEED, Charset.forName("utf-8"));
- ctx.writeAndFlush(byteBuf);
- }
- }
于是我們?cè)俅螁?dòng)服務(wù)端和客戶端,在服務(wù)端的控制臺(tái)可以看到:
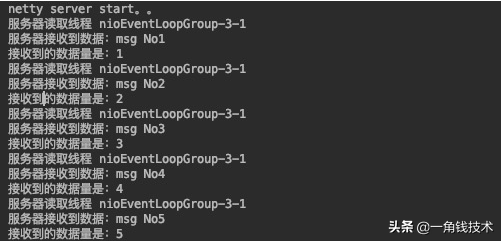
在數(shù)據(jù)的末尾添加特殊的符號(hào)標(biāo)識(shí)數(shù)據(jù)包的邊界,粘包、拆包的問(wèn)題就得到解決了。
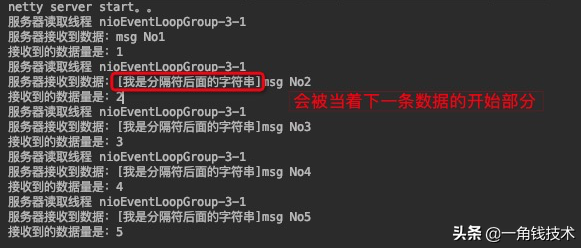
注意:數(shù)據(jù)末尾一定是分隔符,分隔符后面不要再加上數(shù)據(jù),否則會(huì)當(dāng)做下一條數(shù)據(jù)的開(kāi)始部分。下面是錯(cuò)誤演示:
- @Override
- public void channelActive(ChannelHandlerContext ctx) throws Exception {
- for (int i = 1; i <= 5; i++) {
- //在末尾加上默認(rèn)的標(biāo)識(shí)符\n
- ByteBuf byteBuf = Unpooled.copiedBuffer("msg No" + i + StringUtil.LINE_FEED + "[我是分隔符后面的字符串]", Charset.forName("utf-8"));
- ctx.writeAndFlush(byteBuf);
- }
- }
服務(wù)端的控制臺(tái)就會(huì)看到這樣的打印信息:
使用自定義長(zhǎng)度幀解碼器
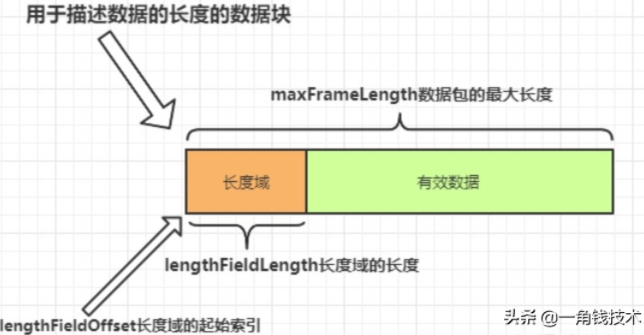
使用這個(gè)解碼器解決粘包問(wèn)題的原理是上面講的第二種,在數(shù)據(jù)的頭部聲明數(shù)據(jù)的長(zhǎng)度,按長(zhǎng)度獲取數(shù)據(jù)。這個(gè)解碼器構(gòu)造器需要定義5個(gè)參數(shù),相對(duì)較為復(fù)雜一點(diǎn),先看參數(shù)的解釋:
- maxFrameLength 發(fā)送數(shù)據(jù)包的最大長(zhǎng)度
- lengthFieldOffset 長(zhǎng)度域的偏移量。長(zhǎng)度域位于整個(gè)數(shù)據(jù)包字節(jié)數(shù)組中的開(kāi)始下標(biāo)。
- lengthFieldLength 長(zhǎng)度域的字節(jié)數(shù)長(zhǎng)度。長(zhǎng)度域的字節(jié)數(shù)長(zhǎng)度。
- lengthAdjustment 長(zhǎng)度域的偏移量矯正。如果長(zhǎng)度域的值,除了包含有效數(shù)據(jù)域的長(zhǎng)度外,還包含了其他域(如長(zhǎng)度域自身)長(zhǎng)度,那么,就需要進(jìn)行矯正。矯正的值為:包長(zhǎng) - 長(zhǎng)度域的值 – 長(zhǎng)度域偏移 – 長(zhǎng)度域長(zhǎng)。
- initialBytesToStrip 丟棄的起始字節(jié)數(shù)。丟棄處于此索引值前面的字節(jié)。
前面三個(gè)參數(shù)比較簡(jiǎn)單,可以用下面這張圖進(jìn)行演示:
矯正偏移量是什么意思呢?
是假設(shè)你的長(zhǎng)度域設(shè)置的值除了包括有效數(shù)據(jù)的長(zhǎng)度還有其他域的長(zhǎng)度包含在里面,那么就要設(shè)置這個(gè)值進(jìn)行矯正,否則解碼器拿不到有效數(shù)據(jù)。
丟棄的起始字節(jié)數(shù)。這個(gè)比較簡(jiǎn)單,就是在這個(gè)索引值前面的數(shù)據(jù)都丟棄,只要后面的數(shù)據(jù)。一般都是丟棄長(zhǎng)度域的數(shù)據(jù)。當(dāng)然如果你希望得到全部數(shù)據(jù),那就設(shè)置為0。
下面就在消息接收端使用自定義長(zhǎng)度幀解碼器,解決粘包的問(wèn)題:
- @Override
- protected void initChannel(SocketChannel ch) throws Exception {
- //數(shù)據(jù)包最大長(zhǎng)度是1024
- //長(zhǎng)度域的起始索引是0
- //長(zhǎng)度域的數(shù)據(jù)長(zhǎng)度是4
- //矯正值為0,因?yàn)殚L(zhǎng)度域只有 有效數(shù)據(jù)的長(zhǎng)度的值
- //丟棄數(shù)據(jù)起始值是4,因?yàn)殚L(zhǎng)度域長(zhǎng)度為4,我要把長(zhǎng)度域丟棄,才能得到有效數(shù)據(jù)
- ch.pipeline().addLast(new LengthFieldBasedFrameDecoder(1024, 0, 4, 0, 4));
- ch.pipeline().addLast(new TcpClientHandler());
- }
接著編寫(xiě)發(fā)送端代碼,根據(jù)解碼器的設(shè)置,進(jìn)行發(fā)送:
- @Override
- public void channelActive(ChannelHandlerContext ctx) throws Exception {
- for (int i = 1; i <= 5; i++) {
- String str = "msg No" + i;
- ByteBuf byteBuf = Unpooled.buffer(1024);
- byte[] bytes = str.getBytes(Charset.forName("utf-8"));
- //設(shè)置長(zhǎng)度域的值,為有效數(shù)據(jù)的長(zhǎng)度
- byteBuf.writeInt(bytes.length);
- //設(shè)置有效數(shù)據(jù)
- byteBuf.writeBytes(bytes);
- ctx.writeAndFlush(byteBuf);
- }
- }
然后啟動(dòng)服務(wù)端,客戶端,我們可以看到控制臺(tái)打印結(jié)果:
可以看到,利用自定義長(zhǎng)度幀解碼器解決了粘包問(wèn)題。
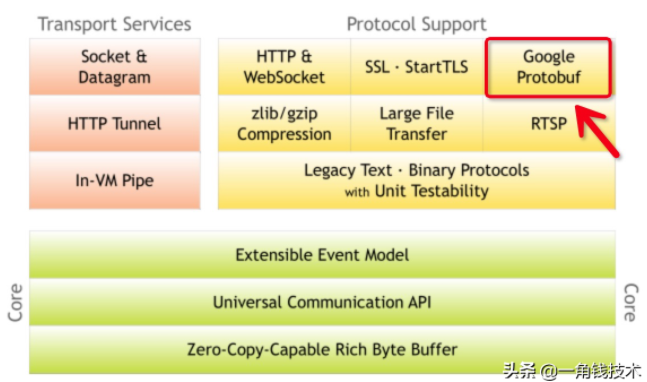
使用Google Protobuf編解碼器
Netty官網(wǎng)上是明顯寫(xiě)著支持Google Protobuf的,如下圖所示:
Google Protobuf是什么
官網(wǎng)的原話: Protocol buffers are Google's language-neutral, platform-neutral, extensible mechanism for serializing structured data – think XML, but smaller, faster, and simpler. You define how you want your data to be structured once, then you can use special generated source code to easily write and read your structured data to and from a variety of data streams and using a variety of languages.
翻譯一下:Protocol buffers是Google公司的與語(yǔ)言無(wú)關(guān)、平臺(tái)無(wú)關(guān)、可擴(kuò)展的序列化數(shù)據(jù)的機(jī)制,類似XML,但是更小、更快、更簡(jiǎn)單。您只需定義一次數(shù)據(jù)的結(jié)構(gòu)化方式,然后就可以使用特殊生成的源代碼,輕松地將結(jié)構(gòu)化數(shù)據(jù)寫(xiě)入和讀取到各種數(shù)據(jù)流中,并支持多種語(yǔ)言。
在rpc或tcp通信等很多場(chǎng)景都可以使用。通俗來(lái)講,如果客戶端和服務(wù)端使用的是不同的語(yǔ)言,那么在服務(wù)端定義一個(gè)數(shù)據(jù)結(jié)構(gòu),通過(guò)protobuf轉(zhuǎn)化為字節(jié)流,再傳送到客戶端解碼,就可以得到對(duì)應(yīng)的數(shù)據(jù)結(jié)構(gòu)。這就是protobuf神奇的地方。并且,它的通信效率極高,“一條消息數(shù)據(jù),用protobuf序列化后的大小是json的10分之一,xml格式的20分之一,是二進(jìn)制序列化的10分之一”。
Google Protobuf 官網(wǎng) :
https://developers.google.cn/protocol-buffers/
為什么使用Google Protobuf
在一些場(chǎng)景下,數(shù)據(jù)需要在不同的平臺(tái),不同的程序中進(jìn)行傳輸和使用,例如某個(gè)消息是用C++程序產(chǎn)生的,而另一個(gè)程序是用java寫(xiě)的,當(dāng)前者產(chǎn)生一個(gè)消息數(shù)據(jù)時(shí),需要在不同的語(yǔ)言編寫(xiě)的不同的程序中進(jìn)行操作,如何將消息發(fā)送并在各個(gè)程序中使用呢?這就需要設(shè)計(jì)一種消息格式,常用的就有json和xml,protobuf出現(xiàn)的則較晚。
Google Protobuf優(yōu)點(diǎn)
- protobuf 的主要優(yōu)點(diǎn)是簡(jiǎn)單,快;
- protobuf將數(shù)據(jù)序列化為二進(jìn)制之后,占用的空間相當(dāng)小,基本僅保留了數(shù)據(jù)部分,而xml和json會(huì)附帶消息結(jié)構(gòu)在數(shù)據(jù)中;
- protobuf使用起來(lái)很方便,只需要反序列化就可以了,而不需要xml和json那樣層層解析。
Google Protobuf安裝
因?yàn)槲疫@里是Mac系統(tǒng),Mac下面除了用dmg、pkg來(lái)安裝軟件外,比較方便的還有用brew命令進(jìn)行安裝 , 它能幫助安裝其他所需要的依賴,從而減少不必要的麻煩。
安裝最新版本的protoc
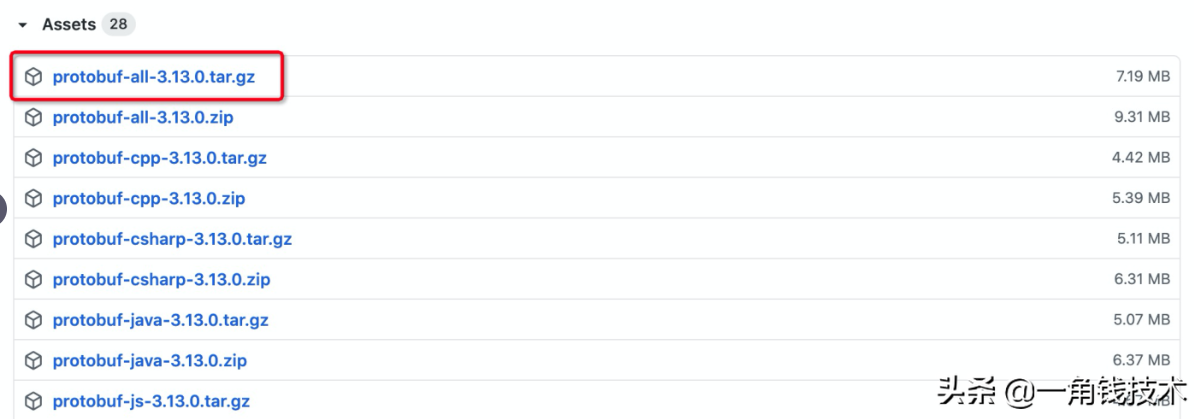
1.從github上下載 protobuf3
https://github.com/protocolbuffers/protobuf/releases/tag/v3.13.0
Mac系統(tǒng)選擇第一個(gè),如下圖所示:
2.下載成功后,切換到root用戶
- sudo -i
3.解壓壓縮包,并進(jìn)入你自己解壓的目錄
- tar xyf protobuf-all-3.13.0.tar.gz
- cd protobuf-3.13.0
4.設(shè)置編譯目錄
- ./configure --prefix=/usr/local/protobuf
5.安裝
- make
- make install
6.配置環(huán)境變量
第一步:找到.bash_profile文件并編輯
- cd ~
- open .bash_profile
第二步:然后在打開(kāi)的bash_profile文件末尾添加如下配置:
- export PROTOBUF=/usr/local/protobuf
- export PATH=$PROTOBUF/bin:$PATH
第三步:source一下使文件生效
- source .bash_profile
7.測(cè)試安裝結(jié)果
- protoc --version
使用Google Protobuf
以下步驟參考Google Protobuf的github項(xiàng)目的指南。
https://github.com/protocolbuffers/protobuf/tree/master/java
第一步:添加maven依賴
- <dependency>
- <groupId>com.google.protobuf</groupId>
- <artifactId>protobuf-java</artifactId>
- <version>3.11.0</version>
- </dependency>
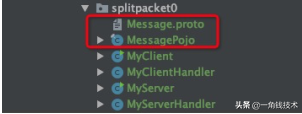
第二步:編寫(xiě)proto文件Message.proto
如何編寫(xiě).proto文件的相關(guān)文檔說(shuō)明,可以去官網(wǎng)查看 下面寫(xiě)一個(gè)例子,請(qǐng)看示范:
- syntax = "proto3"; //版本
- option java_outer_classname = "MessagePojo";//生成的外部類名,同時(shí)也是文件名
- message Message {
- int32 id = 1;//Message類的一個(gè)屬性,屬性名稱是id,序號(hào)為1
- string content = 2;//Message類的一個(gè)屬性,屬性名稱是content,序號(hào)為2
- }
第三步:使用編譯器,通過(guò).proto文件生成代碼
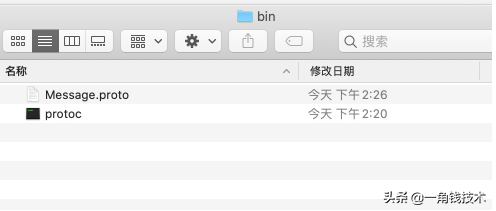
在執(zhí)行上面的安裝步驟后,進(jìn)入到 bin 目錄下,可以看到一個(gè)可執(zhí)行文件 protoc
- cd /usr/local/protobuf/bin/
然后復(fù)制前面寫(xiě)好的Message.proto文件到此目錄下,如圖所示:
輸入命令:
- protoc --java_out=. Message.proto
然后就可以看到生成的MessagePojo.java文件。最后把文件復(fù)制到IDEA項(xiàng)目中。
第四步:在發(fā)送端添加編碼器,在接收端添加解碼器
客戶端添加編碼器,對(duì)消息進(jìn)行編碼。
- @Override
- protected void initChannel(SocketChannel ch) throws Exception {
- //在發(fā)送端添加Protobuf編碼器
- ch.pipeline().addLast(new ProtobufEncoder());
- ch.pipeline().addLast(new TcpClientHandler());
- }
服務(wù)端添加解碼器,對(duì)消息進(jìn)行解碼。
- @Override
- protected void initChannel(SocketChannel ch) throws Exception {
- //添加Protobuf解碼器,構(gòu)造器需要指定解碼具體的對(duì)象實(shí)例
- ch.pipeline().addLast(new ProtobufDecoder(MessagePojo.Message.getDefaultInstance()));
- //給pipeline管道設(shè)置處理器
- ch.pipeline().addLast(new TcpServerHandler());
- }
第五步:發(fā)送消息
客戶端發(fā)送消息,代碼如下:
- @Override
- public void channelActive(ChannelHandlerContext ctx) throws Exception {
- //使用的是構(gòu)建者模式進(jìn)行創(chuàng)建對(duì)象
- MessagePojo.Message message = MessagePojo
- .Message
- .newBuilder()
- .setId(1)
- .setContent("一角錢(qián),起飛~")
- .build();
- ctx.writeAndFlush(message);
- }
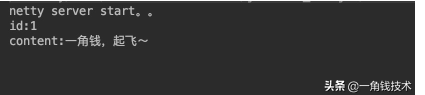
服務(wù)端接收到數(shù)據(jù),并且打印:
- @Override
- protected void channelRead0(ChannelHandlerContext ctx, MessagePojo.Message messagePojo) throws Exception {
- System.out.println("id:" + messagePojo.getId());
- System.out.println("content:" + messagePojo.getContent());
- }
測(cè)試結(jié)果正確:
分析Protocol的粘包、拆包
實(shí)際上直接使用Protocol編解碼器還是存在粘包問(wèn)題的。
證明一下,發(fā)送端循環(huán)一百次發(fā)送100條"一角錢(qián),起飛"的消息,請(qǐng)看發(fā)送端代碼演示:
- @Override
- public void channelActive(ChannelHandlerContext ctx) throws Exception {
- for (int i = 1; i <= 100; i++) {
- MessagePojo.Message message = MessagePojo
- .Message
- .newBuilder()
- .setId(i)
- .setContent(i + "號(hào)一角錢(qián),起飛~")
- .build();
- ctx.writeAndFlush(message);
- }
- }
這時(shí),啟動(dòng)服務(wù)端,客戶端后,可能只有打印幾條消息或者在控制臺(tái)看到如下錯(cuò)誤:
com.google.protobuf.InvalidProtocolBufferException: While parsing a protocol message, the input ended unexpectedly in the middle of a field. This could mean either that the input has been truncated or that an embedded message misreported its own length.
意思是:分析protocol消息時(shí),輸入意外地在字段中間結(jié)束。這可能意味著輸入被截?cái)啵蛘咔度氲南⒄`報(bào)了自己的長(zhǎng)度。
其實(shí)就是粘包問(wèn)題,多條數(shù)據(jù)合并成一條數(shù)據(jù)了,導(dǎo)致解析出現(xiàn)異常。
解決Protocol的粘包、拆包問(wèn)題
只需要在發(fā)送端加上編碼器 ProtobufVarint32LengthFieldPrepender
- @Override
- protected void initChannel(SocketChannel ch) throws Exception {
- ch.pipeline().addLast(new ProtobufVarint32LengthFieldPrepender());
- ch.pipeline().addLast(new ProtobufEncoder());
- ch.pipeline().addLast(new TcpClientHandler());
- }
接收方加上解碼器 ProtobufVarint32FrameDecoder
- @Override
- protected void initChannel(SocketChannel ch) throws Exception {
- ch.pipeline().addLast(new ProtobufVarint32FrameDecoder());
- ch.pipeline().addLast(new ProtobufDecoder(MessagePojo.Message.getDefaultInstance()));
- //給pipeline管道設(shè)置處理器
- ch.pipeline().addLast(new TcpServerHandler());
- }
然后再啟動(dòng)服務(wù)端和客戶端,我們可以看到正常了~
ProtobufVarint32LengthFieldPrepender 編碼器的工作如下:
- * BEFORE ENCODE (300 bytes) AFTER ENCODE (302 bytes)
- * +---------------+ +--------+---------------+
- * | Protobuf Data |-------------->| Length | Protobuf Data |
- * | (300 bytes) | | 0xAC02 | (300 bytes) |
- * +---------------+ +--------+---------------+
- @Sharable
- public class ProtobufVarint32LengthFieldPrepender extends MessageToByteEncoder<ByteBuf> {
- @Override
- protected void encode(ChannelHandlerContext ctx, ByteBuf msg, ByteBuf out) throws Exception {
- int bodyLen = msg.readableBytes();
- int headerLen = computeRawVarint32Size(bodyLen);
- //寫(xiě)入請(qǐng)求頭,消息長(zhǎng)度
- out.ensureWritable(headerLen + bodyLen);
- writeRawVarint32(out, bodyLen);
- //寫(xiě)入數(shù)據(jù)
- out.writeBytes(msg, msg.readerIndex(), bodyLen);
- }
- }
ProtobufVarint32FrameDecoder 解碼器的工作如下:
- * BEFORE DECODE (302 bytes) AFTER DECODE (300 bytes)
- * +--------+---------------+ +---------------+
- * | Length | Protobuf Data |----->| Protobuf Data |
- * | 0xAC02 | (300 bytes) | | (300 bytes) |
- * +--------+---------------+ +---------------+
- ublic class ProtobufVarint32FrameDecoder extends ByteToMessageDecoder {
- @Override
- protected void decode(ChannelHandlerContext ctx, ByteBuf in, List<Object> out) throws Exception {
- //標(biāo)記讀取的下標(biāo)位置
- in.markReaderIndex();
- //獲取讀取的下標(biāo)位置
- int preIndex = in.readerIndex();
- //解碼,獲取消息的長(zhǎng)度,并且移動(dòng)讀取的下標(biāo)位置
- int length = readRawVarint32(in);
- //比較解碼前和解碼后的下標(biāo)位置,如果相等。表示字節(jié)數(shù)不夠讀取,跳到下一輪
- if (preIndex == in.readerIndex()) {
- return;
- }
- //如果消息的長(zhǎng)度小于0,拋出異常
- if (length < 0) {
- throw new CorruptedFrameException("negative length: " + length);
- }
- //如果不夠讀取一個(gè)完整的數(shù)據(jù),reset還原下標(biāo)位置。
- if (in.readableBytes() < length) {
- in.resetReaderIndex();
- } else {
- //否則,把數(shù)據(jù)寫(xiě)入到out,接收端就拿到了完整的數(shù)據(jù)了
- out.add(in.readRetainedSlice(length));
- }
- }
總結(jié):
- 發(fā)送端通過(guò)編碼器在發(fā)送的時(shí)候在消息體前面加上一個(gè)描述數(shù)據(jù)長(zhǎng)度的數(shù)據(jù)塊。
- 接收方通過(guò)解碼器先獲取描述數(shù)據(jù)長(zhǎng)度的數(shù)據(jù)塊,知道完整數(shù)據(jù)的長(zhǎng)度,然后根據(jù)數(shù)據(jù)長(zhǎng)度獲取一條完整的數(shù)據(jù)。
Netty心跳檢測(cè)機(jī)制
何為心跳
所謂心跳, 即在 TCP 長(zhǎng)連接中, 客戶端和服務(wù)器之間定期發(fā)送的一種特殊的數(shù)據(jù)包, 通知對(duì)方自己還在線, 以確保 TCP 連接的有效性.
注:心跳包還有另一個(gè)作用,經(jīng)常被忽略,即:一個(gè)連接如果長(zhǎng)時(shí)間不用,防火墻或者路由器就會(huì)斷開(kāi)該連接。
在 Netty 中, 實(shí)現(xiàn)心跳機(jī)制的關(guān)鍵是 IdleStateHandler, 看下它的構(gòu)造器:
- public IdleStateHandler(int readerIdleTimeSeconds, int writerIdleTimeSeconds, int allIdleTimeSeconds) {
- this((long)readerIdleTimeSeconds, (long)writerIdleTimeSeconds, (long)allIdleTimeSeconds, TimeUnit.SECONDS);
- }
三個(gè)參數(shù)的含義如下:
- readerIdleTimeSeconds: 讀超時(shí)。即當(dāng)在指定的時(shí)間間隔內(nèi)沒(méi)有從 Channel 讀取到數(shù)據(jù)時(shí), 會(huì)觸發(fā)一個(gè) READER_IDLE 的 IdleStateEvent 事件。
- writerIdleTimeSeconds: 寫(xiě)超時(shí)。 即當(dāng)在指定的時(shí)間間隔內(nèi)沒(méi)有數(shù)據(jù)寫(xiě)入到 Channel 時(shí), 會(huì)觸發(fā)一個(gè) WRITER_IDLE 的 IdleStateEvent 事件。
- allIdleTimeSeconds: 讀/寫(xiě)超時(shí)。 即當(dāng)在指定的時(shí)間間隔內(nèi)沒(méi)有讀或?qū)懖僮鲿r(shí), 會(huì)觸發(fā)一個(gè) ALL_IDLE 的 IdleStateEvent 事件。
注:這三個(gè)參數(shù)默認(rèn)的時(shí)間單位是秒。若需要指定其他時(shí)間單位,可以使用另一個(gè)構(gòu)造方法:
- public IdleStateHandler(long readerIdleTime, long writerIdleTime, long allIdleTime, TimeUnit unit) {
- this(false, readerIdleTime, writerIdleTime, allIdleTime, unit);
- }
要實(shí)現(xiàn)Netty服務(wù)端心跳檢測(cè)機(jī)制需要在服務(wù)器端的ChannelInitializer中加入如下的代碼:
- pipeline.addLast(new IdleStateHandler(3, 0, 0, TimeUnit.SECONDS));
Netty心跳源碼分析
初步地看下IdleStateHandler源碼,先看下IdleStateHandler中的channelRead方法:
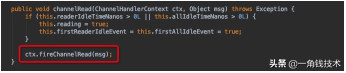
紅框代碼其實(shí)表示該方法只是進(jìn)行了透?jìng)鳎蛔鋈魏螛I(yè)務(wù)邏輯處理,讓channelPipe中的下一個(gè)handler處理channelRead方法;
我們?cè)倏纯?strong>channelActive方法:

這里有個(gè)initialize的方法,這是IdleStateHandler的精髓,接著探究:
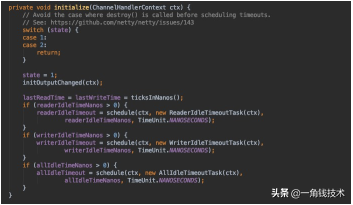
這邊會(huì)觸發(fā)一個(gè)Task,ReaderIdleTimeoutTask,這個(gè)task里的run方法源碼是這樣的:
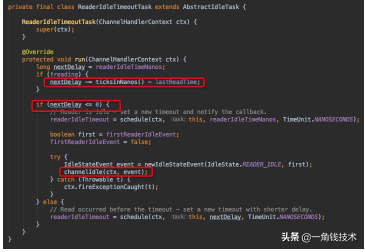
第一個(gè)紅框代碼是用當(dāng)前時(shí)間減去最后一次channelRead方法調(diào)用的時(shí)間,假如這個(gè)結(jié)果是6s,說(shuō)明最后一次調(diào)用channelRead已經(jīng)是6s 之前的事情了,你設(shè)置的是5s,那么nextDelay則為-1,說(shuō)明超時(shí)了,那么第二個(gè)紅框代碼則會(huì)觸發(fā)下一個(gè)handler的 userEventTriggered方法:

如果沒(méi)有超時(shí)則不觸發(fā)userEventTriggered方法。
Netty心跳檢測(cè)代碼示例
服務(wù)端
- package com.niuh.netty.heartbeat;
- import io.netty.bootstrap.ServerBootstrap;
- import io.netty.channel.ChannelFuture;
- import io.netty.channel.ChannelInitializer;
- import io.netty.channel.ChannelPipeline;
- import io.netty.channel.EventLoopGroup;
- import io.netty.channel.nio.NioEventLoopGroup;
- import io.netty.channel.socket.SocketChannel;
- import io.netty.channel.socket.nio.NioServerSocketChannel;
- import io.netty.handler.codec.string.StringDecoder;
- import io.netty.handler.codec.string.StringEncoder;
- import io.netty.handler.timeout.IdleStateHandler;
- import java.util.concurrent.TimeUnit;
- public class HeartBeatServer {
- public static void main(String[] args) throws Exception {
- EventLoopGroup boss = new NioEventLoopGroup();
- EventLoopGroup worker = new NioEventLoopGroup();
- try {
- ServerBootstrap bootstrap = new ServerBootstrap();
- bootstrap.group(boss, worker)
- .channel(NioServerSocketChannel.class)
- .childHandler(new ChannelInitializer<SocketChannel>() {
- @Override
- protected void initChannel(SocketChannel ch) throws Exception {
- ChannelPipeline pipeline = ch.pipeline();
- pipeline.addLast("decoder", new StringDecoder());
- pipeline.addLast("encoder", new StringEncoder());
- //IdleStateHandler的readerIdleTime參數(shù)指定超過(guò)3秒還沒(méi)收到客戶端的連接,
- //會(huì)觸發(fā)IdleStateEvent事件并且交給下一個(gè)handler處理,下一個(gè)handler必須
- //實(shí)現(xiàn)userEventTriggered方法處理對(duì)應(yīng)事件
- pipeline.addLast(new IdleStateHandler(3, 0, 0, TimeUnit.SECONDS));
- pipeline.addLast(new HeartBeatServerHandler());
- }
- });
- System.out.println("netty server start。。");
- ChannelFuture future = bootstrap.bind(9000).sync();
- future.channel().closeFuture().sync();
- } catch (Exception e) {
- e.printStackTrace();
- } finally {
- worker.shutdownGracefully();
- boss.shutdownGracefully();
- }
- }
- }
服務(wù)端回調(diào)處理類
- package com.niuh.netty.heartbeat;
- import io.netty.channel.ChannelHandlerContext;
- import io.netty.channel.SimpleChannelInboundHandler;
- import io.netty.handler.timeout.IdleStateEvent;
- public class HeartBeatServerHandler extends SimpleChannelInboundHandler<String> {
- int readIdleTimes = 0;
- @Override
- protected void channelRead0(ChannelHandlerContext ctx, String s) throws Exception {
- System.out.println(" ====== > [server] message received : " + s);
- if ("Heartbeat Packet".equals(s)) {
- ctx.channel().writeAndFlush("ok");
- } else {
- System.out.println(" 其他信息處理 ... ");
- }
- }
- @Override
- public void userEventTriggered(ChannelHandlerContext ctx, Object evt) throws Exception {
- IdleStateEvent event = (IdleStateEvent) evt;
- String eventType = null;
- switch (event.state()) {
- case READER_IDLE:
- eventType = "讀空閑";
- readIdleTimes++; // 讀空閑的計(jì)數(shù)加1
- break;
- case WRITER_IDLE:
- eventType = "寫(xiě)空閑";
- // 不處理
- break;
- case ALL_IDLE:
- eventType = "讀寫(xiě)空閑";
- // 不處理
- break;
- }
- System.out.println(ctx.channel().remoteAddress() + "超時(shí)事件:" + eventType);
- if (readIdleTimes > 3) {
- System.out.println(" [server]讀空閑超過(guò)3次,關(guān)閉連接,釋放更多資源");
- ctx.channel().writeAndFlush("idle close");
- ctx.channel().close();
- }
- }
- @Override
- public void channelActive(ChannelHandlerContext ctx) throws Exception {
- System.err.println("=== " + ctx.channel().remoteAddress() + " is active ===");
- }
- }
客戶端
- package com.niuh.netty.heartbeat;
- import io.netty.bootstrap.Bootstrap;
- import io.netty.channel.*;
- import io.netty.channel.nio.NioEventLoopGroup;
- import io.netty.channel.socket.SocketChannel;
- import io.netty.channel.socket.nio.NioSocketChannel;
- import io.netty.handler.codec.string.StringDecoder;
- import io.netty.handler.codec.string.StringEncoder;
- import java.util.Random;
- public class HeartBeatClient {
- public static void main(String[] args) throws Exception {
- EventLoopGroup eventLoopGroup = new NioEventLoopGroup();
- try {
- Bootstrap bootstrap = new Bootstrap();
- bootstrap.group(eventLoopGroup).channel(NioSocketChannel.class)
- .handler(new ChannelInitializer<SocketChannel>() {
- @Override
- protected void initChannel(SocketChannel ch) throws Exception {
- ChannelPipeline pipeline = ch.pipeline();
- pipeline.addLast("decoder", new StringDecoder());
- pipeline.addLast("encoder", new StringEncoder());
- pipeline.addLast(new HeartBeatClientHandler());
- }
- });
- System.out.println("netty client start。。");
- Channel channel = bootstrap.connect("127.0.0.1", 9000).sync().channel();
- String text = "Heartbeat Packet";
- Random random = new Random();
- while (channel.isActive()) {
- int num = random.nextInt(10);
- Thread.sleep(2 * 1000);
- channel.writeAndFlush(text);
- }
- } catch (Exception e) {
- e.printStackTrace();
- } finally {
- eventLoopGroup.shutdownGracefully();
- }
- }
- static class HeartBeatClientHandler extends SimpleChannelInboundHandler<String> {
- @Override
- protected void channelRead0(ChannelHandlerContext ctx, String msg) throws Exception {
- System.out.println(" client received :" + msg);
- if (msg != null && msg.equals("idle close")) {
- System.out.println(" 服務(wù)端關(guān)閉連接,客戶端也關(guān)閉");
- ctx.channel().closeFuture();
- }
- }
- }
- }
PS:以上代碼提交在 Github :
https://github.com/Niuh-Study/niuh-netty.git