談談AMS的誕生和使用
前言
今天接著完善Android系統這一塊的體系架構,說說在App啟動流程中舉足輕重的ActivityManagerService。
顧名思義,這個組件肯定是用來管理Activity的服務,其實不僅是Activity,它還負責四大組件相關的啟動,切換,調度等等。
具體是怎么被啟動的,又是怎么進行管理的呢?一起看看吧。
(代碼基于Android9.0)
服務的啟動
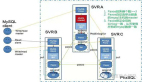
之前在SystemServer章節說過,系統的服務一般都是通過SystemServer進程啟動的,AMS也不例外。
- //SystemServer.java
- private void startBootstrapServices() {
- //...
- // Activity manager runs the show.
- traceBeginAndSlog("StartActivityManager");
- mActivityManagerService = mSystemServiceManager.startService(
- ActivityManagerService.Lifecycle.class).getService();
- mActivityManagerService.setSystemServiceManager(mSystemServiceManager);
- mActivityManagerService.setInstaller(installer);
- traceEnd();
- }
- //中間用到了反射,之前說過。
- public void startService(@NonNull final SystemService service) {
- // Register it.
- mServices.add(service);
- // Start it.
- long time = SystemClock.elapsedRealtime();
- try {
- service.onStart();
- } catch (RuntimeException ex) {
- throw new RuntimeException("Failed to start service " + service.getClass().getName()
- + ": onStart threw an exception", ex);
- }
- }
- //ActivityManagerService.java
- public static final class Lifecycle extends SystemService {
- private final ActivityManagerService mService;
- public Lifecycle(Context context) {
- super(context);
- mService = new ActivityManagerService(context);
- }
- @Override
- public void onStart() {
- mService.start();
- }
- @Override
- public void onBootPhase(int phase) {
- mService.mBootPhase = phase;
- if (phase == PHASE_SYSTEM_SERVICES_READY) {
- mService.mBatteryStatsService.systemServicesReady();
- mService.mServices.systemServicesReady();
- }
- }
- @Override
- public void onCleanupUser(int userId) {
- mService.mBatteryStatsService.onCleanupUser(userId);
- }
- public ActivityManagerService getService() {
- return mService;
- }
- }
可以看到,通過調用了ActivityManagerService.Lifecycle這個內部類中的onStart方法,啟動了AMS,并調用了AMS的start方法。
再簡單看看AMS的實例化方法和start方法:
- public ActivityManagerService(Context systemContext) {
- mContext = systemContext;
- mFactoryTest = FactoryTest.getMode();
- mSystemThread = ActivityThread.currentActivityThread();
- mUiContext = mSystemThread.getSystemUiContext();
- mHandlerThread = new ServiceThread(TAG,
- THREAD_PRIORITY_FOREGROUND, false /*allowIo*/);
- mHandlerThread.start();
- mHandler = new MainHandler(mHandlerThread.getLooper());
- mUiHandler = mInjector.getUiHandler(this);
- //...
- mServices = new ActiveServices(this);
- mProviderMap = new ProviderMap(this);
- mAppErrors = new AppErrors(mUiContext, this);
- // TODO: Move creation of battery stats service outside of activity manager service.
- mBatteryStatsService = new BatteryStatsService(systemContext, systemDir, mHandler);
- mBatteryStatsService.getActiveStatistics().readLocked();
- mBatteryStatsService.scheduleWriteToDisk();
- mOnBattery = DEBUG_POWER ? true
- : mBatteryStatsService.getActiveStatistics().getIsOnBattery();
- mBatteryStatsService.getActiveStatistics().setCallback(this);
- mStackSupervisor = createStackSupervisor();
- mStackSupervisor.onConfigurationChanged(mTempConfig);
- mActivityStartController = new ActivityStartController(this);
- mRecentTasks = createRecentTasks();
- mStackSupervisor.setRecentTasks(mRecentTasks);
- mLockTaskController = new LockTaskController(mContext, mStackSupervisor, mHandler);
- mLifecycleManager = new ClientLifecycleManager();
- mProcessCpuThread = new Thread("CpuTracker")
- //...
- }
- private void start() {
- removeAllProcessGroups();
- mProcessCpuThread.start();
- mBatteryStatsService.publish();
- mAppOpsService.publish(mContext);
- Slog.d("AppOps", "AppOpsService published");
- LocalServices.addService(ActivityManagerInternal.class, new LocalService());
- // Wait for the synchronized block started in mProcessCpuThread,
- // so that any other acccess to mProcessCpuTracker from main thread
- // will be blocked during mProcessCpuTracker initialization.
- try {
- mProcessCpuInitLatch.await();
- } catch (InterruptedException e) {
- Slog.wtf(TAG, "Interrupted wait during start", e);
- Thread.currentThread().interrupt();
- throw new IllegalStateException("Interrupted wait during start");
- }
- }
代碼很長,我只截取了一部分。
在構造函數中,主要初始化了一些對象,比如Context、ActivityThrad、Handler、CPU監控線程,還有一些后文要用到的ActivityStackSupervisor、ActivityStarter等對象,
在start方法中,主要就是啟動了CPU監控線程,然后注冊了電池狀態服務和權限管理服務。
初始工作
AMS被啟動之后,還會在SystemServer啟動三大服務的時候偷偷干一些工作,我們搜索下mActivityManagerService變量就可以看到:
- private void startBootstrapServices() {
- //1、初始化電源管理器
- mActivityManagerService.initPowerManagement();
- //2、為系統進程設置應用程序實例并啟動。
- mActivityManagerService.setSystemProcess();
- }
- private void startCoreServices() {
- // 啟動UsageStatsManager,用于查詢應用的使用情況
- mSystemServiceManager.startService(UsageStatsService.class);
- mActivityManagerService.setUsageStatsManager(
- LocalServices.getService(UsageStatsManagerInternal.class));
- traceEnd();
- }
- private void startOtherServices() {
- //安裝系統的Providers
- mActivityManagerService.installSystemProviders();
- //啟動WMS,并為AMS設置WMS關系
- wm = WindowManagerService.main(context, inputManager,
- mFactoryTestMode != FactoryTest.FACTORY_TEST_LOW_LEVEL,
- !mFirstBoot, mOnlyCore, new PhoneWindowManager());
- mActivityManagerService.setWindowManager(wm);
- //...
- }
- public void setSystemProcess() {
- try {
- ServiceManager.addService(Context.ACTIVITY_SERVICE, this, /* allowIsolated= */ true,
- DUMP_FLAG_PRIORITY_CRITICAL | DUMP_FLAG_PRIORITY_NORMAL | DUMP_FLAG_PROTO);
- }
- }
其中第二步setSystemProcess方法中,會注冊AMS到ServiceManager中,這樣后續如果需要用到AMS的時候就可以通過ServiceManager進行獲取,下面馬上就要講到。
啟動就說這么多,都是比較枯燥的內容,所以也沒有深入下去,有個印象就行,以后如果需要用到相關知識就知道去哪里找了。
從啟動流程看AMS工作內容
為了了解AMS的具體工作,我們就從Activity的啟動過程看起。
上文app啟動流程中說過,startActivityForResult方法會轉到mInstrumentation.execStartActivity方法:
- //mInstrumentation.execStartActivity
- int result = ActivityManager.getService()
- .startActivity(whoThread, who.getBasePackageName(), intent,
- intent.resolveTypeIfNeeded(who.getContentResolver()),
- token, target != null ? target.mEmbeddedID : null,
- requestCode, 0, null, options);
- checkStartActivityResult(result, intent);
- public static IActivityManager getService() {
- return IActivityManagerSingleton.get();
- }
- private static final Singleton<IActivityManager> IActivityManagerSingleton =
- new Singleton<IActivityManager>() {
- @Override
- protected IActivityManager create() {
- final IBinder b = ServiceManager.getService(Context.ACTIVITY_SERVICE);
- final IActivityManager am = IActivityManager.Stub.asInterface(b);
- return am;
- }
- };
可以看到,最終要拿到AMS的IBinder類型引用,這里的ServiceManager.getService(Context.ACTIVITY_SERVICE)是不是有點熟悉,沒錯,就是剛才專門調用了setSystemProcess方法對AMS進行了注冊在ServiceManager中。然后我們要使用相關服務的方法的時候,就通過Servermanager拿到對應服務的引用。
這里也就是拿到了IActivityManager對象,IActivityManager其實就是AMS在當前進程的代理,這里的邏輯就是通過AIDL做了一個進程間的通信。因為這些服務,包括我們今天說的AMS都是在SystemServer進程中的,而我們實際用到的時候是在我們自己的應用進程中,所以就涉及到進程間通信了,這里是用的Binder機制進行通信。
Binder,ServiceManager,這是Binder通信一整套流程,不光是AMS,包括其他的WMS等服務基本上都是通過Binder機制進行進程間通信的,具體內容可以期待下后面說到的Binder章節。
接著看啟動流程,通過Binder調用到了AMS的startActivity方法,然后會調用到ActivityStarter的startActivity方法,在這個方法中,我們發現一個新的類:
- //ActivityStarter.java
- private int startActivity(...){
- ActivityRecord r = new ActivityRecord(mService, callerApp, callingPid, callingUid,
- callingPackage, intent, resolvedType, aInfo, mService.getGlobalConfiguration(),
- resultRecord, resultWho, requestCode, componentSpecified, voiceSession != null,
- mSupervisor, checkedOptions, sourceRecord);
- if (outActivity != null) {
- outActivity[0] = r;
- }
- //...
- return startActivity(r, sourceRecord, voiceSession, voiceInteractor, startFlags,
- true /* doResume */, checkedOptions, inTask, outActivity);
- }
ActivityRecord
這個類翻譯過來是Activity的記錄,所以猜測是和Activity有關,我們點進去看看它里面包含了什么:
- final ActivityManagerService service; // owner
- final IApplicationToken.Stub appToken; // window manager token
- final ActivityInfo info; // all about me
- ApplicationInfo appInfo; // information about activity's app
- final int userId; // Which user is this running for?
- final String packageName; // the package implementing intent's component
- final String processName; // process where this component wants to run
- final String taskAffinity; // as per ActivityInfo.taskAffinity
- private int icon; // resource identifier of activity's icon.
- private int logo; // resource identifier of activity's logo.
- private int theme; // resource identifier of activity's theme.
- int launchMode; // the launch mode activity attribute.
我保留了一些比較常用的屬性,大家應該都看得出來是什么了吧,比如當前Activity的主題——theme,當前Activity的token——apptoken,當前Activity的包名——packageName。
所以這個ActivityRecord其實就是保存記錄了Activity的所有信息。
接著看流程,后續會執行到startActivityUnchecked方法,這個方法中,我們又可以看到一個新的類——TaskRecord.
TaskRecord
- private int startActivityUnchecked(final ActivityRecord r, ActivityRecord sourceRecord,
- IVoiceInteractionSession voiceSession, IVoiceInteractor voiceInteractor,
- int startFlags, boolean doResume, ActivityOptions options, TaskRecord inTask,
- ActivityRecord[] outActivity) {
- if (mStartActivity.resultTo == null && mInTask == null && !mAddingToTask
- && (mLaunchFlags & FLAG_ACTIVITY_NEW_TASK) != 0) {
- newTask = true;
- result = setTaskFromReuseOrCreateNewTask(taskToAffiliate, topStack);
- } else if (mSourceRecord != null) {
- result = setTaskFromSourceRecord();
- } else if (mInTask != null) {
- result = setTaskFromInTask();
- } else {
- // This not being started from an existing activity, and not part of a new task...
- // just put it in the top task, though these days this case should never happen.
- setTaskToCurrentTopOrCreateNewTask();
- }
- }
- // 新建一個任務棧
- private void setTaskToCurrentTopOrCreateNewTask() {
- //...
- final ActivityRecord prev = mTargetStack.getTopActivity();
- final TaskRecord task = (prev != null) ? prev.getTask() : mTargetStack.createTaskRecord(
- mSupervisor.getNextTaskIdForUserLocked(mStartActivity.userId), mStartActivity.info,
- mIntent, null, null, true, mStartActivity, mSourceRecord, mOptions);
- addOrReparentStartingActivity(task, "setTaskToCurrentTopOrCreateNewTask");
- mTargetStack.positionChildWindowContainerAtTop(task);
- }
- //添加Ac到棧頂
- private void addOrReparentStartingActivity(TaskRecord parent, String reason) {
- if (mStartActivity.getTask() == null || mStartActivity.getTask() == parent) {
- parent.addActivityToTop(mStartActivity);
- } else {
- mStartActivity.reparent(parent, parent.mActivities.size() /* top */, reason);
- }
- }
從代碼中可知,當我們啟動的Activity需要一個新的任務棧的時候(比如啟動模式為FLAG_ACTIVITY_NEW_TASK),我們會走到setTaskToCurrentTopOrCreateNewTask方法中,新建一個TaskRecord類,并且把當前的Activity通過addActivityToTop方法添加到棧頂。
所以這個TaskRecord類就是一個任務棧類了,它的作用就是維護棧內的所有Activity,進去看看這個類有哪些變量:
- final int taskId; // Unique identifier for this task.
- /** List of all activities in the task arranged in history order */
- final ArrayList<ActivityRecord> mActivities;
- /** Current stack. Setter must always be used to update the value. */
- private ActivityStack mStack;
這里截取了一些,可以發現有任務id——taskId,任務棧的所有ActivityRecord——mActivities,以及這個還不知道是什么的但是我知道是用來管理所有Activity和任務棧的大管家——ActivityStack。
ActivityStack
啟動流程再往后面走,就會走到的ActivityStackSupervisor的resumeFocusedStackTopActivityLocked方法:
- //ActivityStackSupervisor.java
- /** The stack containing the launcher app. Assumed to always be attached to
- * Display.DEFAULT_DISPLAY. */
- ActivityStack mHomeStack;
- /** The stack currently receiving input or launching the next activity. */
- ActivityStack mFocusedStack;
- /** If this is the same as mFocusedStack then the activity on the top of the focused stack has
- * been resumed. If stacks are changing position this will hold the old stack until the new
- * stack becomes resumed after which it will be set to mFocusedStack. */
- private ActivityStack mLastFocusedStack;
- public ActivityStackSupervisor(ActivityManagerService service, Looper looper) {
- mService = service;
- mLooper = looper;
- mHandler = new ActivityStackSupervisorHandler(looper);
- }
- boolean resumeFocusedStackTopActivityLocked(
- ActivityStack targetStack, ActivityRecord target, ActivityOptions targetOptions) {
- if (targetStack != null && isFocusedStack(targetStack)) {
- return targetStack.resumeTopActivityUncheckedLocked(target, targetOptions);
- }
- final ActivityRecord r = mFocusedStack.topRunningActivityLocked();
- if (r == null || !r.isState(RESUMED)) {
- mFocusedStack.resumeTopActivityUncheckedLocked(null, null);
- } else if (r.isState(RESUMED)) {
- // Kick off any lingering app transitions form the MoveTaskToFront operation.
- mFocusedStack.executeAppTransition(targetOptions);
- }
- return false;
- }
ActivityStackSupervisor是一個管理ActivityStack的類,在AMS的構造方法中被創建,這個類中可以看到有一些任務棧,比如mHomeStack——包含了Launcher APP的Activity。
然后再看看ActivityStack這個大管家家里存儲了什么好東西:
- enum ActivityState {
- INITIALIZING,
- RESUMED,
- PAUSING,
- PAUSED,
- STOPPING,
- STOPPED,
- FINISHING,
- DESTROYING,
- DESTROYED
- }
- private final ArrayList<TaskRecord> mTaskHistory = new ArrayList<>();
- final ArrayList<ActivityRecord> mLRUActivities = new ArrayList<>();
- ActivityRecord mPausingActivity = null;
- ActivityRecord mLastPausedActivity = null;
可以看到,在ActivityStack中:
- 有一個枚舉ActivityState,存儲了Activity的所有狀態。
- 有一些TaskRecord和ActivityRecord的列表,比如mTaskHistory——沒有被銷毀的任務棧列表,mLRUActivities——通過LRU計算的列表頭目是最近最少使用的Activity的ActivityRecord列表。
- 還有一些特殊狀態的Activity對應的ActivityRecord,比如正在暫停的Activity,上一個暫停過的Activity。
最后,啟動流程會走到AMS的startProcessLocked方法,然后跟Zygote進程通信,fork進程。后續就不說了。
總結
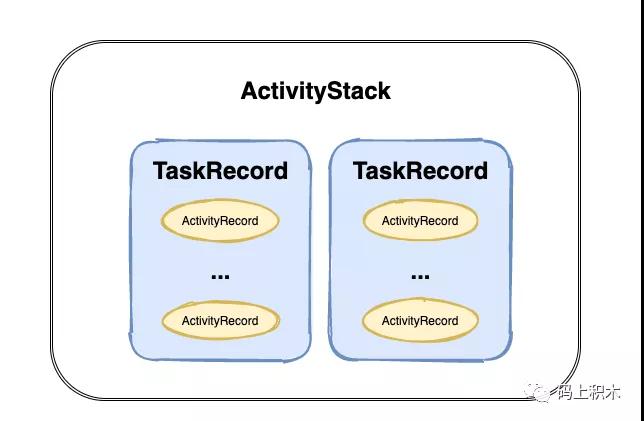
到此,AMS中重要的三個組件我們都接觸過了,分別是:
- 管理Activity所有信息的ActivityRecord。
- 管理一個或者多個ActivityRecord的任務棧TaskRecord.
- 管理一個或者多個任務棧的管理者ActivityStack。
再來畫個圖總結下:
其實AMS里面的邏輯還有很多很多,不僅是Activity,還有其他三大組件的一些啟動調度流程都是通過AMS完成的,還有Activity任務棧相關的內容(包括taskAffinity、allowTaskReparenting),后續具體涉及到的時候會再細談。
本文轉載自微信公眾號「碼上積木」,可以通過以下二維碼關注。轉載本文請聯系碼上積木公眾號。