HarmonyOS三方件開發指南(19)-BGABadgeView徽章組件

引言
現在很多的APP會有新消息/未接來電/未讀消息/新通知圓球紅點提示,典型的以微信、QQ新消息提示為例,當微信朋友圈有新的朋友更新/發布朋友圈消息后,在微信的底部切換卡上會有一個紅色的小圓球紅點,表示有新消息,提示用戶查看。在消息通訊類的app中十分實用。
功能介紹
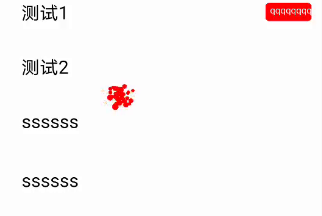
鴻蒙BGABadgeView 徽章組件,主要功能包括:傳入圖片生成徽章,設置文本生成文本徽章,并且每個徽章都具有拖拽超范圍即可消除,范圍內即可回到原位置。模擬機效果圖如下
1.圖片徽章:


2.文字徽章:

3.拖動徽章爆炸:
使用時候,直接將其下載,作為一個har包導入到自己的項目中即可。下面則詳細介紹BGABadgeView 的使用以及開發指南。
BGABadgeView 使用指南
Ø 新建工程, 添加組件Har包依賴
在應用模塊中添加HAR,只需要將verificationcodeview-debug.har復制到entry\libs目錄下即可
Ø 修改配置文件
1. 修改主頁面的布局文件:
- <?xml version="1.0" encoding="utf-8"?>
- <DependentLayout
- xmlns:ohos="http://schemas.huawei.com/res/ohos"
- ohos:height="match_parent"
- ohos:width="match_parent"
- ohos:id="$+id:layout1"
- ohos:orientation="vertical">
- <DependentLayout
- ohos:id="$+id:dependent1"
- ohos:height="200vp"
- ohos:width="match_parent">
- <com.example.bgabadgecomp_library.BAGDragBadgeImage
- ohos:top_margin="15vp"
- ohos:right_margin="10vp"
- ohos:bottom_margin="10vp"
- ohos:height="80vp"
- ohos:width="80vp"
- ohos:scale_mode="zoom_center"
- ohos:image_src="$media:avator"
- ohos:id="$+id:image1"
- ohos:below="$id:title"
- ohos:left_margin="30vp"/>
- <Image
- ohos:top_margin="15vp"
- ohos:right_margin="10vp"
- ohos:bottom_margin="10vp"
- ohos:height="80vp"
- ohos:width="80vp"
- ohos:scale_mode="zoom_center"
- ohos:image_src="$media:avator"
- ohos:id="$+id:image2"
- ohos:end_of="$id:image1"
- ohos:below="$id:title"
- ohos:left_margin="10vp"/>
- </DependentLayout>
- <Text
- ohos:left_margin="30vp"
- ohos:id="$+id:text1"
- ohos:top_margin="10vp"
- ohos:right_margin="15vp"
- ohos:bottom_margin="10vp"
- ohos:height="40vp"
- ohos:width="match_parent"
- ohos:text="測試1"
- ohos:below="$id:dependent1"
- ohos:text_size="20vp"/>
- </DependentLayout>
2.修改MainAbilitySlice中的UI加載代碼
在MainAbilitySlince類的onStart函數中,增加如下代碼:
- @Override
- public void onStart(Intent intent) {
- super.onStart(intent);
- super.setUIContent(ResourceTable.Layout_ability_main);
- BAGDragBadgeImage bagDragBadgeImage = (BAGDragBadgeImage) findComponentById(ResourceTable.Id_image1);
- bagDragBadgeImage.setCornerRadius(bagDragBadgeImage.getWidth() / 2); // 圓形邊框
- DependentLayout stackLayout = (DependentLayout) findComponentById(ResourceTable.Id_layout1);
- Image image2 = (Image) findComponentById(ResourceTable.Id_image2);
- image2.setCornerRadius(20);
- DependentLayout.LayoutConfig config = new DependentLayout.LayoutConfig(DependentLayout.LayoutConfig.MATCH_PARENT, DependentLayout.LayoutConfig.MATCH_PARENT);
- RoundRectImage roundRectImage = RoundRectImage.attach2Window(this, stackLayout, image2, config, BGABadgeViewHelper.getPixelMap(this, ResourceTable.Media_avatar_vip));
- RoundRectText roundRectText = RoundRectText.attach2Window(this, stackLayout, image3, config);
- Text text1 = (Text) findComponentById(ResourceTable.Id_text1);
- RoundRectText roundText1 = RoundRectText.attach2Window(this, stackLayout, text1, config);
- roundText1.setBadgeText("qqqqqqqq");
- List<Component> componentList = new ArrayList<>();
- componentList.add(roundRectText);
- componentList.add(roundText1);
- stackLayout.setTouchEventListener(new Component.TouchEventListener() {
- @Override
- public boolean onTouchEvent(Component component, TouchEvent event) {
- switch (event.getAction()) {
- case TouchEvent.PRIMARY_POINT_DOWN:// 手指第一次觸摸到屏幕
- int startX = (int) event.getPointerPosition(event.getIndex()).getX();
- int startY = (int) event.getPointerPosition(event.getIndex()).getY();
- if (startX < roundRectImage.getCircleLeft() + 2 * roundRectImage.getCircleRadius()
- && startX > roundRectImage.getCircleLeft()
- && startY < roundRectImage.getCircleTop() + 2 * roundRectImage.getCircleRadius()
- && startY > roundRectImage.getCircleTop()) {
- roundRectImage.setDraggedListener(DRAG_HORIZONTAL_VERTICAL, roundRectImage );
- for (Component component1 : componentList) {
- component1.setDraggedListener(DRAG_HORIZONTAL_VERTICAL,null);
- }
- } else {
- roundRectImage.setDraggedListener(DRAG_HORIZONTAL_VERTICAL, null );
- for (Component component1 : componentList) {
- RoundRectText rectText = (RoundRectText) component1;
- if (startX < rectText.getCircleLeft() + 2 * rectText.getRadius()
- && startX > rectText.getCircleLeft()
- && startY < rectText.getCircleTop() + 2 * rectText.getRadius()
- && startY > rectText.getCircleTop()) {
- component1.setDraggedListener(DRAG_HORIZONTAL_VERTICAL, (Component.DraggedListener) component1);
- } else {
- component1.setDraggedListener(DRAG_HORIZONTAL_VERTICAL,null);
- }
- }
- }
- break;
- case TouchEvent.PRIMARY_POINT_UP:
- case TouchEvent.POINT_MOVE:
- default:
- break;
- }
- return true;
- }
- });
- }
復制通過以上兩個步驟,就實現了簡單的徽章組件,接下來在一起看下徽章組件是如何實現的。
BGABadgeView 開發指南
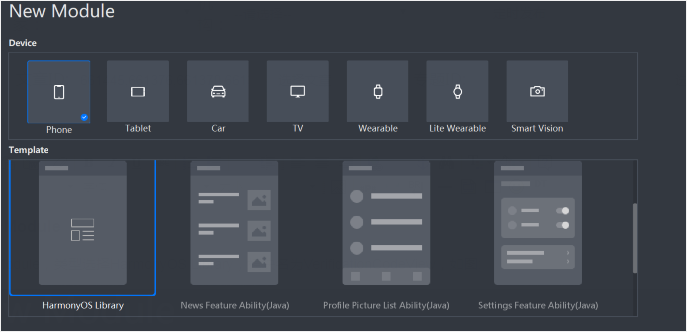
新建一個Module
新建一個Module,類型選擇HarmonyOS Library,模塊名為VerificationCodeView,如圖:
1.實現自定義RoundRectText繪制
- @Override
- public void onDraw(Component component, Canvas canvas){
- length = mBadgeText.length();
- Paint mTextPain = new Paint();
- mTextPain.setColor(Color.WHITE);
- mTextPain.setStyle(Paint.Style.FILL_STYLE);
- mTextPain.setTextSize(30);
- mTextPain.setFont(Font.DEFAULT);
- Rect textBounds = mTextPain.getTextBounds(mBadgeText);
- Paint mBadgePaint = new Paint();
- mBadgePaint.setColor(Color.RED);
- mBadgePaint.setStyle(Paint.Style.FILL_STYLE);
- mBadgePaint.setStrokeWidth(5);
- if (mBadgeRectF == null) {
- switch (mBadgeGravity) {
- case RightTop:
- int left = mComponent.getLeft();
- int top = mComponent.getTop();
- circleLeft = mComponent.getWidth() + left - 2 * radius - 15 * (length - 2);
- circleTop = top;
- mBadgeRectF = new RectFloat( circleLeft, circleTop, circleLeft + 2 * radius + 15 * (length - 2) , circleTop + 2 * radius);
- break;
- case RightCenter:
- left = mComponent.getLeft();
- top = mComponent.getTop();
- circleLeft = mComponent.getWidth() + left - 2 * radius - 15 * (length - 2);
- circleTop = top + (float)mComponent.getHeight() / 2 - radius;
- mBadgeRectF = new RectFloat( circleLeft, circleTop, circleLeft + 2 * radius + 15 * (length - 2) , circleTop + 2 * radius);
- break;
- case RightBottom:
- mBadgeRectF = new RectFloat();
- left = mComponent.getLeft();
- top = mComponent.getTop();
- circleLeft = mComponent.getWidth() + left - 2 * radius - 15 * (length - 2) ;
- circleTop = top + mComponent.getHeight() - 2 * radius;
- mBadgeRectF = new RectFloat( circleLeft, circleTop, circleLeft + 2 * radius + 15 * (length - 2) , circleTop + 2 * radius);
- break;
- default:
- break;
- }
- }
- path = (float) Math.sqrt((mBadgeRectF.left - circleLeft) * (mBadgeRectF.left - circleLeft) + (mBadgeRectF.top - circleTop) * (mBadgeRectF.top - circleTop));
- isOverPath = path > overPath;
- float offSet = (float) (textBounds.top + textBounds.bottom) / 2;
- float boundsX = 0 ;
- if( 15 * length < (mBadgeRectF.right - mBadgeRectF.left)){
- float temp = mBadgeRectF.right - mBadgeRectF.left - 15 * length;
- boundsX = temp / 2;
- }
- float roundNum = 2 * radius / (mBadgeRectF.right - mBadgeRectF.left) ;
- canvas.drawRoundRect(mBadgeRectF,roundNum * radius ,roundNum * radius, mBadgePaint);
- canvas.drawText(mTextPain, mBadgeText, mBadgeRectF.left + boundsX, mBadgeRectF.top + radius - offSet);
- }
2.生成拖拽事件
- @Override
- public void onDragDown(Component component, DragInfo dragInfo) {
- pointX = dragInfo.downPoint.getPointX();
- pointY = dragInfo.downPoint.getPointY();
- if (pointX <= circleLeft || pointX >= circleLeft + 2 * radius + 15 * (length - 2)
- || pointY <= circleTop || pointY >= circleTop + 2 * radius) {
- onDragCancel(component, dragInfo);
- }
- }
- @Override
- public void onDragStart(Component component, DragInfo dragInfo) {
- }
- @Override
- public void onDragUpdate(Component component, DragInfo dragInfo) {
- float left = mBadgeRectF.left;
- float right = mBadgeRectF.right;
- float top = mBadgeRectF.top;
- float bottom = mBadgeRectF.bottom;
- if (pointX <= circleLeft || pointX >= circleLeft + 2 * radius + 15 * (length - 2)
- || pointY <= circleTop || pointY >= circleTop + 2 * radius) {
- onDragCancel(component, dragInfo);
- } else {
- mBadgeRectF.left = (float) (left + dragInfo.xOffset);
- mBadgeRectF.right = (float) (right + dragInfo.xOffset);
- mBadgeRectF.top = (float) (top + dragInfo.yOffset);
- mBadgeRectF.bottom = (float) (bottom + dragInfo.yOffset);
- invalidate();
- }
- }
- @Override
- public void onDragEnd(Component component, DragInfo dragInfo) {
- if (isOverPath) {
- explosionField.explode(component, mBadgeRectF, explosionFieldColor);
- } else {
- mBadgeRectF = new RectFloat(circleLeft, circleTop , circleLeft + 2 * radius + 15 * (length - 2), circleTop + 2 * radius);
- invalidate();
- }
- }
- @Override
- public void onDragCancel(Component component, DragInfo dragInfo) {
- mBadgeRectF = new RectFloat(circleLeft, circleTop , circleLeft + 2 * radius + 15 * (length - 2), circleTop + 2 * radius);
- invalidate();
- }
具體代碼請下載項目查看。
編譯HAR包
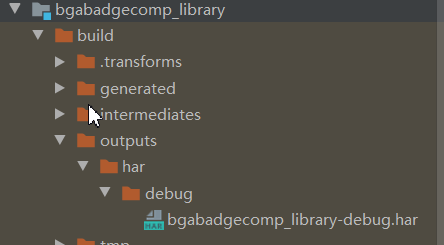
利用Gradle可以將HarmonyOS Library庫模塊構建為HAR包,構建HAR包的方法如下:
在Gradle構建任務中,雙擊PackageDebugHar或PackageReleaseHar任務,構建Debug類型或Release類型的HAR。
待構建任務完成后,可以在工程目錄中的VerificationCodeView> bulid > outputs > har目錄中,獲取生成的HAR包。