Netty的常用編解碼器與使用
本文轉載自微信公眾號「源碼學徒」,作者皇甫嗷嗷叫。轉載本文請聯系源碼學徒公眾號。
我們本章節將了解基本的編解碼器以及自定義編解碼器的使用,在了解之前,我們先看一段代碼:
一、開發服務端
1.開發服務端的Handler
- /**
- * *********************************************************************
- * 歡迎關注公眾號: 【源碼學徒】
- * *********************************************************************
- *
- * @author huangfu
- * @date 2021/5/6 21:22
- */
- public class CodecServerHandler extends ChannelInboundHandlerAdapter {
- @Override
- public void channelActive(ChannelHandlerContext ctx) throws Exception {
- //開啟一個定時任務
- ctx.channel().eventLoop().scheduleAtFixedRate(() -> {
- ByteBufAllocator aDefault = ByteBufAllocator.DEFAULT;
- ByteBuf byteBuf = aDefault.directBuffer();
- //向客戶端寫一句話
- byteBuf.writeBytes("無論是任何的源碼學習,永遠都是枯燥、乏味的,他遠沒有寫出一段很牛逼的代碼有成就感!但是當你登堂入室的那一刻,你會發現,源碼的閱讀是如此的享受!".getBytes(StandardCharsets.UTF_8));
- ctx.writeAndFlush(byteBuf);
- }, 10, 10, TimeUnit.MILLISECONDS);
- }
- @Override
- public void exceptionCaught(ChannelHandlerContext ctx, Throwable cause) throws Exception {
- cause.printStackTrace();
- super.exceptionCaught(ctx, cause);
- }
- }
2. 開發服務端的Server
- /**
- * *********************************************************************
- * 歡迎關注公眾號: 【源碼學徒】
- * *********************************************************************
- *
- * @author huangfu
- * @date 2021/5/6 21:20
- */
- public class CodecServer {
- public static void main(String[] args) throws InterruptedException {
- EventLoopGroup boss = new NioEventLoopGroup(1);
- EventLoopGroup worker = new NioEventLoopGroup();
- try {
- ServerBootstrap serverBootstrap = new ServerBootstrap();
- serverBootstrap.group(boss, worker)
- .channel(NioServerSocketChannel.class)
- .localAddress(8989)
- .childHandler(new ChannelInitializer<SocketChannel>() {
- @Override
- protected void initChannel(SocketChannel ch) throws Exception {
- ch.pipeline().addLast("codecHandler", new CodecHandler());
- }
- });
- ChannelFuture channelFuture = serverBootstrap.bind().sync();
- channelFuture.channel().closeFuture().sync();
- } finally {
- boss.shutdownGracefully();
- worker.shutdownGracefully();
- }
- }
- }
二、開發客戶端
1.開發客戶端的Handler
- /**
- * *********************************************************************
- * 歡迎關注公眾號: 【源碼學徒】
- * *********************************************************************
- *
- * @author huangfu
- * @date 2021/5/6 21:31
- */
- public class CodecClientHandler extends ChannelInboundHandlerAdapter {
- @Override
- public void channelActive(ChannelHandlerContext ctx) throws Exception {
- System.out.println("連接成功");
- }
- @Override
- public void channelRead(ChannelHandlerContext ctx, Object msg) throws Exception {
- ByteBuf byteBuf = (ByteBuf) msg;
- System.out.println(byteBuf.toString(StandardCharsets.UTF_8));
- super.channelRead(ctx, msg);
- }
- }
2.開發客戶端
- /**
- * *********************************************************************
- * 歡迎關注公眾號: 【源碼學徒】
- * *********************************************************************
- *
- * @author huangfu
- * @date 2021/5/6 21:29
- */
- public class CodecClient {
- public static void main(String[] args) throws InterruptedException {
- EventLoopGroup worker = new NioEventLoopGroup();
- try {
- Bootstrap bootstrap = new Bootstrap();
- bootstrap.group(worker)
- .remoteAddress(new InetSocketAddress("127.0.0.1",8989))
- .channel(NioSocketChannel.class)
- .handler(new ChannelInitializer<SocketChannel>() {
- @Override
- protected void initChannel(SocketChannel ch) throws Exception {
- ch.pipeline().addLast("codecClientHandler",new CodecClientHandler());
- }
- });
- ChannelFuture channelFuture = bootstrap.connect().sync();
- channelFuture.channel().closeFuture().sync();
- }finally {
- worker.shutdownGracefully();
- }
- }
- }
三、結果演示
上述的代碼相信大家都極其熟悉,就是開發一個服務端和客戶端,當客戶端連接到服務端之后,服務端每隔10毫秒向客戶端輸出一句話,客戶端收到之后打印出來!
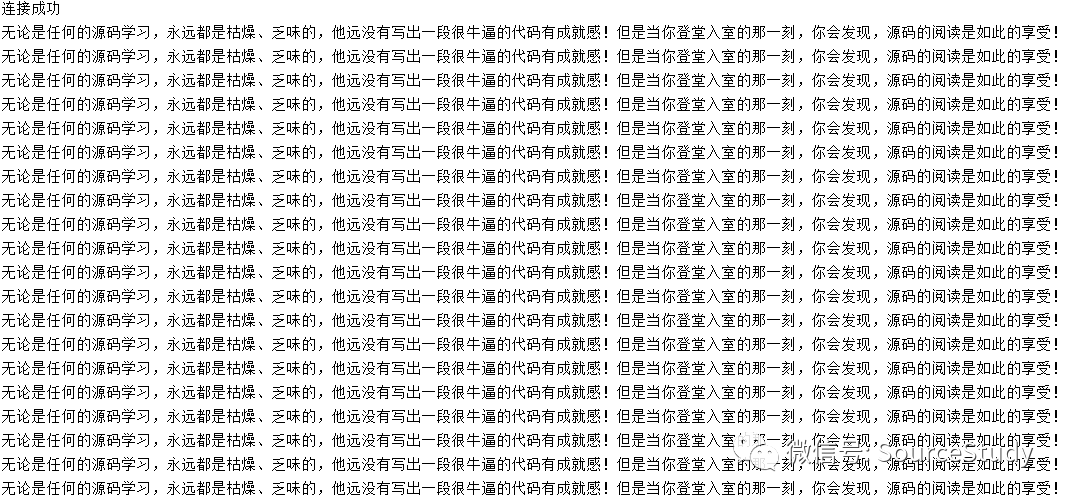
預期結果:

實際結果:
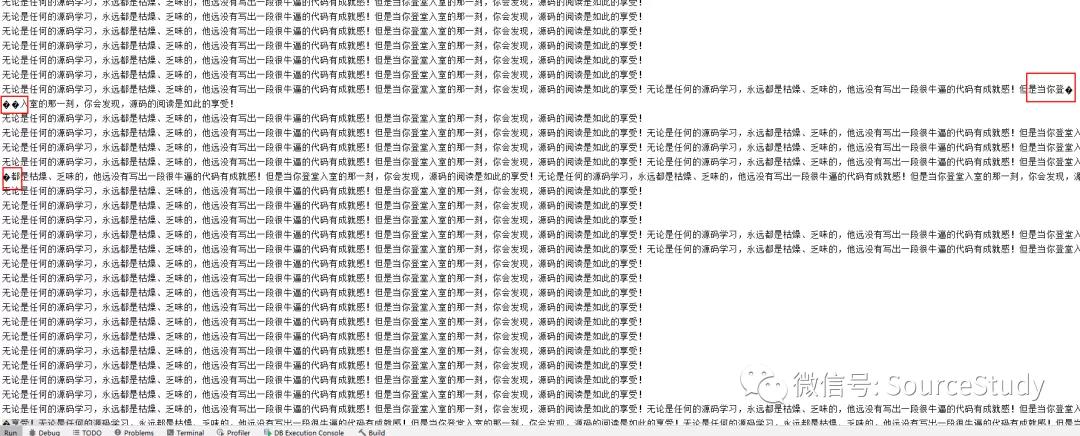
我們發現,真正跑起來,卻并沒有按照我們預期那樣逐行打印,而是好幾行連在一起打印,而且有些字符還出現了亂碼,這是為什么呢?
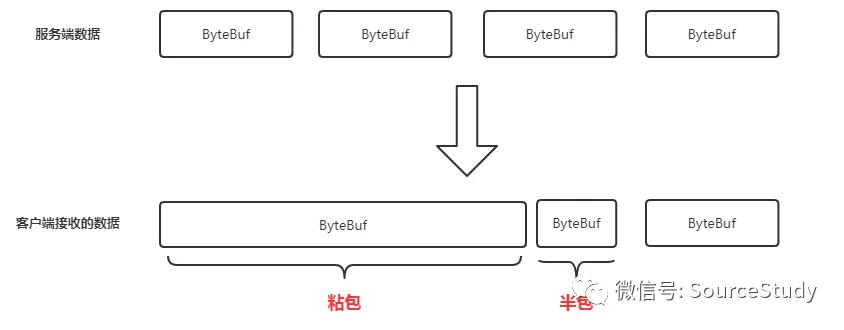
了解過網絡傳輸的同學大概都明白,Socket其實也是TCP的一種,底層通過流的方式傳輸,由服務端發送的數據到客戶端,客戶端的Netty需要重新拼裝為一個完整的包:
- 當傳輸的數據量過大的時候,Netty就 分多從拼裝,這就造成了亂碼的現象! 這種現象,術語叫做半包
- 當Netty讀取的時候,一次讀取了兩個數據包,那就會自動將兩個數據包合為一個數據包,從而完成封裝為一個數據包,這就是造成好幾行連著打印的問題! 這種現象 術語叫做粘包
四、常用的編解碼器
為什么會發生粘包、半包!Netty在解析底層數據流轉換成ByteBuf,但是當請求過于頻繁的時候,兩次的請求數據可能會被合并為一個,甚至,一次數據合并一個半的數據流,此時因為數據流字節的不完全接收,會導致讀取數據不正確或者亂碼等問題!
假設,我們預先知道了這個數據包的一個規則,當數據包規則不滿足的情況下等待,超過數據規則限制的時候進行切分,那么是不是就能夠有效的區分數據包的界限,從根本上上解決粘包半包的問題?
1. 基于換行符的解碼器
LineBasedFrameDecoder
該代碼將以\n或者\r\n 作為區分數據包的依據,程序在進行數據解碼的時候,會判斷該當前的數據包內是否存在\n或者\r\n,當存在的時候會截取以\n或者\r\n的一段字符,作為一個完整的數據包!
客戶端增加解碼器:
CodecClient:
- .handler(new ChannelInitializer<SocketChannel>() {
- @Override
- protected void initChannel(SocketChannel ch) throws Exception {
- //增加數據包解碼器基于換行符的解碼器
- ch.pipeline().addLast("lineBasedFrameDecoder", new LineBasedFrameDecoder(Integer.MAX_VALUE));
- ch.pipeline().addLast("codecClientHandler", new CodecClientHandler());
- }
- });
服務端數據結構發生改變:
CodecServerHandler:
- ByteBuf byteBuf = aDefault.directBuffer();
- //增加一個換行符
- byteBuf.writeBytes("無論是任何的源碼學習,永遠都是枯燥、乏味的,他遠沒有寫出一段很牛逼的代碼有成就感!但是當你登堂入室的那一刻,你會發現,源碼的閱讀是如此的享受!\n".getBytes(StandardCharsets.UTF_8));
- ctx.writeAndFlush(byteBuf);
效果圖:

2. 基于自定義換行符的解碼器
DelimiterBasedFrameDecoder
該代碼將以自定義符號作為區分數據包的依據,程序在進行數據解碼的時候,會判斷該當前的數據包內是否存在指定的自定義的符號,當存在的時候會截取以自定義符號為結尾的一段字符,作為一個完整的數據包!
客戶端增加解碼器:
CodecClient:
- .handler(new ChannelInitializer<SocketChannel>() {
- @Override
- protected void initChannel(SocketChannel ch) throws Exception {
- ByteBuf byteBuf = Unpooled.copiedBuffer("|".getBytes(StandardCharsets.UTF_8));
- ch.pipeline().addLast("delimiterBasedFrameDecoder", new DelimiterBasedFrameDecoder(Integer.MAX_VALUE, byteBuf));
- ch.pipeline().addLast("codecClientHandler", new CodecClientHandler());
- }
- });
服務端數據結構發生改變:
CodecServerHandler:
- ByteBuf byteBuf = aDefault.directBuffer();
- //末尾增加一個指定的字符
- byteBuf.writeBytes("無論是任何的源碼學習,永遠都是枯燥、乏味的,他遠沒有寫出一段很牛逼的代碼有成就感!但是當你登堂入室的那一刻,你會發現,源碼的閱讀是如此的享受!|".getBytes(StandardCharsets.UTF_8));
- ctx.writeAndFlush(byteBuf);
效果圖:

3. 基于固定長度的解碼器
FixedLengthFrameDecoder
定長數據解碼器適用于每次發送的數據包是一個固定長度的場景,指定每次讀取的數據包的數據長度來進行解碼操作!
我們查看我們的數據總共長度是多少:
- 無論是任何的源碼學習,永遠都是枯燥、乏味的,他遠沒有寫出一段很牛逼的代碼有成就感!但是當你登堂入室的那一刻,你會發現,源碼的閱讀是如此的享受!
經過計算為213各字符,我們假設以后的數據都是這個,我們就可以使用固定字符串,作為區分一個完整數據包的依據:
客戶端增加解碼器:
CodecClient:
- .handler(new ChannelInitializer<SocketChannel>() {
- @Override
- protected void initChannel(SocketChannel ch) throws Exception {
- //指定一個完整數據包的長度為213個
- ch.pipeline().addLast("fixedLengthFrameDecoder", new FixedLengthFrameDecoder(213));
- ch.pipeline().addLast("codecClientHandler", new CodecClientHandler());
- }
- });
服務端數據結構發生改變:
CodecServerHandler:
- ByteBuf byteBuf = aDefault.directBuffer();
- //發送原數據 不做任何更改
- byteBuf.writeBytes("無論是任何的源碼學習,永遠都是枯燥、乏味的,他遠沒有寫出一段很牛逼的代碼有成就感!但是當你登堂入室的那一刻,你會發現,源碼的閱讀是如此的享受!".getBytes(StandardCharsets.UTF_8));
- ctx.writeAndFlush(byteBuf);
效果圖:

4. 基于不定長的解碼器
LengthFieldBasedFrameDecoder
不定長長度域解碼器的使用是用在我們不確定數據包的大小的場景下,這也是比較常用的一個解碼器
客戶端增加解碼器:
CodecClient:
- .handler(new ChannelInitializer<SocketChannel>() {
- @Override
- protected void initChannel(SocketChannel ch) throws Exception {
- ch.pipeline().addLast("lengthFieldBasedFrameDecoder", new LengthFieldBasedFrameDecoder(Integer.MAX_VALUE,0,4,0,4));
- ch.pipeline().addLast("codecClientHandler", new CodecClientHandler());
- }
- });
服務端數據結構發生改變:
CodecServerHandler:
- ByteBuf byteBuf = aDefault.directBuffer();
- byte[] bytes = "無論是任何的源碼學習,永遠都是枯燥、乏味的,他遠沒有寫出一段很牛逼的代碼有成就感!但是當你登堂入室的那一刻,你會發現,源碼的閱讀是如此的享受!".getBytes(StandardCharsets.UTF_8);
- byteBuf.writeInt(bytes.length);
- byteBuf.writeBytes(bytes);
- ctx.writeAndFlush(byteBuf);
他的參數比較多,我們做幾個基本的認識:
maxFrameLength:本次能接收的最大的數據長度
lengthFieldOffset:設置的長度域的偏移量,長度域在數據包的起始位置,所以偏移量為0
lengthFieldLength:長度域的長度,例子使用的是Int占4位 所以參數為4
lengthAdjustment:數據包的偏移量,計算方式=數據長度 +lengthAdjustment=數據總長度 這里數據包的總長度=lengthFieldLength ,所以不需要補充,所以參數為0
initialBytesToStrip:需要跳過的字節數,這里我們只關注真正的數據,不關注數據包的長度,所以我們把長度域跳過去,長度域為4,所以跳過4
效果圖:

5. 自定義編解碼器
I. ByteToMessageDecoder
需求:我們需要在解碼器中就將ByteBuf解碼,并轉成字符串,后面直接打印
開發一個自定義的解碼器:
- /**
- * *********************************************************************
- * 歡迎關注公眾號: 【源碼學徒】
- * 自定義一個基于固定長度的解碼器,當解碼成功后,將數據轉成字符串
- * *********************************************************************
- *
- * @author huangfu
- * @date 2021/5/7 22:43
- */
- public class MyByteToMessageDecoder extends ByteToMessageDecoder {
- private Integer length;
- public MessageEqualDecoder(Integer length) {
- this.length = length;
- }
- @Override
- protected void decode(ChannelHandlerContext ctx, ByteBuf in, List<Object> out) throws Exception {
- //當前的可讀字節數
- int readableBytes = in.readableBytes();
- //當可讀字節數超過預設數量的時候
- if(readableBytes >= length) {
- byte[] bytes = new byte[length];
- //讀取出來
- in.readBytes(bytes);
- //轉換成字符串 并添加進集合中
- out.add(new String(bytes, StandardCharsets.UTF_8));
- }
- }
- }
客戶端處理器開發:
CodecClientHandler
- /**
- * *********************************************************************
- * 歡迎關注公眾號: 【源碼學徒】
- * *********************************************************************
- *
- * @author huangfu
- * @date 2021/5/6 21:31
- */
- public class CodecClientHandler extends ChannelInboundHandlerAdapter {
- @Override
- public void channelActive(ChannelHandlerContext ctx) throws Exception {
- System.out.println("連接成功");
- }
- @Override
- public void channelRead(ChannelHandlerContext ctx, Object msg) throws Exception {
- //解碼器已經將數據轉換成字符串了,這里直接強壯為字符串使用
- String msgStr = (String) msg;
- System.out.println(msgStr);
- super.channelRead(ctx, msg);
- }
- }
客戶端開發:
CodecClient
- public class CodecClient {
- public static void main(String[] args) throws InterruptedException {
- EventLoopGroup worker = new NioEventLoopGroup();
- try {
- Bootstrap bootstrap = new Bootstrap();
- bootstrap.group(worker)
- .remoteAddress(new InetSocketAddress("127.0.0.1", 8989))
- .channel(NioSocketChannel.class)
- .handler(new ChannelInitializer<SocketChannel>() {
- @Override
- protected void initChannel(SocketChannel ch) throws Exception {
- //添加自定義的解碼器
- ch.pipeline().addLast("messageEqualDecoder", new MyByteToMessageDecoder(213));
- ch.pipeline().addLast("codecClientHandler", new CodecClientHandler());
- }
- });
- ChannelFuture channelFuture = bootstrap.connect().sync();
- channelFuture.channel().closeFuture().sync();
- } finally {
- worker.shutdownGracefully();
- }
- }
- }
效果圖:
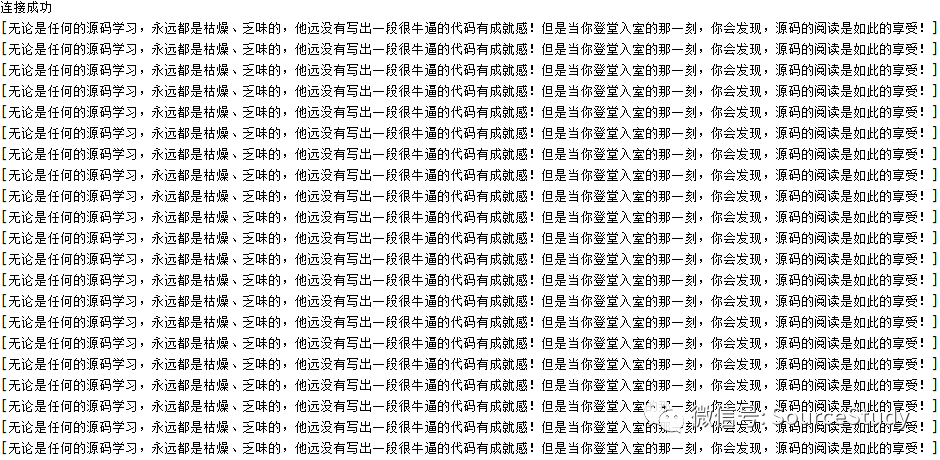
II. MessageToMessageDecoder
需求:我們再上面自定義的解碼器的基礎上增加一個需求,要求上一個解碼器解碼出來的數據,在傳播到客戶端的時候,需用[]包裹住。
開發自定義的消息轉換器(泛型為String的原因是 上一個解碼器已經將其轉換為了String):
- /**
- * 將消息用[]包裹起來
- *
- * @author huangfu
- * @date 2021年5月8日08:25:21
- */
- public class MyMessageToMessageDecoder extends MessageToMessageDecoder<String> {
- @Override
- protected void decode(ChannelHandlerContext ctx, String msg, List<Object> out) throws Exception {
- if(!StringUtil.isNullOrEmpty(msg)){
- out.add(String.format("[%s]", msg));
- }
- }
- }
客戶端開發:
CodecClient
- /**
- * *********************************************************************
- * 歡迎關注公眾號: 【源碼學徒】
- * *********************************************************************
- *
- * @author huangfu
- * @date 2021/5/6 21:29
- */
- public class CodecClient {
- public static void main(String[] args) throws InterruptedException {
- EventLoopGroup worker = new NioEventLoopGroup();
- try {
- Bootstrap bootstrap = new Bootstrap();
- bootstrap.group(worker)
- .remoteAddress(new InetSocketAddress("127.0.0.1",8989))
- .channel(NioSocketChannel.class)
- .handler(new ChannelInitializer<SocketChannel>() {
- @Override
- protected void initChannel(SocketChannel ch) throws Exception {
- //添加自定義的解碼器
- ch.pipeline().addLast("messageEqualDecoder", new MyByteToMessageDecoder(213));
- ch.pipeline().addLast("myMessageToMessageDecoder", new MyMessageToMessageDecoder());
- ch.pipeline().addLast("codecClientHandler", new CodecClientHandler());
- }
- });
- ChannelFuture channelFuture = bootstrap.connect().sync();
- channelFuture.channel().closeFuture().sync();
- }finally {
- worker.shutdownGracefully();
- }
- }
- }
效果圖:
6. 心跳檢測
我們現在假設有一個客戶端與服務端,客戶端與服務端進行數據交互,服務端探測到客戶端5秒沒有發送數據 3次以上關閉連接!
開發一個心跳服務端處理器
- /**
- * 心跳處理的Handler
- *
- * @author huangfu
- * @date 2021年5月8日09:03:46
- */
- public class HeartBeatServerHandler extends ChannelInboundHandlerAdapter {
- /**
- * 讀空閑次數
- */
- private int readIdleTimes = 0;
- @Override
- public void channelActive(ChannelHandlerContext ctx) throws Exception {
- System.out.println("客戶端連接:"+ ctx.channel().remoteAddress());
- super.channelActive(ctx);
- }
- @Override
- public void channelRead(ChannelHandlerContext ctx, Object msg) throws Exception {
- ByteBuf byteBuf = (ByteBuf) msg;
- String string = byteBuf.toString(StandardCharsets.UTF_8);
- System.out.println(string);
- //有數據 次數歸0
- readIdleTimes = 0;
- super.channelRead(ctx, msg);
- }
- @Override
- public void userEventTriggered(ChannelHandlerContext ctx, Object evt) throws Exception {
- if (evt instanceof IdleStateEvent) {
- IdleStateEvent idleStateEvent = (IdleStateEvent) evt;
- if (idleStateEvent.state() == IdleState.READER_IDLE) {
- System.out.println("發生讀空閑");
- readIdleTimes++;
- }
- //3次讀空閑之后,關閉客戶端連接
- if (readIdleTimes > 3) {
- //關閉客戶端連接
- System.out.println("客戶端連接被關閉:"+ ctx.channel().remoteAddress());
- ctx.close();
- }
- }
- }
- }
開發一個心跳服務端
- /**
- * 心跳服務器
- *
- * @author huangfu
- * @date 2021年5月8日08:52:56
- */
- public class HeartBeatServer {
- public static void main(String[] args) {
- EventLoopGroup boss = new NioEventLoopGroup(1);
- EventLoopGroup worker = new NioEventLoopGroup();
- try {
- ServerBootstrap bootstrap = new ServerBootstrap();
- bootstrap.group(boss,worker)
- .channel(NioServerSocketChannel.class)
- .localAddress(8989)
- .childHandler(new ChannelInitializer<SocketChannel>() {
- @Override
- protected void initChannel(SocketChannel ch) throws Exception {
- //心跳觸發器 讀空閑 寫空閑 讀寫空閑5秒的均會觸發心跳事件
- ch.pipeline().addLast(new IdleStateHandler(5,5,5, TimeUnit.SECONDS));
- ch.pipeline().addLast(new LengthFieldBasedFrameDecoder(Integer.MAX_VALUE, 0,4,0,4));
- //定義處理器
- ch.pipeline().addLast(new HeartBeatServerHandler());
- }
- });
- ChannelFuture channelFuture = bootstrap.bind().sync();
- channelFuture.channel().closeFuture().sync();
- } catch (InterruptedException e) {
- e.printStackTrace();
- } finally {
- boss.shutdownGracefully();
- worker.shutdownGracefully();
- }
- }
- }
開發一個心跳客戶端處理器
- /**
- * 客戶端心跳處理
- *
- * @author huangfu
- * @date 2021年5月8日09:29:05
- */
- public class HeartBeatClientHandler extends ChannelInboundHandlerAdapter {
- @Override
- public void channelActive(ChannelHandlerContext ctx) throws Exception {
- System.out.println("通道被激活");
- super.channelActive(ctx);
- }
- @Override
- public void channelInactive(ChannelHandlerContext ctx) throws Exception {
- System.out.println("通道被銷毀");
- super.channelInactive(ctx);
- }
- }
開發一個心跳客戶端
- /**
- * 心跳消息服務
- *
- * @author huangfu
- * @date 2021年5月8日09:37:07
- */
- public class HeartBeatClient {
- private static Channel channel = null;
- private static Scanner sc = new Scanner(System.in);
- public static void main(String[] args) {
- EventLoopGroup worker = new NioEventLoopGroup();
- try {
- Bootstrap bootstrap = new Bootstrap();
- bootstrap.group(worker)
- .channel(NioSocketChannel.class)
- .remoteAddress("127.0.0.1",8989)
- .handler(new ChannelInitializer<SocketChannel>() {
- @Override
- protected void initChannel(SocketChannel ch) throws Exception {
- //長度解碼器
- ch.pipeline().addLast(new LengthFieldBasedFrameDecoder(Integer.MAX_VALUE, 0,4,0,4));
- ch.pipeline().addLast(new HeartBeatClientHandler());
- }
- });
- //連接服務端
- ChannelFuture channelFuture = bootstrap.connect().sync();
- channel = channelFuture.channel();
- Thread thread = new Thread(HeartBeatClient::writeStr);
- thread.setDaemon(true);
- thread.start();
- channel.closeFuture().sync();
- } catch (InterruptedException e) {
- e.printStackTrace();
- } finally {
- worker.shutdownGracefully();
- }
- }
- /**
- * 向服務端寫入數據
- */
- public static void writeStr(){
- while (true) {
- System.out.print("請輸入要發送的數據:");
- //從鍵盤讀入數據
- String line = sc.nextLine();
- ByteBuf buffer = Unpooled.buffer();
- buffer.writeInt(line.length());
- buffer.writeBytes(line.getBytes(StandardCharsets.UTF_8));
- //發送數據
- channel.writeAndFlush(buffer).addListener(future -> {
- if (future.isSuccess()) {
- System.out.println("發送成功");
- }
- });
- }
- }
- }