HarmonyOS Sample之PixelMap圖像功能開發
1.介紹
HarmonyOS圖像模塊支持圖像業務的開發,常見功能如圖像解碼、圖像編碼、基本的位圖操作、圖像編輯等。當然,也支持通過接口組合來實現更復雜的圖像處理邏輯。
那么什么叫圖像解碼,什么叫圖像編碼,什么叫位圖?
PixelMap是圖像解碼后無壓縮的位圖格式
圖像解碼就是不同的存檔格式圖片(如JPEG、PNG等)解碼為無壓縮的位圖格式
圖像編碼就是將無壓縮的位圖格式,編碼成不同格式的存檔格式圖片(JPEG、PNG等)
不管是編碼還是解碼的目的是方便在應用或者系統中進行相應的處理。
本文正在參與優質創作者激勵
2.搭建環境
安裝DevEco Studio,詳情請參考DevEco Studio下載。
設置DevEco Studio開發環境,DevEco Studio開發環境需要依賴于網絡環境,需要連接上網絡才能確保工具的正常使用,可以根據如下兩種情況來配置開發環境:
- 如果可以直接訪問Internet,只需進行下載HarmonyOS SDK操作。
- 如果網絡不能直接訪問Internet,需要通過代理服務器才可以訪問,請參考配置開發環境。
下載源碼后,使用DevEco Studio 打開項目,模擬器運行即可。
真機運行需要將config.json中的buddleName修改為自己的,如果沒有請到AGC上進行配置,參見 使用模擬器進行調試 。
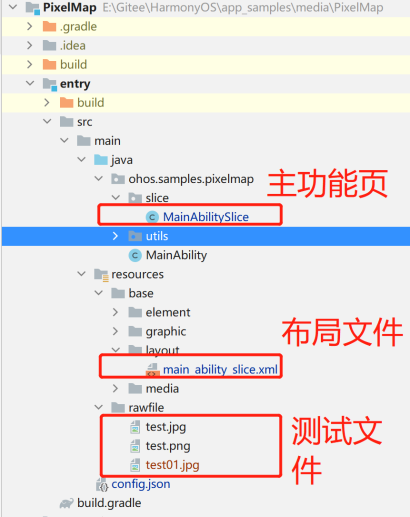
3.代碼結構
4.實例講解
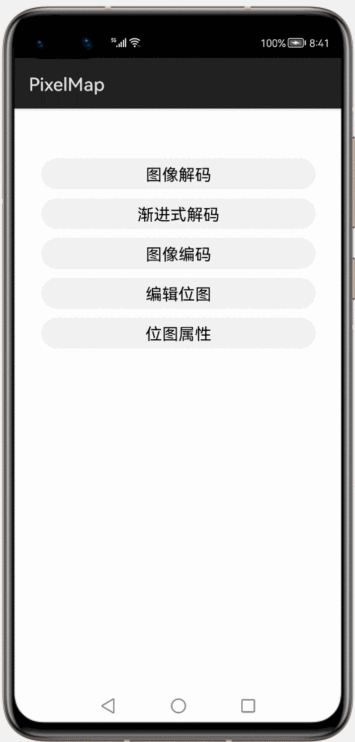
4.1.界面布局
布局只有幾個操作按鈕,見后面的效果圖,不是本文的重點。
4.2.后臺代碼
4.2.1 圖像解碼功能
圖像解碼就是將所支持格式的存檔圖片解碼成統一的PixelMap圖像,用于后續圖像顯示或其他處理,比如旋轉、縮放、裁剪等。當前支持格式包括JPEG、PNG、GIF、HEIF、WebP、BMP。
主要用到 ImageSource等
ImageSource.SourceOptions 指定數據源的格式信息,非必填
ImageSource.DecodingOptions 用來支持在解碼過程中的圖像處理操作,例如縮放、裁剪、旋轉,非必填。
接下來看個最簡單的圖像解碼的例子:
- /**
- * 圖形解碼
- * png -->ImageSource -->PixelMap
- *
- * @param component
- */
- private void commonDecode(Component component) {
- cleanComponents();
- //1.獲取應用程序在設備內部存儲器上存放文件的目錄。
- String pathName = new File(getFilesDir(), "test.png").getPath();
- /*
- InputStream inputStream=null;
- try {
- //2.讀取 media目錄的圖片
- inputStream = getContext().getResourceManager().getResource(ResourceTable.Media_icon);
- ImageSource imageSource = ImageSource.create(inputStream, null);
- inputStream.close();
- } catch (IOException e) {
- e.printStackTrace();
- } catch (NotExistException e) {
- e.printStackTrace();
- }*/
- //--------------------最簡單的方式-----------------------
- ImageSource imageSource = ImageSource.create(pathName, null);
- //解碼為位圖格式
- PixelMap pixelMap = imageSource.createPixelmap(null);
- //設置圖片顯示
- showFirstImage.setPixelMap(pixelMap);
- //--------------------使用SourceOptions、DecodingOptions 選項-------------
- //指定數據源的格式信息,提高解碼效率
- ImageSource.SourceOptions sourceOptions = new ImageSource.SourceOptions();
- sourceOptions.formatHint = "image/png";
- //image 源
- imageSource = ImageSource.create(pathName, sourceOptions);
- //提供圖像解碼選項
- ImageSource.DecodingOptions decodingOptions = new ImageSource.DecodingOptions();
- //裁剪,如果設置為全0,則不進行裁剪。358/227-448/279
- decodingOptions.desiredRegion = new Rect(358, 227, 90, 52);
- //縮放,如果選擇的尺寸與原始圖像尺寸不同,則將圖像放大或縮小后輸出。如果設置為全0,則不進行縮放
- decodingOptions.desiredSize = new Size(90 * 3, 52 * 3);
- //旋轉角度,取值范圍為0~360。以原圖為旋轉中心,順時針旋轉圖像。
- decodingOptions.rotateDegrees = 180;
- //解碼為位圖格式
- pixelMap = imageSource.createPixelmap(decodingOptions);
- //設置圖片先死
- showSecondImage.setPixelMap(pixelMap);
- //記得釋放資源
- imageSource.release();
- pixelMap.release();
- }
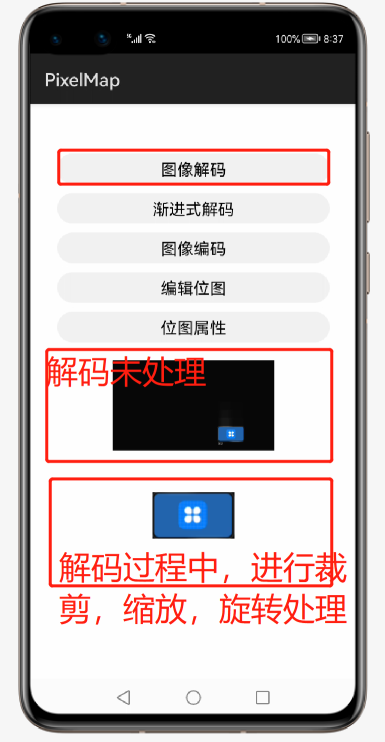
效果:
- 10-26 19:02:01.594 13148-13148/? D 00000/=>MainAbilitySlice: pngCachePath:/data/user/0/com.buty.samples/files/test.png
- 10-26 19:02:01.594 13148-13148/? D 00000/=>MainAbilitySlice: jpgCachePath:/data/user/0/com.buty.samples/files/test.jpg
還有一個漸進式解碼,
官方文檔的描述:在未獲取到全部圖像時,支持先更新部分數據來嘗試解碼,調用updateData更新數據,將參數isFinal設置為false;當獲取到全部數據后,最后一次更新數據時設置isFinal為true,表示數據更新完畢。
又去網上搜索了一下關于漸進式解碼的內容,是這么說的。
“漸進式解碼提供在整個圖像完成下載之前以增量方式解碼和呈現圖像部分的能力。 此功能極大地改進了從 Internet 查看圖像時用戶的體驗,因為用戶無需等待整個圖像下載,就可以開始解碼。 在下載整個映像之前,用戶可以查看包含可用數據的映像預覽。 此功能對于用于從 Internet 或帶寬有限的數據源查看圖像的任何應用程序都至關重要。”
“漸進式解碼是一種從不完整的圖像文件中以增量方式解碼圖像部分的能力。 傳統解碼需要完整的圖像文件才能開始解碼。 漸進式解碼在圖像的漸進式級別完成下載后開始。 解碼器對圖像的當前漸進式級別執行解碼傳遞。 然后,它會在下載每個漸進式級別時對圖像執行多個解碼傳遞。 每次解碼傳遞都顯示更多圖像,直到完全下載并解碼圖像。 解碼完整圖像所需的傳遞數取決于圖像文件格式和用于創建圖像的編碼過程。
使用漸進式解碼的要求:
1.圖像文件必須支持漸進式解碼。 大多數圖像格式不支持漸進式解碼,盡管常用圖像格式為 JPEG、PNG 和 GIF。
2.圖像文件必須編碼為漸進式圖像。 未使用漸進式圖像編碼創建的圖像文件無法實現漸進式解碼,即使文件格式會支持漸進式解碼。
3.支持漸進式解碼的編解碼器必須可用。 如果編解碼器不支持漸進式解碼,則編碼為漸進式圖像的圖像將被解碼為傳統圖像。”
一起看個漸進式解碼的例子,
點擊 “漸進式解碼” 按鈕,執行一次imageSource.updateData
- /**
- * 漸進式解碼
- *
- * @param component
- */
- private void regionDecode(Component component) {
- if (buttonClickNum < 10) {
- // 獲取到一定的數據時嘗試解碼,
- imageSource.updateData(fileByte, fileByte.length * buttonClickNum / 10, fileByte.length / 10,
- buttonClickNum==9?true:false);
- pixelMap = imageSource.createPixelmap(null);
- showResultText.setText( (buttonClickNum + 1) + "/10");
- showSecondImage.setPixelMap(pixelMap);
- buttonClickNum++;
- }else{
- pixelMap.release();
- imageSource.release();
- readFileForInitFileByte();
- buttonClickNum=0;
- cleanComponents();
- }
- }
- /**
- * 讀取文件初始化 fileByte變量
- * 初始化 imageSource
- */
- private void readFileForInitFileByte() {
- File file = new File(jpgCachePath);
- try {
- FileInputStream fileInputStream = new FileInputStream(file);
- ByteArrayOutputStream byteArrayOutputStream = new ByteArrayOutputStream();
- byte[] data = new byte[1024];
- int len = -1;
- while ((len = fileInputStream.read(data)) != -1) {
- byteArrayOutputStream.write(data, 0, len);
- }
- fileByte = byteArrayOutputStream.toByteArray();
- ImageSource.SourceOptions srcOpts = new ImageSource.SourceOptions();
- srcOpts.formatHint = "image/jpeg";
- //增量源選項 IncrementalSourceOptions
- ImageSource.IncrementalSourceOptions incrementalSourceOptions = new ImageSource.IncrementalSourceOptions();
- incrementalSourceOptions.opts = srcOpts;
- //表示只輸入增量數據來更新源。
- incrementalSourceOptions.mode = ImageSource.UpdateMode.INCREMENTAL_DATA;
- //創建增量數據源
- imageSource = ImageSource.createIncrementalSource(incrementalSourceOptions);
- } catch (IOException e) {
- e.printStackTrace();
- }
- }
效果:
4.2.2 圖像編碼功能
圖像編碼主要用到ImagePacker
ImagePacker.PackingOptions 設置編碼選項,目前沒有太多可選。
- /**
- * 使用 ImagePacker 來打包圖片
- * 表示將壓縮圖像打包成文件或其他對象的圖像打包器。
- * 可以調用create創建圖片打包器,調用initializePacking設置打包選項,調用addImage添加要打包的圖片數據,調用finalizePacking完成打包輸出目標對象。
- *
- * @param component
- */
- private void encode(Component component) {
- cleanComponents();
- //創建ImagePacker對象
- ImagePacker imagePacker = ImagePacker.create();
- //設置編碼選項
- ImagePacker.PackingOptions packingOptions = new ImagePacker.PackingOptions();
- //圖像質量,范圍從0-100,100為最佳質量。
- packingOptions.quality = 90;
- //文件輸出流, test_encode.jpg
- try (FileOutputStream outputStream = new FileOutputStream(encodeOutPath)) {
- //初始化將結果輸出到 OutputStream 對象的打包任務。
- imagePacker.initializePacking(outputStream, packingOptions);
- //圖像數據源,test.png
- ImageSource imageSource = ImageSource.create(pngCachePath, null);
- //轉為位圖格式
- PixelMap pixelMap = imageSource.createPixelmap(null);
- //將pixelMap添加到編碼器,進行編碼
- boolean result = imagePacker.addImage(pixelMap);
- showResultText.setText(
- "Encode result : " + result + System.lineSeparator() + "OutputFilePath:" + encodeOutPath);
- //釋放圖像數據源
- imageSource.release();
- pixelMap.release();
- } catch (IOException e) {
- HiLog.info(LABEL_LOG, "%{public}s", "encode IOException ");
- }
- //釋放imagePacker
- imagePacker.release();
- }
4.2.3 編輯位圖功能
a.通過imageSource創建縮略圖,createThumbnailPixelmap
- //解碼 ImageSource 實例中包含的縮略圖數據以生成縮略圖并創建縮略圖像素圖。
- //allowFromImage - 如果 ImageSource 不包含縮略圖數據,則指定是否允許基于原始圖像創建。
- PixelMap thumbnailPixelMap = imageSource.createThumbnailPixelmap(decodingOpts, true);
b.讀寫位圖像素數據,畫個像素小人
- /**
- * 編輯位圖
- * @param component
- */
- private void edit(Component component) {
- cleanComponents();
- int colorsWidth = 552;
- int colorsHeight = 310;
- //PixelMap 選項
- PixelMap.InitializationOptions initializationOptions = new PixelMap.InitializationOptions();
- //指示要創建的像素圖的預期大小。
- initializationOptions.size = new Size(colorsWidth, colorsHeight);
- initializationOptions.pixelFormat = PixelFormat.ARGB_8888;
- //PixelMap是否允許修改
- initializationOptions.editable = true;
- //表示像素顏色的 int 數組。 數組中的每個元素都是 PixelFormat#ARGB_8888 格式。
- int[] colors = new int[colorsWidth * colorsHeight];
- Arrays.fill(colors, Color.RED.getValue());
- //創建PixelMap
- PixelMap pixelMap = PixelMap.create(colors, initializationOptions);
- //顯示圖片
- showFirstImage.setPixelMap(pixelMap);
- // 以另外一個PixelMap作為數據源創建
- PixelMap pixelMap2 = PixelMap.create(pixelMap, initializationOptions);
- //讀取指定位置的顏色值。
- int color = pixelMap2.readPixel(new Position(1, 1));
- HiLog.info(LABEL_LOG, "%{public}s", "pixelMapEdit readPixel color :" + color);
- //背上一把寶劍
- for(int i=130;i<180 ;i++){
- //在指定位置寫入像素
- pixelMap2.writePixel(new Position(i, i), 0xFF112233);
- }
- //在指定區域寫入像素
- int[] pixelArray = new int[1024*1024];
- Arrays.fill(pixelArray, Color.BLACK.getValue());
- //頭
- Rect region = new Rect(160, 110, 50, 50);
- //stride - 表示數組每行中的像素數。 該值必須大于或等于此 PixelMap 中目標區域的寬度。
- pixelMap2.writePixels(pixelArray, 0, 100, region);
- Arrays.fill(pixelArray, Color.GREEN.getValue());
- //身體
- Rect region2= new Rect(150, 160, 70, 60);
- //stride - 表示數組每行中的像素數。 該值必須大于或等于此 PixelMap 中目標區域的寬度。
- pixelMap2.writePixels(pixelArray, 0, 100, region2);
- Arrays.fill(pixelArray, Color.YELLOW.getValue());
- //胳膊
- Rect region3= new Rect(130, 160, 20, 70);
- //stride - 表示數組每行中的像素數。 該值必須大于或等于此 PixelMap 中目標區域的寬度。
- pixelMap2.writePixels(pixelArray, 0, 100, region3);
- //胳膊
- Rect region4= new Rect(220, 160, 20, 70);
- //stride - 表示數組每行中的像素數。 該值必須大于或等于此 PixelMap 中目標區域的寬度。
- pixelMap2.writePixels(pixelArray, 0, 100, region4);
- Arrays.fill(pixelArray, Color.GRAY.getValue());
- //腿
- Rect region5= new Rect(160, 200, 20, 70);
- //stride - 表示數組每行中的像素數。 該值必須大于或等于此 PixelMap 中目標區域的寬度。
- pixelMap2.writePixels(pixelArray, 0, 100, region5);
- //腿
- Rect region6= new Rect(190, 200, 20, 70);
- //stride - 表示數組每行中的像素數。 該值必須大于或等于此 PixelMap 中目標區域的寬度。
- pixelMap2.writePixels(pixelArray, 0, 100, region6);
- showSecondImage.setPixelMap(pixelMap2);
- //從位圖對象中獲取信息
- long capacity = pixelMap.getPixelBytesCapacity();
- long bytesNumber = pixelMap.getPixelBytesNumber();
- int rowBytes = pixelMap.getBytesNumberPerRow();
- byte[] ninePatchData = pixelMap.getNinePatchChunk();
- showResultText.setText(
- "This pixelMap detail info :" + System.lineSeparator() + "capacity = " + capacity + System.lineSeparator()
- + "bytesNumber = " + bytesNumber + System.lineSeparator() + "rowBytes = " + rowBytes
- + System.lineSeparator() + "ninePatchData = " + Arrays.toString(ninePatchData) + System.lineSeparator());
- pixelMap.release();
- pixelMap2.release();
- }
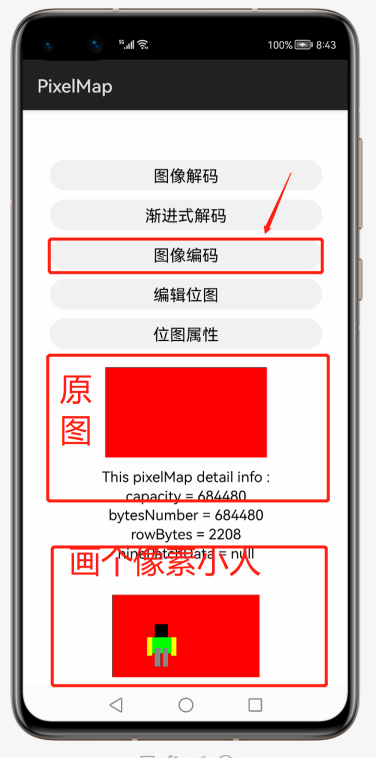
效果是這樣的:
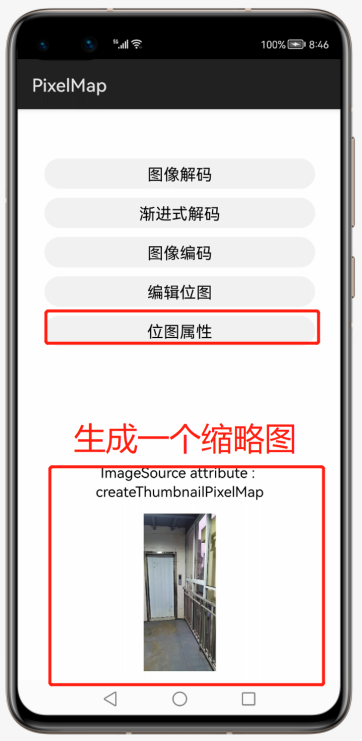
4.2.4 獲取圖像屬性
圖像屬性解碼就是獲取圖像中包含的屬性信息,PropertyKey 存儲了常用的屬性KEY信息。
看代碼:
- /**
- * 獲取圖片的縮略圖和位置信息
- *
- * @param component
- */
- private void attribute(Component component) {
- cleanComponents();
- ImageSource.SourceOptions srcOpts = new ImageSource.SourceOptions();
- srcOpts.formatHint = "image/jpeg";
- HiLog.debug(LABEL_LOG,"jpgCachePath="+jpgCachePath);
- ImageSource imageSource = ImageSource.create(jpgCachePath, srcOpts);
- ImageSource.DecodingOptions decodingOpts = new ImageSource.DecodingOptions();
- //解碼 ImageSource 實例中包含的縮略圖數據以生成縮略圖并創建縮略圖像素圖。
- //allowFromImage - 如果 ImageSource 不包含縮略圖數據,則指定是否允許基于原始圖像創建。
- PixelMap thumbnailPixelMap = imageSource.createThumbnailPixelmap(decodingOpts, true);
- //位置信息
- String location = imageSource.getImagePropertyString(PropertyKey.Exif.SUBJECT_LOCATION);
- HiLog.info(LABEL_LOG, "%{public}s", "imageExif location : " + location);
- showResultText.setText("ImageSource attribute : createThumbnailPixelMap");
- showSecondImage.setPixelMap(thumbnailPixelMap);
- //
- imageSource.release();
- thumbnailPixelMap.release();
- }
效果:
5.思考總結
通過這次實踐,可以學到的內容:
- 位圖的概念,如何進行圖像的編碼、解碼、編輯。
- 漸進式解碼的概念,如何生成縮略圖,獲取其他圖像屬性等。
文章相關附件可以點擊下面的原文鏈接前往下載
https://harmonyos.51cto.com/resource/1419