HarmonyOS Sample之JavaDistributeAuthDemo分布式身份認證功能
1.介紹
相信大部分關注HarmonyOS的人來說,對于HarmonyOS的特性都有一定的了解了,從官網我們可以看到一些關鍵的提煉:“統一OS,彈性部署”,“硬件互助,資源共享”,“一次開發,多端部署”。
接下來幾期就想和大家一起就HarmonyOS的特性,來找一些案例進行學習和實踐,目的是進一步鞏固對特性的理解然后去靈活應用。
這一期是通過分布式身份認證的功能來了解一下 常用的通信方法。
分享的內容:
- 在設備遷移或協同時都需要顯示可用設備列表,有一種方式不需要自己單獨獲取設備,也不需要自己定義列表布局文件就可以顯示設備窗口。
- 如何實現一個分布式身份認證授權的功能。
案例來自codelabs官方示例分布式鑒權(Java) 本貼進行了整理和分析,供學習和交流使用。
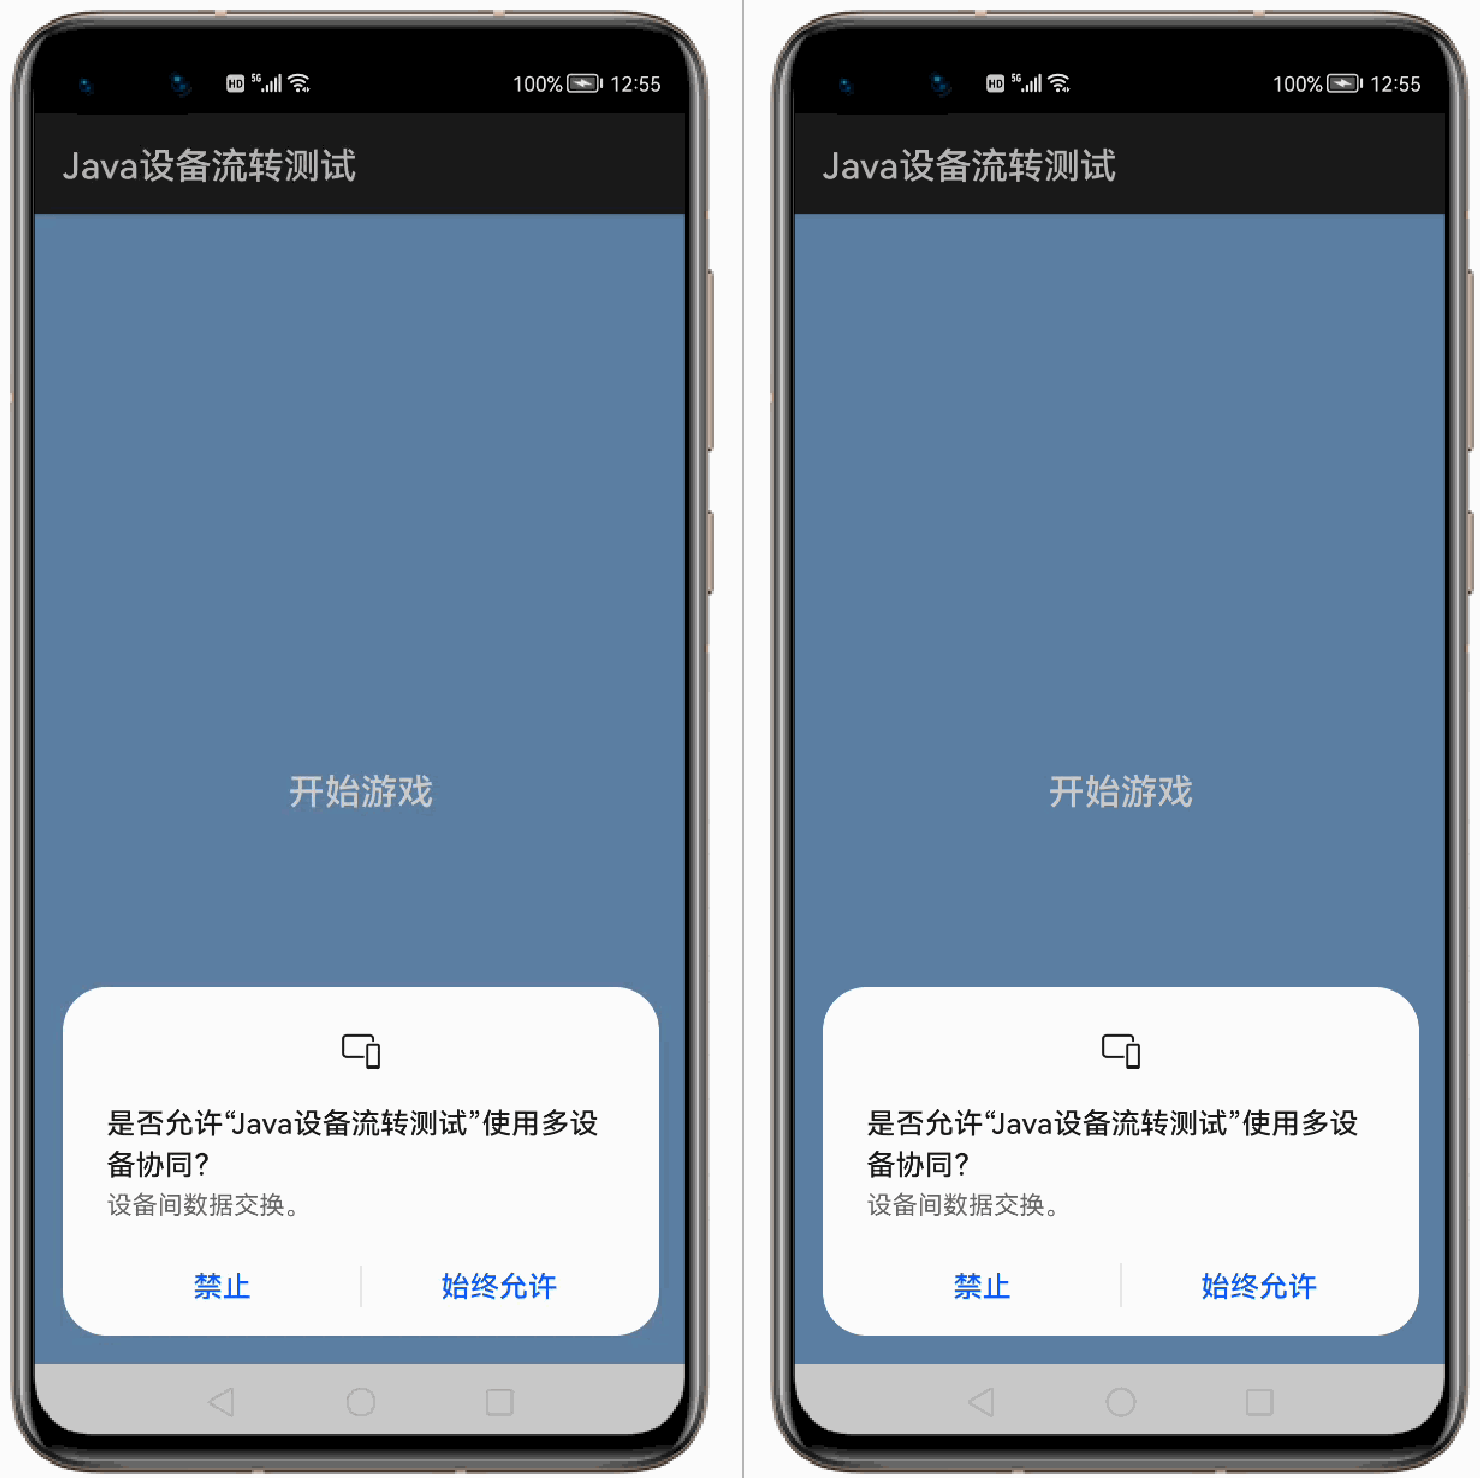
2.效果展示
3.搭建環境
安裝DevEco Studio,詳情請參考DevEco Studio下載。
設置DevEco Studio開發環境,DevEco Studio開發環境需要依賴于網絡環境,需要連接上網絡才能確保工具的正常使用,可以根據如下兩種情況來配置開發環境:
如果可以直接訪問Internet,只需進行下載HarmonyOS SDK操作。
如果網絡不能直接訪問Internet,需要通過代理服務器才可以訪問,請參考配置開發環境。
下載源碼后,使用DevEco Studio 打開項目,模擬器運行即可。
真機上運行,參見真機運行應用
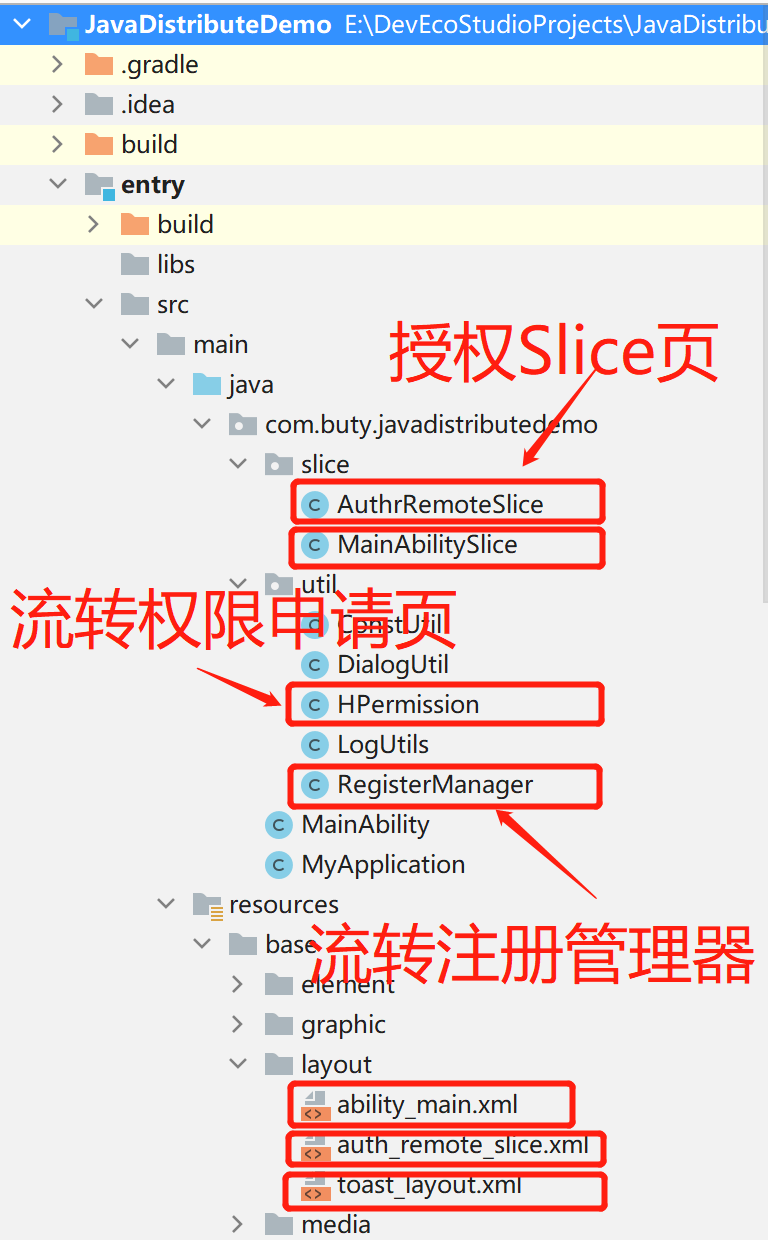
4.項目結構
5.代碼講解
5.1 一種顯示流轉設備列表的方法
這種方式不需要自己單獨獲取設備,也不需要定義對應的布局文件就可以顯示設備窗口。
①向ContinuationRegisterManager注冊一個跳轉的能力,并獲得分配給該能力的注冊令牌
- /**
- * 注冊流轉能力
- * register Continuation
- *
- * @param context
- * @param deviceCallback
- * @param show 是否顯示可用流轉設備
- */
- public void registerContinuation(AbilitySlice context, DeviceCallback deviceCallback, boolean show) {
- LogUtils.info("registerContinuation");
- if (continuationRegisterManager == null) {
- this.deviceCallback = deviceCallback;
- this.show = show;
- continuationRegisterManager = context.getContinuationRegisterManager();
- //支持的設備類型
- ExtraParams params = new ExtraParams();
- String[] devTypes = new String[]{ExtraParams.DEVICETYPE_SMART_PAD,
- ExtraParams.DEVICETYPE_SMART_WATCH,
- ExtraParams.DEVICETYPE_SMART_PHONE};
- params.setDevType(devTypes);
- //向ContinuationRegisterManager注冊一個跳轉的能力,并獲得分配給該能力的注冊令牌
- //您可以使用 IContinuationDeviceCallback 來監聽用戶選擇設備進行能力跳躍后的設備連接狀態變化,并實現您自己的處理邏輯。
- continuationRegisterManager.register(context.getBundleName(), params, callback, requestCallback);
- } else {
- if (show) {
- //顯示設備列表
- showContinuationDevice();
- }
- }
- }
②完成流轉后的狀態回調,提供用于偵聽設備連接狀態更改的回調
- //完成流轉后的狀態回調,提供用于偵聽設備連接狀態更改的回調。
- private IContinuationDeviceCallback callback = new IContinuationDeviceCallback() {
- @Override
- public void onDeviceConnectDone(String deviceId, String val) {
- LogUtils.info("onDeviceConnectDone");
- //設備連接完成后,提交選中設備的任務到隊列,等同于點擊了要流轉的設備
- EventHandler eventHandler = new EventHandler(EventRunner.getMainEventRunner());
- //提交任務 到事件隊列。
- eventHandler.postTask(new Runnable() {
- @Override
- public void run() {
- if (deviceCallback != null) {
- deviceCallback.onItemClick(deviceId);
- }
- //更新指定能力成功跳轉的設備的連接狀態。
- continuationRegisterManager
- .updateConnectStatus(abilityToken,
- //表示需要更新連接狀態的設備的ID。
- deviceId,
- DeviceConnectState.IDLE.getState(),null
- );
- }
- });
- }
- @Override
- public void onDeviceDisconnectDone(String deviceId) {
- LogUtils.info("onDeviceDisconnectDone");
- }
- };
③完成流轉請求的回調,顯示可流轉的設備
- //完成流轉請求的回調,提供用于偵聽躍點任務管理服務的連接狀態變化的回調。
- private RequestCallback requestCallback = new RequestCallback() {
- @Override
- public void onResult(int result) {
- abilityToken = result;
- if (show) {
- //顯示 可流轉設備
- showContinuationDevice();
- }
- }
- };
- /**
- * 顯示 可流轉設備
- * show Continuation
- */
- private void showContinuationDevice() {
- LogUtils.info("showContinuation");
- ExtraParams extraParams = new ExtraParams();
- extraParams.setDevType(new String[]{ExtraParams.DEVICETYPE_SMART_TV,
- ExtraParams.DEVICETYPE_SMART_PAD,
- ExtraParams.DEVICETYPE_SMART_WATCH,
- ExtraParams.DEVICETYPE_SMART_PHONE});
- extraParams.setDescription("設備流轉測試");
- //顯示 可流轉設備
- continuationRegisterManager.showDeviceList(abilityToken, extraParams, null);
- }
5.2 實現一個分布式身份認證授權的功能
為了方便理解,把發送請求的設備成為 請求授權設備,進行授權操作的設備成為 授權設備。
RegisterManager 自定義了CommonEvent 接口,MainAbilitySlice實現了該接口,所以RegisterManager具備了 到 MainAbilitySlice方向的通信能力。
RegisterManager 完成了對 ConstUtil.ORDER_CODE 類型公共事件的訂閱,所以就能夠接收到該類型的公共事件。
認證授權的完整過程:
①在請求授權設備上,RegisterManager提供了注冊設備流轉能力的函數,在設備連接完成的狀態回調中 提交了一個“點擊設備”的任務到執行隊列。
- //完成流轉后的狀態回調,提供用于偵聽設備連接狀態更改的回調。
- private IContinuationDeviceCallback callback = new IContinuationDeviceCallback() {
- @Override
- public void onDeviceConnectDone(String deviceId, String val) {
- LogUtils.info("onDeviceConnectDone");
- //設備連接完成后,提交選中設備的任務到隊列,等同于點擊了要流轉的設備
- EventHandler eventHandler = new EventHandler(EventRunner.getMainEventRunner());
- //提交任務 到事件隊列。
- eventHandler.postTask(new Runnable() {
- @Override
- public void run() {
- if (deviceCallback != null) {
- deviceCallback.onItemClick(deviceId);
- }
- //更新指定能力成功跳轉的設備的連接狀態。
- continuationRegisterManager
- .updateConnectStatus(abilityToken,
- //表示需要更新連接狀態的設備的ID。
- deviceId,
- DeviceConnectState.IDLE.getState(),null
- );
- }
- });
- }
在MainAbilitySlice中,在完成流轉能力注冊完成后,在“點擊設備” 的回調中,打開了遠端授權設備上的AuthrRemoteSlice頁,同時傳遞了ConstUtil.DEVICE_ID和ConstUtil.ORDER_CODE(ConstUtil.START_ORDER)參數過去,其中ConstUtil.START_ORDER并沒有使用。
- /**
- * 注冊協同能力
- *
- * @param show
- */
- private void registerContinuation(boolean show) {
- LogUtils.info("registerContinuation");
- registerManager.registerContinuation(this,
- new RegisterManager.DeviceCallback() {
- @Override
- public void onItemClick(String deviceId) {
- LogUtils.info("onItemClick,deviceId:" + deviceId);
- //啟動遠端Ablity
- startRemoteAbility(deviceId);
- }
- }, show);
- }
- /**
- * 啟動遠端FA
- *
- * @param deviceId
- */
- private void startRemoteAbility(String deviceId) {
- LogUtils.info("startRemoteAbility");
- DialogUtil.showToast(getContext(), "請求已經發送,等待對方確認。");
- //
- String localDeviceId = KvManagerFactory.getInstance().createKvManager(
- new KvManagerConfig(this)).getLocalDeviceInfo().getId();
- Intent intent = new Intent();
- Operation operation =
- new Intent.OperationBuilder()
- .withDeviceId(deviceId)
- .withBundleName(getBundleName())
- .withAbilityName(MainAbility.class.getName())
- //指向授權設備的認證頁面路由
- .withAction(MainAbility.ACTION)
- .withFlags(Intent.FLAG_ABILITYSLICE_MULTI_DEVICE)
- .build();
- intent.setOperation(operation);
- intent.setParam(ConstUtil.DEVICE_ID, localDeviceId);
- //啟動遠端FA指令代碼
- intent.setParam(ConstUtil.ORDER_CODE, ConstUtil.START_ORDER);
- startAbility(intent);
- }
②在授權設備上的AuthrRemoteSlice頁被打開后,點擊允許或不允許時,請求分布式權限后,又打開了請求授權設備的 MainAbility。
- private void initViewData() {
- LogUtils.info("initViewData");
- findComponentById(ResourceTable.Id_yes_btn).setClickedListener(component -> {
- sendMessage(AUTH_TYPE1);
- });
- findComponentById(ResourceTable.Id_no_btn).setClickedListener(component -> {
- sendMessage(AUTH_TYPE2);
- });
- }
- private void sendMessage(int type) {
- LogUtils.info("sendMessage");
- //從MainAbility獲取HPermission實例
- HPermission hPermission = ((MainAbility) getAbility()).getPermission();
- //如果用戶已允許分布式權限,設置按鈕可用
- hPermission.requestPermissions(this, () -> {
- // button Enabled
- findComponentById(ResourceTable.Id_yes_btn).setEnabled(false);
- findComponentById(ResourceTable.Id_no_btn).setEnabled(false);
- //打開請求側的頁面
- startRemoteAbility(type);
- });
- }
- /**
- * 打開請求授權側的MainAbility
- *
- * @param type 是否同意授權
- */
- private void startRemoteAbility(int type) {
- LogUtils.info("startRemoteAbility");
- DialogUtil.showToast(getContext(), type == AUTH_TYPE1 ? "允許玩游戲" : "已拒絕玩游戲");
- Intent intent = new Intent();
- Operation operation =
- new Intent.OperationBuilder()
- .withDeviceId(remoteDeviceId == null ? "" : remoteDeviceId)
- .withBundleName(getBundleName())
- .withAbilityName(MainAbility.class.getName())
- .withFlags(Intent.FLAG_ABILITYSLICE_MULTI_DEVICE)
- .build();
- intent.setOperation(operation);
- //授權碼
- intent.setParam(ORDER_CODE, type);
- startAbility(intent);
- //關閉當前宿主 Ability
- getUITaskDispatcher().delayDispatch(() -> terminateAbility(), DELAY);
- }
③在請求授權設備上,由于MainAbility設置為singleton模式(“launchType”: “singleton”)而且已經實例過,所以請求進入到onNewIntent函數。
config.json
- {
- ...
- "orientation": "unspecified",
- "visible": true,
- "name": "com.buty.javadistributedemo.MainAbility",
- "icon": "$media:icon",
- "description": "$string:mainability_description",
- "label": "$string:entry_MainAbility",
- "type": "page",
- "launchType": "singleton"
- }
在onNewIntent函數中,通過 CommonEventManager發布一個ConstUtil.ORDER_CODE類型的事件,該事件被RegisterManager收到并進行了處理,如何處理的呢,又通過RegisterManager.CommonEvent 把事件傳遞給了實現了RegisterManager.CommonEvent接口MainAbilitySlice,最終顯示對端設備的授權結果(允許/不允許)
- /**
- * Ability設置為singleton模式
- * 當創建時,如果實例已存在,觸發該函數
- *
- * @param intent
- */
- @Override
- protected void onNewIntent(Intent intent) {
- LogUtils.info("onNewIntent");
- super.onNewIntent(intent);
- //是否允許
- int code = intent.getIntParam(ConstUtil.ORDER_CODE, 0);
- //
- String deviceId = intent.getStringParam(ConstUtil.DEVICE_ID);
- sendCommonEvent(code, deviceId);
- }
MainAbilitySlice收到消息
- /**
- * 實現 RegisterManager的 CommonEvent接口
- *
- * @param code code
- * @param deviceId deviceId
- */
- @Override
- public void onReceiveEvent(int code, String deviceId) {
- LogUtils.info("onReceiveEvent,code:"+code);
- switch (code) {
- // Agree to allow games to be played
- case ConstUtil.AUTH_TYPE1:
- //start.setVisibility(Component.HIDE);
- tips.setVisibility(Component.VISIBLE);
- tips.setText("已授權,可以開始游戲");
- break;
- // Refuse to play games
- case ConstUtil.AUTH_TYPE2:
- tips.setVisibility(Component.VISIBLE);
- //DialogUtil.exitDialog(getAbility());
- tips.setText("已拒絕,不可以游戲");
- break;
- default:
- break;
- }
- }
6.思考總結
分布式中常用的通信方式:
1.Intent 直接傳遞參數(intent.setParam(ORDER_CODE, type))
2.公共事件訂閱/發布的方式(Intent封裝到CommonEventData)
3.自定義接口的方式(RegisterManager.CommonEvent)
文章相關附件可以點擊下面的原文鏈接前往下載
https://harmonyos.51cto.com/resource/1574