使用 ChatterBot 庫制作一個聊天機器人
我們學習一些如何使用 ChatterBot 庫在 Python 中創(chuàng)建聊天機器人,該庫實現了各種機器學習算法來生成響應對話,還是挺不錯的
1. 什么是聊天機器人
聊天機器人也稱為聊天機器人、機器人、人工代理等,基本上是由人工智能驅動的軟件程序,其目的是通過文本或語音與用戶進行對話。我們日常接觸的比較著名的例子包括 Siri、Alexa 等
這些聊天機器人傾向于為用戶執(zhí)行特定任務,聊天機器人經常執(zhí)行諸如進行交易、預訂酒店、提交表格等任務。隨著人工智能領域的技術進步,聊天機器人的可能性也是無窮無盡的
當然了,在當前技術下,聊天機器人還是有很多局限性的
- 領域知識 —— 由于真正的人工智能仍然遙不可及,任何聊天機器人在與人類對話時都很難完全理解對話含義
- 個性 —— 無法正確響應和相當差的理解能力比任何聊天機器人的常見錯誤更重要,為聊天機器人添加個性仍然是很遙遠和困難的事情
我們可以將聊天機器人定義為兩類
- 基于特定規(guī)則 —— 在這種方法中,機器人是根據規(guī)則進行訓練的。基于此,機器人可以回答簡單的查詢,但有時無法回答復雜的對話
- 自學 —— 這些機器人遵循機器學習方法,效率更高,并進一步分為另外兩類
- 基于檢索模型 —— 在這種方法中,機器人根據用戶輸入從響應列表中檢索最佳響應
- 生成模型 —— 這些模型通常會給出答案,而不是從一組答案中進行搜索,這也使它們成為智能機器人
好了,高大上的聊天機器人知識就先介紹到這里,下面我們就通過 chatterbot 來構建一個簡單的在線聊天機器人
2. ChatterBot 庫簡介
ChatterBot 是 Python 中的一個庫,它生成對用戶輸入的響應,使用多種機器學習算法來產生各種響應。用戶可以更輕松地使用 ChatterBot 庫制作具有更準確響應的聊天機器人
ChatterBot 的設計允許機器人接受多種語言的訓練,最重要的是,機器學習算法使機器人更容易使用用戶的輸入自行改進
ChatterBot 可以輕松創(chuàng)建參與對話的軟件,每次聊天機器人從用戶那里獲得輸入時,它都會保存輸入和響應,這有助于沒有初始知識的聊天機器人使用收集到的響應進行自我進化
隨著響應的增加,聊天機器人的準確性也會提高。程序從與輸入匹配的最接近匹配語句中選擇最接近匹配的響應,然后從該響應的已知語句選擇中選擇響應
安裝 ChatterBot 也非常簡單
- pip install chatterbot
下面我們就正式進入 Chatterbot 的世界吧
3. 構建聊天機器人
機器人訓練
Chatterbot 帶有一個數據實用程序模塊,可用于訓練聊天機器人。目前該模塊中有十多種語言的訓練數據,我們可以拿來直接使用
https://github.com/gunthercox/chatterbot-corpus
下面是在 python 中開始使用 ChatterBot 的簡單示例
- from chatterbot import chatbot
- from chatterbot.trainers import ListTrainer
- chatbot = Chatbot('Edureka')
- trainer = ListTrainer(chatbot)
- trainer.train([ 'hi, can I help you find a course', 'sure I'd love to find you a course', 'your course have been selected'])
- response = chatbot.get_response("I want a course")
- print(response)
在例子中,我們根據提供的輸入從聊天機器人獲得響應
構建 flask app
對于基本的 flask 結構,我們直接使用 GitHub 上的一個腳手架,這個是專門用來開發(fā) ChatterBot 應用的
https://github.com/chamkank/flask-chatterbot
我們直接克隆項目就好
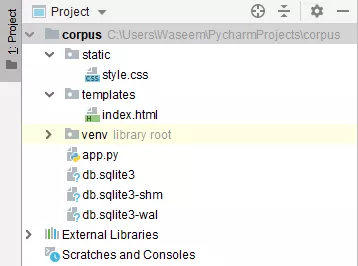
把項目下載到本地之后,我們進行一些修改
我們需要為 HTML 和 CSS 文件添加另外兩個目錄 static 和模板
修改 App.py 文件
- from flask import Flask, render_template, request
- from chatterbot import ChatBot
- from chatterbot.trainers import ChatterBotCorpusTrainer
- app = Flask(__name__)
- english_bot = ChatBot("Chatterbot", storage_adapter="chatterbot.storage.SQLStorageAdapter")
- trainer = ChatterBotCorpusTrainer(english_bot)
- trainer.train("chatterbot.corpus.english")
- @app.route("/")
- def home():
- return render_template("index.html")
- @app.route("/get")
- def get_bot_response():
- userText = request.args.get('msg')
- return str(english_bot.get_response(userText))
- if __name__ == "__main__":
- app.run()
index.html 文件
- <!DOCTYPE html>
- <html>
- <head>
- <link rel="stylesheet" type="text/css" href="/static/style.css">
- <script src="https://ajax.googleapis.com/ajax/libs/jquery/3.2.1/jquery.min.js"></script>
- </head>
- <body>
- <h1>Flask Chatterbot Example</h1>
- <div>
- <div id="chatbox">
- <p class="botText"><span>Hi! I'm Chatterbot.</span></p>
- </div>
- <div id="userInput">
- <input id="textInput" type="text" name="msg" placeholder="Message">
- <input id="buttonInput" type="submit" value="Send">
- </div>
- <script>
- function getBotResponse() {
- var rawText = $("#textInput").val();
- var userHtml = '<p class="userText"><span>' + rawText + '</span></p>';
- $("#textInput").val("");
- $("#chatbox").append(userHtml);
- document.getElementById('userInput').scrollIntoView({block: 'start', behavior: 'smooth'});
- $.get("/get", { msg: rawText }).done(function(data) {
- var botHtml = '<p class="botText"><span>' + data + '</span></p>';
- $("#chatbox").append(botHtml);
- document.getElementById('userInput').scrollIntoView({block: 'start', behavior: 'smooth'});
- });
- }
- $("#textInput").keypress(function(e) {
- if(e.which == 13) {
- getBotResponse();
- }
- });
- $("#buttonInput").click(function() {
- getBotResponse();
- })
- </script>
- </div>
- </body>
- </html>
index.html 文件將包含應用程序的模板,而 style.css 將包含帶有 CSS 代碼的樣式表。執(zhí)行上述程序后,我們將得到如下圖所示的輸出
Style.css 文件
- body
- {
- font-family: Garamond;
- background-color: black;
- }
- h1
- {
- color: black;
- margin-bottom: 0;
- margin-top: 0;
- text-align: center;
- font-size: 40px;
- }
- h3
- {
- color: black;
- font-size: 20px;
- margin-top: 3px;
- text-align: center;
- }
- #chatbox
- {
- background-color: black;
- margin-left: auto;
- margin-right: auto;
- width: 40%;
- margin-top: 60px;
- }
- #userInput {
- margin-left: auto;
- margin-right: auto;
- width: 40%;
- margin-top: 60px;
- }
- #textInput {
- width: 87%;
- border: none;
- border-bottom: 3px solid #009688;
- font-family: monospace;
- font-size: 17px;
- }
- #buttonInput {
- padding: 3px;
- font-family: monospace;
- font-size: 17px;
- }
- .userText {
- color: white;
- font-family: monospace;
- font-size: 17px;
- text-align: right;
- line-height: 30px;
- }
- .userText span {
- background-color: #009688;
- padding: 10px;
- border-radius: 2px;
- }
- .botText {
- color: white;
- font-family: monospace;
- font-size: 17px;
- text-align: left;
- line-height: 30px;
- }
- .botText span {
- background-color: #EF5350;
- padding: 10px;
- border-radius: 2px;
- }
- #tidbit {
- position:absolute;
- bottom:0;
- right:0;
- width: 300px;
- }

接下來我們打開網頁,就可以看到聊天頁面啦!

有一個文本框,我們可以在其中提供用戶輸入,機器人將為該語句生成相應的響應消息,當我們輸入的消息越多,機器人就會越智能!
好了,今天的分享就到這里,我們下次見!