Spring Security權(quán)限控制系列(二)

本篇主要內(nèi)容:請求攔截及自定義登錄頁面。
上一篇:《??Spring Security權(quán)限控制系列(一)??》
自定義攔截請求
默認項目中引入Spring Security后會攔截所有的請求,這其中包括了靜態(tài)資源,這肯定不是我們希望的,接下來我們看如何進行資源自定義的攔截。
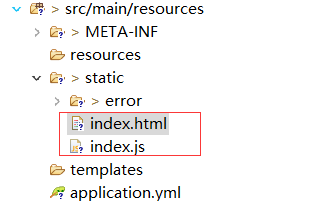
- 新建如下靜態(tài)資源
- 配置靜態(tài)資源訪問路徑
由于靜態(tài)資源默認訪問路徑是/**,這里為了區(qū)分靜態(tài)資源與Controller給靜態(tài)資源加一個前綴。
spring: mvc: static-path-pattern: /resources/**
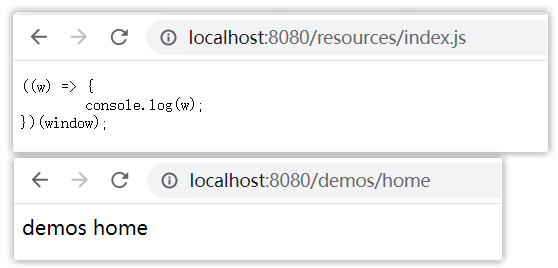
- 訪問靜態(tài)資源
先將Spring Security從項目中移除,然后進行訪問。分別訪問index.js和index.html。
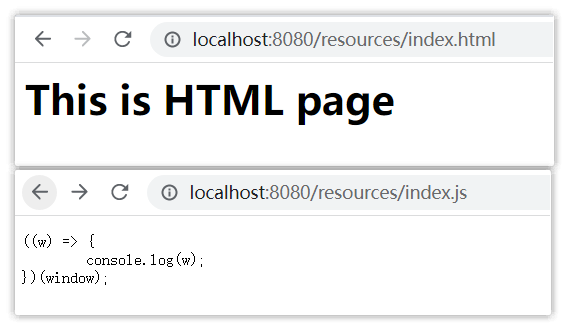
都能正常訪問,接下來將Spring Security加到項目中后,再進行訪問會發(fā)現(xiàn)之前還能訪問的現(xiàn)在直接跳轉(zhuǎn)到了登錄頁面。
- 靜態(tài)資源放行
自定義配置設置路徑方向規(guī)則。
@Configurationpublic class SecurityConfig extends WebSecurityConfigurerAdapter { @Override protected void configure(HttpSecurity http) throws Exception { http .authorizeRequests() // 獲取基于SpEL表達式的基于URL的授權(quán)對象 .antMatchers("/resources/**") // 設定URI路徑規(guī)則以/resoures開頭的任意請求 .permitAll() ; // 只要是基于上面/resources開頭的請求都進行放行 http.formLogin() ; // 如果請求不是上面配置的訪問uri前綴則進行登錄 }}再次訪問靜態(tài)資源,這時候就能正常訪問了,沒有跳轉(zhuǎn)到登錄頁面,在訪問Controller接口 GET /demos/home運行結(jié)果。
發(fā)現(xiàn)靜態(tài)資源能訪問,同時我們的Controller也能訪問。

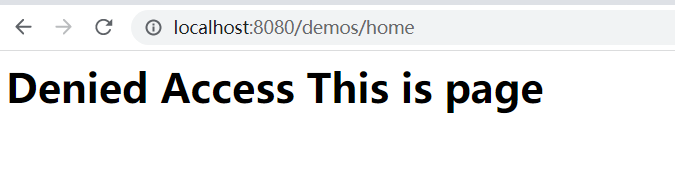
- 修改配置只放行指定的資源
protected void configure(HttpSecurity http) throws Exception { http .authorizeRequests() .antMatchers("/resources/**") .permitAll() ; // 方向/resource請求的資源 ① http .authorizeRequests() .anyRequest() // 任意請求 .authenticated() ; // 必須進行登錄認證授權(quán) ② http.formLogin() ;}以上配置后以/resources前綴的請求都會方向,其它任意的請求都會進行攔截跳轉(zhuǎn)到登錄頁面。
注意:上面的 ① ② 如果順序進行顛倒后服務啟動會報錯。報錯信息如下。
Caused by: java.lang.IllegalStateException: Can't configure antMatchers after anyRequestat org.springframework.util.Assert.state(Assert.java:76) ~[spring-core-5.3.12.jar:5.3.12]
不能在anyRequest之后配置antMatchers。
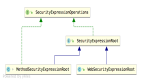
- 為請求配置角色
定義2個Controller。
@RestController@RequestMapping("/demos")public class DemoController { @GetMapping("home") public Object home() { return "demos home" ; }}@RestController@RequestMapping("/api")public class ApiController { @GetMapping("/{id}") public Object get(@PathVariable("id") Integer id) { return "獲取 - " + id + " - 數(shù)據(jù)" ; }}我們期望/demos/**接口訪問必須擁有USERS權(quán)限,/api/**接口訪問必須擁有ADMIN權(quán)限, 配置如下:
@Overrideprotected void configure(AuthenticationManagerBuilder auth) throws Exception { // 配置guest用戶,該用戶擁有ADMIN角色 auth.inMemoryAuthentication().passwordEncoder(NoOpPasswordEncoder.getInstance()).withUser("guest").password("123456").roles("ADMIN") ;}@Overrideprotected void configure(HttpSecurity http) throws Exception { http.csrf().disable() ; http.authorizeRequests().antMatchers("/resources/**").permitAll() ; // 這里無需使用ROLE_前綴,系統(tǒng)會自動插入該前綴 http.authorizeRequests().antMatchers("/demos/**").hasRole("USERS") ; // /demos/**必須具備USERS角色 http.authorizeRequests().antMatchers("/api/**").hasRole("ADMIN") ; // /api/**必須具備ADMIN角色 http.authorizeRequests().anyRequest().authenticated() ; http.formLogin() ;}分別訪問/demos/home 和 /api/1接口。
通過guest/123456登錄后,該接口之間返回了403的狀態(tài)錯誤(讀取403.html)。
我的項目中在static/error下新建了403.html錯誤頁面
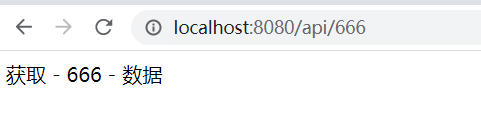
/api/**接口訪問正常,接下來我們在配置一個用于USERS權(quán)限的用戶。
protected void configure(AuthenticationManagerBuilder auth) throws Exception { auth.inMemoryAuthentication() .passwordEncoder(NoOpPasswordEncoder.getInstance()) .withUser("guest").password("123456").roles("ADMIN") .and() .withUser("test").password("666666").roles("USERS") ;}通過test用戶訪問/demos/home接口登錄后能正常訪問。
- 配置多權(quán)限
在很多情況下我們期望只要用戶用于任意其中一個權(quán)限就認定可以訪問該資源,如何配置?
http.authorizeRequests().antMatchers("/demos/**").hasAnyRole("USERS", "AKKF", "BLLE") ;http.authorizeRequests().antMatchers("/api/**").hasAnyRole("ADMIN", "MGR", "SYSTEM") ;通過上面的配置即可滿足只要擁有任意一個權(quán)限就可以放行。
- 其它配置
多個URI具有相同的權(quán)限。
http.authorizeRequests().antMatchers("/demos/**", "/api/**").hasAnyAuthority("ROLE_USERS", "ROLE_ADMIN") ;對請求的Method控制。
http.authorizeRequests().antMatchers(HttpMethod.GET).permitAll() ;
自定義登錄頁面
- 引入依賴
<dependency> <groupId>org.thymeleaf</groupId> <artifactId>thymeleaf-spring5</artifactId></dependency><dependency> <groupId>org.springframework.boot</groupId> <artifactId>spring-boot-starter-thymeleaf</artifactId></dependency>
- thymeleaf配置
spring: thymeleaf: prefix: classpath:/templates/
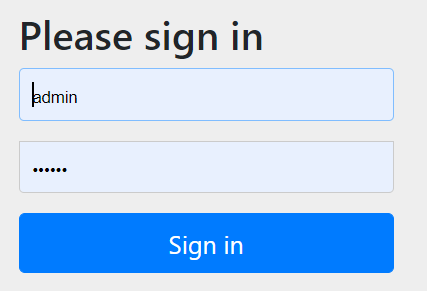
- 登錄頁面
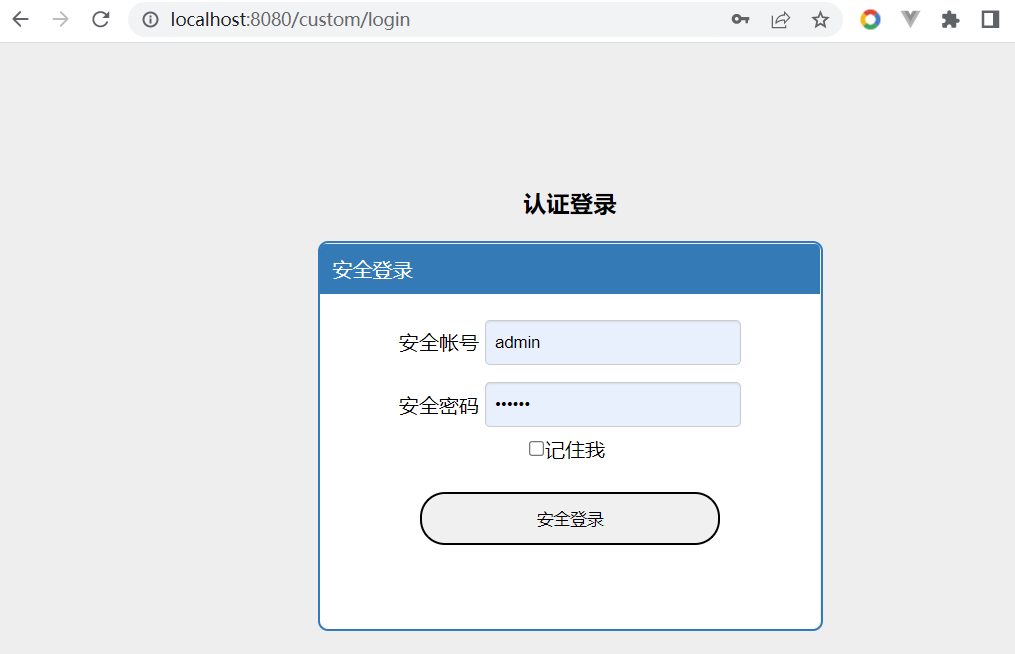
在/resources/templates/下新建login.html頁面。
這里省去無關(guān)緊要的東西。
<div class="loginContainer"> <div class="pageTitle"> <h3>認證登錄</h3> </div> <div class="loginPanel"> <div class="loginTitle">安全登錄</div> <div class="loginContent"> <form method="post" action="login"> <div class="c-row"> <label>安全帳號</label> <input type="text" class="input-control" id="username" name="username" placeholder="帳號"> </div> <div class="c-row"> <label>安全密碼</label> <input type="password" class="input-control" id="password" name="password" placeholder="密碼"> </div> <div class="c-row" style="height: auto;"> <input type="checkbox" class="checkbox-control" id="remember-me" name="remember-me"/><label for="remember-me">記住我</label> </div> <div class="c-row" style="margin-top: 20px;"> <button type="submit" class="btn btn-sm btn-primary" style="padding: 10px 15px;width: 60%;border-radius: 20px;">安全登錄</button> </div> </form> <div class="c-row"> <div th:if="${param.error}" th:text="${session.SPRING_SECURITY_LAST_EXCEPTION?.message }" class="alert alert-danger" style="padding:5px; margin-bottom:5px;"></div> </div> </div> </div></div>- Controller定義login頁面
@Controllerpublic class LoginController { @GetMapping("/custom/login") public String login() { return "login" ; }}- 自定義配置登錄頁
protected void configure(HttpSecurity http) throws Exception { http.csrf().disable() ; http.authorizeRequests().antMatchers("/resources/**").permitAll() ; http.authorizeRequests().antMatchers("/demos/**").hasRole("USERS") ; http.authorizeRequests().antMatchers("/api/**").hasRole("ADMIN") ; // 登錄頁面指向上面配置的Controller即可 http.formLogin().loginPage("/custom/login") ;}測試:
總結(jié):
- Spring Security如何配置攔截請求。
- 資源訪問必須具備權(quán)限的配置。
- 自定義登錄頁面。