DiscoArt 是一個很牛逼的開源模塊,它能根據(jù)你給定的關(guān)鍵詞自動繪畫。
繪制過程是完全可見的,你可以在 jupyter 頁面上看見這個繪制的過程:

1.準(zhǔn)備
開始之前,你要確保Python和pip已經(jīng)成功安裝在電腦上,如果沒有,可以訪問這篇文章:超詳細(xì)Python安裝指南 進(jìn)行安裝。
(可選1) 如果你用Python的目的是數(shù)據(jù)分析,可以直接安裝Anaconda:Python數(shù)據(jù)分析與挖掘好幫手—Anaconda,它內(nèi)置了Python和pip.
(可選2) 此外,推薦大家用VSCode編輯器,它有許多的優(yōu)點:Python 編程的最好搭檔—VSCode 詳細(xì)指南。
請選擇以下任一種方式輸入命令安裝依賴:
- Windows 環(huán)境 打開 Cmd (開始-運行-CMD)。
- MacOS 環(huán)境 打開 Terminal (command+空格輸入Terminal)。
- 如果你用的是 VSCode編輯器 或 Pycharm,可以直接使用界面下方的Terminal.
pip install discoart
為了運行 Discoart, 你需要Python 3.7+ 和支持 CUDA 的 PyTorch.
2.開始使用 Discoart
你可以在Jupyter中運行Discoart,這樣能方便地實時展示繪制過程:
from discoart import create

da = create()
這樣將使用默認(rèn)的 文本描述 和參數(shù)創(chuàng)建圖像:
text_prompts:
  - A beautiful painting of a singular lighthouse, shining its light across a tumultuous sea of blood by greg rutkowski and thomas kinkade, Trending on artstation.
  - yellow color scheme

init_image:
width_height: [ 1280, 768 ]

skip_steps: 0
steps: 250

init_scale: 1000
clip_guidance_scale: 5000

tv_scale: 0
range_scale: 150
sat_scale: 0
cutn_batches: 4

diffusion_model: 512x512_diffusion_uncond_finetune_008100
use_secondary_model: True
diffusion_sampling_mode: ddim

perlin_init: False
perlin_mode: mixed
seed:
eta: 0.8
clamp_grad: True
clamp_max: 0.05

randomize_class: True
clip_denoised: False
rand_mag: 0.05

cut_overview: "[12]*400+[4]*600"
cut_innercut: "[4]*400+[12]*600"
cut_icgray_p: "[0.2]*400+[0]*600"
cut_ic_pow: 1.

save_rate: 20
gif_fps: 20
gif_size_ratio: 0.5
n_batches: 4
batch_size: 1
batch_name:
clip_models:
  - ViT-B-32::openai
  - ViT-B-16::openai
  - RN50::openai
clip_models_schedules:

use_vertical_symmetry: False
use_horizontal_symmetry: False
transformation_percent: [0.09]

on_misspelled_token: ignore
diffusion_model_config:
cut_schedules_group:
name_docarray:
skip_event:
stop_event:
text_clip_on_cpu: False
truncate_overlength_prompt: False
image_output: True
visualize_cuts: False
display_rate: 1
創(chuàng)建出來的就是這個圖:

Create 支持的所有參數(shù)如下:
text_prompts:
  - A beautiful painting of a singular lighthouse, shining its light across a tumultuous sea of blood by greg rutkowski and thomas kinkade, Trending on artstation.
  - yellow color scheme

init_image:
width_height: [ 1280, 768 ]

skip_steps: 0
steps: 250

init_scale: 1000
clip_guidance_scale: 5000

tv_scale: 0
range_scale: 150
sat_scale: 0
cutn_batches: 4

diffusion_model: 512x512_diffusion_uncond_finetune_008100
use_secondary_model: True
diffusion_sampling_mode: ddim

perlin_init: False
perlin_mode: mixed
seed:
eta: 0.8
clamp_grad: True
clamp_max: 0.05

randomize_class: True
clip_denoised: False
rand_mag: 0.05

cut_overview: "[12]*400+[4]*600"
cut_innercut: "[4]*400+[12]*600"
cut_icgray_p: "[0.2]*400+[0]*600"
cut_ic_pow: 1.

save_rate: 20
gif_fps: 20
gif_size_ratio: 0.5
n_batches: 4
batch_size: 1
batch_name:
clip_models:
  - ViT-B-32::openai
  - ViT-B-16::openai
  - RN50::openai
clip_models_schedules:

use_vertical_symmetry: False
use_horizontal_symmetry: False
transformation_percent: [0.09]

on_misspelled_token: ignore
diffusion_model_config:
cut_schedules_group:
name_docarray:
skip_event:
stop_event:
text_clip_on_cpu: False
truncate_overlength_prompt: False
image_output: True
visualize_cuts: False
display_rate: 1
你可以這么使用參數(shù):
from discoart import create

da = create(
    text_prompts='A painting of sea cliffs in a tumultuous storm, Trending on ArtStation.',
    init_image='https://d2vyhzeko0lke5.cloudfront.net/2f4f6dfa5a05e078469ebe57e77b72f0.png',
    skip_steps=100,
)

如果你不是用jupyter運行的,你也可以看到中間結(jié)果,因為最終結(jié)果和中間結(jié)果都會被創(chuàng)建在當(dāng)前工作目錄下,即
./{name-docarray}/{i}-done.png
./{name-docarray}/{i}-step-{j}.png
./{name-docarray}/{i}-progress.png
./{name-docarray}/{i}-progress.gif
./{name-docarray}/da.protobuf.lz4- name-docarray是運行時定義的名稱,如果沒有定義,則會隨機(jī)生成。
- i-* 第幾個Batch。
- -done- 是當(dāng)前Batch完成后的最終圖像。
- -step- 是某一步的中間圖像,實時更新。
- *-progress.png 是到目前為止所有中間結(jié)果的png圖像,實時更新。
- *-progress.gif 是到目前為止所有中間結(jié)果的動畫 gif,實時更新。
- da.protobuf.lz4 是到目前為止所有中間結(jié)果的壓縮 protobuf,實時更新。
3.顯示/保存/加載配置
如果你想知道你當(dāng)前繪圖的配置,有三種方法:
from discoart import show_config
show_config(da) # show the config of the first run
show_config(da[3]) # show the config of the fourth run
show_config(
'discoart-06030a0198843332edc554ffebfbf288'
) # show the config of the run with a known DocArray ID
要保存 Document/DocumentArray 的配置:
from discoart import save_config
save_config(da, 'my.yml') # save the config of the first run
save_config(da[3], 'my.yml') # save the config of the fourth run
從配置中導(dǎo)入:
from discoart import create, load_config
config = load_config('my.yml')
create(**config)
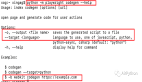
此外,你還能直接把配置導(dǎo)出為圖像的形式
from discoart.config import save_config_svg
save_config_svg(da)
圖片
我們的文章到此就結(jié)束啦,如果你喜歡今天的Python 實戰(zhàn)教程,請持續(xù)關(guān)注Python實用寶典。