詳解Spring多線程下如何保證事務的一致性
作者:Springboot實戰案例錦集
我們先來大概的了解下Spring事務的工作原理,核心技術是通過AOP實現,將獲取的Connection對象綁定到當前線程上下文中(ThreadLocal)。
環境:Spring5.3.23
1. 事務原理
首先,我們先來大概的了解下Spring事務的工作原理,核心技術是通過AOP實現,將獲取的Connection對象綁定到當前線程上下文中(ThreadLocal)。
事務核心攔截器TransactionInterceptor對象,如下(以下只會列出核心代碼):
public class TransactionInterceptor {
  public Object invoke(MethodInvocation invocation) {
    // 該方法調用為核心方法,該方法在父類中
    return invokeWithinTransaction(...) ;
  }
}
父類TransactionAspectSupport
public abstract class TransactionAspectSupport {
  protected Object invokeWithinTransaction(...) {
    // 1.1.創建事務對象
    TransactionInfo txInfo = createTransactionIfNecessary(ptm, txAttr, joinpointIdentification);
    try {
        // 調用下一個攔截器或者是目標方法
      retVal = invocation.proceedWithInvocation();
    }
    catch (Throwable ex) {
      // 1.2.回滾事務
      completeTransactionAfterThrowing(txInfo, ex);
      throw ex;
    } finally {
      // 重置ThreadLocal中的TransactionInfo對象
      cleanupTransactionInfo(txInfo);
    }
    // 1.3.提交或者回滾事務
    commitTransactionAfterReturning(txInfo);
    return retVal;
  }
}
上面代碼列出了主要的事務執行流程及動作,我們主要是關心數據庫連接對象Connection在當前線程中是如何使用的。
創建事務對象
protected TransactionInfo createTransactionIfNecessary(
    @Nullable PlatformTransactionManager tm,
    @Nullable TransactionAttribute txAttr,
    final String joinpointIdentification) {
  TransactionStatus status = null;
  if (txAttr != null) {
    if (tm != null) {
      // 創建事務狀態對象
      status = tm.getTransaction(txAttr);
    }
  }
  // 將事務狀態對象包裝到TransactionInfo中,然后將這個對象綁定到當前線程中
  return prepareTransactionInfo(tm, txAttr, joinpointIdentification, status);
}
創建事務狀態對象
public abstract class AbstractPlatformTransactionManager {
  public final TransactionStatus getTransaction(...) {
    if (isExistingTransaction(transaction)) {
      // Existing transaction found -> check propagation behavior to find out how to behave.
      return handleExistingTransaction(def, transaction, debugEnabled);
    }


    // 如果超時時間 < -1則拋出異常
    if (def.getTimeout() < TransactionDefinition.TIMEOUT_DEFAULT) {
      throw new InvalidTimeoutException("Invalid transaction timeout", def.getTimeout());
    }


    // 當前不存在事務,則拋出異常
    if (def.getPropagationBehavior() == TransactionDefinition.PROPAGATION_MANDATORY) {
      throw new IllegalTransactionStateException(
          "No existing transaction found for transaction marked with propagation 'mandatory'");
    }
    // 其它的傳播特性,開啟事務功能
    else if (def.getPropagationBehavior() == TransactionDefinition.PROPAGATION_REQUIRED ||
        def.getPropagationBehavior() == TransactionDefinition.PROPAGATION_REQUIRES_NEW ||
        def.getPropagationBehavior() == TransactionDefinition.PROPAGATION_NESTED) {
      try {
        // 開始事務
        return startTransaction(def, transaction, debugEnabled, suspendedResources);
      }
    }
  }
}
開始事務
private TransactionStatus startTransaction(
    TransactionDefinition definition,
    Object transaction,
    boolean debugEnabled,
    @Nullable SuspendedResourcesHolder suspendedResources) {


  boolean newSynchronization = (getTransactionSynchronization() != SYNCHRONIZATION_NEVER);
  DefaultTransactionStatus status = newTransactionStatus(
      definition, transaction, true, newSynchronization, debugEnabled, suspendedResources);
  //
  doBegin(transaction, definition);
  prepareSynchronization(status, definition);
  return status;
}
創建Connection對象,并綁定到當前線程
public class DataSourceTransactionManager {
  protected void doBegin(
      Object transaction,
      TransactionDefinition definition) {
    DataSourceTransactionObject txObject = (DataSourceTransactionObject) transaction;
    Connection con = null;
    try {
      if (!txObject.hasConnectionHolder() ||
          txObject.getConnectionHolder().isSynchronizedWithTransaction()) {
        // 獲取數據庫連接對象
        Connection newCon = obtainDataSource().getConnection();
        txObject.setConnectionHolder(new ConnectionHolder(newCon), true);
      }
      // 將連接對象綁定到當前的線程
      if (txObject.isNewConnectionHolder()) {
        TransactionSynchronizationManager.bindResource(obtainDataSource(), txObject.getConnectionHolder());
      }
    }
  }
}
到此,已經清楚了當開始一個新的事務時,Spring會將獲取的Connection綁定到當前的Thread中。
當我們使用通過JdbcTemplate操作數據庫時,如下:
public class JdbcTemplate {
  // 核心執行方法
  private <T> T execute(...) {
    // 獲取數據庫連接對象
    Connection con = DataSourceUtils.getConnection(obtainDataSource());
  }
}
DataSourceUtils
public abstract class DataSourceUtils {
public static Connection getConnection(DataSource dataSource) throws CannotGetJdbcConnectionException {
try {
return doGetConnection(dataSource) ;
}
}
public static Connection doGetConnection(DataSource dataSource) throws SQLException {
// 通過TransactionSynchronizationManager從當前線程上下文中獲取連接對象
// 在上面我們也是通過這個對象將連接對象綁定到當前的Thread中
ConnectionHolder conHolder = (ConnectionHolder) TransactionSynchronizationManager.getResource(dataSource);
if (conHolder != null && (conHolder.hasConnection() || conHolder.isSynchronizedWithTransaction())) {
conHolder.requested() ;
if (!conHolder.hasConnection()) {
conHolder.setConnection(fetchConnection(dataSource)) ;
}
return conHolder.getConnection() ;
}
}
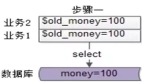
}原理相信你應該非常清楚了,每個線程都會綁定自己的Connection。那在多線程下每個線程都使用的是自己的Connection對象,所以要想保證事務的一致性,單靠傳統的方式一個@Transaction是肯定無法解決的,接下來我們就來實現一個多線程下的事務一致性的處理。
2.多線程事務
多線程下要實現事務的一致性,我們需要借助JUC下的相關類來實現。
這里直接給出代碼示例:
static class PersonService {
  @Resource
  private JdbcTemplate jdbcTemplate;
  @Resource
  private DataSource dataSource ;


  @Transactional
  public void save() throws Exception {
    CountDownLatch cdl = new CountDownLatch(2) ;
    AtomicBoolean txRollback = new AtomicBoolean(false) ;
    CompletableFuture.runAsync(() -> {
      Person person = new Person();
      person.setAge(1);
      person.setName("張三");
      transactionTemplate.execute(status -> {
        int result = 0 ;
        try {
          result = jdbcTemplate.update("insert into t_person (age, name) values (?, ?)", person.getAge(), person.getName()) ;
          // TODO
          // System.out.println(1 / 0) ;
        } catch (Exception e) {
            // 當發生異常后將狀態該為true
          txRollback.set(true) ;
        }
        try {
            // 計數減一
          cdl.countDown() ;
          // 繼續等待其它線程結束
          cdl.await() ;
        } catch (InterruptedException e) {
          e.printStackTrace();
        }
          // 如果回滾狀態為true說明有線程發生了異常,需要事務回滾
        if (txRollback.get()) {
          // 標記當前事務回滾
          status.setRollbackOnly() ;
        }
        System.out.printf("%s Insert Operator Result: %d 次%n", Thread.currentThread().getName(), result);
        return result ;
      }) ;
      }) ;
    transactionTemplate.execute(status -> {
      Person person = new Person();
      person.setAge(2);
      person.setName("李四");
      int result = 0 ;
      try {
        result = jdbcTemplate.update("insert into t_person (age, name) values (?, ?)", person.getAge(), person.getName()) ;
        // TODO
        TimeUnit.SECONDS.sleep(3) ;
      } catch (Exception e) {
        txRollback.set(true) ;
      }
      try {
        cdl.countDown() ;
        cdl.await() ;
      } catch (InterruptedException e) {
        e.printStackTrace();
      }
      if (txRollback.get()) {
        // 回滾
        status.setRollbackOnly() ;
      }
      System.out.printf("%s Insert Operator Result: %d 次%n", Thread.currentThread().getName(), result);
      return result ;
    }) ;
    cdl.await() ;
    System.err.println("Operator Complete...") ;
  }
}
以上就是借助JUC來實現多線程下的事務一致性問題。
其實如果你真的理解了事務的原理,其實這里還有更加簡單的實現方式,大家可以先思考,咱們下期再說這種簡單的實現方法。
完畢!!!
責任編輯:武曉燕
來源:
Spring全家桶實戰案例源碼