ELK Stack生產實踐——pod日志采集(EFK方案)
EFK日志采集方案
方案介紹
- 實現目標:k8s集群所有節點container和kubelet服務日志采集、k8s集群所有pod日志采集并對自定義應用日志實現過濾和清洗操作。
- fluent bit采集:相較于fluentd而言,fluent bit更加輕量,且內置了pod日志解析插件和service日志采集功能無需編寫復雜的日志處理配置。因此使用daemonset方式在每個節點部署fluent bit容器,可以最大程度減少資源占用。
- fluentd處理:雖然fluent bit足夠輕量,但日志解析處理能力弱于fluentd。fluentd支持更多的過濾處理插件,對于常用的數據處理操作,fluentd可以直接通過ruby語法處理,而fluent bit需要開發lua腳本才能實現。
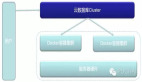
- fluentd集群方案:使用Fluentd充當日志聚合層,接收fluent-bit日志后統一進行處理操作,最后批量寫入elasticsearch集群。這樣做的好處是當k8s集群規模過大時,避免了過多的fluent-bit連接ES寫入數據,導致ES連接資源消耗過高、網絡擁堵、連接資源競爭等問題。
- fluent bit+fluentd方案:將日志采集與日志處理拆后分別交由不同的組件負責,最大程度發揮各個組件的優勢,使得配置文件更加清晰易讀,便于后期維護管理。
架構圖
 圖片
圖片
fluent bit部署與配置
參考文檔
https://docs.fluentbit.io/manual/installation/kubernetes
開啟journal日志持久化
默認情況下fluent-bit通過socket獲取journald日志,但如果使用pod運行fluent-bit時無法獲取journald日志,需要配置journald參數,改為存儲至宿主機本地/var/log/journal目錄下,然后pod掛載宿主機/var/log目錄進而讀取kubelet和container日志。
[root@work1 ~]# vim /etc/systemd/journald.conf
Storage=persistent
[root@work1 ~]# systemctl restart systemd-journald
部署fluent-bit
拉取helm包
[root@master1 ~]# helm repo add fluent https://fluent.github.io/helm-charts
[root@master1 ~]# helm pull fluent/fluent-bit --untar
[root@master1 ~]# cd fluent-bit/
[root@master1 fluent-bit]# ls
Chart.yaml  ci  dashboards  README.md  templates  values.yaml
修改配置
[root@tiaoban fluent-bit]# vim values.yaml
image:
  repository: harbor.local.com/elk/fluentbit # 修改為本地倉庫地址
  tag: v2.1.9 # 指定鏡像版本

config:
 # 默認未配置文件緩沖,新增文件緩沖配置
  service: |
    [SERVICE]
        Daemon Off
        Flush {{ .Values.flush }}
        Log_Level {{ .Values.logLevel }}
        Parsers_File /fluent-bit/etc/parsers.conf
        Parsers_File /fluent-bit/etc/conf/custom_parsers.conf
        HTTP_Server On
        HTTP_Listen 0.0.0.0
        HTTP_Port {{ .Values.metricsPort }}
        Health_Check On
        storage.path              /var/log/flb-storage/
        storage.sync              normal
        storage.checksum          off
        storage.backlog.mem_limit 5M

  # 默認配置文件只采集pod和kubelet服務日志,新增containerd日志,并排除Fluentd和Fluent-bit日志采集
  inputs: |
    [INPUT]
        Name systemd
        Tag containerd.service
        Systemd_Filter _SYSTEMD_UNIT=containerd.service
        Read_From_Tail On

    [INPUT]
        Name systemd
        Tag kubelet.service
        Systemd_Filter _SYSTEMD_UNIT=kubelet.service
        Read_From_Tail On

    [INPUT]
        Name tail
        Path /var/log/containers/*.log
        Exclude_Path /var/log/containers/fluent-bit*, /var/log/containers/fluentd-*
        multiline.parser docker, cri
        Tag kube.*
        Mem_Buf_Limit 5MB
        Skip_Long_Lines On

  # 原始字段中的time值不是標準時間格式,直接寫入es會報錯,可移除time字段,使用@timestamp標識時間
 filters: |
    [FILTER]
        name        record_modifier
        match       kube.*
        remove_key  time

  # 將所有采集到的數據直接轉發至后端fluentd服務。
  outputs: |
    [OUTPUT]
        Name forward
        Match *
        Host fluentd.logging.svc
        Port 8888
        storage.total_limit_size 5M

hotReload:
  enabled: true # 按需開啟配置熱更新
  image:
    repository: harbor.local.com/elk/fluentbit # 修改為本地倉庫地址
部署fluent-bit
[root@tiaoban fluent-bit]# kubectl create ns logging
namespace/logging created
[root@tiaoban fluent-bit]# helm install fluent-bit -n logging . -f values.yaml
NAME: fluent-bit
LAST DEPLOYED: Sat Sep 16 14:46:03 2023
NAMESPACE: logging
STATUS: deployed
REVISION: 1
NOTES:
Get Fluent Bit build information by running these commands:

export POD_NAME=$(kubectl get pods --namespace logging -l "app.kubernetes.io/name=fluent-bit,app.kubernetes.io/instance=fluent-bit" -o jsnotallow="{.items[0].metadata.name}")
kubectl --namespace logging port-forward $POD_NAME 2020:2020
curl http://127.0.0.1:2020
驗證
[root@tiaoban fluent]# cat Dockerfile
FROM fluent/fluentd:v1.16.2-debian-1.1
USER root
ADD GeoLite2-City.mmdb /fluentd/GeoLite2-City.mmdb
RUN buildDeps="build-essential libgeoip-dev autoconf automake libtool libffi-dev" \
    && sed -i "s@http://deb.debian.org@http://mirrors.aliyun.com@g" /etc/apt/sources.list \
    && apt-get update \
    && apt-get install -y --no-install-recommends $buildDeps \
    && gem sources --add https://gems.ruby-china.com/ --remove https://rubygems.org/ \
    && fluent-gem install fluent-plugin-elasticsearch fluent-plugin-geoip fluent-plugin-rewrite-tag-filter \
    && apt-get autoclean \
    && gem sources --clear-all \
    && rm -rf /var/lib/apt/lists/* \
    && rm -rf /tmp/* /var/tmp/* /usr/lib/ruby/gems/*/cache/*.gem
[root@tiaoban fluent]# docker build -t harbor.local.com/elk/fluentd:fluentd:v1.16.2 .
[root@tiaoban fluent]# docker push harbor.local.com/elk/fluentd:fluentd:v1.16.2
fluentd部署與配置
構建fluentd鏡像
由于fluentd鏡像未安裝elasticsearch、geoip、rewrite-tag-filter插件,如果在pod的init階段在線安裝插件經常會導致拉取超時無法正常啟動。因此需要提前構建包含相關插件的fluentd鏡像,并上傳至harbor倉庫中。
[root@tiaoban fluentd]# cat fluentd-conf.yaml
apiVersion: v1
kind: ConfigMap
metadata:
  name: fluentd-conf
  namespace: logging
data:
  fluent.conf : |-
    <source>
      @type forward
      port 8888
      bind 0.0.0.0
    </source>

    <match *.service>
      @type elasticsearch
      host elasticsearch-es-http.elk.svc
      port 9200
      default_elasticsearch_version 8
      user elastic
      scheme https
      password 78HOWor95Iiot076O59xq2Am
      ssl_verify false
      data_stream_name logs-${tag}-fluentd
      include_timestamp true
      <buffer>
        @type file
        flush_interval 5s
        path /fluentd/buf/service-logs.*
      </buffer>
    </match>

    <match kube.**>
      @type elasticsearch
      host elasticsearch-es-http.elk.svc
      port 9200
      default_elasticsearch_version 8
      user elastic
      scheme https
      password 78HOWor95Iiot076O59xq2Am
      ssl_verify false
      data_stream_name logs-pod-fluentd
      include_timestamp true
      <buffer>
        @type file
        flush_interval 5s
        path /fluentd/buf/pod-logs.*
      </buffer>
    </match>
fluentd部署配置
fluentd使用deployment控制器部署多副本集群,用于接收fluent bit的數據然后寫入es的數據流中。
- fluentd-conf.yaml
apiVersion: apps/v1
kind: Deployment
metadata:
  name: fluentd
  namespace: logging
spec:
  replicas: 3
  selector:
    matchLabels:
      app: fluentd
  template:
    metadata:
      labels:
        app: fluentd
    spec:
      containers:
      - name: fluentd
        image: harbor.local.com/elk/fluentd:v1.16.2
        resources:
          limits:
            memory: "128Mi"
            cpu: "500m"
        ports:
        - containerPort: 8888
        volumeMounts:
          - name: fluentd-conf
            mountPath: /fluentd/etc/fluent.conf
            subPath: fluent.conf
      volumes:
        - name: fluentd-conf
          configMap:
name: fluentd-conf- fluentd-svc.yaml
apiVersion: v1
kind: Service
metadata:
  name: fluentd
  namespace: logging
spec:
  selector:
    app: fluentd
  ports:
  - port: 8888
targetPort: 8888- fluentd.yaml
apiVersion: apps/v1
kind: Deployment
metadata:
  name: fluentd
  namespace: logging
spec:
  replicas: 3
  selector:
    matchLabels:
      app: fluentd
  template:
    metadata:
      labels:
        app: fluentd
    spec:
      containers:
      - name: fluentd
        image: harbor.local.com/elk/fluentd:v1.16.2
        resources:
          limits:
            memory: "128Mi"
            cpu: "500m"
        ports:
        - containerPort: 8888
        volumeMounts:
          - name: fluentd-conf
            mountPath: /fluentd/etc/fluent.conf
            subPath: fluent.conf
      volumes:
        - name: fluentd-conf
          configMap:
            name: fluentd-conf
部署fluentd服務
[root@tiaoban fluentd]# ls
Dockerfile  fluentd-conf.yaml  fluentd-svc.yaml  fluentd.yaml  GeoLite2-City.mmdb
[root@tiaoban fluentd]# kubectl apply -f .
configmap/fluentd-conf created
service/fluentd created
deployment.apps/fluentd created
訪問驗證
此時查看kibana索引管理,已成功創建了pod、containerd、kubelet日志數據流。
 圖片
圖片
service日志處理
雖然我們已經將service日志存儲在了elasticsearch中,但觀察發現默認情況下日志內容都在MESSAGE字段中,通常情況下,我們只會關注日志等級為warning和error的日志,因此我們需要對該字段內容做解析處理。
日志內容分析
觀察container日志可知,MESSAGE中包含了日志時間、日志等級、日志內容三部分內容
 圖片
圖片
觀察kubelet日志,MESSAGE中包含了日志時間、處理函數、日志內容三部分內容
 圖片
圖片
新增service日志處理規則
我們可以通過正則匹配插件實現MESSAGE字段值解析操作,需要注意的是正則匹配時一定是所有字段都包含,否則會因為匹配不到而無法過濾處理操作。
- service-conf.yaml
apiVersion: v1
kind: ConfigMap
metadata:
  name: service-conf
  namespace: logging
data:
  service.conf : |
    <filter containerd.service>
      @type parser
      key_name MESSAGE
      reserve_data true
      <parse>
        @type regexp
        expression /time="(?<time>[^"]+)" level=(?<level>[^ ]+) msg="(?<msg>[^"]+)"/
        time_key time
        time_format %Y-%m-%dT%H:%M:%S.%N%z
      </parse>
    </filter>

    <filter kubelet.service>
      @type parser
      key_name MESSAGE
      reserve_data true
      <parse>
        @type regexp
        expression /[EI](?<time>\d{4} \d{2}:\d{2}:\d{2}.\d{6}) +\d* (?<class>\w*).go:\d*] (?<message>.*)/
        time_key time
        time_format %m%d %H:%M:%S.%N
        timezone +08:00
      </parse>
    </filter>

    <match *.service>
      @type elasticsearch_data_stream
      host elasticsearch-es-http.elk.svc
      port 9200
      default_elasticsearch_version 8
      user elastic
      scheme https
      password 78HOWor95Iiot076O59xq2Am
      ssl_verify false
      data_stream_name logs-${tag}-fluentd
      include_timestamp true
      <buffer>
        @type file
        path /fluentd/buf/service-logs.*
      </buffer>
    </match>
訪問驗證
查看containerd服務日志,已成功解析了MESSAGE字段內容,并新增了@timestamp、leve、msg字段
 圖片
圖片
查看kubelet服務日志,同樣成功解析了MESSAGE字段內容,并新增了@timestamp、class、message字段
 圖片
圖片
自定義日志解析
需求分析
默認情況下,fluent bit會采集所有pod日志信息,并自動添加namespace、pod、container等信息,所有日志內容存儲在log字段中。 以log-demo應為日志為例,將所有日志內容存儲到log字段下無法很好的解析日志內容,因此需要編寫fluentd解析規則,實現日志內容解析。
 圖片
圖片
新增自定義日志處理規則
使用rewrite_tag_filter插件,匹配到container_name字段值為log-demo的事件時,新增myapp.log標簽,接下來對myapp.log標簽的事件進一步做解析處理操作。
- myapp-conf.yaml
apiVersion: v1
kind: ConfigMap
metadata:
  name: myapp-conf
  namespace: logging
data:
  myapp.conf : |
    <match kube.**>
      @type rewrite_tag_filter
      <rule>
        key $.kubernetes.container_name
        pattern log-demo
        tag myapp.log
      </rule>
    </match>

    <filter myapp.log>
      @type parser
      key_name log
      <parse>
        @type regexp
        expression /^(?<logtime>[^|]+) \| (?<level>[A-Z]*) *\| __main__:(?<class>\D*:\d*) - (?<content>.*)$/
        time_key logtime
        time_format %Y-%m-%d %H:%M:%S.%L
      </parse>
    </filter>

    <filter myapp.log>
      @type record_transformer
      enable_ruby
      <record>
        content ${record["content"].gsub("'", '"')}
      </record>
    </filter>

    <filter myapp.log>
      @type parser
      key_name content
      <parse>
        @type json
      </parse>
    </filter>

    <filter myapp.log>
      @type geoip
      geoip_lookup_keys remote_address
      geoip2_database /fluentd/GeoLite2-City.mmdb
      backend_library geoip2_c
      <record>
        geoip_city            ${city.names.en["remote_address"]}
        geoip_latitude        ${location.latitude["remote_address"]}
        geoip_longitude       ${location.longitude["remote_address"]}
        geoip_country         ${country.iso_code["remote_address"]}
        geoip_country_name    ${country.names.en["remote_address"]}
        geoip_postal_code     ${postal.code["remote_address"]}
        geoip_region_name     ${subdivisions.0.names.en["remote_address"]}
      </record>
    </filter>

    <match myapp.log>
      @type elasticsearch_data_stream
      host elasticsearch-es-http.elk.svc
      port 9200
      default_elasticsearch_version 8
      user elastic
      scheme https
      password 78HOWor95Iiot076O59xq2Am
      ssl_verify false
      data_stream_name logs-myapp-default
      include_timestamp true
      <buffer>
        @type file
        flush_interval 5s
        path /fluentd/buf/myapp-logs.*
      </buffer>
    </match>
訪問驗證
查看kibana索引信息,已成功創建名為logs-myapp-default的數據流。
 圖片
圖片
查看logs-myapp-default字段信息,已成功解析了日志內容。
 圖片
圖片
完整資源清單
本實驗案例所有yaml文件已上傳至git倉庫。訪問地址如下:
Github
https://github.com/cuiliang0302/blog-demo
Gitee
https://gitee.com/cuiliang0302/blog_demo
參考文檔
fluent bit轉發事件至fluentd:
https://docs.fluentbit.io/manual/pipeline/outputs/forward
構建自定義fluentd鏡像:
https://github.com/fluent/fluentd-docker-image#31-for-current-images
fluentd重寫事件tag: