圖形編輯器開發:實現自定義規則輸入框組件

圖形編輯器中,雖然編輯器內核本身很重要,但相當大的一部分工作是 UI 層的交互實現。
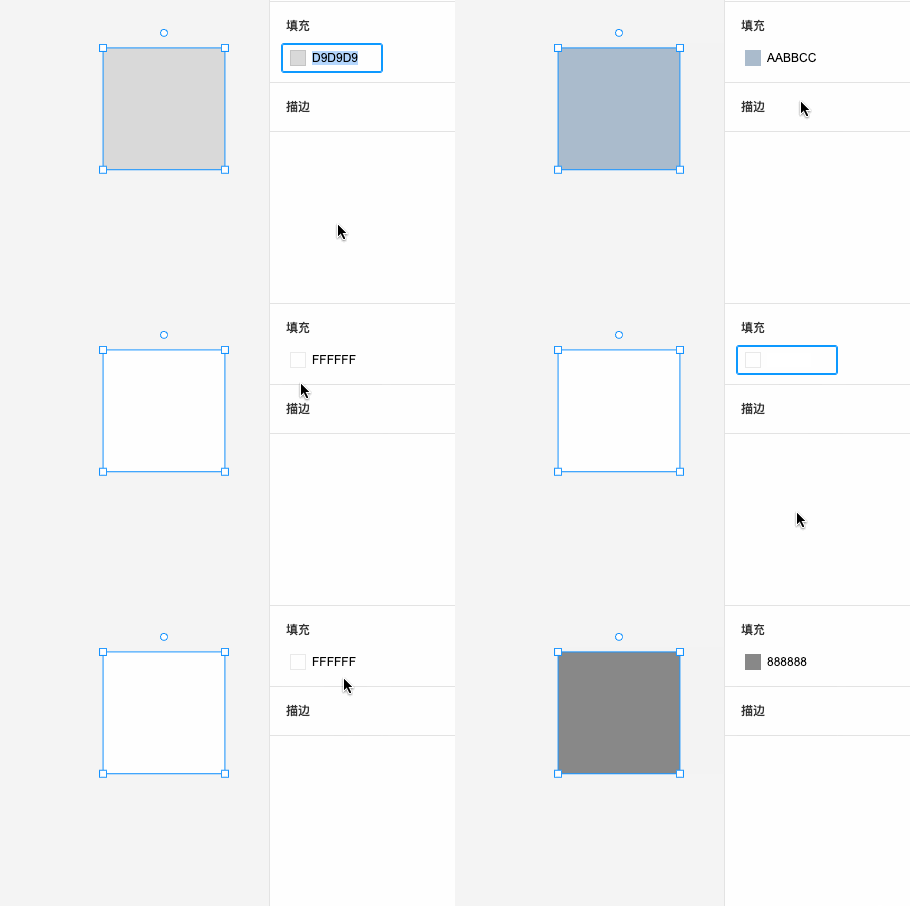
其中很重要的交互功能是用戶可以 通過輸入框去修改一些屬性。
不同類型的輸入框有著各自的規則,今天我們來看看怎么去實現這么一個 自定義規則輸入框 React 組件。
需求
我們需要做一個自定義規則輸入框。它需要支持的核心功能是,失焦時:
- 嘗試對輸入的內容進行校驗和補正,將得到的合法值去更新數據源;
- 上述操作后,如果無法得出合法值,恢復上一次的合法輸入;
一些次要的功能:
- 按下回車時自動失焦;
- 點在輸入框時,自動全選。
我之前的一篇文章講述過一個場景,即用戶輸入 hex 格式的顏色值時,應該如何實現 hex 的校驗補正算法,去拿到一個合法的值。
當時只說了校驗補正算法。這篇文章是它的一個補充,即去實現這么一個自定義規則組件,這個組件可以裝配不同格式對應的校驗補正算法。

組件實現
首先是 props 的設計。
- value:外部傳入的值,如果 props.value 發生改變,輸入框要立即改變。
- parser:轉換算法,會拿到輸入框的字符串內容。函數的返回值返回值如果是 false,表示不合法;如果是字符串,這個字符串會通過 props.onBlue 方法傳遞給調用者。
- onBlur:轉換成功后會被調用,在這里可以拿到最后的合法值。(感覺 onChange 命名會不會更好)
interface ICustomRuleInputProps {
  parser: (newValue: string, preValue: string | number) => string | false;
  value: string | number;
  onBlur: (newValue: string) => void;
}
這里選擇非受控組件的做法,用一個 inputRef 變量拿到 input 元素,通過 inputRef.current.value 去讀寫內容。
不多說,給出實現。
import { FC, useEffect, useRef } from 'react';

interface ICustomRuleInputProps {
  parser: (newValue: string, preValue: string | number) => string | false;
  value: string | number;
  onBlur: (newValue: string) => void;
}

export const CustomRuleInput: FC<ICustomRuleInputProps> = ({
  value,
  onBlur,
  parser
}) => {
  const inputRef = useRef<HTMLInputElement>(null);

  useEffect(() => {
    if (inputRef.current) {
      // 如果 props.value 改變,input 的內容無條件同步
      inputRef.current.value = String(value);
    }
  }, [value]);

  return (
    <input
      ref={inputRef}
      defaultValue={value}
      notallow={() => {
        // 點在 input 上,會自動全選輸入框內容
        inputRef.current.select();
      }}
      notallow={(e) => {
        // enter 時觸發失焦(注意中文輸入法下按下 enter 不要失焦)
        if (e.key === 'Enter' && !e.nativeEvent.isComposing) {
          e.currentTarget.blur();
        }
      }}
      notallow={(e) => {
        if (inputRef.current) {
          const str = inputRef.current.value.trim();
          // 檢驗補正
          const newValue = parser(str, value);
          if (newValue !== false) { // 能拿到一個合法值
            e.target.value = String(newValue);
            onBlur(newValue);
          } else { // 拿不到合法值,恢復為上一次的合法值
            e.target.value = String(value);
          }
        }
      }}
    />
  );
};
線上 demo 地址:
https://codesandbox.io/s/hjmmz4
基于這個組件,我們可以擴展各種特定效果的 input 組件。比如 NumberInput 和 ColorHexInput。
NumberInput 實現
下面就基于這個 CustomRuleInput,擴展一個數字輸入框 NumberInput 組件。
該組件接受的 props:
- value:數據源。如果你有需求,這里可以做一層單位轉換,比如角度轉弧度;
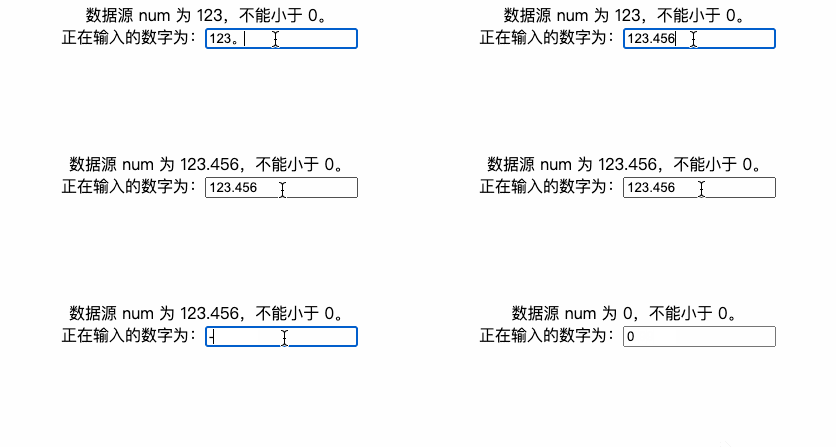
- min:最小值,如果小于 min,會修正為 min;
- onBlur:數據改變相應事件。
校驗補正算法在 NumberInput 組件內部實現。
const parser={(str) => {
  str = str.trim();

  // 字符串轉數字
  let number = Number(str);
  if (!Number.isNaN(number) && number !== value) {
    // 不能小于 min
    number = Math.max(min, number);
    console.log(number);
    return String(number);
  } else {
    return false;
  }
}}
完整實現:
import { FC, useEffect, useRef } from 'react';
import { CustomRuleInput } from './CustomRuleInput';

interface INumberInputProps {
  value: string | number;
  min?: number;
  onBlur: (newValue: number) => void;
}

export const NumberInput: FC<INumberInputProps> = ({
  value,
  min = -Infinity,
  onBlur
}) => {
  const inputRef = useRef<HTMLInputElement>(null);

  useEffect(() => {
    if (inputRef.current) {
      inputRef.current.value = String(value);
    }
  }, [value]);

  return (
    <CustomRuleInput
      parser={(str) => {
        str = str.trim();
        let number = parseToNumber(str);
        if (!Number.isNaN(number) && number !== value) {
          number = Math.max(min, number);
          console.log(number);
          return String(number);
        } else {
          return false;
        }
      }}
      value={value}
      notallow={(newVal) => onBlur(Number(newVal))}
    />
  );
};
用法:
const [num, setNum] = useState(123);

<NumberInput value={num} min={0} notallow={(val) => setNum(val)} />
效果:

ColorHexInput
然后是十六進制顏色輸入框。
這個算法我們在之前的文章講過了。
直接看組件實現:
import { FC, useEffect, useRef } from 'react';
import { CustomRuleInput } from './CustomRuleInput';

interface IProps {
  value: string;
  onBlur: (newValue: string) => void;
}

/**
 * 補正為 `RRGGBB` 格式
 *
 * reference: https://mp.weixin.qq.com/s/RWlsT-5wPTD7-OpMiVhqiA
 */
export const normalizeHex = (hex: string) => {
  hex = hex.toUpperCase();
  const match = hex.match(/[0-9A-F]{1,6}/);
  if (!match) {
    return '';
  }
  hex = match[0];

  if (hex.length === 6) {
    return hex;
  }
  if (hex.length === 4 || hex.length === 5) {
    hex = hex.slice(0, 3);
  }
  // ABC -> AABBCC
  if (hex.length === 3) {
    return hex
      .split('')
      .map((c) => c + c)
      .join('');
  }
  // AB => ABABAB
  // A -> AAAAAA
  return hex.padEnd(6, hex);
};

export const ColorHexInput: FC<IProps> = ({ value, onBlur, prefix }) => {
  const inputRef = useRef<HTMLInputElement>(null);

  useEffect(() => {
    if (inputRef.current) {
      inputRef.current.value = String(value);
    }
  }, [value]);

  return (
    <CustomRuleInput
      parser={(str, prevStr) => {
        str = str.trim();
        // check if it is a valid hex and normalize it
        str = normalizeHex(str);
        if (!str || str === prevStr) {
          return false;
        }
        return str;
      }}
      value={value}
      notallow={(newVal) => onBlur(newVal)}
    />
  );
};
結尾
除了數字和顏色值輸入框,CustomRuleInput 在圖形編輯器中用到的地方非常多,邏輯也不復雜,相比普通 input,多加一個校驗補正的 parser 算法。


