深入理解Java淺拷貝與深拷貝
淺拷貝和深拷貝是 Java 初中級面試中經常會被問到的一個問題,兩個就像是兄弟倆,一個調皮一個乖巧,現在讓我們一起來探索它們的奇妙之處!
特別說明:不論是淺拷貝還是深拷貝,都可以使用Object類的clone方法來實現,代碼如下:
protected native Object clone() throws CloneNotSupportedException;注意:clone()方法也是一個本地方法,具體實現交給虛擬機,也就是說虛擬機在運行給方法時,就會變成搞笑的C/C++代碼。
1. 淺拷貝
先讓我們來了解一下淺拷貝。它就像是我們上學時抄了學霸一份作業,但結果可能讓人出乎意料。為了演示這一點,我們創建了一個名為Student的類,這個學生有一個名為“name”的字符串字段和一個名為“age”的整數字段。
public class Student implements  Cloneable{
    private int age;
    private String name;

    public Student(int age, String name) {
        this.age = age;
        this.name = name;
    }

    public int getAge() {
        return age;
    }

    public void setAge(int age) {
        this.age = age;
    }

    public String getName() {
        return name;
    }

    public void setName(String name) {
        this.name = name;
    }

    @Override
    public String toString() {
        return super.toString().substring(19) + "{" +
                "age=" + age +
                ", name='" + name + '\'' +
                '}';
    }

    @Override
    public   Object clone() throws CloneNotSupportedException {
        return super.clone();
    }
}
接著,我們來進行測試。假設我們有一個名叫“springboot葵花寶典”的Student對象,并進行了淺拷貝。結果出來了!讓我們看看會發生什么。
public class CloneTest {

    public static void main(String[] args) throws CloneNotSupportedException {

        Student student1 = new Student(18,"springboot葵花寶典");


        Student student2 = (Student) student1.clone();


        System.out.println("淺拷貝后:");
        System.out.println("Student1:" + student1);
        System.out.println("Student2:" + student2);

        student2.setName("zbbmeta");

        System.out.println("調整了Student2 的 name  后:");
        System.out.println("Student1:" + student1);
        System.out.println("Student2:" + student2);
    }
}
測試結果如下:
淺拷貝后:
Student1:Student@4cb2c100{age=18, name='springboot葵花寶典'}
Student2:Student@39fb3ab6{age=18, name='springboot葵花寶典'}
調整了Student2 的 name 后:
Student1:Student@4cb2c100{age=18, name='springboot葵花寶典'}
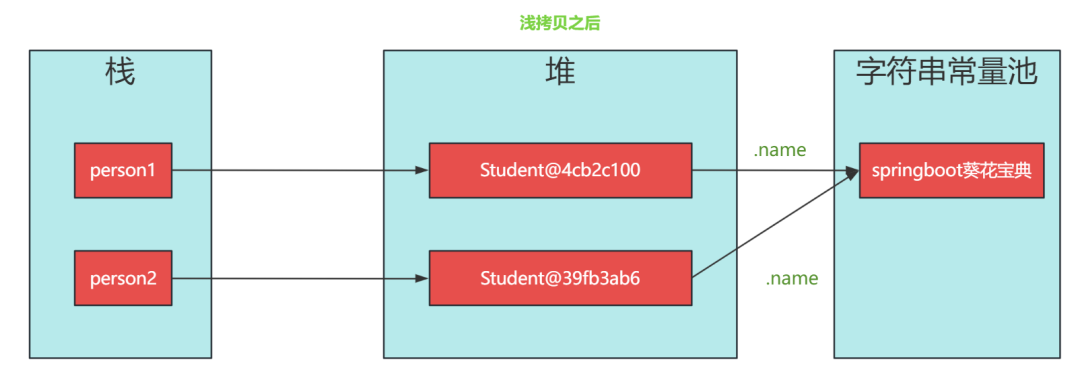
Student2:Student@39fb3ab6{age=18, name='zbbmeta'}淺拷貝后,Student1 和 Student1 引用不同對象,但值是相同的,說明拷貝成功。之后,修改了 Student2 的 name 字段,student2的name和student1的name值不同。
 圖片
圖片
注意:一個類沒有實現 Cloneable 接口,即便它重寫了 clone() 方法,依然是無法調用該方法進行對象克隆的,會拋出異常CloneNotSupportedException。
Exception in thread "main" java.lang.CloneNotSupportedException: com.zbbmeta.entity.Student
思考:前面Student只有兩個基本類型,沒有引用類型,如果給Student添加一個自定義Book引用類型,淺拷貝會是什么結果?
public class Book {
    private String bookName;
    private int price;

    public Book(String bookName, int price) {
        this.bookName = bookName;
        this.price = price;
    }

    //...   省略getter/setter 方法


    @Override
    public String toString() {
        return super.toString().substring(19) +
                " bookName='" + bookName + '\'' +
                ", price=" + price +
                '}';
    }


}
重新編寫Studnet類:
public class Student implements  Cloneable{
    private int age;
    private String name;
    private Book book;


    public Student(int age, String name, Book book) {
        this.age = age;
        this.name = name;
        this.book = book;
    }

   //...   省略getter/setter 方法

    @Override
    public String toString() {
        return super.toString().substring(19) +
                " age=" + age +
                ", name='" + name + '\'' +
                ", book=" + book +
                '}';
    }


    @Override
    public   Object clone() throws CloneNotSupportedException {
        return super.clone();
    }
}
比之前的例子多了一個自定義類型的字段 book,clone() 方法并沒有任何改變。
測試類修改內容如下:
public static void main(String[] args) throws CloneNotSupportedException {

        Student student1 = new Student(18,"springboot葵花寶典");

        Book book1 = new Book("springboot入門到精通",90);
        student1.setBook(book1);
        Student student2 = (Student) student1.clone();


        System.out.println("淺拷貝后:");
        System.out.println("Student1:" + student1);
        System.out.println("Student2:" + student2);

        Book book2 = student2.getBook();
        book2.setBookName("K8S實戰");
        book2.setPrice(70);
        System.out.println("調整了Student2 的 book  后:");
        System.out.println("Student1:" + student1);
        System.out.println("Student2:" + student2);
    }
輸出結果如下:
淺拷貝后:
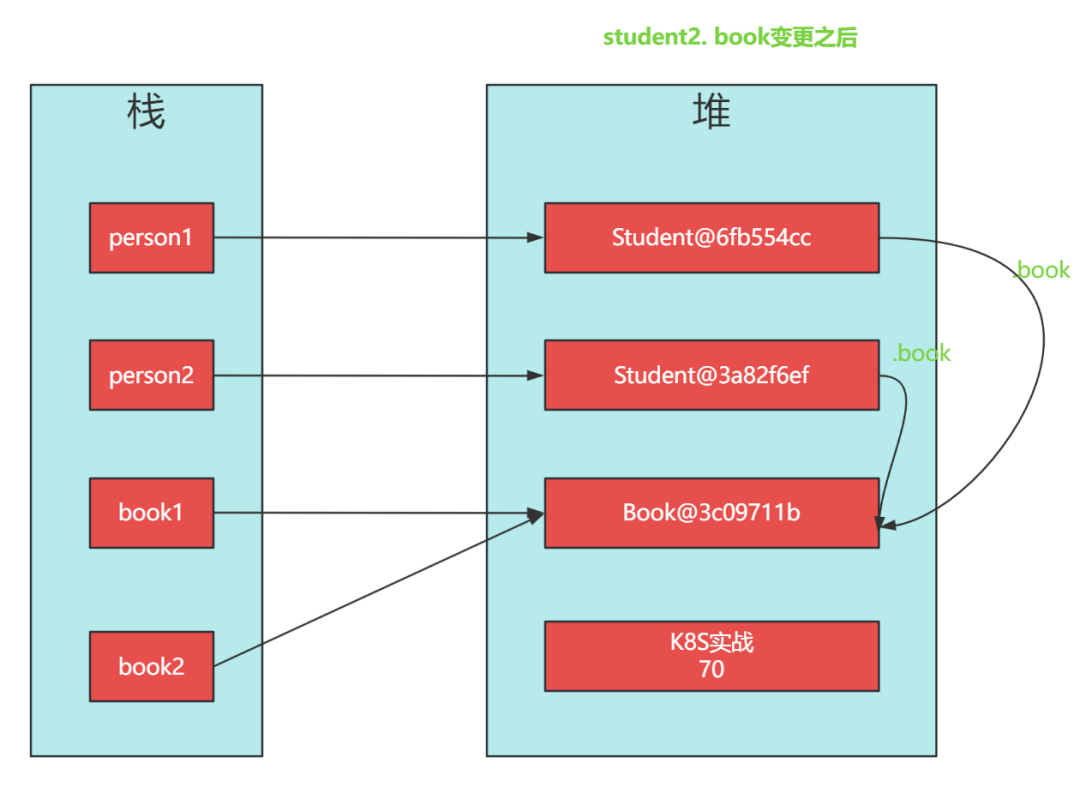
Student1:Student@6fb554cc age=18, name='springboot葵花寶典', book=Book@3c09711b bookName='springboot入門到精通', price=90}}
Student2:Student@3a82f6ef age=18, name='springboot葵花寶典', book=Book@3c09711b bookName='springboot入門到精通', price=90}}
調整了Student2 的 book 后:
Student1:Student@6fb554cc age=18, name='springboot葵花寶典', book=Book@3c09711b bookName='K8S實戰', price=70}}
Student2:Student@3a82f6ef age=18, name='springboot葵花寶典', book=Book@3c09711b bookName='K8S實戰', price=70}}student2.book 變更后,student1.book 也發生了改變。這是因為name字符串 String 是不可變對象,一個新的值必須在字符串常量池中開辟一段新的內存空間,而Book是自定義對象的內存地址并沒有發生改變,只是對應的字段值發生了改變。
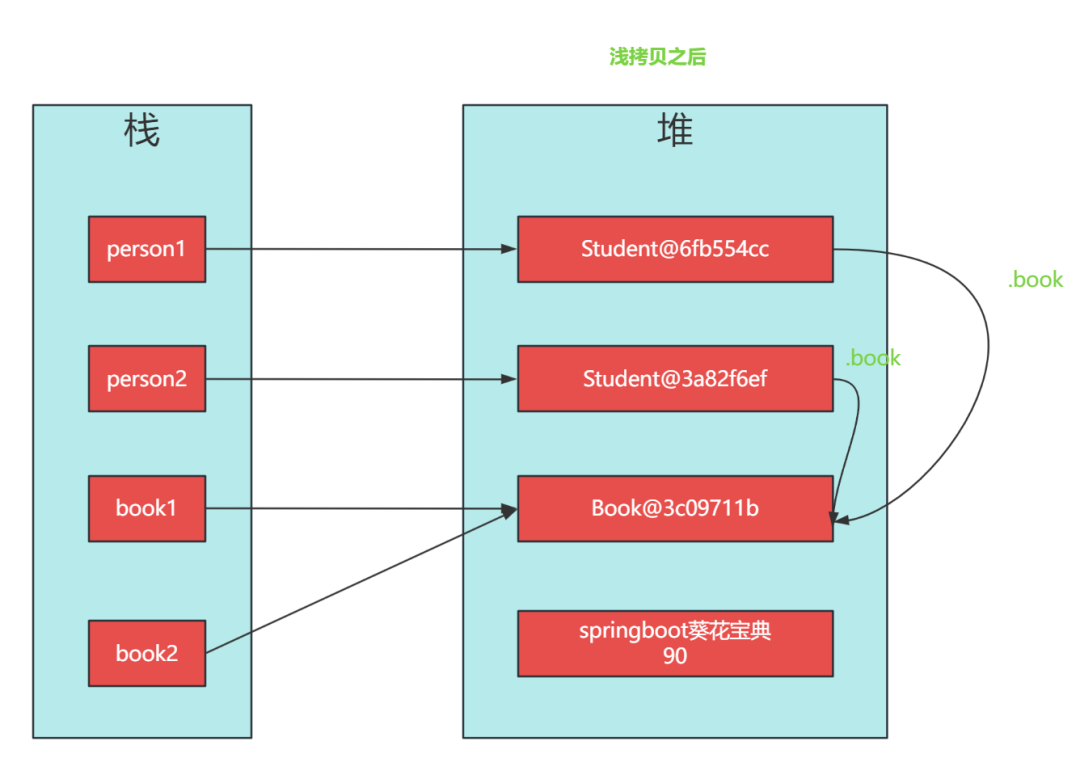
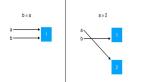
總結:淺拷貝是創建一個新的對象,這個對象有著對原始對象屬性值的一份精確拷貝。如果屬性是基本數據類型,拷貝的就是基本數據類型的值;如果屬性是引用數據類型,拷貝的就是內存地址,所以如果其中一個對象改變了引用類型的數據,就會影響另一個對象。
2. 深拷貝
深拷貝和淺拷貝不同的,深拷貝中的引用類型字段也會克隆一份,當改變任何一個對象,另外一個對象不會隨之改變。例子如下:
public class Book implements Cloneable{
    private String bookName;
    private int price;

    public Book(String bookName, int price) {
        this.bookName = bookName;
        this.price = price;
    }
 //...   省略getter/setter 方法

    @Override
    public String toString() {
        return super.toString().substring(19) +
                " bookName='" + bookName + '\'' +
                ", price=" + price +
                '}';
    }
    @Override
    public Object clone() throws CloneNotSupportedException {
        return super.clone();
    }
}
注意:此時的 Book 類和淺拷貝時不同,重寫了 clone() 方法,并實現了 Cloneable 接口。為的就是深拷貝的時候也能夠克隆該字段。
重新編寫Studnet類:
public class Student implements  Cloneable{
    private int age;
    private String name;
    private Book book;


    public Student(int age, String name, Book book) {
        this.age = age;
        this.name = name;
        this.book = book;
    }

   //...   省略getter/setter 方法

    @Override
    public String toString() {
        return super.toString().substring(19) +
                " age=" + age +
                ", name='" + name + '\'' +
                ", book=" + book +
                '}';
    }

    @Override
    public Object clone() throws CloneNotSupportedException {
        Student student = (Student) super.clone();
        student.setBook((Book) student.getBook().clone());
        return student;
    }
}
注意,此時 Student 類也與之前的不同,clone() 方法當中,不再只調用 Object 的 clone() 方法對 Student 進行克隆了,還對 Book 也進行了克隆。
測試結果如下:
淺拷貝后:
Student1:Student@6fb554cc age=18, name='springboot葵花寶典', book=Book@3c09711b bookName='springboot入門到精通', price=90}}
Student2:Student@3a82f6ef age=18, name='springboot葵花寶典', book=Book@100fc185 bookName='springboot入門到精通', price=90}}
調整了Student2 的 book  后:
Student1:Student@6fb554cc age=18, name='springboot葵花寶典', book=Book@3c09711b bookName='springboot入門到精通', price=90}}
Student2:Student@3a82f6ef age=18, name='springboot葵花寶典', book=Book@100fc185 bookName='K8S實戰', price=70}}
發現: 不僅student1 和 student2 對象不同,它們中的 book 對象不同。所以,改變了 student2 中的 book 并不會影響到 student1。

 圖片
圖片
思考:嵌套的對象比較多的時,每一個類都需要重寫clone()方法,這樣拷貝起來就比較麻煩,那么有沒有別的方法實現深拷貝。
利用序列化,序列化是將對象寫到流中便于傳輸,而反序列化則是將對象從流中讀取出來。寫入流中的對象就是對原始對象的拷貝。需要注意的是,每個要序列化的類都要實現 Serializable 接口,該接口和 Cloneable 接口類似,都是標記型接口。
public class Book implements Cloneable{
    private String bookName;
    private int price;

    public Book(String bookName, int price) {
        this.bookName = bookName;
        this.price = price;
    }
 //...   省略getter/setter 方法

    @Override
    public String toString() {
        return super.toString().substring(19) +
                " bookName='" + bookName + '\'' +
                ", price=" + price +
                '}';
    }
}
注意:Book 需要實現 Serializable 接口。
重新編寫Studnet類:
public class Student implements  Cloneable{
    private int age;
    private String name;
    private Book book;


    public Student(int age, String name, Book book) {
        this.age = age;
        this.name = name;
        this.book = book;
    }

   //...   省略getter/setter 方法

    @Override
    public String toString() {
        return super.toString().substring(19) +
                " age=" + age +
                ", name='" + name + '\'' +
                ", book=" + book +
                '}';
    }

    //深度拷貝
    public Object deepClone() throws IOException, ClassNotFoundException {
        // 序列化
        ByteArrayOutputStream bos = new ByteArrayOutputStream();
        ObjectOutputStream oos = new ObjectOutputStream(bos);

        oos.writeObject(this);

        // 反序列化
        ByteArrayInputStream bis = new ByteArrayInputStream(bos.toByteArray());
        ObjectInputStream ois = new ObjectInputStream(bis);

        return ois.readObject();
    }
}
注意:Student 類實現 Serializable 接口,并且在該類中,增加了一個 deepClone() 的方法,利用 OutputStream 進行序列化,InputStream 進行反序列化,這樣就實現了深拷貝。
public static void main(String[] args) throws  IOException, ClassNotFoundException {

        Student student1 = new Student(18,"springboot葵花寶典");

        Book book1 = new Book("springboot入門到精通",90);
        student1.setBook(book1);
        Student student2 = (Student) student1.deepClone();


        System.out.println("淺拷貝后:");
        System.out.println("Student1:" + student1);
        System.out.println("Student2:" + student2);

        Book book2 = student2.getBook();
        book2.setBookName("K8S實戰");
        book2.setPrice(70);
        System.out.println("調整了Student2 的 book  后:");
        System.out.println("Student1:" + student1);
        System.out.println("Student2:" + student2);
    }
與之前測試類不同的是,調用了 deepClone() 方法。
測試結果如下:
淺拷貝后:
Student1:Student@5dfcfece age=18, name='springboot葵花寶典', book=Book@5d5eef3d bookName='springboot入門到精通', price=90}}
Student2:Student@5a8e6209 age=18, name='springboot葵花寶典', book=Book@4b4523f8 bookName='springboot入門到精通', price=90}}
調整了Student2 的 book  后:
Student1:Student@5dfcfece age=18, name='springboot葵花寶典', book=Book@5d5eef3d bookName='springboot入門到精通', price=90}}
Student2:Student@5a8e6209 age=18, name='springboot葵花寶典', book=Book@4b4523f8 bookName='K8S實戰', price=70}}
測試結果和之前用 clone() 方法實現的深拷貝類似。
特別說明:序列化涉及到輸入流和輸出流的讀寫,在性能上要比 虛擬機實現的 clone() 方法差很多。