RenderScript:Android平臺上高性能圖形計算框架
RenderScript介紹
RenderScript是一種高性能的計算框架,用于在設備上執行復雜的數學計算,尤其是在圖像處理方面。最初是為了解決Android平臺上圖形和計算密集型任務而設計的,可以在CPU或GPU上并行執行,以利用多核處理器和圖形硬件的加速能力。

RenderScript的主要特點:
- 并行計算:RenderScript利用設備的多核處理器進行并行計算,從而顯著提高計算密集型任務的性能。
- 硬件加速:RenderScript能夠利用GPU進行硬件加速計算,適用于圖形和圖像處理任務。
- 易于使用:RenderScript使用C99樣式的語法,Android SDK提供了方便的Java/Kotlin綁定,使得可以在Android應用中輕松集成RenderScript代碼。
- 性能優化:RenderScript編譯器會自動優化代碼,以充分利用目標設備的硬件特性。
RenderScript使用場景:
- 圖像處理:如模糊、銳化、顏色轉換等。
- 計算機視覺:如特征檢測、邊緣識別等。
- 物理模擬:如碰撞檢測、粒子系統等。
隨著Android平臺的不斷發展,一些新的API和框架(如Android的NDK,Vulkan和RenderEffect(Android12))也提供了類似的性能優化能力。
Google在Android開發者博客中提到,其實早已不建議將RenderScript用于對性能需求至關重要的任務,Android開發者應該轉向可在GPU硬件層級上高效運作、且具有出色的跨平臺體驗的Vulkan API 。
RenderScript腳本
RenderScript .rs 腳本使用一種類似于C99的語法,允許開發者定義內核函數,這些函數可以在Android設備上高效地并行執行。.rs 腳本的基本語法說明:
1.腳本頭
在腳本的開頭,通常會看到一些預處理指令,用于定義腳本的版本和Java包名:
#pragma version(1)
#pragma rs java_package_name(com.reathin.renderscript)- #pragma version(1):指定RenderScript的版本。
- #pragma rs java_package_name(...):指定生成的Java類的包名。
2.數據類型
RenderScript使用了一些特殊的數據類型,如rs_allocation,是用于訪問內存分配的引用類型。還有uchar4、float4等類型,用于表示包含四個無符號字符或浮點數的向量。
3.內核函數
內核函數是RenderScript腳本中的主要部分,定義了要在GPU或CPU上執行的并行計算。
void blur(const uchar4 *v_in, uchar4 *v_out, const void *usrData, uint32_t x, uint32_t y) {
    // 內核函數的實現
}- void blur(...):定義了一個名為blur的內核函數。
- const uchar4 *v_in 和 uchar4 *v_out:是輸入和輸出參數的指針。
- const void *usrData:是傳遞給內核的任意用戶數據。
- uint32_t x, uint32_t y:是內核的當前執行位置(例如,像素坐標)。
4.根函數
根函數是RenderScript腳本的入口點。當RenderScript運行時加載腳本時,會調用根函數。
void root() {
    // 初始化代碼或調用其他內核函數
}
5.訪問全局變量
在.rs腳本中,可以定義全局變量,并在內核函數中訪問它們。
float mGlobalData;

void blur(...) {
    // 使用 mGlobalData
}
6.調用其他內核
可以在根函數或其他內核函數中調用其他內核。
void blur(...) {
    // 另一個內核的實現
}

void root() {
    // 調用另一個內核
    blur(...);
}
7.分配和訪問內存
RenderScript使用Allocation對象來管理內存。在Java代碼中,會創建Allocation對象,并將其傳遞給RenderScript內核。在.rs腳本中,可以使用rsGetAllocationAddress函數來獲取指向這些分配的內存的指針。
const uchar4 *in = rsGetAllocationAddress(inAllocation);
uchar4 *out = rsGetAllocationAddress(outAllocation);
8.內置函數和API
RenderScript提供了一些內置函數和API,用于執行常見的操作,如數學運算、內存操作、類型轉換等。
9.編譯和鏈接
.rs 腳本文件在構建過程中會被編譯成字節碼,并與應用一起打包。當應用運行時,RenderScript運行時會加載這些字節碼,并在適當的硬件上執行它們。
10.注意事項
- 確保你的RenderScript腳本遵循Android NDK的C/C++編碼規范。
- 由于RenderScript是并行執行的,要避免在內核函數中使用可能導致競態條件的全局變量或狀態。
- 對于涉及復雜計算或大量數據的任務,RenderScript可以顯著提高性能,也要小心管理內存和避免不必要的復制操作。
使用RenderScript實現模糊效果
在Android中實現模糊效果通常使用RenderScript或者自定義的OpenGL著色器。RenderScript和OpenGL都是相對底層的API,需要一定的圖形編程知識。對于更簡單的模糊效果,可以考慮使用第三方庫,如Glide或Picasso,提供了更高級的API來實現圖像模糊和其他效果。
下面使用RenderScript實現模糊效果。
添加RenderScript支持:
android {

    //高版本Studio
    buildFeatures {
        renderScript true
    }

    defaultConfig {
        renderscriptTargetApi 21
        renderscriptSupportModeEnabled true
    }

}
使用RenderScript實現圖片高斯模糊效果
public static Bitmap scriptBlur(Context context, Bitmap origin, int outWidth, int outHeight, float radius) {
    if (origin == null || origin.isRecycled()) {
        return null;
    }
    mStartTime = System.currentTimeMillis();
    RenderScript renderScript = RenderScript.create(context.getApplicationContext(), RenderScript.ContextType.NORMAL, RenderScript.CREATE_FLAG_NONE);
    Allocation blurInput = Allocation.createFromBitmap(renderScript, origin);
    Allocation blurOutput = Allocation.createTyped(renderScript, blurInput.getType());
    ScriptIntrinsicBlur blur = null;
    try {
        blur = ScriptIntrinsicBlur.create(renderScript, blurInput.getElement());
    } catch (RSIllegalArgumentException e) {
        if (e.getMessage().contains("Unsuported element type")) {
            blur = ScriptIntrinsicBlur.create(renderScript, Element.U8_4(renderScript));
        }
    }
    if (blur == null) {
        //腳本模糊失敗
        return null;
    }
    blur.setRadius(range(radius, 0, 20));
    blur.setInput(blurInput);
    blur.forEach(blurOutput);

    Bitmap result = Bitmap.createBitmap(outWidth, outHeight, Bitmap.Config.ARGB_8888);
    blurOutput.copyTo(result);

    //釋放
    renderScript.destroy();
    blurInput.destroy();
    blurOutput.destroy();

    origin.recycle();
    long time = (System.currentTimeMillis() - mStartTime);
    Log.i("BlurUtils", "模糊用時:[" + time + "ms]");
    return result;
}
調用高斯模糊方法
val bitmap = BitmapFactory.decodeResource(resources, R.mipmap.image_beauty)

val bitmap1 = BlurUtils.scriptBlur(this, bitmap, bitmap.getWidth(), bitmap.getHeight(), 10f)
val bitmap2 = BlurUtils.scriptBlur(this, bitmap, bitmap.getWidth(), bitmap.getHeight(), 15f)
val bitmap3 = BlurUtils.scriptBlur(this, bitmap, bitmap.getWidth(), bitmap.getHeight(), 20f)
val bitmap4 = BlurUtils.scriptBlur(this, bitmap, bitmap.getWidth(), bitmap.getHeight(), 25f)

imageView1.setImageBitmap(bitmap)
imageView2.setImageBitmap(bitmap2)
imageView3.setImageBitmap(bitmap3)
imageView4.setImageBitmap(bitmap4)
運行效果:

在Android中,RenderScript .rs 腳本是一種用C99語法編寫的文件,定義了可以在設備上并行執行的計算任務。通常用于圖形和計算密集型任務,例如圖像處理、物理模擬等。.rs 腳本編譯后會生成二進制代碼,代碼可以在Android設備的CPU或GPU上執行。
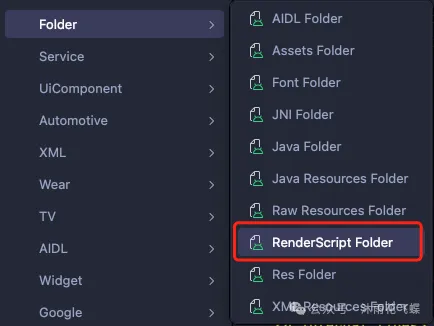
Android Studio創建rs腳本目錄:
(1) 編寫.rs腳本
#pragma version(1)
#pragma rs java_package_name(com.reathin.renderscript)

// 輸入圖像
rs_allocation inImage;
// 輸出圖像
rs_allocation outImage;
// 模糊半徑
float blurRadius;

// 定義模糊函數
void blur(const uchar4 *v_in, uchar4 *v_out, const void *usrData, uint32_t x, uint32_t y) {
    // 計算模糊后的顏色值
    float4 sum = 0.0f;
    int count = 0;
    for (float dx = -blurRadius; dx <= blurRadius; dx++) {
        for (float dy = -blurRadius; dy <= blurRadius; dy++) {
            int newX = x + (int)dx;
            int newY = y + (int)dy;
            if (newX >= 0 && newX < rsAllocationGetDimX(inImage) && newY >= 0 && newY < rsAllocationGetDimY(inImage)) {
                sum += rsUnpackColor8888(*v_in + rsAllocationGetElementPtr(inImage, newX, newY));
                count++;
            }
        }
    }
    *v_out = rsPackColor8888(sum / count);
}

// 根函數,RenderScript執行時的入口點
void root() {
    // 獲取輸入和輸出圖像的指針
    const uchar4 *in = rsGetAllocationAddress(inImage);
    uchar4 *out = rsGetAllocationAddress(outImage);

    // 執行模糊操作
    blur(in, out, NULL, 0, 0);
}
將 .rs 文件放在項目的 src/main/rs 目錄下。在Java或Kotlin代碼中加載這個腳本并設置輸入和輸出 Allocation 對象,最后調用RenderScript的內核來執行模糊操作。
(2) 調用RenderScript內核進行調用
import android.content.Context;
import android.graphics.Bitmap;
import android.renderscript.Allocation;
import android.renderscript.Element;
import android.renderscript.RenderScript;
import android.renderscript.ScriptC;

public Bitmap applyBlur(Context context, Bitmap inputBitmap, float blurRadius) {
    // 創建RenderScript實例
    RenderScript rs = RenderScript.create(context);

    // 創建輸入和輸出Allocation
    Allocation inputAllocation = Allocation.createFromBitmap(rs, inputBitmap);
    Allocation outputAllocation = Allocation.createTyped(rs, inputAllocation.getType());

    // 加載RenderScript腳本
    ScriptC_Blur blurScript = new ScriptC_Blur(rs);
    blurScript.set_inImage(inputAllocation);
    blurScript.set_outImage(outputAllocation);
    blurScript.set_blurRadius(blurRadius);

    // 執行模糊操作
    blurScript.invoke_root();

    // 創建輸出位圖并復制數據
    Bitmap outputBitmap = Bitmap.createBitmap(inputBitmap.getWidth(), inputBitmap.getHeight(), inputBitmap.getConfig());
    outputAllocation.copyTo(outputBitmap);

    // 銷毀資源和清理
    inputAllocation.destroy();
    outputAllocation.destroy();
    rs.destroy();

    return outputBitmap;
}
ScriptC_Blur是根據.rs腳本文件自動生成的類。需要用實際的類名替換ScriptC_Blur應該與.rs文件名相同(去掉.rs擴展名,并將下劃線_替換為駝峰命名法的大寫字母)。
完整示例代碼: https://github.com/Reathin/Sample-Android