實(shí)戰(zhàn):如何編寫一個(gè) OpenTelemetry Extensions

前言
前段時(shí)間我們從 SkyWalking 切換到了 OpenTelemetry ,與此同時(shí)之前使用 SkyWalking 編寫的插件也得轉(zhuǎn)移到 OpenTelemetry 體系下。
好在 OpenTelemetry 社區(qū)也提供了 Extensions 的擴(kuò)展開(kāi)發(fā),我們可以不用去修改社區(qū)發(fā)行版:opentelemetry-javaagent.jar 的源碼也可以擴(kuò)展其中的能力。
比如可以:
- 修改一些 trace,某些 span 不想記錄等。
- 新增 metrics
這次我準(zhǔn)備編寫的插件也是和 metrics 有關(guān)的,因?yàn)?pulsar 的 Java sdk 中并沒(méi)有暴露客戶端的一些監(jiān)控指標(biāo),所以我需要在插件中攔截到一些關(guān)鍵函數(shù),然后執(zhí)行暴露出指標(biāo)。
截止到本文編寫的時(shí)候, Pulsar 社區(qū)也已經(jīng)將 Java-client 集成了 OpenTelemetry,后續(xù)正式發(fā)版后我這個(gè)插件也可以光榮退休了。
由于 OpenTelemetry 社區(qū)還處于高速發(fā)展階段,我在中文社區(qū)沒(méi)有找到類似的參考文章(甚至英文社區(qū)也沒(méi)有,只有一些 example 代碼,或者是只有去社區(qū)成熟插件里去參考代碼)
其中也踩了不少坑,所以覺(jué)得非常有必要分享出來(lái)幫助大家減少遇到同類問(wèn)題的機(jī)會(huì)。
開(kāi)發(fā)流程
OpenTelemetry extension 的寫法其實(shí)和 skywalking 相似,都是用的 bytebuddy這個(gè)字節(jié)碼增強(qiáng)庫(kù),只是在一些 API 上有一些區(qū)別。
創(chuàng)建項(xiàng)目
首先需要?jiǎng)?chuàng)建一個(gè) Java 項(xiàng)目,這里我直接參考了官方的示例,使用了 gradle 進(jìn)行管理(理論上 maven 也是可以的,只是要找到在 gradle 使用的 maven 插件)。
這里貼一下簡(jiǎn)化版的 build.gradle 文件:
plugins {
    id 'java'
    id "com.github.johnrengelman.shadow" version "8.1.1"
    id "com.diffplug.spotless" version "6.24.0"
}

group = 'com.xx.otel.extensions'
version = '1.0.0'

ext {
    versions = [
            // this line is managed by .github/scripts/update-sdk-version.sh
            opentelemetrySdk           : "1.34.1",

            // these lines are managed by .github/scripts/update-version.sh
            opentelemetryJavaagent     : "2.1.0-SNAPSHOT",
            opentelemetryJavaagentAlpha: "2.1.0-alpha-SNAPSHOT",

            junit                      : "5.10.1"
    ]

    deps = [
    // 自動(dòng)生成服務(wù)發(fā)現(xiàn) service 文件
            autoservice: dependencies.create(group: 'com.google.auto.service', name: 'auto-service', version: '1.1.1')
    ]
}

repositories {
    mavenLocal()
    maven { url "https://maven.aliyun.com/repository/public" }
    mavenCentral()
}

configurations {
    otel
}


dependencies {

    implementation(platform("io.opentelemetry:opentelemetry-bom:${versions.opentelemetrySdk}"))

    /*
    Interfaces and SPIs that we implement. We use `compileOnly` dependency because during
    runtime all necessary classes are provided by javaagent itself.
     */
    compileOnly 'io.opentelemetry:opentelemetry-sdk-extension-autoconfigure-spi:1.34.1'
    compileOnly 'io.opentelemetry.instrumentation:opentelemetry-instrumentation-api:1.32.0'
    compileOnly 'io.opentelemetry.javaagent:opentelemetry-javaagent-extension-api:1.32.0-alpha'

    //Provides @AutoService annotation that makes registration of our SPI implementations much easier
    compileOnly deps.autoservice
    annotationProcessor deps.autoservice

    // https://mvnrepository.com/artifact/org.apache.pulsar/pulsar-client
    compileOnly 'org.apache.pulsar:pulsar-client:2.8.0'

}

test {
    useJUnitPlatform()
}
然后便是要?jiǎng)?chuàng)建 javaagent 的一個(gè)核心類:
@AutoService(InstrumentationModule.class)
public class PulsarInstrumentationModule extends InstrumentationModule {
    public PulsarInstrumentationModule() {
        super("pulsar-client-metrics", "pulsar-client-metrics-2.8.0");
    }
}
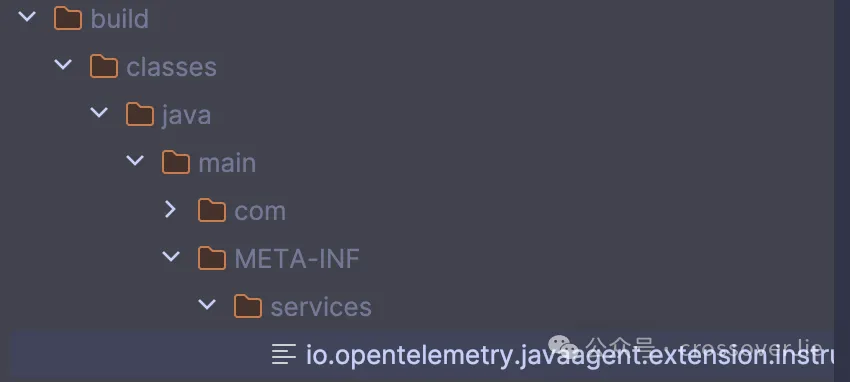
在這個(gè)類中定義我們插件的名稱,同時(shí)使用 @AutoService 注解可以在打包的時(shí)候幫我們?cè)?nbsp;META-INF/services/目錄下生成 SPI 服務(wù)發(fā)現(xiàn)的文件:

這是一個(gè) Google 的插件,本質(zhì)是插件是使用 SPI 的方式進(jìn)行開(kāi)發(fā)的。
關(guān)于 SPI 以前也寫過(guò)一篇文章,不熟的朋友可以用作參考:
- Java SPI 的原理與應(yīng)用
創(chuàng)建 Instrumentation
之后就需要?jiǎng)?chuàng)建自己的 Instrumentation,這里可以把它理解為自己的攔截器,需要配置對(duì)哪個(gè)類的哪個(gè)函數(shù)進(jìn)行攔截:
public class ProducerCreateImplInstrumentation implements TypeInstrumentation {

    @Override
    public ElementMatcher<TypeDescription> typeMatcher() {
        return named("org.apache.pulsar.client.impl.ProducerBuilderImpl");
    }
    @Override
    public void transform(TypeTransformer transformer) {
        transformer.applyAdviceToMethod(
                isMethod()
                        .and(named("createAsync")),
                ProducerCreateImplInstrumentation.class.getName() + "$ProducerCreateImplConstructorAdvice");
    }
比如這就是對(duì) ProducerBuilderImpl 類的 createAsync 創(chuàng)建函數(shù)進(jìn)行攔截,攔截之后的邏輯寫在了 ProducerCreateImplConstructorAdvice 類中。
值得注意的是對(duì)一些繼承和實(shí)現(xiàn)類的攔截方式是不相同的:
@Override
public ElementMatcher<TypeDescription> typeMatcher() {
    return extendsClass(named(ENHANCE_CLASS));
    // return implementsInterface(named(ENHANCE_CLASS));
}
從這兩個(gè)函數(shù)名稱就能看出,分別是針對(duì)繼承和實(shí)現(xiàn)類進(jìn)行攔截的。
這里的 API 比 SkyWalking 的更易讀一些。
之后需要把我們自定義的 Instrumentation 注冊(cè)到剛才的 PulsarInstrumentationModule 類中:
@Override
    public List<TypeInstrumentation> typeInstrumentations() {
        return Arrays.asList(
                new ProducerCreateImplInstrumentation(),
                new ProducerCloseImplInstrumentation(),
                );
    }
有多個(gè)的話也都得進(jìn)行注冊(cè)。
編寫切面代碼
之后便是編寫我們自定義的切面邏輯了,也就是剛才自定義的 ProducerCreateImplConstructorAdvice 類:
public static class ProducerCreateImplConstructorAdvice {

        @Advice.OnMethodEnter(suppress = Throwable.class)
        public static void onEnter() {
            // inert your code
            MetricsRegistration.registerProducer();
        }

        @Advice.OnMethodExit(suppress = Throwable.class)
        public static void after(
                @Advice.Return CompletableFuture<Producer> completableFuture) {
            try {
                Producer producer = completableFuture.get();
                CollectionHelper.PRODUCER_COLLECTION.addObject(producer);
            } catch (Throwable e) {
                System.err.println(e.getMessage());
            }
        }
    }
可以看得出來(lái)其實(shí)就是兩個(gè)核心的注解:
- @Advice.OnMethodEnter 切面函數(shù)調(diào)用之前
- @Advice.OnMethodExit 切面函數(shù)調(diào)用之后
還可以在 @Advice.OnMethodExit的函數(shù)中使用 @Advice.Return獲得函數(shù)調(diào)用的返回值。
當(dāng)然也可以使用 @Advice.This 來(lái)獲取切面的調(diào)用對(duì)象。
編寫自定義 metrics
因?yàn)槲疫@個(gè)插件的主要目的是暴露一些自定義的 metrics,所以需要使用到 io.opentelemetry.api.metrics 這個(gè)包:
這里以 Producer 生產(chǎn)者為例,整體流程如下:
- 創(chuàng)建生產(chǎn)者的時(shí)候?qū)⑸a(chǎn)者對(duì)象存儲(chǔ)起來(lái)
- OpenTelemetry 框架會(huì)每隔一段時(shí)間回調(diào)一個(gè)自定義的函數(shù)
- 在這個(gè)函數(shù)中遍歷所有的 producer 獲取它的監(jiān)控指標(biāo),然后暴露出去。
注冊(cè)函數(shù):
public static void registerObservers() {
    Meter meter = MetricsRegistration.getMeter();

    meter.gaugeBuilder("pulsar_producer_num_msg_send")
            .setDescription("The number of messages published in the last interval")
            .ofLongs()
            .buildWithCallback(
                    r -> recordProducerMetrics(r, ProducerStats::getNumMsgsSent));
private static void recordProducerMetrics(ObservableLongMeasurement observableLongMeasurement, Function<ProducerStats, Long> getter) {
for (Producer producer : CollectionHelper.PRODUCER_COLLECTION.list()) {
ProducerStats stats = producer.getStats();
String topic = producer.getTopic();
if (topic.endsWith(RetryMessageUtil.RETRY_GROUP_TOPIC_SUFFIX)) {
continue;
} observableLongMeasurement.record(getter.apply(stats),
Attributes.of(PRODUCER_NAME, producer.getProducerName(), TOPIC, topic));
}}回調(diào)函數(shù),在這個(gè)函數(shù)中遍歷所有的生產(chǎn)者,然后讀取它的監(jiān)控指標(biāo)。
這樣就完成了一個(gè)自定義指標(biāo)的暴露,使用的時(shí)候只需要加載這個(gè)插件即可:
java -javaagent:opentelemetry-javaagent.jar \
     -Dotel.javaagent.extensinotallow=ext.jar
     -jar myapp.jar
-Dotel.javaagent.extensinotallow=/extensions當(dāng)然也可以指定一個(gè)目錄,該目錄下所有的 jar 都會(huì)被作為 extensions 被加入進(jìn)來(lái)。
打包
使用 ./gradlew build 打包,之后可以在build/libs/目錄下找到生成物。
當(dāng)然也可以將 extension 直接打包到 opentelemetry-javaagent.jar中,這樣就可以不用指定 -Dotel.javaagent.extensions參數(shù)了。
具體可以在 gradle 中加入以下 task:
task extendedAgent(type: Jar) {
  dependsOn(configurations.otel)
  archiveFileName = "opentelemetry-javaagent.jar"
  from zipTree(configurations.otel.singleFile)
  from(tasks.shadowJar.archiveFile) {
    into "extensions"
  }
  //Preserve MANIFEST.MF file from the upstream javaagent
  doFirst {
    manifest.from(
      zipTree(configurations.otel.singleFile).matching {
        include 'META-INF/MANIFEST.MF'
      }.singleFile
    )
  }
}
具體可以參考這里的配置:https://github.com/open-telemetry/opentelemetry-java-instrumentation/blob/main/examples/extension/build.gradle#L125
踩坑
看起來(lái)這個(gè)開(kāi)發(fā)過(guò)程挺簡(jiǎn)單的,但其中的坑還是不少。
NoClassDefFoundError
首先第一個(gè)就是我在調(diào)試過(guò)程中出現(xiàn) NoClassDefFoundError 的異常。
但我把打包好的 extension 解壓后明明是可以看到這個(gè)類的。

排查一段時(shí)間后沒(méi)啥頭緒,我就從頭仔細(xì)閱讀了開(kāi)發(fā)文檔:

發(fā)現(xiàn)我們需要重寫 getAdditionalHelperClassNames函數(shù),用于將我們外部的一些工具類加入到應(yīng)用的 class loader 中,不然在應(yīng)用在運(yùn)行的時(shí)候就會(huì)報(bào) NoClassDefFoundError 的錯(cuò)誤。
因?yàn)槭亲止?jié)碼增強(qiáng)的關(guān)系,所以很多日常開(kāi)發(fā)覺(jué)得很常見(jiàn)的地方都不行了,比如:
- 如果切面類是一個(gè)內(nèi)部類的時(shí)候,必須使用靜態(tài)函數(shù)。
- 只能包含靜態(tài)函數(shù)。
- 不能包含任何字段,常量。
- 不能使用任何外部類,如果要使用就得使用 getAdditionalHelperClassNames 額外加入到 class loader 中(這一條就是我遇到的問(wèn)題)。
- 所有的函數(shù)必須使用 @Advice 注解。
以上的內(nèi)容其實(shí)在文檔中都有寫:

所以還是得仔細(xì)閱讀文檔。
缺少異常日志
其實(shí)上述的異常剛開(kāi)始都沒(méi)有打印出來(lái),只有一個(gè)現(xiàn)象就是程序沒(méi)有正常運(yùn)行。
因?yàn)闆](méi)有日志也不知道如何排查,也懷疑是不是運(yùn)行過(guò)程中報(bào)錯(cuò)了,所以就嘗試把@Advice 注解的函數(shù)全部 try catch ,果然打印了上述的異常日志。

之后我注意到了注解的這個(gè)參數(shù),原來(lái)在默認(rèn)情況下是不會(huì)打印任何日志的,需要手動(dòng)打開(kāi)。
比如這樣:@Advice.OnMethodExit(suppress = Throwable.class)
調(diào)試日志
最后就是調(diào)試功能了,因?yàn)槲疫@個(gè)插件的是把指標(biāo)發(fā)送到 OpenTelemetry-collector ,再由它發(fā)往 VictoriaMetrics/Prometheus;由于整個(gè)鏈路比較長(zhǎng),我想看到最終生成的指標(biāo)是否正常的干擾條件太多了。
好在 OpenTelemetry 提供了多種 metrics.exporter 的輸出方式:
- -Dotel.metrics.exporter=otlp (default),默認(rèn)通過(guò) otlp 協(xié)議輸出到 collector 中。
- -Dotel.metrics.exporter=logging,以 stdout 的方式輸出到控制臺(tái),主要用于調(diào)試
- -Dotel.metrics.exporter=logging-otlp
- -Dotel.metrics.exporter=prometheus,以 Prometheus 的方式輸出,還可以配置端口,這樣也可以讓 Prometheus 進(jìn)行遠(yuǎn)程采集,同樣的也可以在本地調(diào)試。
采用哪種方式可以根據(jù)環(huán)境情況自行選擇。
Opentelemetry-operator 配置 extension
最近在使用 opentelemetry-operator注入 agent 的時(shí)候發(fā)現(xiàn) operator 目前并不支持配置 extension,所以在社區(qū)也提交了一個(gè)草案,下周會(huì)嘗試提交一個(gè) PR 來(lái)新增這個(gè)特性。
這個(gè)需求我在 issue 列表中找到了好幾個(gè),時(shí)間也挺久遠(yuǎn)了,不太確定為什么社區(qū)還為實(shí)現(xiàn)。
目前 operator 只支持在自定義鏡像中配置 javaagent.jar,無(wú)法配置 extension:
這個(gè)原理在之前的文章中有提到。
apiVersion: opentelemetry.io/v1alpha1
kind: Instrumentation
metadata:
  name: my-instrumentation
spec:
  java:
    image: your-customized-auto-instrumentation-image:java
我的目的是可以在自定義鏡像中把 extension 也復(fù)制進(jìn)去,類似于這樣:
FROM busybox

ADD open-telemetry/opentelemetry-javaagent.jar /javaagent.jar

# Copy extensions to specify a path.
ADD open-telemetry/ext-1.0.0.jar /ext-1.0.0.jar

RUN chmod -R go+r /javaagent.jar
RUN chmod -R go+r /ext-1.0.0.jar
然后在 CRD 中配置這個(gè) extension 的路徑:
apiVersion: opentelemetry.io/v1alpha1
kind: Instrumentation
metadata:
  name: my-instrumentation
spec:
  java:
    image: custom-image:1.0.0
    extensions: /ext-1.0.0.jar
    env:
    # If extension.jar already exists in the container, you can only specify a specific path with this environment variable.
      - name: OTEL_EXTENSIONS_DIR
        value: /custom-dir
這樣 operator 在拿到 extension 的路徑時(shí),就可以在環(huán)境變量中加入 -Dotel.javaagent.extensinotallow=${java.extensions} 參數(shù),從而實(shí)現(xiàn)自定義 extension 的目的。
總結(jié)
整個(gè)過(guò)程其實(shí)并不復(fù)雜,只是由于目前用的人還不算多,所以也很少有人寫教程或者文章,相信用不了多久就會(huì)慢慢普及。
這里有一些官方的 example可以參考。
參考鏈接:
- https://github.com/apache/pulsar/pull/22178。
- https://opentelemetry.io/docs/languages/java/automatic/extensions/。
- https://github.com/open-telemetry/opentelemetry-java-。instrumentation/tree/main/examples/extension#extensions-examples。
- https://github.com/open-telemetry/opentelemetry-operator/issues/1758#issuecomment-1982159356。


