深入剖析 Java 線程池:原理、使用與優秀實踐
作者:Java技術營地
通過線程池技術,我們可以實現線程的復用管理,有效避免頻繁創建/銷毀線程的系統開銷,同時提供流量控制、任務隊列管理等關鍵能力。
一、為什么需要線程池?
在大數據、高并發的時代背景下,Java線程池作為并發編程的利器,已成為開發者必須掌握的核心技能。讓我們先看一組對比數據:
- 直接創建線程耗時:約0.5ms
- 線程池獲取線程耗時:約0.01ms
- 系統默認最大線程數:約1萬個(Linux系統)
通過線程池技術,我們可以實現線程的復用管理,有效避免頻繁創建/銷毀線程的系統開銷,同時提供流量控制、任務隊列管理等關鍵能力。

二、線程池核心架構解析
1. 線程池類關系圖
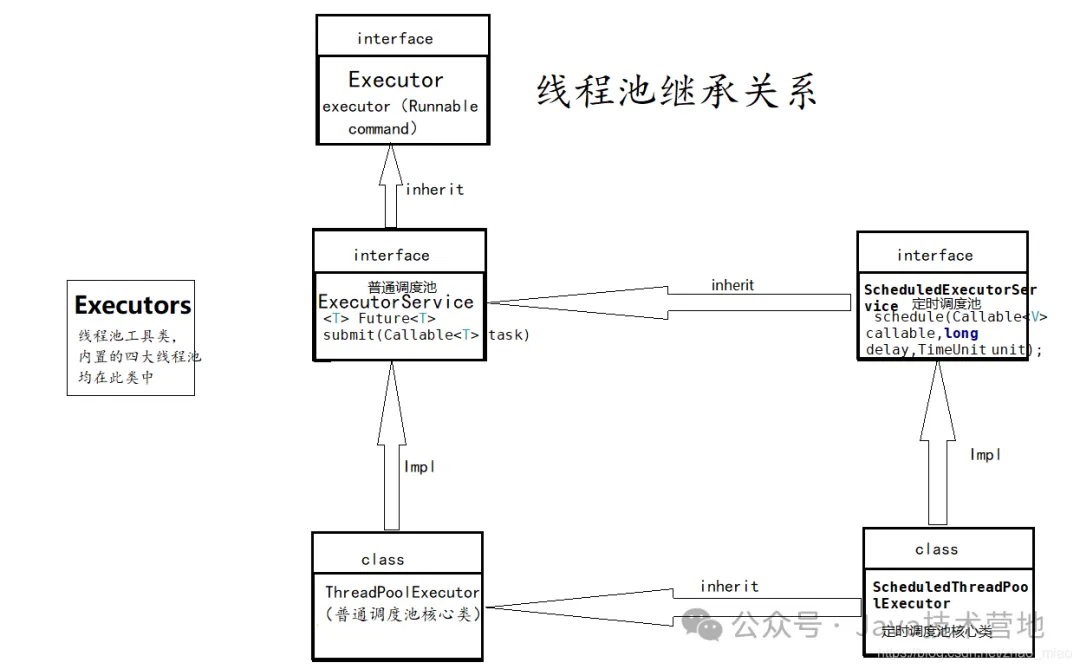
2. 核心參數詳解
public ThreadPoolExecutor(
    int corePoolSize,       // 核心線程數(常駐線程)
    int maximumPoolSize,    // 最大線程數
    long keepAliveTime,     // 空閑線程存活時間
    TimeUnit unit,          // 時間單位
    BlockingQueue<Runnable> workQueue, // 任務隊列
    ThreadFactory threadFactory,       // 線程工廠
    RejectedExecutionHandler handler)  // 拒絕策略
三、線程池工作流程實戰
1. 銀行窗口模型
想象銀行辦理業務的場景:
- 核心窗口(corePoolSize)
- 臨時窗口(maximumPoolSize - corePoolSize)
- 等候區(workQueue)
- 客滿策略(handler)
2. 代碼示例
public class ThreadPoolDemo {
    public static void main(String[] args) {
        // 創建自定義線程池
        ThreadPoolExecutor executor = new ThreadPoolExecutor(
            2,                      // 核心線程2個
            5,                     // 最大線程5個
            60, TimeUnit.SECONDS,  // 空閑線程存活時間
            new ArrayBlockingQueue<>(10), // 容量10的隊列
            Executors.defaultThreadFactory(), // 默認線程工廠
            new ThreadPoolExecutor.AbortPolicy()); // 拒絕策略

        // 提交20個任務
        for (int i = 0; i < 20; i++) {
            final int taskId = i;
            executor.execute(() -> {
                System.out.println(Thread.currentThread().getName()
                    + " 執行任務:" + taskId);
                try {
                    Thread.sleep(1000); // 模擬任務執行
                } catch (InterruptedException e) {
                    e.printStackTrace();
                }
            });
        }

        executor.shutdown(); // 優雅關閉
    }
}
執行結果分析:
pool-1-thread-1 執行任務:0
pool-1-thread-2 執行任務:1
pool-1-thread-3 執行任務:11
pool-1-thread-4 執行任務:12
pool-1-thread-5 執行任務:13
(后續任務進入隊列或被拒絕)
四、四大線程池類型對比
1. 創建方式對比
// 固定大小線程池
ExecutorService fixedPool = Executors.newFixedThreadPool(5);

// 單線程池
ExecutorService singlePool = Executors.newSingleThreadExecutor();

// 緩存線程池
ExecutorService cachedPool = Executors.newCachedThreadPool();

// 調度線程池
ScheduledExecutorService scheduledPool =
    Executors.newScheduledThreadPool(3);
2. 內部實現差異
類型 | 核心線程數 | 最大線程數 | 隊列類型 |
FixedThreadPool | 指定值 | 同核心數 | LinkedBlockingQueue |
CachedThreadPool | 0 | Integer.MAX | SynchronousQueue |
SingleThreadPool | 1 | 1 | LinkedBlockingQueue |
ScheduledPool | 指定值 | Integer.MAX | DelayedWorkQueue |
五、源碼級深度解析
1. 核心執行流程(execute方法)
public void execute(Runnable command) {
    if (command == null)
        throw new NullPointerException();

    int c = ctl.get();
    // 階段1:核心線程處理
    if (workerCountOf(c) < corePoolSize) {
        if (addWorker(command, true))
            return;
        c = ctl.get();
    }
    // 階段2:入隊列
    if (isRunning(c) && workQueue.offer(command)) {
        int recheck = ctl.get();
        if (!isRunning(recheck) && remove(command))
            reject(command);
        else if (workerCountOf(recheck) == 0)
            addWorker(null, false);
    }
    // 階段3:創建非核心線程
    else if (!addWorker(command, false))
        reject(command); // 執行拒絕策略
}
2. Worker線程工作原理
每個Worker包含:
- Thread實例:實際執行線程
- Runnable task:初始任務
- 循環從隊列獲取任務執行
六、實戰經驗與避坑指南
1. 參數配置黃金法則
(1) CPU密集型:核心數 = CPU核數 + 1
(2) IO密集型:核心數 = CPU核數 * 2
(3) 隊列選擇:
- 快速響應:SynchronousQueue
- 流量削峰:LinkedBlockingQueue
- 延時任務:DelayedWorkQueue
2. 常見問題解決方案
場景1:任務堆積導致OOM
// 錯誤示范:使用無界隊列
new ThreadPoolExecutor(n, n, 0, TimeUnit.SECONDS,
    new LinkedBlockingQueue<>());

// 正確做法:使用有界隊列+合適拒絕策略
new ThreadPoolExecutor(n, 2*n, 60, TimeUnit.SECONDS,
    new ArrayBlockingQueue<>(1000),
    new CustomRejectedPolicy());
場景2:線程泄露
// 必須調用shutdown
executor.shutdown();

// 或者使用Hook關閉
Runtime.getRuntime().addShutdownHook(new Thread(() -> {
    executor.shutdown();
    try {
        if (!executor.awaitTermination(60, TimeUnit.SECONDS)) {
            executor.shutdownNow();
        }
    } catch (InterruptedException e) {
        executor.shutdownNow();
    }
}));
3. 監控技巧
自定義線程池監控:
public class MonitorThreadPool extends ThreadPoolExecutor {
    // 重寫鉤子方法
    @Override
    protected void beforeExecute(Thread t, Runnable r) {
        System.out.println("Task start: " + ((Task) r).getId());
    }

    @Override
    protected void afterExecute(Runnable r, Throwable t) {
        System.out.println("Task complete: " + ((Task) r).getId());
    }

    // 自定義監控方法
    public void printStats() {
        System.out.println("Pool Size: " + this.getPoolSize());
        System.out.println("Active Count: " + this.getActiveCount());
        System.out.println("Queue Size: " + this.getQueue().size());
    }
}
七、線程池性能優化
1. 并行處理優化示例
// 使用CompletableFuture實現并行計算
public class ParallelProcessor {
    private final ExecutorService executor =
        Executors.newWorkStealingPool();

    public Result process(List<Task> tasks) {
        List<CompletableFuture<PartialResult>> futures = tasks.stream()
            .map(task -> CompletableFuture.supplyAsync(
                () -> compute(task), executor))
            .collect(Collectors.toList());

        CompletableFuture<Void> allDone =
            CompletableFuture.allOf(futures.toArray(new CompletableFuture[0]));

        return allDone.thenApply(v ->
            futures.stream()
                .map(CompletableFuture::join)
                .reduce(new Result(), this::merge))
            .join();
    }
}
2. 上下文傳遞方案
// 使用TransmittableThreadLocal解決線程池上下文傳遞
TransmittableThreadLocal<String> context = new TransmittableThreadLocal<>();

void executeTask() {
    context.set("main-context");
    executor.execute(TtlRunnable.get(() -> {
        System.out.println("Get context: " + context.get());
    }));
}
八、總結與展望
通過本文的深度解析,相信你已經掌握了:
- 線程池的底層實現原理
- 參數配置的黃金法則
- 常見問題的解決方案
- 性能優化的高級技巧
未來趨勢建議關注:
- 虛擬線程(Project Loom)
- 響應式編程結合
- AI自動調參技術
責任編輯:趙寧寧
來源:
Java技術營地