ASP.NET的HTTP模塊和處理程序之模塊實現
實現一個提供安全服務的HTTP模塊
現在我們實現一個HTTP模塊,它為我們的Web應用程序提供安全服務。該HTTP模塊基本上是提供一種定制的身份認證服務。它將接收HTTP請求中的身份憑證,并確定該憑證是否有效。如果有效,與用戶相關的角色是什么?通過User.Identity對象,它把這些角色與訪問我們的Web應用程序頁面的用戶的標識關聯起來。
下面是該HTTP模塊的代碼:
- using System;
- using System.Web;
- using System.Security.Principal;
- namespace SecurityModules
- {
- /// Class1的總體描述。
- public class CustomAuthenticationModule : IHttpModule
- {
- public CustomAuthenticationModule()
- {
- }
- public void Init(HttpApplication r_objApplication)
- {
- // 向Application 對象注冊事件處理程序。
- r_objApplication.AuthenticateRequest +=
- new EventHandler(this.AuthenticateRequest) ;
- }
- public void Dispose()
- {
- // 此處空出,因為我們不需要做什么操作。
- }
- private void AuthenticateRequest(object r_objSender,EventArgs r_objEventArgs)
- {
- // 鑒別用戶的憑證,并找出用戶角色。。
- 1. HttpApplication objApp = (HttpApplication) r_objSender ;
- 2. HttpContext objContext = (HttpContext) objApp.Context ;
- 3. if ( (objApp.Request["userid"] == null) ||
- 4. (objApp.Request["password"] == null) )
- 5. {
- 6. objContext.Response.Write("<H1>Credentials not provided</H1>") ;
- 7. objContext.Response.End() ;
- 8. }
- 9. string userid = "" ;
- 10. userid = objApp.Request["userid"].ToString() ;
- 11. string password = "" ;
- 12. password = objApp.Request["password"].ToString() ;
- 13. string[] strRoles ;
- 14. strRoles = AuthenticateAndGetRoles(userid, password) ;
- 15. if ((strRoles == null) || (strRoles.GetLength(0) == 0))
- 16. {
- 17. objContext.Response.Write("<H1>We are sorry but we could not
- find this user id and password in our database</H1>") ;
- 18. objApp.CompleteRequest() ;
- 19. }
- 20. GenericIdentity objIdentity = new GenericIdentity(userid,
- "CustomAuthentication") ;
- 21. objContext.User = new GenericPrincipal(objIdentity, strRoles) ;
- }
- private string[] AuthenticateAndGetRoles(string r_strUserID,string r_strPassword)
- {
- string[] strRoles = null ;
- if ((r_strUserID.Equals("Steve")) && (r_strPassword.Equals("15seconds")))
- {
- strRoles = new String[1] ;
- strRoles[0] = "Administrator" ;
- }
- else if ((r_strUserID.Equals("Mansoor")) && (r_strPassword.Equals("mas")))
- {
- strRoles = new string[1] ;
- strRoles[0] = "User" ;
- }
- return strRoles ;
- }
- }
- }
#p#
我們研究一下上面的代碼
我們是從Init函數開始的。這個函數把處理程序的AuthenticateRequest事件插入Application(應用程序)對象的事件處理程序列表中。這將導致引發AuthenticationRequest事件的時候Application調用該方法。
我們的HTTP模塊初始化之后,我們就可以調用它的AuthenticateRequest方法來鑒別客戶端請求。AuthenticateRequest方法是該安全/身份認證機制的核心。在這個函數中:
1和2行提取HttpApplication和HttpContext對象。3到7行檢測是否沒有給我們提供了用戶id或密碼。如果沒有提供,就顯示錯誤信息,請求處理過程終止。
9到12行從HttpRequest對象中提取用戶id和密碼。
14行調用一個叫做AuthenticateAndGetRoles的輔助(helper)函數。這個函數主要執行身份驗證并決定用戶角色。上面的代碼采用了硬編碼(hard-coded),只允許兩個用戶使用,但是我們可以擴展這個方法,并添加代碼與用戶數據庫交互操作并檢索用戶的角色。
16到19行檢測是否有角色與用戶關聯。如果沒有就意味著傳遞給我們的憑證沒有通過驗證;因此該憑證是無效的。因此,給客戶端發送一個錯誤信息,并且請求結束了。
20和21行非常重要,因為這兩行實際上告訴ASP.NET HTTP運行時已登錄用戶的身份。這兩行成功執行以后,我們的aspx頁面就能夠使用User對象訪問這些信息了。
現在我們看一看這種身份驗證機制的運行情況。目前我們只允許下面兩個用戶登錄到系統:
· User id = Steve, Password = 15seconds, Role = Administrator
· User id = Mansoor, Password = mas, Role = User
注意用戶id和密碼是大小寫敏感的(區分大小寫)。
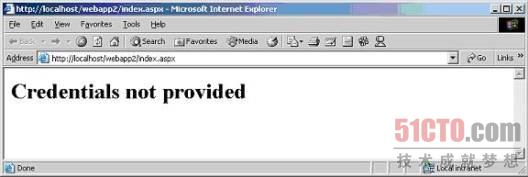
首先試圖不提供憑證登錄系統,在IE中輸入http://localhost/webapp2/index.aspx將看到下面的消息:
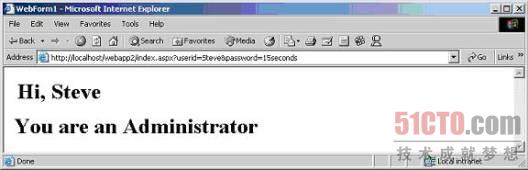
現在試圖使用用戶id“Steve”和密碼“15seconds”登錄系統。輸入 http://localhost/webapp2/index.aspx?userid=Steve&password=15seconds你將看到下面的歡迎消息:
現在試圖使用用戶id“Mansoor”和秘碼“mas”登錄系統。輸入http://localhost/webapp2/index.aspx?userid=Mansoor&password=mas你將看到下面的歡迎消息頁面:

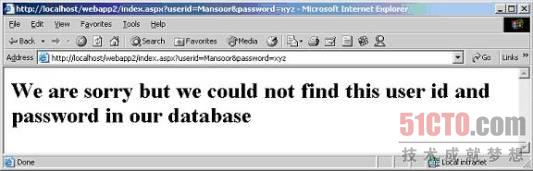
現在試圖使用錯誤的用戶id和密碼組合來登錄系統。輸入http://localhost/webapp2/index.aspx?userid=Mansoor&password=xyz你將看到下面的錯誤消息:
這表明我們的安全模塊在起作用了。你可以通過在AuthenticateAndGetRoles方法中使用數據庫訪問代碼來擴展該安全模塊。
要使所有的部分都起作用,我們必須對web.config文件進行一些修改。首先,由于我們要使用自己的身份驗證,因此不需要其它的身份驗證機制。為了達到這個目的,改變webapp2的web.config文件中的<authentication>節點,如下所示:
- <authentication mode="None"/>
類似地,不允許匿名用戶訪問我們的Web站點。給web.config文件添加下面的語句:
- <authorization>
- <deny users="?"/>
- </authorization>
用于至少能夠匿名訪問用于提供憑證的文件。在web.config文件中使用下面的配置設置信息把index.aspx作為***能夠匿名訪問的文件:
- <location path="index.aspx">
- <system.web>
- <authorization>
- <allow users="*"/>
- </authorization>
- </system.web>
- </location>
#p#
結論
你可能已經意識到有了HTTP處理程序和模塊后,ASP.NET已經給開發者提供了強大的能量。把你自己的組件插入ASP.NET請求處理管道,享受它的優點吧。
作為練習,你應該進一步改進程序,使示例身份驗證模塊更加靈活,并能根據用戶的需要進行調整。
【編輯推薦】