一步一步教你150行代碼實現(xiàn)簡書滑動返回效果
作者:程序亦非猿
通過閱讀本文你能學習到:
1、ViewDragHelper的使用(如果你想學習自定義View,那么ViewDragHelper你絕對不能錯過)
2、好像也沒有什么了....
這個效果,難度不大,會ViewDragHelper的同學應該10分鐘就能寫出來了吧~如果不會也沒關(guān)系~
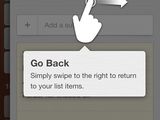
今天帶大家實現(xiàn)簡書的滑動返回效果.
先看看效果圖:

最終效果圖.gif
因為沒有具體內(nèi)容,也沒有簡書的圖片資源,所以稍微簡陋了點.
但是依然不妨礙我們的效果展示~
OK,接下來慣例,通過閱讀本文你能學習到:
- ViewDragHelper的使用(如果你想學習自定義View,那么ViewDragHelper你絕對不能錯過)
- 好像也沒有什么了....
這個效果,難度不大,會ViewDragHelper的同學應該10分鐘就能寫出來了吧~
如果不會也沒關(guān)系~
1. 我們自定義一個SwipeBackFrameLayout繼承自FrameLayout
1.1 因為看到左邊黃色的View是被遮住的,而另外一個View的寬度是MatchParent的,所以FrameLayout是不錯的選擇.
順便增加一個回調(diào),通知activity去finish
- public void setCallback(Callback mCallback){
- this.mCallback = mCallback;
- }
- private Callback mCallback;
- public interface Callback{
- void onShouldFinish();
- }
1.2 Xml布局,非常簡單:
- <yifeiyuan.practice.practicedemos.drager.SwipeBackFrameLayout
- xmlns:android="http://schemas.android.com/apk/res/android"
- xmlns:tools="http://schemas.android.com/tools"
- android:id="@+id/swipe_back"
- android:layout_width="match_parent"
- android:layout_height="match_parent"
- tools:context="yifeiyuan.practice.practicedemos.drager.SwipeBackActivity">
- <TextView
- android:layout_width="40dp"
- android:layout_height="match_parent"
- android:text="@string/hello_world"
- android:gravity="center"
- android:background="#ffff00"
- />
- <View
- android:layout_width="match_parent"
- android:layout_height="match_parent"
- android:background="#ff00ff"
- />
- </yifeiyuan.practice.practicedemos.drager.SwipeBackFrameLayout>
1.3 實例化一個ViewDragHelper
- //1f代表靈敏度
- mDragHelper = ViewDragHelper.create(this, 1f,new ViewDragHelper.Callback() {
- @Override
- public boolean tryCaptureView(View child, int pointerId) {
- return false;
- }
- }
- //因為我們是從左向右滑動 所以設(shè)置EDGE_LEFT
- mDragHelper.setEdgeTrackingEnabled(ViewDragHelper.EDGE_LEFT);
1.4 在SwipeBackFrameLayout里實例化xml里的子View
- private View mDividerView;
- private View mContentView;
- @Override
- protected void onFinishInflate() {
- super.onFinishInflate();
- mDividerView = getChildAt(0);
- mDividerView.setAlpha(0f);
- mContentView = getChildAt(1);
- }
1.5 讓ViewDragHelper處理touch事件
- @Override
- public boolean onInterceptTouchEvent(MotionEvent ev) {
- return mDragHelper.shouldInterceptTouchEvent(ev);
- }
- @Override
- public boolean onTouchEvent(MotionEvent event) {
- mDragHelper.processTouchEvent(event);
- return true;
- }
1.6重寫ViewDragHelper的一些處理方法
已附上詳細注釋
- @Override
- public void onEdgeTouched(int edgeFlags, int pointerId) {
- super.onEdgeTouched(edgeFlags, pointerId);
- //觸摸到左邊界的時候 我們capture住mContentView
- mDragHelper.captureChildView(mContentView, pointerId);
- }
- @Override
- public int getViewHorizontalDragRange(View child) {
- return 1;
- }
- @Override
- public void onViewPositionChanged(View changedView, int left, int top, int dx, int dy) {
- super.onViewPositionChanged(changedView, left, top, dx, dy);
- Log.d(TAG, "onViewPositionChanged() called with left = [" + left + "], top = [" + top + "], dx = [" + dx + "], dy = [" + dy + "]");
- //0.0 - 1.0
- //Notice 這邊可以給個接口回調(diào)出去,就可以做各種炫酷的效果了
- float alpha = (float) (left*1.0/mDividerWidth);
- mDividerView.setAlpha(alpha);
- }
- @Override
- public int clampViewPositionHorizontal(View child, int left, int dx) {
- // Log.d(TAG, "clampViewPositionHorizontal() called with dx = [" + dx + "]");
- // 計算left 我們的目標范圍是0-dividerwidth的寬度
- mLastdx = dx;
- int newLeft = Math.min(mDividerWidth, Math.max(left,0));
- return newLeft;
- }
- @Override
- public void onViewReleased(View releasedChild, float xvel, float yvel) {
- //>0代表用戶想關(guān)閉
- if (mLastdx>0){
- // 還不到關(guān)閉條件,我們讓view滑動過去,再關(guān)閉
- if (mDividerWidth != releasedChild.getLeft()) {
- mDragHelper.settleCapturedViewAt(mDividerWidth,releasedChild.getTop();
- invalidate();
- } else {
- if (mCallback != null) {
- mCallback.onShouldFinish();
- }
- }
- }else{
- //用戶不想關(guān)閉 ,則滑動到最左邊
- if (mDividerWidth != 0) {
- mDragHelper.settleCapturedViewAt(0, releasedChild.getTop());
- invalidate();
- }
- }
- }
- @Override
- public void onViewDragStateChanged(int state) {
- super.onViewDragStateChanged(state);
- //滑動停止,并且到達了滑動的判斷條件 則回調(diào)關(guān)閉
- if(mDragHelper.getViewDragState()==ViewDragHelper.STATE_IDLE&&mCallback != null&&mDividerWidth==mContentView.getLeft()&&mLastdx>0) {
- mCallback.onShouldFinish();
- }
- }
- });
1.7 增加對view滑動事件處理,對于以上mDividerWidth我們在onLayout里獲取
- private int mDividerWidth;
- @Override
- protected void onLayout(boolean changed, int left, int top, int right, int bottom) {
- super.onLayout(changed, left, top, right, bottom);
- mDividerWidth = mDividerView.getWidth();
- }
- //Notice view 剛初始化的時候就會被調(diào)用一次
- @Override
- public void computeScroll() {
- super.computeScroll();
- // Log.d(TAG, "computeScroll() called with " + "");
- if (mDragHelper.continueSettling(true)) {
- invalidate();
- }
- }
我們寫完自定義view后還需要自定義一下activity的退出動畫~
2.定義activity的finish動畫
2.1 在anim目錄下,創(chuàng)建兩個動畫xml:
- //no_anim
- <alpha
- android:duration="300"
- xmlns:android="http://schemas.android.com/apk/res/android"
- android:fromAlpha="1.0"
- android:toAlpha="1.0"
- ></alpha>
- //out_to_right
- <translate
- xmlns:android="http://schemas.android.com/apk/res/android"
- android:duration="300"
- android:fromXDelta="0%"
- android:toXDelta="100%"
- ></translate>
2.2 在activity里設(shè)置callback監(jiān)聽,并運用動畫
- mSwipeBack.setCallback(new SwipeBackFrameLayout.Callback() {
- @Override
- public void onShouldFinish() {
- finish();
- overridePendingTransition(R.anim.no_anim, R.anim.out_to_right);
- }
- });
好了!!~代碼量非常少!~就是這么簡單~
吐槽一下,簡書對代碼塊的支持太差了,代碼復制過來全是亂的!!
同學們還是去看源碼吧:
源碼在我的Github上
責任編輯:倪明
來源:
簡書