手把手教你用1行命令實(shí)現(xiàn)人臉識(shí)別
環(huán)境要求
- Ubuntu 17.10
- Python 2.7.14
環(huán)境搭建
1、 安裝 Ubuntu17.10 > 安裝步驟在這里。
2、 安裝 Python2.7.14 (Ubuntu17.10 默認(rèn)Python版本為2.7.14)
3、 安裝 git 、cmake 、 python-pip
- # 安裝 git
- $ sudo apt-get install -y git
- # 安裝 cmake
- $ sudo apt-get install -y cmake
- # 安裝 python-pip
- $ sudo apt-get install -y python-pip
4、 安裝編譯 dlib
安裝 face_recognition 這個(gè)之前需要先安裝編譯 dlib。
- # 編譯dlib前先安裝 boost
- $ sudo apt-get install libboost-all-dev
- # 開始編譯dlib
- # 克隆dlib源代碼
- $ git clone https://github.com/davisking/dlib.git
- $ cd dlib
- $ mkdir build
- $ cd build
- $ cmake .. -DDLIB_USE_CUDA=0 -DUSE_AVX_INSTRUCTIONS=1
- $ cmake --build .(注意中間有個(gè)空格)
- $ cd ..
- $ python setup.py install --yes USE_AVX_INSTRUCTIONS --no DLIB_USE_CUDA
5、 安裝 face_recognition
- # 安裝 face_recognition
- $ pip install face_recognition
- # 安裝face_recognition過程中會(huì)自動(dòng)安裝 numpy、scipy 等
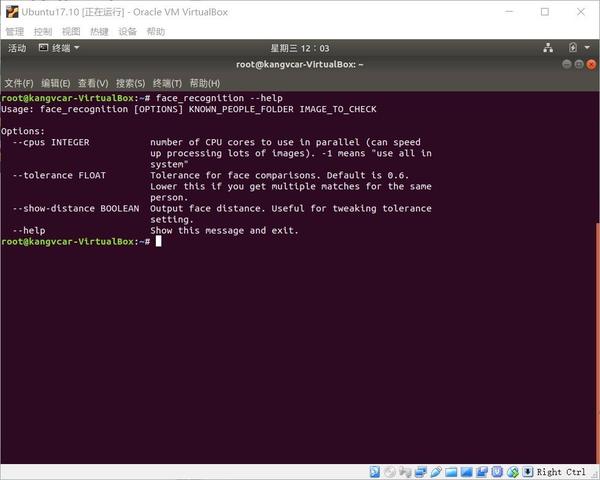
環(huán)境搭建完成后,在終端輸入 face_recognition 命令查看是否成功
實(shí)現(xiàn)人臉識(shí)別
示例一(1 行命令實(shí)現(xiàn)人臉識(shí)別):
1、 首先你需要提供一個(gè)文件夾,里面是所有你希望系統(tǒng)認(rèn)識(shí)的人的圖片。其中每個(gè)人一張圖片,圖片以人的名字命名:

known_people 文件夾下有 babe、成龍、容祖兒的照片
2、 接下來,你需要準(zhǔn)備另一個(gè)文件夾,里面是你要識(shí)別的圖片:

unknown_pic 文件夾下是要識(shí)別的圖片,其中韓紅是機(jī)器不認(rèn)識(shí)的
3、 然后你就可以運(yùn)行 face_recognition 命令了,把剛剛準(zhǔn)備的兩個(gè)文件夾作為參數(shù)傳入,命令就會(huì)返回需要識(shí)別的圖片中都出現(xiàn)了誰:
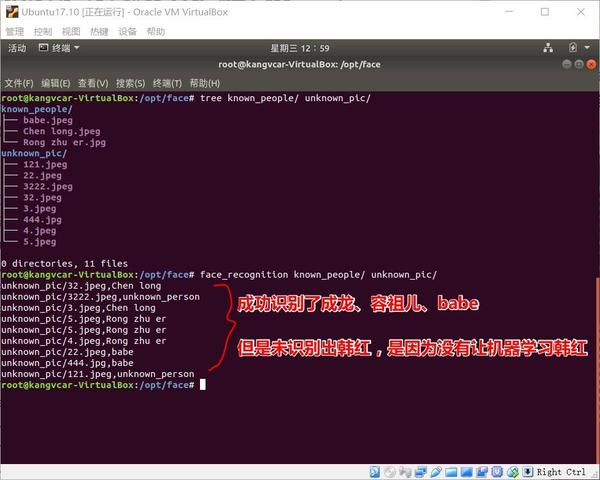
識(shí)別成功!!!
示例二(識(shí)別圖片中的所有人臉并顯示出來):
- # filename : find_faces_in_picture.py
- # -*- coding: utf-8 -*-
- # 導(dǎo)入pil模塊 ,可用命令安裝 apt-get install python-Imaging
- from PIL import Image
- # 導(dǎo)入face_recogntion模塊,可用命令安裝 pip install face_recognition
- import face_recognition
- # 將jpg文件加載到numpy 數(shù)組中
- image = face_recognition.load_image_file("/opt/face/unknown_pic/all_star.jpg")
- # 使用默認(rèn)的給予HOG模型查找圖像中所有人臉
- # 這個(gè)方法已經(jīng)相當(dāng)準(zhǔn)確了,但還是不如CNN模型那么準(zhǔn)確,因?yàn)闆]有使用GPU加速
- # 另請(qǐng)參見: find_faces_in_picture_cnn.py
- face_locations = face_recognition.face_locations(image)
- # 使用CNN模型
- # face_locations = face_recognition.face_locations(image, number_of_times_to_upsample=0, model="cnn")
- # 打印:我從圖片中找到了 多少 張人臉
- print("I found {} face(s) in this photograph.".format(len(face_locations)))
- # 循環(huán)找到的所有人臉
- for face_location in face_locations:
- # 打印每張臉的位置信息
- top, right, bottom, left = face_location
- print("A face is located at pixel location Top: {}, Left: {}, Bottom: {}, Right: {}".format(top, left, bottom, right))
- # 指定人臉的位置信息,然后顯示人臉圖片
- face_image = image[top:bottom, left:right]
- pil_image = Image.fromarray(face_image)
- pil_image.show()

用于識(shí)別的圖片
- # 執(zhí)行python文件
- $ python find_faces_in_picture.py
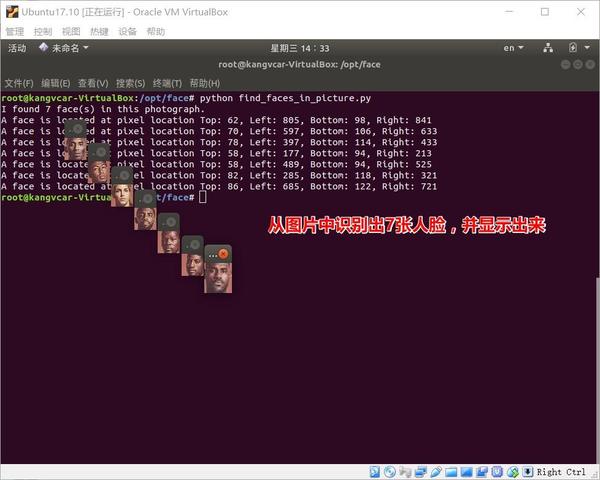
從圖片中識(shí)別出 7 張人臉,并顯示出來
示例三(自動(dòng)識(shí)別人臉特征):
- # filename : find_facial_features_in_picture.py
- # -*- coding: utf-8 -*-
- # 導(dǎo)入pil模塊 ,可用命令安裝 apt-get install python-Imaging
- from PIL import Image, ImageDraw
- # 導(dǎo)入face_recogntion模塊,可用命令安裝 pip install face_recognition
- import face_recognition
- # 將jpg文件加載到numpy 數(shù)組中
- image = face_recognition.load_image_file("biden.jpg")
- #查找圖像中所有面部的所有面部特征
- face_landmarks_list = face_recognition.face_landmarks(image)
- print("I found {} face(s) in this photograph.".format(len(face_landmarks_list)))
- for face_landmarks in face_landmarks_list:
- #打印此圖像中每個(gè)面部特征的位置
- facial_features = [
- 'chin',
- 'left_eyebrow',
- 'right_eyebrow',
- 'nose_bridge',
- 'nose_tip',
- 'left_eye',
- 'right_eye',
- 'top_lip',
- 'bottom_lip'
- ]
- for facial_feature in facial_features:
- print("The {} in this face has the following points: {}".format(facial_feature, face_landmarks[facial_feature]))
- #讓我們?cè)趫D像中描繪出每個(gè)人臉特征!
- pil_image = Image.fromarray(image)
- d = ImageDraw.Draw(pil_image)
- for facial_feature in facial_features:
- d.line(face_landmarks[facial_feature], width=5)
- pil_image.show()
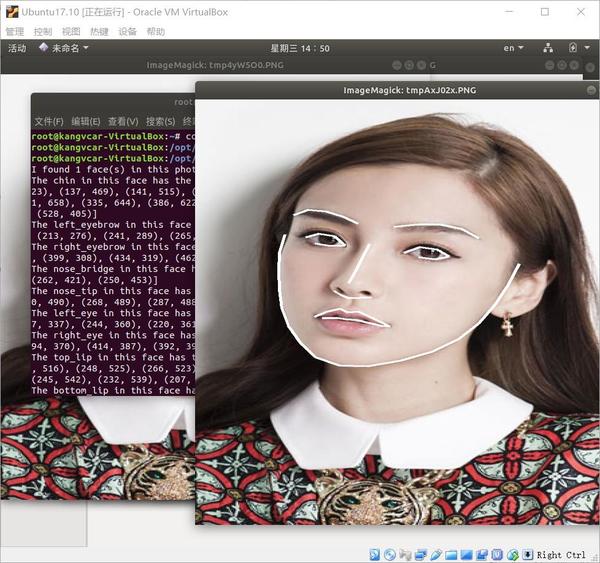
自動(dòng)識(shí)別出人臉特征
示例四(識(shí)別人臉鑒定是哪個(gè)人):
- # filename : recognize_faces_in_pictures.py
- # -*- conding: utf-8 -*-
- # 導(dǎo)入face_recogntion模塊,可用命令安裝 pip install face_recognition
- import face_recognition
- #將jpg文件加載到numpy數(shù)組中
- babe_image = face_recognition.load_image_file("/opt/face/known_people/babe.jpeg")
- Rong_zhu_er_image = face_recognition.load_image_file("/opt/face/known_people/Rong zhu er.jpg")
- unknown_image = face_recognition.load_image_file("/opt/face/unknown_pic/babe2.jpg")
- #獲取每個(gè)圖像文件中每個(gè)面部的面部編碼
- #由于每個(gè)圖像中可能有多個(gè)面,所以返回一個(gè)編碼列表。
- #但是由于我知道每個(gè)圖像只有一個(gè)臉,我只關(guān)心每個(gè)圖像中的第一個(gè)編碼,所以我取索引0。
- babe_face_encoding = face_recognition.face_encodings(babe_image)[0]
- Rong_zhu_er_face_encoding = face_recognition.face_encodings(Rong_zhu_er_image)[0]
- unknown_face_encoding = face_recognition.face_encodings(unknown_image)[0]
- known_faces = [
- babe_face_encoding,
- Rong_zhu_er_face_encoding
- ]
- #結(jié)果是True/false的數(shù)組,未知面孔known_faces陣列中的任何人相匹配的結(jié)果
- results = face_recognition.compare_faces(known_faces, unknown_face_encoding)
- print("這個(gè)未知面孔是 Babe 嗎? {}".format(results[0]))
- print("這個(gè)未知面孔是 容祖兒 嗎? {}".format(results[1]))
- print("這個(gè)未知面孔是 我們從未見過的新面孔嗎? {}".format(not True in results))
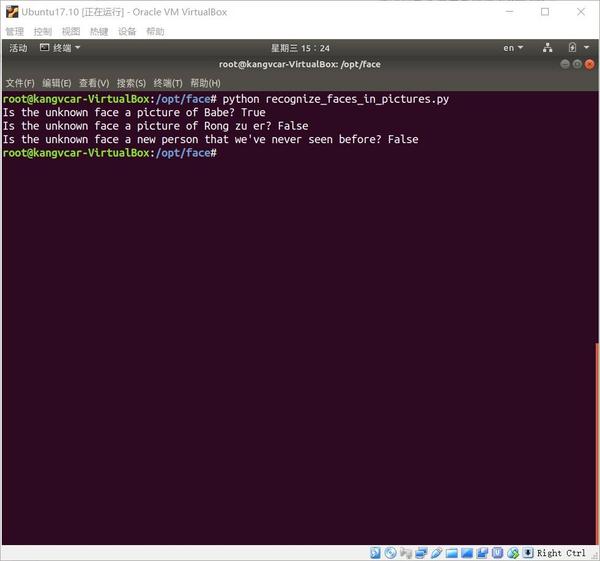
顯示結(jié)果如圖
示例五(識(shí)別人臉特征并美顏):
- # filename : digital_makeup.py
- # -*- coding: utf-8 -*-
- # 導(dǎo)入pil模塊 ,可用命令安裝 apt-get install python-Imaging
- from PIL import Image, ImageDraw
- # 導(dǎo)入face_recogntion模塊,可用命令安裝 pip install face_recognition
- import face_recognition
- #將jpg文件加載到numpy數(shù)組中
- image = face_recognition.load_image_file("biden.jpg")
- #查找圖像中所有面部的所有面部特征
- face_landmarks_list = face_recognition.face_landmarks(image)
- for face_landmarks in face_landmarks_list:
- pil_image = Image.fromarray(image)
- d = ImageDraw.Draw(pil_image, 'RGBA')
- #讓眉毛變成了一場噩夢
- d.polygon(face_landmarks['left_eyebrow'], fill=(68, 54, 39, 128))
- d.polygon(face_landmarks['right_eyebrow'], fill=(68, 54, 39, 128))
- d.line(face_landmarks['left_eyebrow'], fill=(68, 54, 39, 150), width=5)
- d.line(face_landmarks['right_eyebrow'], fill=(68, 54, 39, 150), width=5)
- #光澤的嘴唇
- d.polygon(face_landmarks['top_lip'], fill=(150, 0, 0, 128))
- d.polygon(face_landmarks['bottom_lip'], fill=(150, 0, 0, 128))
- d.line(face_landmarks['top_lip'], fill=(150, 0, 0, 64), width=8)
- d.line(face_landmarks['bottom_lip'], fill=(150, 0, 0, 64), width=8)
- #閃耀眼睛
- d.polygon(face_landmarks['left_eye'], fill=(255, 255, 255, 30))
- d.polygon(face_landmarks['right_eye'], fill=(255, 255, 255, 30))
- #涂一些眼線
- d.line(face_landmarks['left_eye'] + [face_landmarks['left_eye'][0]], fill=(0, 0, 0, 110), width=6)
- d.line(face_landmarks['right_eye'] + [face_landmarks['right_eye'][0]], fill=(0, 0, 0, 110), width=6)
- pil_image.show()

美顏前后對(duì)比