關于Python數據抓取、分析、挖掘、機器學習和Python分布式計算內容分享

01 數據抓取
1、背景調研
1)檢查robots.txt,了解爬取該網站有哪些限制;
2)pip install builtwith;pip install python-whois
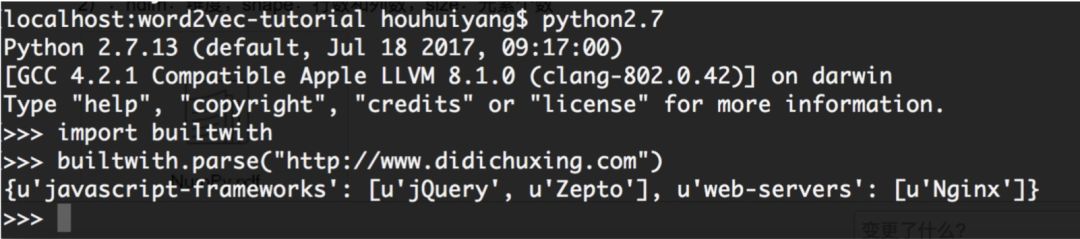
2、數據抓取:
1)動態加載的內容:
使用selenium
- #!/usr/bin/env python
- # -*- coding: utf-8 -*-
- from selenium import webdriver
- from selenium.webdriver.common.keys import Keys
- import time
- import sys
- reload(sys)
- sys.setdefaultencoding('utf8')
- driver = webdriver.Chrome("/Users/didi/Downloads/chromedriver") driver.get('http://xxx')
- elem_account = driver.find_element_by_name("UserName")
- elem_password = driver.find_element_by_name("Password")
- elem_code = driver.find_element_by_name("VerificationCode") elem_account.clear()
- elem_password.clear()
- elem_code.clear()
- elem_account.send_keys("username")
- elem_password.send_keys("pass")
- elem_code.send_keys("abcd")
- time.sleep(10)
- driver.find_element_by_id("btnSubmit").submit()
- time.sleep(5) driver.find_element_by_class_name("txtKeyword").send_keys(u"x") #模擬搜索 driver.find_element_by_class_name("btnSerch").click()
- # ...省略處理過程
- dw = driver.find_elements_by_xpath('//li[@class="min"]/dl/dt/a')
- for item in dw:
- url = item.get_attribute('href')
- if url:
- ulist.append(url)
- print(url + "---" + str(pnum))
- print("##################")
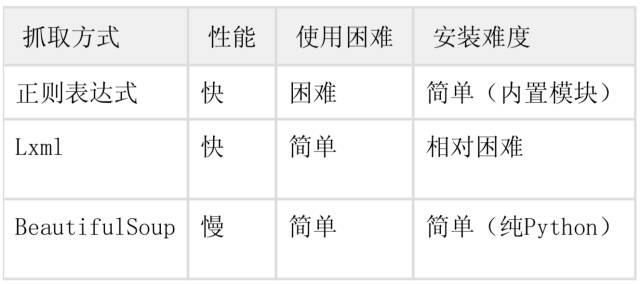
2)靜態加載的內容
(1)正則;
(2)lxml;
(3)bs4
- #!/usr/bin/env python
- # -*- coding: utf-8 -*-
- string = r'src="(http://imgsrc\.baidu\.com.+?\.jpg)" pic_ext="jpeg"' # 正則表達式字符串 urls = re.findall(string, html)
- import requests
- from lxml import etree
- import urllib
- response = requests.get(url)
- html = etree.HTML(requests.get(url).content)
- res = html.xpath('//div[@class="d_post_content j_d_post_content "]/img[@class="BDE_Image"]/@src') # lxml
- import requests
- from bs4 import BeautifulSoup
- soup = BeautifulSoup(response.text, 'lxml') # 解析response并創建BeautifulSoup對象 urls = soup.find_all('img', 'BDE_Image')
3):反爬與反反爬
(1):請求頻率;
(2):請求頭;
(3):IP代理;
4):爬蟲框架:
(1):Scrapy
(2):Portia
02 數據分析
1、常用的數據分析庫:
NumPy:是基于向量化的運算。http://www.numpy.org/
1)List => 矩陣
2)ndim:維度;shape:行數和列數;size:元素個數
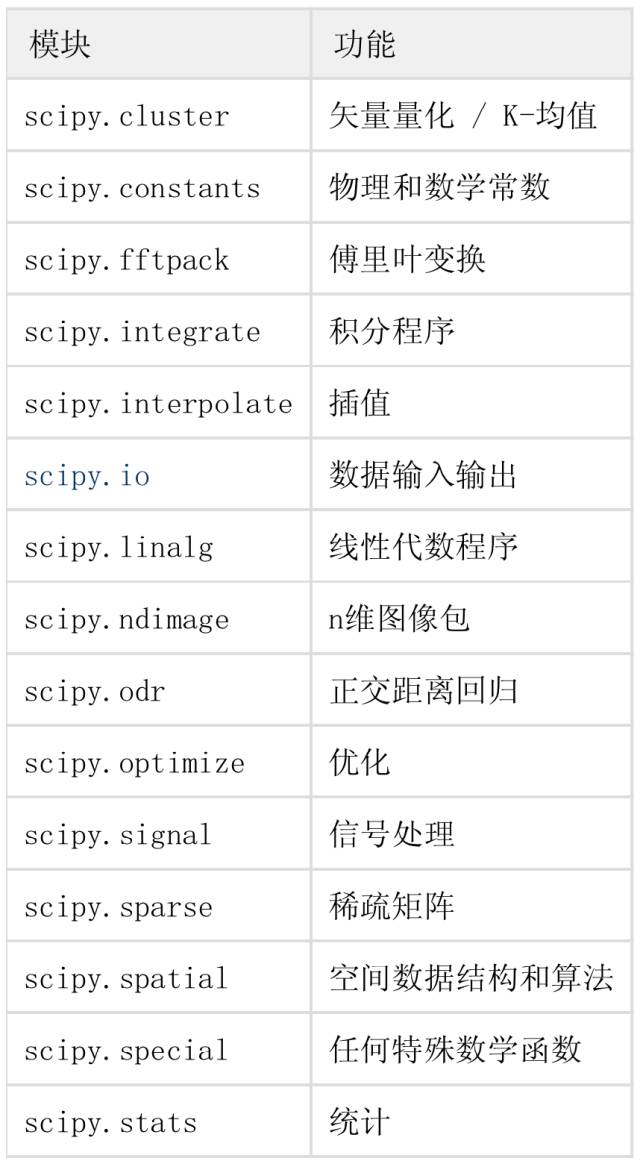
Scipy:是NumPy的擴展,有高等數學、信號處理、統計等。https://www.scipy.org/
Pandas:是基于NumPy的快速構建高級數據結構的包,數據結構:Series和DataFrame。http://pandas.pydata.org/
1):NumPy類似于List,Pandas 類似于Dict。
Matplotlib:繪圖庫。
1):是一個強大的繪圖工具;
2):支持散點圖、線圖、柱狀圖等;
簡單例子:
- pip2 install Numpy
- >>> import numpy as np
- >>> a = np.arange(10)
- >>> a
- array([0, 1, 2, 3, 4, 5, 6, 7, 8, 9])
- >>> a ** 2
- array([ 0, 1, 4, 9, 16, 25, 36, 49, 64, 81])
- pip2 install Scipy
- >>> import numpy as np
- >>> from scipy import linalg
- >>> a = np.array([[1, 2], [3, 4]])
- >>> linalg.det(a)
- -2.0
- pip2 install pandas
- >>> df = pd.DataFrame({ 'A' : pd.date_range("20170802", periods=5), 'B' : pd.Series([11, 22, 33, 44,
- 55]), 'C' : pd.Categorical(["t","a","b","c","g"])})
- >>> df
- ABC 0 2017-08-02 11 t 1 2017-08-03 22 a 2 2017-08-04 33 b 3 2017-08-05 44 c 4 2017-08-06 55 g
- pip2 install Matplotlib
- >>> import matplotlib.pyplot as plt
- >>> plt.plot([1, 2, 3])
- [<matplotlib.lines.Line2D object at 0x113f88f50>]
- >>> plt.ylabel("didi")
- <matplotlib.text.Text object at 0x110b21c10>
- >>> plt.show()
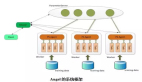
2、高級數據分析庫:
scikit-learn:機器學習框架。
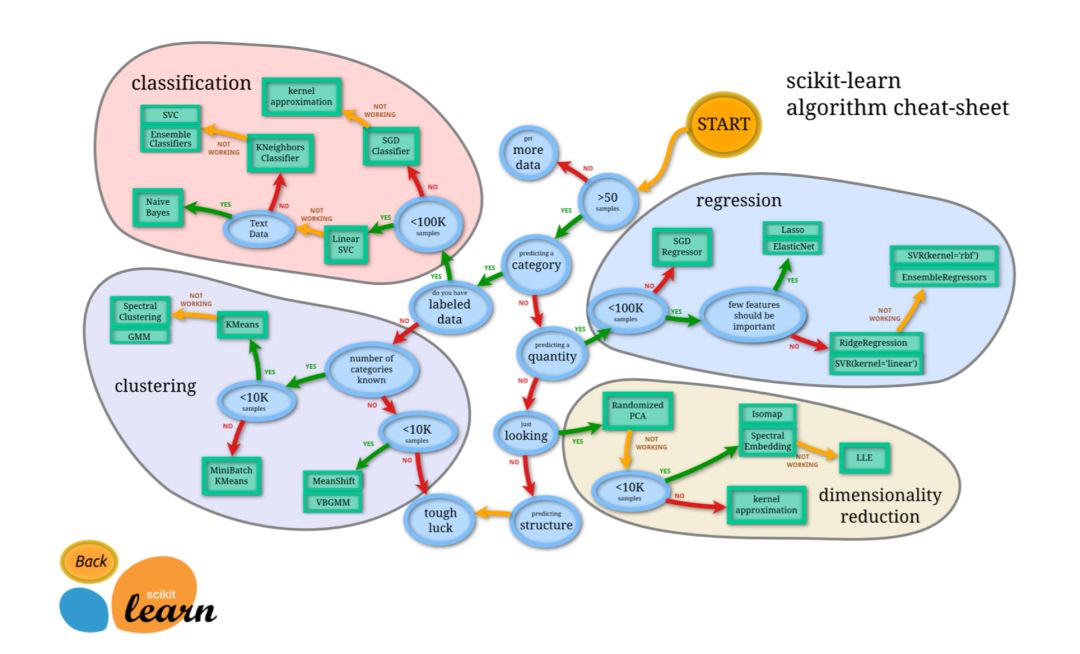
圖上可以表示出數據小于50,No:需要更多的數據, Yes使用分類器,一直走下去;
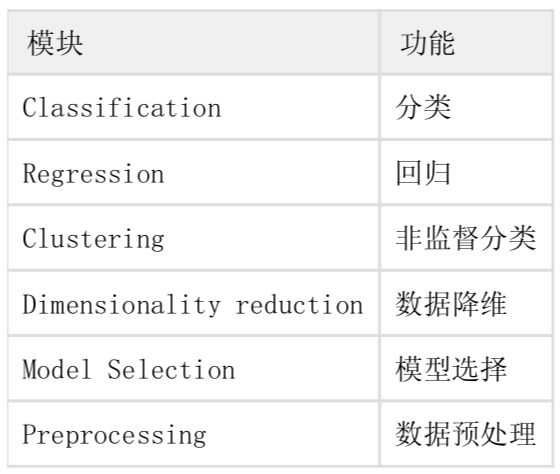
由圖中,可以看到算法有四類,分類,回歸,聚類,降維。
KNN:
- #!/usr/local/bin/python
- # -*- coding: utf-8 -*-
- '''
- 預測Iris https://en.wikipedia.org/wiki/Iris_flower_data_set '''
- # 導入模塊
- from __future__ import print_function
- from sklearn import datasets
- from sklearn.model_selection import train_test_split
- from sklearn.neighbors import KNeighborsClassifier
- # 創建數據
- iris = datasets.load_iris()
- iris_X = iris.data # 花萼的長寬、 花瓣的長寬
- iris_y = iris.target # 花的種類 0, 1, 2
- print(iris_X)
- print(iris_y)
- print(iris.target_names)
- # 定義模型-訓練模型-預測
- X_train, X_test, y_train, y_test = train_test_split(iris_X, iris_y, test_size = 0.1) # 訓練數據10% knn = KNeighborsClassifier() # 創建KNN近鄰器
- knn.fit(X_train, y_train) # 訓練數據
- predicts = knn.predict(X_test) # 得到預測結果
- # 對比結果
- print("#########################")
- print(X_test)
- print(predicts)
- print(y_test)
- # 計算預測準確率
- print(knn.score(X_test, y_test))
- [[ 5. 3.3 1.4 0.2]
- [ 5. 3.5 1.3 0.3]
- [ 6.7 3.1 5.6 2.4]
- [ 5.8 2.7 3.9 1.2]
- [ 6. 2.2 5. 1.5]
- [ 6. 3. 4.8 1.8]
- [ 6.3 2.5 5. 1.9]
- [ 5. 3.6 1.4 0.2]
- [ 5.6 2.9 3.6 1.3]
- [ 6.9 3.2 5.7 2.3]
- [ 4.9 3. 1.4 0.2]
- [ 5.9 3. 4.2 1.5]
- [ 4.8 3. 1.4 0.1]
- [ 5.1 3.4 1.5 0.2]
- [ 4.7 3.2 1.6 0.2]]
- [0 0 2 1 1 2 2 0 1 2 0 1 0 0 0]
- [0 0 2 1 2 2 2 0 1 2 0 1 0 0 0]
- 0.933333333333
Linear Regression
- #!/usr/local/bin/python # -*- coding: utf-8 -*- '''
- 波士頓房價趨勢
- '''
- # 導入模塊
- from __future__ import print_function
- from sklearn import datasets
- from sklearn.linear_model import LinearRegression
- import matplotlib.pyplot as plt
- # 創建數據
- loaded_data = datasets.load_boston() #波士頓的房價
- data_X = loaded_data.data
- data_y = loaded_data.target
- print(data_X)
- print(data_y)
- # 定義模型-訓練模型-預測
- model = LinearRegression() # 線性回歸
- model.fit(data_X, data_y) # 訓練數據
- print(model.predict(data_X[:4, :])) # 得到預測結果
- print(data_y[:4])
- # 結果
- print("#########################")
- X, y = datasets.make_regression(n_samples=100, n_features=1, noise=10) # 生成回歸模型數據100個樣本, 每個樣本一個特征, 高斯噪聲
- plt.scatter(X, y) # 散點圖
- plt.show()

03 數據挖掘
1、挖掘關鍵詞:
涉及到的算法:TF-IDF
參考文獻:http://www.ruanyifeng.com/blog/2013/03/tf-idf.html
news.txt:
滴滴出行與歐非地區領先出行企業Taxify達成戰略合作 支持跨地區交通技術創新
2017-08-01 滴滴出行 【2017年8月1日,中國,北京/愛沙尼亞,塔林】滴滴出行今日宣布與歐非地區移動出行領軍企業Taxify達成戰略合作 。滴滴將通過投資以及智能交通技術研發等方面協作,支持Taxify在多元市場進行更深度的市場拓展和技術創新。 滴滴出行是全球領先的移動出行平臺。依靠人工智能技術, 滴滴在超過400個城市為4億多用戶提供包括出租車、專車、快車、豪華車和順風車等在內的多元化出行服務。在為1700 余萬司機提供靈活就業與收入機會的同時,滴滴也以人工智能技術支持城市管理者建設一體化、可持續的智慧交通解決 方案。 Taxify于2013年成立于愛沙尼亞,是歐洲和非洲地區成長最快的移動出行企業。目前其出租車和私家車共享出行服務網 絡遍及歐洲、非洲、西亞的中心城市;觸達匈牙利、羅馬尼亞、波蘭、波羅的海三國、南非、尼日利亞、肯尼亞等18個 國家,擁有超過250萬用戶。 滴滴出行創始人、CEO程維表示:“Taxify在多元化的市場提供優質的創新型出行服務。我們都致力于運用移動互聯網 科技的力量,滿足迅速演變的消費者需求;幫助傳統交通行業轉型升級。我相信這一合作將為亞洲,歐洲和非洲市場間 構建跨地區智慧交通紐帶作出貢獻。”
Taxify創始人、CEO馬克斯·維利格(Marcus Villig)表示:“Taxify將借力此次戰略合作,鞏固我們在歐洲和非洲核心市場的優勢地位。我們相信滴滴是最理想的 伙伴,能幫助我們成為歐非地區***和最有效率的出行選擇。”
- #!/usr/local/bin/python # -*- coding: utf-8 -*- '''
- 分析文章關鍵詞
- '''
- import os
- import codecs
- import pandas
- import jieba
- import jieba.analyse
- # 格式化數據格式
- tagDF = pandas.DataFrame(columns=['filePath', 'content', 'tag1', 'tag2', 'tag3', 'tag4', 'tag5']) try:
- with open('./houhuiyang/news.txt', 'r') as f: #載入語料庫 content = f.read().strip()
- tags = jieba.analyse.extract_tags(content, topK=5) #TF_IDF
- tagDF.loc[len(tagDF)] = ["./news.txt", content, tags[0], tags[1], tags[2], tags[3], tags[4]]
- print(tagDF)
- except Exception, ex:
- print(ex)
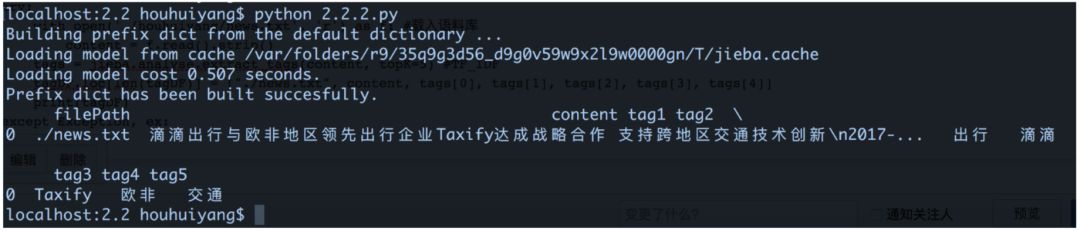
計算出文章Top5的關鍵詞:出行、滴滴、Taxify、歐非、交通
2、情感分析
情感用語資料:http://www.keenage.com/html/c_bulletin_2007.htm
1)最簡單的方式就是基于情感詞典的方法;
2)復雜的就是基于機器學習的方法;
- pip2 install nltk
- >>> import nltk
- >>> from nltk.corpus import stopwords #停止詞 >>> nltk.download() # 安裝語料庫
- >>> t = "Didi is a travel company"
- >>> word_list = nltk.word_tokenize(t)
- >>> filtered_words = [word for word in word_list if word not in stopwords.words('english')] ['Didi', 'travel', 'company']
- >>> nltk.download('stopwords') #下載停止詞
中英文NLP分詞區別
1):啟發式 Heuristic
2):機器學習/統計法:HMM、CRF
處理流程:raw_text -> tokenize[pos tag] -> lemma / stemming[pos tag] -> stopwords -> word_list
04 Python 分布式計算
- pip2 install mrjjob
- pip2 install pyspark
1)Python 多線程;
2)Python 多進程【multiprocessing】;
3)全局解釋器鎖GIL;
4)進程間通信Queue;
5)進程池Pool;
6)Python的高階函數;
- map/reduce/filter
7)基于Linux的管道的MapReducer 【cat word.log | python mapper.py | python reducer.py | sort -k 2r】
word.log
北京 成都 上海 北京 山西 天津 廣州
- #!/usr/local/bin/python
- # -*- coding: utf-8 -*-
- '''
- mapper
- '''
- import sys
- try:
- for lines in sys.stdin:
- line = lines.split()
- for word in line:
- if len(word.strip()) == 0:
- continue
- count = "%s,%d" % (word, 1)
- print(count)
- except IOError, ex:
- print(ex)
- #!/usr/local/bin/python
- # -*- coding: utf-8 -*-
- '''
- reducer
- '''
- import sys
- try:
- word_dict = {}
- for lines in sys.stdin:
- line = lines.split(",")
- if len(line) != 2:
- continue
- word_dict.setdefault(line[0], 0)
- word_dict[line[0]] += int(line[1])
- for key, val in word_dict.items():
- stat = "%s %d" % (key, val)
- print(stat)
- except IOError, ex:
- print(ex)

05 神經網絡
分別有CPU/GPU版本
1)tensorflow 建立的神經網絡是靜態的
2)pytorch http://pytorch.org/#pip-install-pytorch 建立的神經網絡是動態的 【Troch 是Lua寫的,這個是Python版本】
簡單說數據:
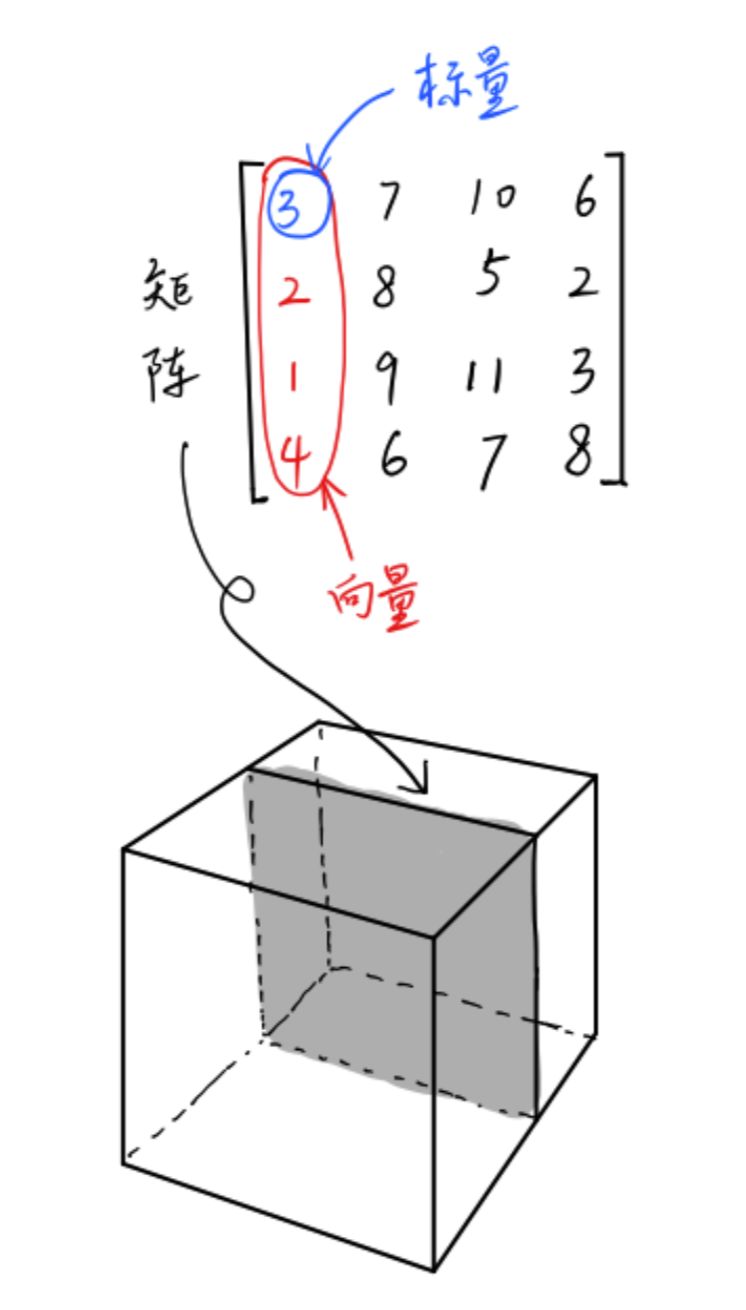
標量(Scalar)是只有大小,沒有方向的量,如1,2,3等
向量(Vector)是有大小和方向的量,其實就是一串數字,如(1,2)
矩陣(Matrix)是好幾個向量拍成一排合并而成的一堆數字,如[1,2;3,4]
張量(Tensor)是按照任意維排列的一堆數字的推廣。如圖所示,矩陣不過是三維張量下的一個二維切面。要找到三維張量下的一個 標量,需要三個維度的坐標來定位。
TensorFlow pytorch用張量這種數據結構來表示所有的數據。
- #-*- coding: UTF-8 -*-
- #author houhuiyang
- import torch
- import numpy as np
- from torch.autograd import Variable
- import torch.nn.functional as F
- import matplotlib.pyplot as plt
- np_data = np.arange(6).reshape((2, 3))
- torch_data = torch.from_numpy(np_data)
- tensor2np = torch_data.numpy()
- print(
- "\nnp_data", np_data, #矩陣
- "\ntorch_data", torch_data, #張量
- "\ntensor to numpy", tensor2np
- )
- # data = [-1, -2, 1, 2, 3]
- data = [[1, 2], [3, 4]]
- tensor = torch.FloatTensor(data)
- # abs sin cos mean平均值 matmul/mm print(
- "\nnumpy", np.matmul(data, data),
- "\ntorch", torch.mm(tensor, tensor)
- )
- # tensor variable
- tensor_v = torch.FloatTensor([[1,2], [3,4]]) variable = Variable(tensor_v, requires_grad=True) # 計算中值
- t_out = torch.mean(tensor_v * tensor_v) # x ^ 2 v_out = torch.mean(variable * variable) # 反向傳播 print(
- tensor_v,
- variable,
- t_out,
- v_out
- )
- v_out.backward() # 反向傳遞
- print(variable.grad) # 梯度
- '''
- y = Wx 線性
- y =AF(Wx)非線性 【激勵函數 relu/sigmoid/tanh】
- '''
- x =torch.linspace(-5,5,200) # 從-5到5取200個點
- x = Variable(x)
- x_np = x.data.numpy()
- y_relu = F.relu(x).data.numpy()
- y_sigmoid = F.sigmoid(x).data.numpy()
- y_tanh = F.tanh(x).data.numpy()
- # y_softplus = F.softplus(x).data.numpy() # 概率圖 plt.figure(1, figsize=(8, 6))
- # plt.subplot(221) # 繪制子圖
- plt.plot(x_np, y_relu, c = "red", label = "relu") plt.ylim(-1, 5)
- plt.legend(loc = "best")
- plt.show()
- # plt.subplot(222)
- plt.plot(x_np, y_sigmoid, c = "red", label = "igmoid")
- plt.ylim(-0.2, 1.2)
- plt.legend(loc = "best")
- plt.show()
- # plt.subplot(223)
- plt.plot(x_np, y_tanh, c = "red", label = "subplot")
- plt.ylim(-1.2, 1.2)
- plt.legend(loc = "best")
- plt.show()
搭建簡單的神經網絡
- #-*- coding: UTF-8 -*- #author 守望之心
- '''
- 回歸
- 分類
- '''
- import torch
- from torch.autograd import Variable
- import torch.nn.functional as F # 激勵函數
- import matplotlib.pyplot as plt
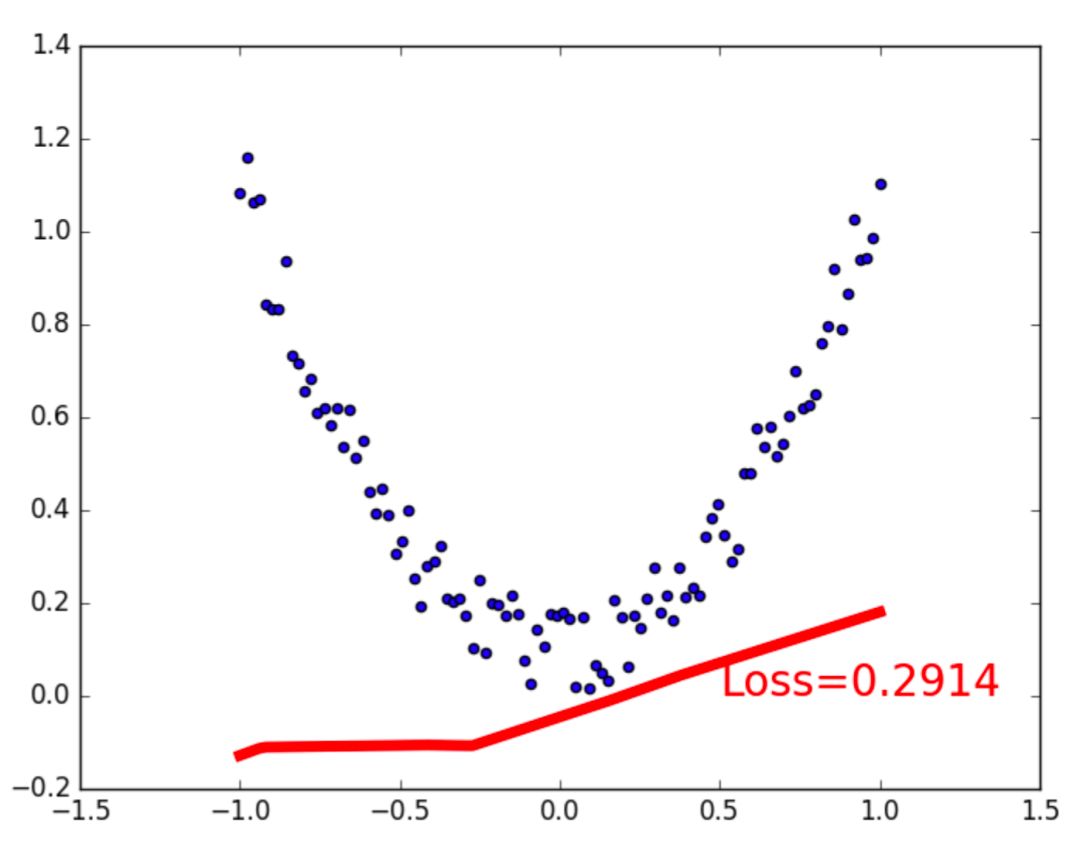
- x = torch.unsqueeze(torch.linspace(-1, 1, 100), dim = 1) # unsqueeze 一維轉變為二維 y = x.pow(2) + 0.2 * torch.rand(x.size())
- x, y = Variable(x), Variable(y)
- # print(x)
- # print(y)
- # plt.scatter(x.data.numpy(), y.data.numpy())
- # plt.show()
- class Net(torch.nn.Module): # 繼承 torch 的Moudle
- def __init__(self, n_features, n_hidden, n_output):
- super(Net, self).__init__() # 繼承torch __init__
- self.hidden = torch.nn.Linear(n_features, n_hidden) # 隱藏層線性輸出 self.predict = torch.nn.Linear(n_hidden, n_output) # 輸出線性層
- def forward(self, x):
- x = F.relu(self.hidden(x)) # 激勵函數 x = self.predict(x) # 輸出值
- return x
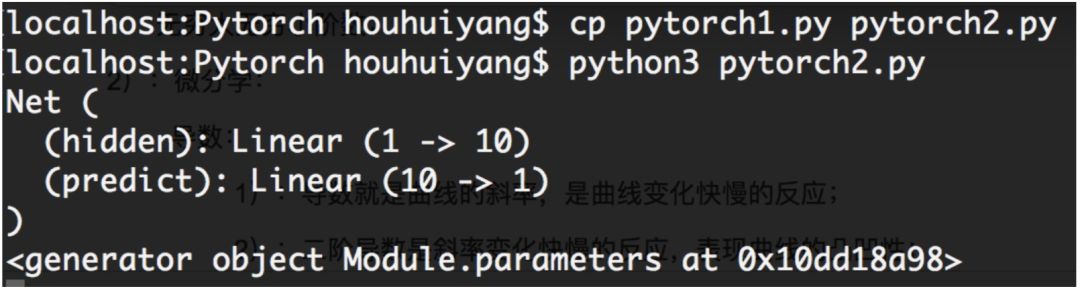
- net = Net(1, 10, 1) # 輸入值, 隱藏層10,10個神經元, 1個輸出值 print(net) # 輸出搭建的神經網絡結構
- plt.ion()
- plt.show()
- # 訓練工具
- optimizer = torch.optim.SGD(net.parameters(), lr = 0.5) # 傳入net的所有值, lr是學習率 loss_func = torch.nn.MSELoss() # 均方差
- print(net.parameters())
- for t in range(100):
- prediction = net(x) #喂給net 訓練數據x, 輸出預測值 loss = loss_func(prediction, y) # 計算兩者誤差
- # 反向傳播
- optimizer.zero_grad()
- loss.backward()
- optimizer.step()
- if t % 5 == 0:
- plt.cla()
- plt.scatter(x.data.numpy(), y.data.numpy())
- plt.plot(x.data.numpy(), prediction.data.numpy(), "r-", lw = 5)
- plt.text(0.5, 0, 'Loss=%.4f' % loss.data[0], fontdict={'size': 20, 'color': 'red'})
- plt.pause(0.1)
- plt.ioff()
- plt.show()
06 數學 微積分
1、極限:
無窮大無窮小階數;
2、微分學:
導數:
1)導數就是曲線的斜率,是曲線變化快慢的反應;
2)二階導數是斜率變化快慢的反應,表現曲線的凸凹性;
泰勒級數逼近
牛頓法和梯度下降;
3、Jensen不等式:
凸函數;Jensen不等式
概率論:
1、積分學:
牛頓-萊布尼茨公式
2、概率空間
隨機變量與概率:概率密度函數的積分;條件概率;共軛分布;
概率分布:
1)兩點分布/貝努力分布;
2)二項分布;
3)泊松分布;
4)均勻分布;
5)指數分布;
6)正態分布/高斯分布;
3、大數定律和中心極限
線性代數:
1)矩陣
2)線性回歸;