用Scikit-Learn構建K-近鄰算法,分類MNIST數據集
K 近鄰算法,簡稱 K-NN。在如今深度學習盛行的時代,這個經典的機器學習算法經常被輕視。本篇教程將帶你使用 Scikit-Learn 構建 K 近鄰算法,并應用于 MNIST 數據集。然后,作者將帶你構建自己的 K-NN 算法,開發出比 Scikit-Learn K-NN 更準更快的算法。
一、K 近鄰分類模型

K 近鄰算法是一種容易實現的監督機器學習算法,并且其分類性能的魯棒性還不錯。K-NN ***的優點之一就是它是一個惰性算法,即該模型無須訓練就可以對數據進行分類,而不像其他需要訓練的 ML 算法,如 SVM、回歸和多層感知機。
K-NN 如何工作
為了對給定的數據點 p 進行分類,K-NN 模型首先使用某個距離度量將 p 與其數據庫中其它點進行比較。
距離度量就是類似歐幾里得距離之類的標準,以兩個點為輸入并返回這兩個點之間距離的簡單函數。
因此,可以假設距離較小的兩個點比距離較大的兩個點相似度更高。這是 K-NN 的核心思想。
該過程將返回一個無序數組,其中數組中的每一項都表示 p 與模型數據庫中 n 個數據點之間的距離。所以返回數組的大小為 n。
K 近鄰的 K 的含義是:k 是一個任意值(通常在 3-11 之間),表示模型在對 p 分類時應該考慮多少個最相似的點。然后模型將記錄這 k 個最相似的值,并使用投票算法來決定 p 屬于哪一類,如下圖所示。

上圖中的 K-NN 模型的 k 值為 3,箭頭指向的中心點為 p,算法將對這個點進行分類。
如你所見,圓圈中的三個點是與 p 最接近或最相似的三個點。因此,使用簡單的投票算法,p 將被歸為「白色」,因為白色在 k 個最相似值中占大多數。
酷炫!但令人驚訝的是,這個簡單的算法可以在某些情況下實現不俗的結果,并且可以應用于各種各樣的問題,我們將在下面介紹。
二、在 Scikit-Learn 中實現 K-NN 算法用來分類 MNIST 圖像
1. 數據
對于這個例子,我們將使用常見的 MNIST 數據集。MNIST 數據集是機器學習中最常用的數據集之一,因為它很容易實現,而且是驗證我們模型的可靠方法。

MNIST 是一組包含 70,000 個手寫數字 0-9 的數據集。任意兩個手寫數字都不相同,有些可能很難正確分類。
2. 算法
我們從 Scikit-Learn 的 Python 庫的 KNeighborsClassifier() 函數入手。這個函數有很多參數,但在這個例子中我們只需用少量幾個參數。具體來說,我們只會傳遞 n_neighbors 參數的值(就是 k 值啦)。
weights 參數給出了模型使用的投票算法的類型,其中默認值是 uniform。這意味著在對 p 進行分類時,k 個點中的每一個的權重都一樣。algorithm 參數也將使用默認值 auto,因為我們希望 Scikit-Learn 自動找到對 MNIST 數據進行分類的***算法。
以下是一個用 Scikit-Learn 構建 K-NN 分類器的 Jupyter Notebook:Scikit-Learn 實現的用于 MNIST 的 K 近鄰算法
Notebook 地址:https://gist.github.com/samgrassi01/82d0e5f89daac3e65531a6ef497cc129#file-skl-knn-ipynb
我們通過導入所需的庫直接開始。
- In [1]:
- import numpy as np
- from sklearn import datasets, model_selection
- from sklearn.neighbors import KNeighborsClassifier
- from sklearn.metrics import classification_report
- mnist = datasets.fetch_mldata('MNIST original')
- data, target = mnist.data, mnist.target
- # make sure everything was correctly imported
- data.shape, target.shape
- Out[1]:
- ((70000, 784), (70000,))
(1) 構建數據集
我們通過制作不同的數據集來構建 K-NN 模型。我們將創建一個可以獲取特定大小數據集、返回數據集大小的函數。
- In [2]:
- # make an array of indices the size of MNIST to use for making the data sets.
- # This array is in random order, so we can use it to scramble up the MNIST data
- indx = np.random.choice(len(target), 70000, replace=False)
- # method for building datasets to test with
- def mk_dataset(size):
- """makes a dataset of size "size", and returns that datasets images and targets
- This is used to make the dataset that will be stored by a model and used in
- experimenting with different stored dataset sizes
- """
- train_img = [data[i] for i in indx[:size]]
- train_img = np.array(train_img)
- train_target = [target[i] for i in indx[:size]]
- train_target = np.array(train_target)
不錯。現在我們將使用這個函數來構建兩個不同大小的數據集,來看看模型在不同數據量上的分類性能怎么樣。
提示:制作較小的數據集時,你仍然可以進行分類,但模型畢竟少了一些數據,這可能會導致分類錯誤。
- In [3]:
- # lets make a dataset of size 50,000, meaning the model will have 50,000 data points to compare each
- # new point it is to classify to
- fifty_x, fifty_y = mk_dataset(50000)
- fifty_x.shape, fifty_y.shape
- Out[3]:
- ((50000, 784), (50000,))
- In [4]:
- # lets make one more of size 20,000 and see how classification accuracy decreases when we use that one
- twenty_x, twenty_y = mk_dataset(20000)
- twenty_x.shape, twenty_y.shape
- Out[4]:
- ((20000, 784), (20000,))
注意這些數據是如何為模型匹配標簽的。模型需要這些標簽來理解每一個點代表什么,因此可以把我們要分類的點放在一個特定的類中,而不是說「這是與待分類點最相似的類」。
現在我們將構建一個大小為 10000 的測試集。
- In [5]:
- # build model testing dataset
- test_img = [data[i] for i in indx[60000:70000]]
- test_img1 = np.array(test_img)
- test_target = [target[i] for i in indx[60000:70000]]
- test_target1 = np.array(test_target)
- test_img1.shape, test_target1.shape
- Out[5]:
- ((10000, 784), (10000,))
不錯!現在我們已經完成了所有的數據處理,可以開始搭建 K-NN 模型了!
(2) 構建模型
我們首先將 Scikit-Learn K-NN 模型放在函數中,以便可以輕松調用它并對其進行調整。
- In [6]:
- def skl_knn(k, test_data, test_target, stored_data, stored_target):
- """k: number of neighbors to use in classication
- test_data: the data/targets used to test the classifier
- stored_data: the data/targets used to classify the test_data
- """
- classifier = KNeighborsClassifier(n_neighbors=k)
- classifier.fit(stored_data, stored_target)
- y_pred = classifier.predict(test_data)
- print(classification_report(test_target, y_pred))
(3) 測試
現在我們看看這個模型在兩個不同的測試集上的運行效果。
- In [7]:
- %%time
- # stored data set size of 50,000
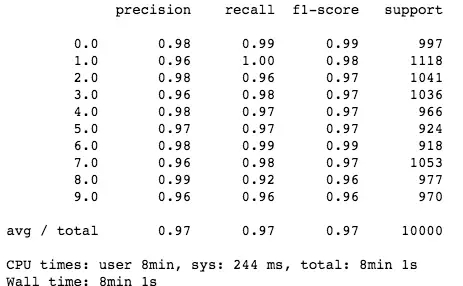
- skl_knn(5, test_img1, test_target1, fifty_x, fifty_y)
- In [8]:
- %%time
- # stored data set size of 20,000
- skl_knn(5, test_img1, test_target1, twenty_x, twenty_y)
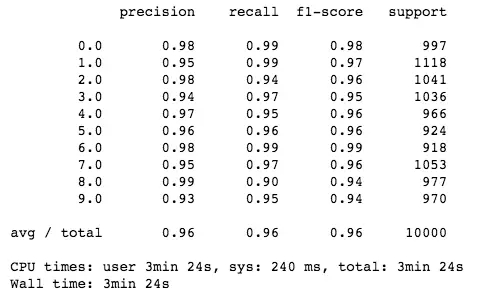
可以的!我們的模型與人眼識別差不多!如你所見,當模型有更多的數據可以使用時(50,000 而不是 20,000 個點),它的性能會更好。更加引人注目的是,它非常簡單,并且能以人類水平來獲取不同圖像之間的復雜關系。更多的細節分析請訪問這個 GitHub repo:
https://github.com/samgrassi01/Cosine-Similarity-Classifier。
厲害了!我們使用 Scikit-Learn 構建了一個非常簡單的 K 近鄰模型,該模型在 MNIST 數據集上表現非凡。
不足之處?分類這些點需要很長時間(兩個數據集分別耗時 8 分鐘和 4 分鐘),諷刺的是,K-NN 仍然是最快的分類方法之一。我們必須有一個更快的方法。
三、構建一個更快的模型
大多數 K-NN 模型使用歐幾里德距離或曼哈頓距離作為 go-to 距離度量。這些指標非常簡單,而且在各種各樣的情況中都表現不錯。
還有一個很少用到的距離標準度量是余弦相似度。余弦相似度通常不是 go-to 距離度量標準,這是因為它違反了三角不等式,而且對負數無效。但是,余弦相似度對于 MNIST 來說很***。它速度快、算法簡單,而且比 MNIST 中應用其他距離度量的準確率稍高一些。
但是,為了得到***性能,我們需要自己編寫 K-NN 模型。然后,我們應該能得到比 Scikit-Learn 模型更高的性能,甚至能得到更高的準確度。讓我們看看以下建立的 K-NN 模型的 Notebook 吧:
構建一個更快的 KNN 分類器
Notebook 地址:
https://gist.github.com/samgrassi01/15a1fe53dcde8813eed9367b103676b2#file-cos-knn-ipynb
在這個 notebook 中,我們將構建一個簡單的 K-NN 模型,該模型使用余弦相似度作為距離度量對 MNIST 圖像進行分類,試圖找到更快或更加準確的模型。
首先,需要導入所需的庫,然后構建與 Scikit-Learn K-NN notebook 相同的數據集。
- In [1]:
- import numpy as np
- import heapq
- from collections import Counter
- from sklearn.metrics.pairwise import cosine_similarity
- from sklearn import datasets, model_selection
- from sklearn.metrics import classification_report
- mnist = datasets.fetch_mldata('MNIST original')
- data, target = mnist.data, mnist.target
- # make sure everything was correctly imported
- data.shape, target.shape
- Out[1]:
- ((70000, 784), (70000,))
使用與 Scikit-Learn K-NN notebook 相同的方法,設置完全相同的數據集。
- In [2]:
- # make an array of indices the size of MNIST to use for making the data sets.
- # This array is in random order, so we can use it to scramble up the MNIST data
- indx = np.random.choice(len(target), 70000, replace=False)
- # method for building datasets to test with
- def mk_dataset(size):
- """makes a dataset of size "size", and returns that datasets images and targets
- This is used to make the dataset that will be stored by a model and used in
- experimenting with different stored dataset sizes
- """
- train_img = [data[i] for i in indx[:size]]
- train_img = np.array(train_img)
- train_target = [target[i] for i in indx[:size]]
- train_target = np.array(train_target)
- return train_img, train_target
- In [3]:
- # lets make a dataset of size 50,000, meaning the model will have 50,000 data points to compare each
- # new point it is to classify to
- fifty_x, fifty_y = mk_dataset(50000)
- fifty_x.shape, fifty_y.shape
- Out[3]:
- ((50000, 784), (50000,))
- In [4]:
- # lets make one more of size 20,000 and see how classification accuracy decreases when we use that one
- twenty_x, twenty_y = mk_dataset(20000)
- twenty_x.shape, twenty_y.shape
- Out[4]:
- ((20000, 784), (20000,))
- In [5]:
- # build model testing dataset
- test_img = [data[i] for i in indx[60000:70000]]
- test_img1 = np.array(test_img)
- test_target = [target[i] for i in indx[60000:70000]]
- test_target1 = np.array(test_target)
- test_img1.shape, test_target1.shape
- Out[5]:
- ((10000, 784), (10000,))
1. . 構建模型
下面,我們創建函數 cos_knn(),作為用于 MNIST 數據集的分類器。你可以利用函數的注釋了解其工作原理。
- In [6]:
- def cos_knn(k, test_data, test_target, stored_data, stored_target):
- """k: number of neighbors to use for voting
- test_data: a set of unobserved images to classify
- test_target: the labels for the test_data (for calculating accuracy)
- stored_data: the images already observed and available to the model
- stored_target: labels for stored_data
- """
- # find cosine similarity for every point in test_data between every other point in stored_data
- cosim = cosine_similarity(test_data, stored_data)
- # get top k indices of images in stored_data that are most similar to any given test_data point
- top = [(heapq.nlargest((k), range(len(i)), i.take)) for i in cosim]
- # convert indices to numbers using stored target values
- top = [[stored_target[j] for j in i[:k]] for i in top]
- # vote, and return prediction for every image in test_data
- pred = [max(set(i), key=i.count) for i in top]
- pred = np.array(pred)
- # print table giving classifier accuracy using test_target
- print(classification_report(test_target, pred))
2. 測試模型
現在,就像 Scikit-Learn K-NN 模型一樣,我們對 cos_knn() 模型在兩個數據集上分別測試,并看看它的性能如何。
- In [7]:
- %%time
- # stored data set size of 50,000
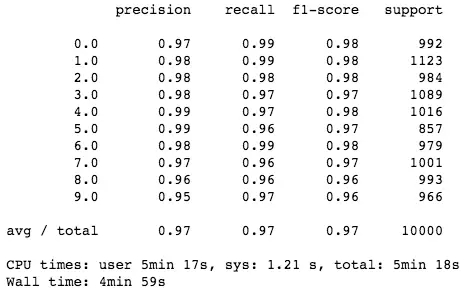
- cos_knn(5, test_img1, test_target1, fifty_x, fifty_y)
- In [8]:
- %%time
- # stored data set size of 20,000
- cos_knn(5, test_img1, test_target1, twenty_x, twenty_y)
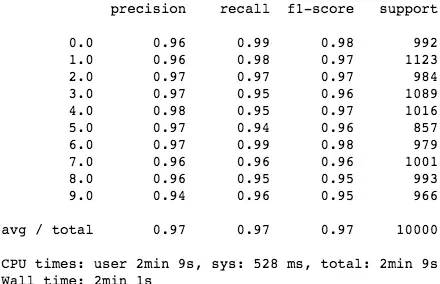
太棒了!余弦相似度模型性能超過了 Scikit-Learn K-NN!值得一提的是,該模型的分類速度和準確率都優于 Scikit-Learn K-NN(其中速度獲得了很大提升),而模型卻非常簡單!
為了進一步分析模型的工作原理,同時了解該模型為何在許多不同情況下比 Scikit-Learn K-NN 模型要性能更優,請參閱這個 GitHub repo:
https://github.com/samgrassi01/Cosine-Similarity-Classifier。
正如 notebook 所示,該 K-NN 模型在分類速度和準確率方面都勝過了 Scikit-Learn K-NN,其中速度獲得了大幅提升,而在一個數據集上的準確率提高了 1%。既然如此,我們可以在實踐中繼續使用這個模型了。
四、結論
首先,我們知道了 K-NN 的工作機制,以及如何輕松地實現它。但最重要的是,我們發現,始終考慮需要解決的問題以及解決問題的工具非常重要。有時候,在解決問題的過程中,***花一些時間來實踐——當然,也需要建立自己的模型。正如 notebook 中所展示的那樣,它可以帶來極大的益處:我們第二個專有模型獲得了 1.5 - 2 倍的加速,節省了很多時間。
原文鏈接:
https://towardsdatascience.com/building-improving-a-k-nearest-neighbors-algorithm-in-python-3b6b5320d2f8
【本文是51CTO專欄機構“機器之心”的原創譯文,微信公眾號“機器之心( id: almosthuman2014)”】