模型秒變API只需一行代碼,支持TensorFlow等框架
還在為機(jī)器學(xué)習(xí)模型打包成 API 發(fā)愁?這個(gè)工具能讓你一行代碼直接打包。
專注于機(jī)器學(xué)習(xí)應(yīng)用的人們知道,從訓(xùn)練好的模型到實(shí)際的工業(yè)生產(chǎn)工具還有一定的距離。其中工作量很大的地方在于將模型打包,預(yù)留 API 接口,并和現(xiàn)有的生產(chǎn)系統(tǒng)相結(jié)合。近日,GitHub 上有了這樣一個(gè)項(xiàng)目,能夠讓用戶一行代碼將任意模型打包為 API。這一工具無疑能夠幫助開發(fā)者在實(shí)際的生產(chǎn)應(yīng)用中快速部署模型。
項(xiàng)目地址:https://github.com/cortexlabs/cortex
項(xiàng)目特點(diǎn)和原理
該項(xiàng)目名為 Cortex,是一個(gè)命令行工具。作者表示,該項(xiàng)目具有以下優(yōu)點(diǎn):
- 自動(dòng)定義:Cortex 可以自動(dòng)定義需要負(fù)責(zé)生產(chǎn)工作的 API;
- 多框架支持:Cortex 支持多種機(jī)器學(xué)習(xí)框架,包括 TensorFlow、PyTorch、scikit-learn、XGBoost 等;
- CPU/GPU 支持:Cortex 能夠在 CPU 或者 GPU 上進(jìn)行推理工作;
- 回滾式更新:Cortex 可以對(duì)部署的 API 直接更新;
- 日志流:Cortex 會(huì)保留部署模型的日志流,并在 CLI 上顯示;
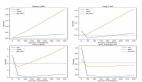
- 預(yù)測(cè)監(jiān)控:Cortex 能夠監(jiān)控網(wǎng)絡(luò)的評(píng)價(jià)指標(biāo),并追蹤預(yù)測(cè)結(jié)果;
- 最小配置:部署時(shí),用戶只需要在一個(gè)名為 cortex.yaml 的文件中配置相關(guān)屬性。
這一項(xiàng)目是怎樣工作的?具體而言,每當(dāng)用戶運(yùn)行 cortex deploy 時(shí),命令行將配置屬性和代碼發(fā)送到服務(wù)器集群上。每個(gè)模型都載入到一個(gè) Docker 容器中,包括相關(guān)的 Python 包和處理請(qǐng)求的代碼。模型通過網(wǎng)絡(luò)服務(wù),如 Elastic Load Balancing (ELB)、Flask、TensorFlow Serving 和 ONNX Runtime 公開 API 給用戶使用。容器通過 Elastic Kubernetes Service (EKS) 進(jìn)行控制,而日志文件和評(píng)價(jià)指標(biāo)的記錄和打印工作由 CloudWatch 完成。
使用方法
使用過程主要分為以下三個(gè)步驟:
定義模型的 API
- # predictor.py
- model = download_my_model()def predict(sample, metadata): return model.predict(sample["text"])
如上所示,用戶需要做的是定義代表這個(gè) API 的函數(shù),使其能夠根據(jù)輸入數(shù)據(jù)返回輸出。
配置部署
- $ curl http://***.amazonaws.com/sentiment/classifier \-X POST -H "Content-Type: application/json" \-d '{"text": "the movie was great!"}'
- positive
第二個(gè)步驟中,用戶需要?jiǎng)?chuàng)建一個(gè)新的 yaml 文件,這個(gè)文件用于配置相關(guān)屬性。
具體而言,用戶可以定義部署模型的名稱,本例中名為 classifierpredictor。然后還需要定義 API 的名稱,如 classifierpredictor 以及路徑、模型的類型和使用的 GPU 數(shù)量等。
AWS 部署
- $ cortex deploy
- creating classifier (http://***.amazonaws.com/sentiment/classifier)
以 AWS 為例,以上工作完成后,用戶可以創(chuàng)建這個(gè) API,使其利用 AWS 進(jìn)行工作。
當(dāng)然,用戶還可以實(shí)時(shí)保存推斷結(jié)果,如下所示:
- $ curl http://***.amazonaws.com/sentiment/classifier \-X POST -H "Content-Type: application/json" \-d '{"text": "the movie was great!"}'
- positive
此外,用戶還可以監(jiān)控運(yùn)行結(jié)果。
- $ cortex get classifier --watch
- status up-to-date available requested last update avg latencylive 1 1 1 8s 123ms
- class countpositive 8negative 4
使用教程
為了讓用戶更好地使用這一工具,項(xiàng)目作者同時(shí)還提供了一些使用案例。包括:
- 基于 TensorFlow 和 BERT 進(jìn)行情感分析:https://github.com/cortexlabs/cortex/tree/0.10/examples/tensorflow/sentiment-analysis
- 基于 TensorFlow 和 Inception 模型進(jìn)行圖像分類:https://github.com/cortexlabs/cortex/tree/0.10/examples/tensorflow/image-classifier
- 基于 PyTorch 和 DistilGPT2 進(jìn)行文本生成:https://github.com/cortexlabs/cortex/tree/0.10/examples/pytorch/text-generator
- 基于 XGBoost / ONNX 進(jìn)行虹膜分類:https://github.com/cortexlabs/cortex/tree/0.10/examples/xgboost/iris-classifier
以使用 BERT 進(jìn)行情感分析為例:
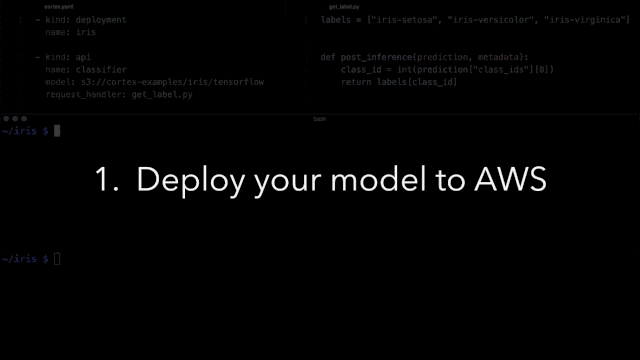
首先用戶需要在模型上定義 API 接口函數(shù),使其可以通過函數(shù)輸入數(shù)據(jù),并返回模型的推理結(jié)果。這一 py 文件被定義為 handler.py:
- # handler.py
- import tensorflow as tfimport tensorflow_hub as hubfrom bert import tokenization, run_classifier
- labels = ["negative", "positive"]
- with tf.Graph().as_default(): bert_module = hub.Module("https://tfhub.dev/google/bert_uncased_L-12_H-768_A-12/1") info = bert_module(signature="tokenization_info", as_dict=True)with tf.Session() as sess: vocab_file, do_lower_case = sess.run([info["vocab_file"], info["do_lower_case"]]) tokenizer = tokenization.FullTokenizer(vocab_file=vocab_file, do_lower_case=do_lower_case)
- def pre_inference(sample, signature, metadata): input_example = run_classifier.InputExample(guid="", text_a=sample["review"], label=0) input_feature = run_classifier.convert_single_example(0, input_example, [0, 1], 128, tokenizer) return {"input_ids": [input_feature.input_ids]}
- def post_inference(prediction, signature, metadata): return labels[prediction["labels"][0]]
接著,用戶需要定義配置 yaml 文件,在文件中指定相關(guān)屬性,這里需要注意,文件名必須定義為 cortex.yaml:
- # cortex.yaml
- - kind: deployment name: sentiment
- - kind: api name: classifier tensorflow: model: s3://cortex-examples/tensorflow/sentiment-analysis/bert request_handler: handler.py tracker: model_type: classification
從中可以看到,yaml 文件中需要指定出使用的模型,以及作為 API 接口的 py 文件(即第一步中定義了的 py 文件)。
然后進(jìn)行部署即可:
- $ cortex deploy
- deployment started
如果需要獲得監(jiān)控信息,則需要輸入 cortex get 命令:
- $ cortex get classifier --watch
- status up-to-date available requested last update avg latencylive 1 1 1 8s
還可以用命令行獲得實(shí)時(shí)預(yù)測(cè):
- $ cortex get classifier
- url: http://***.amazonaws.com/sentiment/classifier
- $ curl http://***.amazonaws.com/sentiment/classifier \ -X POST -H "Content-Type: application/json" \ -d '{"review": "The movie was great!"}'"positive